CAMERA LENS FILTERS
Camera lens filters still have many uses in digital photography, and should be an important part of any photographer's camera bag. These can include polarizing filters to reduce glare and improve saturation, or simple UV/haze filters to provide extra protection for the front of your lens. This tutorial aims to familiarize one with these and other filter options that cannot be reproduced using digital editing techniques. Common problems/disadvantages and filter sizes are discussed towards the end.
OVERVIEW: LENS FILTER TYPES
The most commonly used filters for digital photography include polarizing (linear/circular), UV/haze, neutral density, graduated neutral density and warming/cooling or color filters. Example uses for each are listed below:
| Filter Type | Primary Use | Common Subject Matter |
|---|---|---|
| Linear & Circular Polarizers |
Reduce Glare Improve Saturation |
Sky / Water / Foliage in Landscape Photography |
| Neutral Density (ND) | Extend Exposure Time | Waterfalls, Rivers under bright light |
| Graduated Neutral Density (GND) |
Control Strong Light Gradients Reduce Vignetting |
Dramatically Lit Landscapes |
| UV / Haze | Improve Clarity with Film Provide Lens Protection |
Any |
| Warming / Cooling | Change White Balance | Landscapes, Underwater, Special Lighting |
LINEAR & CIRCULAR POLARIZING FILTERS
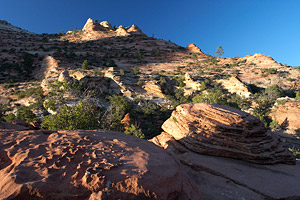
Polarizing filters (aka "polarizers") are perhaps the most important of any filter for landscape photography. They work by reducing the amount of reflected light that passes to your camera's sensor. Similar to polarizing sunglasses, polarizers will make skies appear deeper blue, will reduce glare and reflections off of water and other surfaces, and will reduce the contrast between land and sky.
| Select: | No Polarizer | Polarizer at Max |
 |
||
two separate handheld photos taken seconds apart
Note how the sky becomes a much darker blue, and how the foliage/rocks acquire slightly more color saturation. The intensity of the polarizing effect can be varied by slowly rotating your polarizing filter, although no more than 180° of rotation is needed, since beyond this the possible intensities repeat. Use your camera's viewfinder (or rear LCD screen) to view the effect as you rotate the polarizing filter.
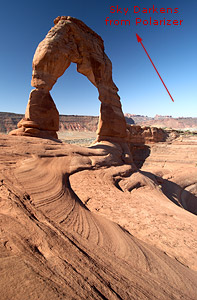
The polarizing effect may also increase or decrease substantially depending on the direction your camera is pointed and the position of the sun in the sky. The effect is strongest when your camera is aimed in a direction which is perpendicular to the direction of the sun's incoming light. This means that if the sun is directly overhead, the polarizing effect will be greatest near the horizon in all directions.
However, polarizing filters should be used with caution because they may adversely affect the photo. Polarizers dramatically reduce the amount of light reaching the camera's sensor — often by 2-3 f-stops (1/4 to 1/8 the amount of light). This means that the risk of a blurred handheld image goes up dramatically, and may make some action shots prohibitive.
Additionally, using a polarizer on a wide angle lens can produce an uneven or unrealistic looking sky which visibly darkens. In the example to the left, the sky could be considered unusually uneven and too dark at the top.
Linear vs. Circular Polarizing Filters: The circular polarizing variety is designed so that the camera's metering and autofocus systems can still function. Linear polarizers are much less expensive, but cannot be used with cameras that have through-the-lens (TTL) metering and autofocus — meaning nearly all digital SLR cameras. One could of course forego metering and autofocus, but that is rarely desirable.
NEUTRAL DENSITY FILTERS
Neutral density (ND) filters uniformly reduce the amount of light reaching the camera's sensor. This is useful when a sufficiently long exposure time is not otherwise attainable within a given range of possible apertures (at the lowest ISO setting).
Situations where ND filters are particularly useful include:
- Smoothing water movement in waterfalls, rivers, oceans, etc.
- Achieving a shallower depth of field in very bright light
- Reducing diffraction (which reduces sharpness) by enabling a larger aperture
- Making moving objects less apparent or not visible (such as people or cars)
- Introducing blur to convey motion with moving subjects
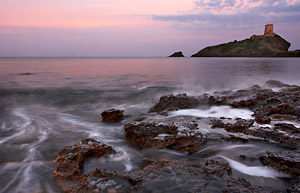 Smoothed water from a long exposure
However, only use ND filters when absolutely necessary because they effectively discard light — which could otherwise be used to enable a shorter shutter speed (to freeze action), a smaller aperture (for depth of field) or a lower ISO setting (to reduce image noise). Additionally, some ND filters can add a very slight color cast to the image.
Understanding how much light a given ND filter blocks can sometimes be difficult since manufacturers list this in many different forms:
| Amount of Light Reduction | Hoya, B+W and Cokin | Lee, Tiffen | Leica | |
|---|---|---|---|---|
| f-stops | Fraction | |||
| 1 | 1/2 | ND2, ND2X | 0.3 ND | 1X |
| 2 | 1/4 | ND4, ND4X | 0.6 ND | 4X |
| 3 | 1/8 | ND8, ND8X | 0.9 ND | 8X |
| 4 | 1/16 | ND16, ND16X | 1.2 ND | 16X |
| 5 | 1/32 | ND32, ND32X | 1.5 ND | 32X |
| 6 | 1/64 | ND64, ND64X | 1.8 ND | 64X |
Generally no more than a few f-stops is need for most waterfall scenarios, so most photographers just keep one or two different ND filter amounts on hand. Extreme light reduction can enable very long exposures even during broad daylight.
GRADUATED NEUTRAL DENSITY FILTERS
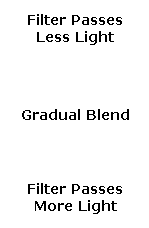
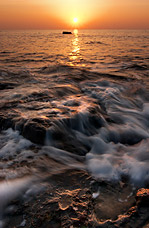
Graduated neutral density (GND) filters restrict the amount of light across an image in a smooth geometric pattern. These are sometimes also called "split filters." Scenes which are ideally suited for GND filters are those with simple lighting geometries, such as the linear blend from dark to light encountered commonly in landscape photography (below).
 GND Filter
 Final Result
Prior to digital cameras, GND filters were absolutely essential for capturing dramatically-lit landscapes. With digital cameras one can instead often take two separate exposures and blend these using a linear gradient in photoshop. On the other hand, this technique is not possible for fast moving subject matter or changing light (unless it is a single exposure developed twice from the RAW file format, but this increases image noise). Many also prefer using a GND to see how the final image will look immediately through the viewfinder or rear LCD.
GND filters come in many varieties. The first important setting is how quickly the filter blends from light to dark, which is usually termed "soft edge" or "hard edge" for gradual and more abrupt blends, respectively. These are chosen based on how quickly the light changes across the scene, where a sharp division between dark land and bright sky would necessitate a harder edge GND filter, for example. Alternatively, the blend can instead be radial to either add or remove light fall-off at the lens's edges (vignetting).


note: in the above diagrams white = clear, which passes 100% of the light
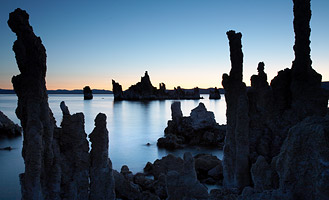
Placing the blend should be performed very carefully and usually requires a tripod. The soft edge is generally more flexible and forgiving of misplacement. On the other hand, a soft edge may produce excessive darkening or brightening near where the blend occurs if the scene's light transitions faster than the filter. One should also be aware that vertical objects extending across the blend may appear unrealistically dark
| Choose: | Final Photo | Location of GND Blend |
 |
||
Note how the rock columns become nearly black at their top compared to below the blend;
this effect is often unavoidable when using GND filters.
A problem with the soft and hard edge terminology is that it is not standardized from one brand to another. One company's "soft edge" can sometimes be nearly as abrupt a blend as another company's so called "hard edge". It is therefore best to take these on a case by case basis and actually look at the filter itself to judge the blend type. Most manufacturers will show an example of the blend on their own websites.
The second important setting is the differential between how much light is let in at one side of the blend versus the other (the top versus bottom in the examples directly above). This differential is expressed using the same terminology as used for ND filters in the previous section. A "0.6 ND grad" therefore refers to a graduated neutral density filter which lets in 2 f-stops less light (1/4th) at one side of the blend versus the other. Similarly, a 0.9 ND grad lets in 3 f-stops less light (1/8th) at one side. Most landscape photos need no more than a 1-3 f-stop blend.
HAZE & UV FILTERS
Nowadays UV filters are primarily used to protect the front element of a camera lens since they are clear and do not noticably affect the image. With film cameras, UV filters reduce haze and improve contrast by minimizing the amount of ultraviolet (UV) light that reaches the film. The problem with UV light is that it is not visible to the human eye, but is often uniformly distributed on a hazy day; UV therefore adversely affects the camera's exposure by reducing contrast. Fortunately, digital camera sensors are nowhere near as sensitive to UV light as film, therefore UV filtration is no longer necessary.

77 mm UV filter
However, UV filters have the potential to decrease image quality by increasing lens flare, adding a slight color tint or reducing contrast. Multicoated UV filters can dramatically reduce the chance of flare, and keeping your filter very clean minimizes any reduction in image quality (although even invisible micro abrasions will affect sharpness/contrast). High quality UV filters will not introduce any visible color cast.
For digital cameras, it is often debated whether the advantage of a UV filter (protection) outweighs the potential reduction in image quality. For very expensive SLR lenses, the increased protection is often the determining factor, since it is much easier to replace a filter than to replace or repair a lens. However, for less expensive SLR lenses or compact digital cameras protection is much less of a factor — the choice therefore becomes more a matter of personal preference.
Another consideration is that UV filters may increase the resale value of the lens by keeping the front lens element in mint condition. In that sense, a UV filter could also even be deemed to increase image quality (relative to an unfiltered lens) since it can be routinely replaced whenever it is perceived to adversely affect the image.
COOL & WARM FILTERS
Cooling or warming filters change the white balance of light reaching the camera's sensor. This can be used to either correct an unrealistic color cast, or to instead add one, such as adding warmth to a cloudy day to make it appear more like during sunset.
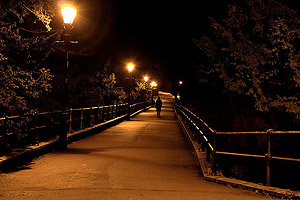
Above image's orange color cast is from the monochromatic sodium streetlamps;
with this type of light source virtually no amount of white balance correction can restore full color.
A cooling filter or special streetlight filter could be used to restore color based on other light sources.
These filters have become much less important with digital cameras since most automatically adjust for white balance, and this can be adjusted afterwards when taking photos with the RAW file format. On the other hand, some situations may still necessitate color filters, such as situations with unusual lighting (above example) or underwater photography. This is because there may be such an overwhelming amount of monochromatic light that no amount of white balance can restore full color—or at least not without introducing huge amounts of image noise in some color channels.
PROBLEMS WITH LENS FILTERS
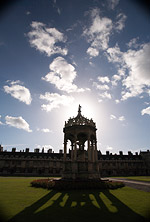
visible filter vignetting
Filters should only be used when necessary because they can also adversely affect the image. Since they effectively introduce an additional piece of glass between your camera's sensor and the subject, they have the potential to reduce image quality. This usually comes in the form of either a slight color tint, a reduction in local or overall image contrast, or ghosting and increased lens flare caused by light inadvertently reflecting off the inside of the filter.
Filters may also introduce physical vignetting (light fall-off or blackening at the edges of the image) if their opaque edge gets in the way of light entering the lens (right example). This was created by stacking a polarizing filter on top of a UV filter while also using a wide angle lens — causing the edges of the outermost filter to get in the way of the image. Stacking filters therefore has the potential to make all of the above problems much worse.
NOTES ON CHOOSING A FILTER SIZE FOR A CAMERA LENS
Lens filters generally come in two varieties: screw-on and front filters. Front filters are more flexible because they can be used on virtually any lens diameter, however these may also be more cumbersome to use since they may need to be held in front of the lens. On the other hand, filter holder kits are available that can improve this process. Screw-on filters can provide an air-tight seal when needed for protection, and cannot accidentally move relative to the lens during composure. The main disadvantage is that a given screw-on filter will only work with a specific lens size.
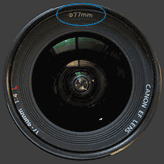
The size of a screw-on filter is expressed in terms of its diameter, which corresponds to the diameter usually listed on the top or front of your camera lens. This diameter is listed in millimeters and usually ranges from about 46 to 82 mm for digital SLR cameras. Step-up or step-down adapters can enable a given filter size to be used on a lens with a smaller or larger diameter, respectively. However, step-down filter adapters may introduce substantial vignetting (since the filter may block light at the edges of the lens), whereas step-up adapters mean that your filter is much larger (and potentially more cumbersome) than is required.
The height of the filter edges may also be important. Ultra-thin and other special filters are designed so that they can be used on wide angle lenses without vignetting. On the other hand, these may also be much more expensive and often do not have threads on the outside to accept another filter (or sometimes even the lens cap).
For a more in-depth discussion of specific filters, also see these tutorials:
- Understanding & Using Polarizing Filters
- How to use Graduated Neutral Density Filters
- How to use Neutral Density Filters
