USING WIDE ANGLE LENSES
A wide angle lens can be a powerful tool for exaggerating depth and relative size in a photo. However, it's also one of the most difficult types of lenses to learn how to use. This page dispels some common misconceptions, and discusses techniques for taking full advantage of the unique characteristics of a wide angle lens.
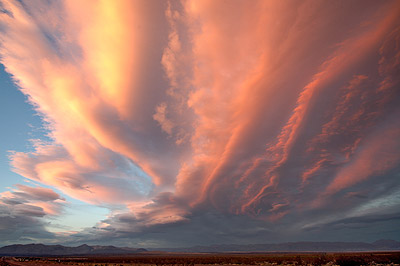
16mm ultra-wide angle lens - sunset near Death Valley, California, USA
OVERVIEW
A lens is generally considered to be "wide angle" when its focal length is less than around 35 mm (on a full frame; see camera lenses: focal length & aperture). This translates into an angle of view which is greater than about 55° across your photo's widest dimension. The definition of ultra-wide is a little fuzzier, but most agree that this realm begins with focal lengths somewhere around 20-24 mm and less. On a compact camera, wide angle is often when you've fully zoomed out, however ultra-wide is usually never available without a special lens adapter.
Regardless, the key concept is this: the shorter the focal length, the more you will tend to notice the unique effects of a wide angle lens.

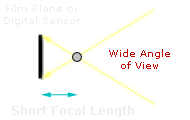
The above diagrams depict the maximum angles that light rays can take when hitting your camera's sensor. The location where light rays cross is not necessarily equal to the focal length, but is instead roughly proportional to this distance. The angle of view therefore still increases similarly.
What makes a wide angle lens unique? A common misconception is that wide-angle lenses are primarily used for when you cannot step far enough away from your subject, but yet still want to capture all of this subject in a single camera frame. Unfortunately, if one were to only use it this way they'd really be missing out. In fact, wide angle lenses are often used for just the opposite: when you want to get closer to a subject!
So, let's take a closer look at just what makes a wide angle lens unique:
- Its image encompasses a wide angle of view
- It generally has a close minimum focusing distance
Although the above characteristics might seem pretty basic, they result in a surprising range of possibilities. The rest of this page focuses on techniques for how to best use these traits for maximal impact in wide angle photography.
WIDE ANGLE PERSPECTIVE
Obviously, a wide angle lens is special because it has a wide angle of view — but what does this actually do? A wide angle of view means that both the relative size and distance is exaggerated when comparing near and far objects. This causes nearby objects to appear gigantic, and far away objects to appear unusually tiny and distant. The reason for this is the angle of view:
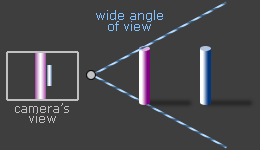 Wide Angle Lens
(objects are very different sizes)
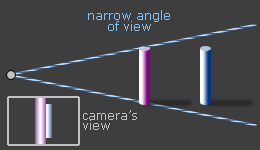 Telephoto Lens
 (objects are similar in size)
Even though the two cylinders above are the same distance apart when photographed with each lens, their relative sizes are very different when one fills the frame with the closest cylinder. With a wider angle of view, farther objects therefore comprise a much lower fraction of the total angle of view.
A misconception is that a wide angle lens affects perspective, but strictly speaking, this isn't true. Perspective is only influenced by where you are located when you take a photograph. However, in practical use, wide-angle lenses often cause you to move much closer to your subject — which does affect perspective.
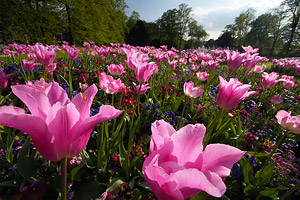
Exaggerated 3 inch Flowers in Cambridge, UK.
Uses a 16mm ultra-wide angle focal length.
This exaggeration of relative size can be used to add emphasis and detail to foreground objects, while still capturing expansive backgrounds. If you plan on using this effect to full impact, you'll want to get as close as possible to the nearest subject in the scene.
In the extreme wide angle example to the left, the nearest flowers are nearly touching the front of the lens, which greatly exaggerates their size. In real life, these flowers are only a few inches wide!
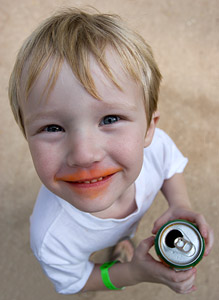
Disproportionate body parts
caused by a wide angle lens.
However, one needs to take extra caution when photographing people. Their nose, head or other features can become greatly out of proportion if you are too close to them when taking the photo. This proportionality is in part why narrower focal lengths are much more common for traditional portrait photography.
In the example to the right, note how the person's head has become abnormally large relative to their body. This can be a useful tool for adding drama or extra character to a candid shot, but certainly isn't how most people would want to be depicted in a standard portrait.
Finally, because far away objects become quite small, sometimes it's a good idea to include some foreground elements to anchor the composition. Otherwise a landscape shot (taken at eye level) can appear overly busy and lack that extra something that's needed to draw the eye into the photo.
Regardless, don't be afraid to get much closer! This is where wide angle really shines. Just take extra care with the composition though; extremely close objects can move a lot inside the image due to camera movements of even a fraction of an inch. It can therefore become quite difficult to frame subjects the way you want.
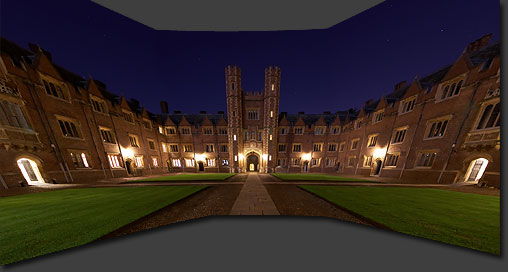
CONVERGING VERTICALS
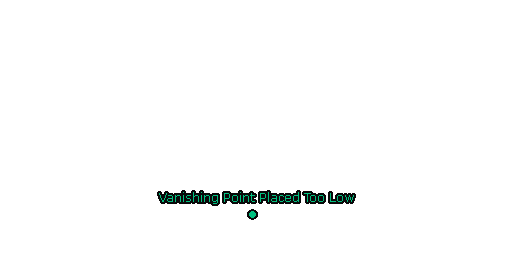
Whenever a wide angle lens is pointed above or below the horizon, it will cause otherwise parallel vertical lines to appear as if they are converging. Any lens does this — even telephoto lenses — it's just that a wider expanse of converging lines is visible with a wide angle lens. Furthermore, with a wide angle lens, even small changes in composition will alter the location of the vanishing point by a large amount — resulting in a big difference in how sharply lines seem to converge.
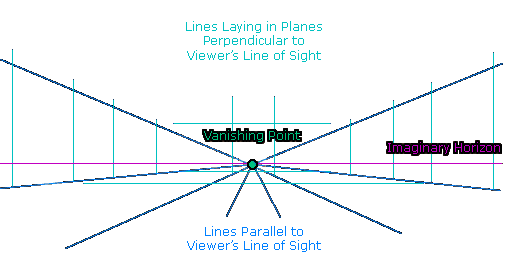
In this case, the vanishing point is the direction that you are pointing your camera. Move your mouse over the image below to see a simulation of what happens when you point your camera above or below the horizon:
| Camera Aimed Above the Horizon | Camera Aimed Below the Horizon |
In the above example, the vanishing point didn't change by a whole lot as a fraction of the total image — but this had a huge impact on the building. In each case, the building appears to be either falling in on or away from the viewer.
Although converging vertical lines are generally avoided in architectural photography for the above reasons, one can also sometimes use these to their advantage:
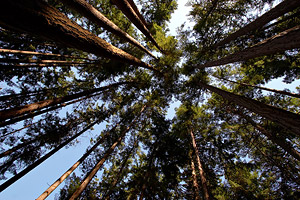
left: Wide angle shot of trees on Vancouver Island, Canada.
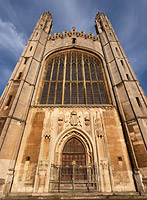
right: King's College Chapel, Cambridge, UK.
In the above trees example, a wide angle lens was used to capture the towering trees in a way that makes them appear to be enveloping the viewer. A big reason for this is that they look as if they are coming from all directions and converging in the middle of the image — even though they are actually all parallel to one another.
Similarly, the architectural photo to the right was taken close to the door in order to exaggerate the apparent height of the chapel. On the other hand, this also gives the unwanted appearance that the building is about to fall over backwards.
The only ways to reduce converging verticals are to either (i) aim your camera closer to the horizon, even if this means that you'll capture a lot of ground in addition to the subject (which you crop out later), (ii) get much further from your subject and use a lens with a longer focal length, (iii) use Photoshop or other software to distort the photo so that vertical lines diverge less, or (iv) use a tilt/shift lens to control perspective.
Unfortunately all of these options have their drawbacks, whether it be resolution in the case of (i) and (iii), convenience/perspective in the case of (ii), or cost, technical knowledge and a slight reduction in image quality in the case of (iv).
INTERIORS & ENCLOSED SPACES
A wide angle lens can be an absolute requirement in enclosed spaces, simply because one cannot move far enough away from their subject to get all of them in the photo (using a normal lens). A common example is photography of interior rooms or other indoor architecture. This kind of photography is also perhaps the easiest way to make the most of a wide angle lens — in part because it forces you to be close to the subject.
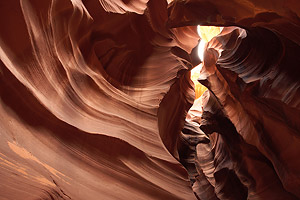
left: 16mm focal length - Antelope Canyon, Arizona, USA.
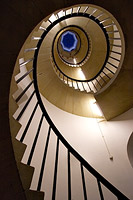
right: Spiral staircase in New Court, St John's College, Cambridge
In both examples above, you could not move more than a few feet in any direction — and yet the photos do not give any appearance of being cramped.
POLARIZING FILTERS
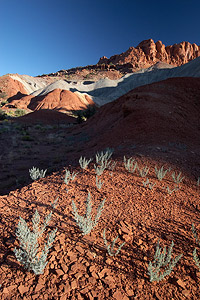
Coral Reef National Park, Utah, USA.
Using a polarizing filter should almost always be avoided with a wide angle lens. A key trait of a polarizer is that its influence varies depending on the angle of the subject relative to the sun. When you face your camera 90° from where the sun is coming from, you will maximize its effect; similarly, whenever you face your camera directly away from or into the sun, you will minimize the effect of a polarizer.
With an ultra-wide angle lens, one edge of your image frame might be nearly facing the sun, whereas the opposing edge might be facing 90° away from the sun. This means that you will be able to see the changing influence of your polarizer across a single photo, which is usually undesirable.
In the example to the left, the blue sky clearly changes in saturation and brightness as you move across the image from left to right.
MANAGING LIGHT ACROSS A WIDE ANGLE
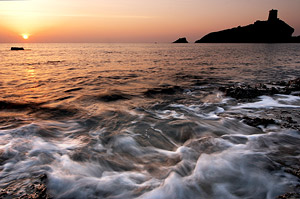
GND filter example - lighthouse in Nora, Sardinia.
A common hurdle with wide angle lenses is strong variation in the intensity of light across an image. Using an ordinary exposure, uneven light can make some parts of the image over-exposed, while also leaving other parts underexposed — even though our eye would have adjusted to this changing brightness as we looked in different directions. One therefore needs to take extra care when determining the desired exposure.
For example, in landscape photography the foreground foliage is often much less intensely lit than the sky or a distant mountain. This often results in an over-exposed sky and/or an under-exposed foreground. Most photographers therefore use what is called a graduated neutral density (GND) filter to overcome this uneven lighting.
In the example above, the GND filter partially obstructed some of the light from the bright sky, while also gradually letting in more and more light for positions progressively lower in the photo. At the bottom of the photo, the GND filter let in the full amount of light. Move your mouse over the image above to see what it would have looked like without a GND filter. Also take a look at the tutorials on camera lens filters and high dynamic range (HDR) for additional examples.
A wide angle lens is also much more susceptible to lens flare, in part because the sun is much more likely to enter into the composition. It can also be difficult to effectively shield the sides of the lens from stray light using a lens hood, since this hood cannot also block any of the image-forming light across the wide angle of coverage.
WIDE ANGLE LENSES & DEPTH OF FIELD
Note that nowhere in this page is it mentioned that a wide angle lens has a greater depth of field. Unfortunately, this is another common misconception. If you are magnifying your subject by the same amount (meaning that they fill the image frame by the same proportion), then a wide angle lens will give the same* depth of field as a telephoto lens.
*Technical Note: for situations of extreme magnification, the depth of field may differ by a small amount. However, this is an extreme case and is not relevant for the uses discussed in this page. See the tutorial on depth of field for a more detailed discussion of this topic.
The reason that wide angle lenses get the reputation of improving depth of field is not because of any inherent property with the lens itself. It's because of how they're most often used. People rarely get close enough to their subject to have them fill the same amount of the frame with a wide angle lens as they do with lenses that have narrower angles of view.
SUMMARY: HOW TO USE A WIDE ANGLE LENS
While there are no steadfast rules, you can often use your wide angle lens most effectively if you experiment with the following four guidelines:
A wide angle lens exaggerates the relative sizes of near and far subjects. To emphasize this effect it's important to get very close to your subject. Wide angle lenses also typically have much closer minimum focusing distances, and enable your viewer to see a lot more in tight spaces.
Wide angle shots often encompass a vast set of subject matter, so it's easy for the viewer to get lost in the confusion. Experiment with different techniques of organizing your subject matter.
Many photographers try to organize their subject matter into clear layers, and/or to include foreground objects which might guide the eye into and across the image. Other times it's a simple near-far composition with a close-up subject and a seemingly equidistant background.
Even slight changes in where you point your camera can have a huge impact on whether otherwise parallel vertical lines will appear to converge. Pay careful attention to architecture, trees and other geometric objects.
The two most prevalent forms of distortion are barrel and edge distortion. Barrel distortion causes otherwise straight lines to appear bulged if they don't pass through the center of the image. Edge distortion causes objects at the extreme edges of the frame to appear stretched in a direction leading away from the center of the image.