CAMERA METERING & EXPOSURE
Knowing how your digital camera meters light is critical for achieving consistent and accurate exposures. Metering is the brains behind how your camera determines the shutter speed and aperture, based on lighting conditions and ISO speed. Metering options often include partial, evaluative zone or matrix, center-weighted and spot metering. Each of these have subject lighting conditions for which they excel — and for which they fail. Understanding these can improve one's photographic intuition.
Recommended background reading: camera exposure: aperture, ISO & shutter speed
BACKGROUND: INCIDENT vs. REFLECTED LIGHT
All in-camera light meters have a fundamental flaw: they can only measure reflected light. This means the best they can do is guess how much light is actually hitting the subject.

If all objects reflected the same percentage of incident light, this would work just fine, however real-world subjects vary greatly in their reflectance. For this reason, in-camera metering is standardized based on the luminance of light which would be reflected from an object appearing as middle gray. If the camera is aimed directly at any object lighter or darker than middle gray, the camera's light meter will incorrectly calculate under or over-exposure, respectively. A hand-held light meter would calculate the same exposure for any object under the same incident lighting.


Above patches depict approximations of 18% luminance. This will appear most accurate when using a PC display which closely mimics the sRGB color space, and have calibrated your monitor accordingly. Monitors emit as opposed to reflect light, so this is also a fundamental limitation.
What constitutes middle gray? In the printing industry it is standardized as the ink density which reflects 18% of incident light, however cameras seldom adhere to this. This topic deserves a discussion of its own, but for the purposes of this tutorial, just know that each camera treats middle gray slightly differently, but that it's usually somewhere between 10-18% reflectance. Metering off a subject which reflects more or less light than this may cause your camera's metering algorithm to go awry — either through under or over-exposure, respectively.
An in-camera light meter can work surprisingly well if object reflectance is sufficiently diverse throughout the photo. In other words, if there is an even spread varying from dark to light objects, then the average reflectance will remain roughly middle gray. Unfortunately, some scenes may have a significant imbalance in subject reflectivity, such as a photo of a white dove in the snow, or of a black dog sitting on a pile of charcoal. For such cases the camera may try to create an image with a histogram whose primary peak is in the midtones, even though it should have instead produced this peak in the highlights or shadows (see high and low-key histograms).
METERING OPTIONS
In order to accurately expose a greater range of subject lighting and reflectance combinations, most cameras have several metering options. Each option works by assigning a relative weighting to different light regions; regions with a higher weighting are considered more reliable, and thus contribute more to the final exposure calculation.


Partial and spot areas are roughly 13.5% and 3.8% of the picture area, respectively,
which correspond to settings on the Canon EOS 1D Mark II.
The whitest regions are those which contribute most towards the exposure calculation, whereas black areas are ignored. Each of the above metering diagrams may also be located off-center, depending on the metering options and autofocus point used.
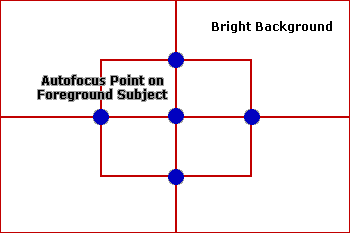
More sophisticated algorithms may go beyond just a regional map and include: evaluative, zone and matrix metering. These are usually the default when your camera is set to auto exposure. Each generally works by dividing the image up into numerous sub-sections, where each section is then considered in terms of its relative location, light intensity or color. The location of the autofocus point and orientation of the camera (portrait vs. landscape) may also contribute to the calculation.
WHEN TO USE PARTIAL & SPOT METERING
Partial and spot metering give the photographer far more control over the exposure than any of the other settings, but this also means that these are more difficult to use — at least initially. They are useful when there is a relatively small object within your scene which you either need to be perfectly exposed, or know will provide the closest match to middle gray.
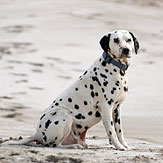
One of the most common applications of partial metering is a portrait of someone who is back-lit. Metering off their face can help avoid an exposure that makes the subject appear as an under-exposed silhouette against the bright background. On the other hand, care should be taken as the shade of a person's skin may lead to inaccurate exposure if this shade is far from neutral gray reflectance (although not by as much as with backlighting.
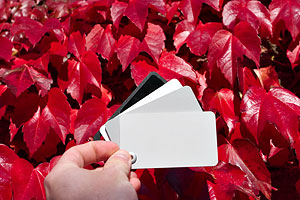
Spot metering is used less often because its metering area is very small and thus quite specific. This can be an advantage when you are unsure of your subject's reflectance and have a specially designed gray card (or other small object) to meter off of.
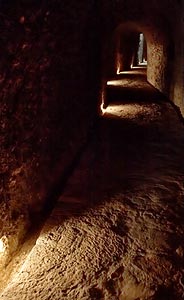
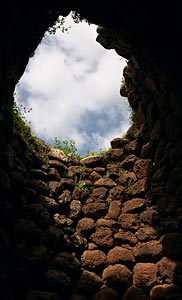
Spot and partial metering are also quite useful for creative exposures, and when ambient lighting is unusual. In the examples to the left and right below, one could meter off the diffusely lit foreground tiles, or off the directly lit stone below the sky opening:
NOTES ON CENTER-WEIGHTED METERING
Center-weighted metering was once a very common default setting in cameras because it coped well with a bright sky above a darker landscape. Nowadays, it has more or less been surpassed in flexibility by evaluative and matrix, and in specificity by partial and spot metering. On the other hand, the results produced by center-weighted metering are very predictable, whereas matrix and evaluative metering modes have complicated algorithms which are harder to predict. For this reason some still prefer to use center-weighted as the default metering mode.
EXPOSURE COMPENSATION
Any of the above metering modes can use a feature called exposure compensation (EC). When this is activated, the metering calculation still works as normal, but the final the final exposure target gets compensated by the EC value. This allows for manual corrections if you observe a metering mode to be consistently under or over-exposing. Most cameras allow up to 2 stops of exposure compensation, where each stop provides either a doubling or halving of light compared to what the metering mode would have done otherwise. A setting of zero means no compensation will be applied (which is the default).
Exposure compensation is ideal for correcting in-camera metering errors caused by the subject's reflectivity. No matter what metering mode is used, an in-camera light meter will always mistakenly under-expose a subject such as a white dove in a snowstorm (see incident vs. reflected light). Photographs in the snow will therefore always require around +1 exposure compensation, whereas a low-key image may require negative compensation.
When shooting in RAW mode under tricky lighting, sometimes it is useful to set a slight negative exposure compensation (0.3-0.5). This decreases the chance of clipped highlights, yet still allows one to increase the exposure afterwards. Alternatively, a positive exposure compensation can be used to improve the signal to noise ratio in situations where the highlights are far from clipping.
