RAW FILE FORMAT
The RAW file format is digital photography's equivalent of a negative in film photography: it contains untouched, "raw" pixel information straight from the digital camera's sensor. The RAW file format has yet to undergo demosaicing, and so it contains just one red, green, or blue value at each pixel location. Digital cameras normally "develop" this RAW file by converting it into a full color JPEG or TIFF image file, and then store the converted file in your memory card. Digital cameras have to make several interpretive decisions when they develop a RAW file, and so the RAW file format offers you more control over how the final JPEG or TIFF image is generated. This section aims to illustrate the technical advantages of RAW files, and makes suggestions about when to use the RAW file format.
OVERVIEW
A RAW file is developed into a final JPEG or TIFF image in several steps, each of which may contain several irreversible image adjustments. One key advantage of RAW is that it allows the photographer to postpone applying these adjustments — giving more flexibility to the photographer to later apply these themselves, in a way which best suits each image. The following diagram illustrates the sequence of adjustments:


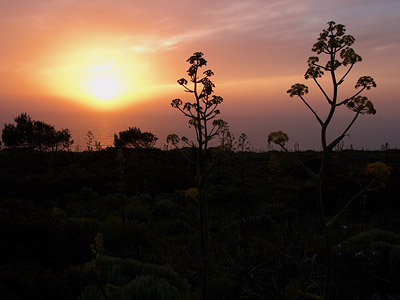
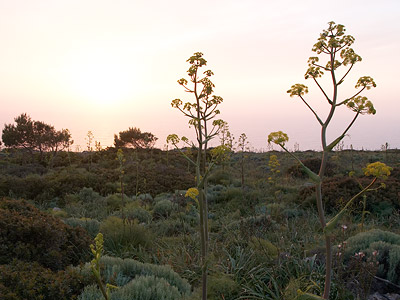
Demosaicing and white balance involve interpreting and converting the bayer array into an image with all three colors at each pixel, and occur in the same step. The bayer array is what makes the first image appear more pixelated than the other two, and gives the image a greenish tint.
Our eyes perceive differences in lightness logarithmically, and so when light intensity quadruples we only perceive this as roughly a doubling in the amount of light. A digital camera, on the other hand, records differences in lightness linearly — twice the light intensity produces twice the response in the camera sensor. This is why the first and second images above look so much darker than the third. In order for the numbers recorded within a digital camera to be shown as we perceive them, tone curves need to be applied (see the tutorial on gamma correction for more on this topic).
Color saturation and contrast may also be adjusted, depending on the setting within your camera. The image is then sharpened to offset the softening caused by demosaicing, which is visible in the second image.
The high bit depth RAW image is then converted into 8-bits per channel, and compressed into a JPEG based on the compression setting within your camera. Up until this step, RAW image information most likely resided within the digital camera's memory buffer.
There are several advantages to performing any of the above RAW conversion steps afterwards on a personal computer, as opposed to within a digital camera. The next sections describe how using RAW files can enhance these RAW conversion steps.
DEMOSAICING
Demosaicing is a very processor-intensive step, and so the best demosaicing algorithms require more processing power than is practical within today's digital cameras. Most digital cameras therefore take quality-compromising shortcuts to convert a RAW file into a TIFF or JPEG in a reasonable amount of time. Performing the demosaicing step on a personal computer allows for the best algorithms since a PC has many times more processing power than a typical digital camera. Better algorithms can squeeze a little more out of your camera sensor by producing more resolution, less noise, better small-scale color accuracy and reduced moiré. Note the resolution advantage shown below:
| JPEG (in-camera) |
 |
| RAW | 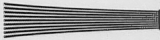 |
| Ideal | 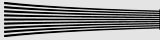 |
Images from actual camera tests with a Canon EOS 20D using an ISO 12233 resolution test chart.
Differential between RAW and JPEG resolution may vary with camera model and conversion software.
The in-camera JPEG image is not able to resolve lines as closely spaced as those in the RAW image. Even so, a RAW file cannot achieve the ideal lines shown, because the process of demosaicing always introduces some softening to the image. Only sensors which capture all three colors at each pixel location could achieve the ideal image shown at the bottom (such as Foveon-type sensors).
FLEXIBLE WHITE BALANCE
White balance is the process of removing unrealistic color casts, so that objects which appear white in person are rendered white in your photo.Color casts within JPEG images can often be removed in post-processing, but at the cost of bit depth and color gamut. This is because the white balance has effectively been set twice: once in RAW conversion and then again in post-processing. RAW files give you the ability to set the white balance of a photo *after* the picture has been taken — without unnecessarily destroying bits.
HIGH BIT DEPTH
Digital cameras actually record each color channel with more precision than the 8-bits (256 levels) per channel used for JPEG images (see "Understanding Bit Depth"). Most current cameras capture each color with 12-bits of precision (212 = 4096 levels) per color channel, providing several times more levels than could be achieved by using an in-camera JPEG. Higher bit depth decreases the susceptibility to posterization, and increases your flexibility when choosing a color space and in post-processing.
DYNAMIC RANGE & EXPOSURE COMPENSATION
The RAW file format usually provides considerably more "dynamic range" than a JPEG file, depending on how the camera creates its JPEG. Dynamic range refers to the range of light to dark which can be captured by a camera before becoming completely white or black, respectively. Since the raw color data has not been converted into logarithmic values using curves (see overview section above), the exposure of a RAW file can be adjusted slightly — after the photo has been taken. Exposure compensation can correct for metering errors, or can help bring out lost shadow or highlight detail. The following example was taken directly into the setting sun, and shows the same RAW file with -1 stop, 0 (no change), and +1 stop exposure compensation. Move your mouse over each to see how exposure compensation affects the image:
 Apply Exposure Compensation:
| -1.0 | none | +1.0 |
Note: +1 or -1 stop refers to a doubling or halving of the light used for an exposure, respectively.
A stop can also be listed in terms of eV, and so +1 stop is equivalent to +1 eV.
Note the broad range of shadow and highlight detail across the three images. Similar results could not be achieved by merely brightening or darkening a JPEG file — both in dynamic range and in the smoothness of tones. A graduated neutral density filter could then be used to better utilize this broad dynamic range.
ENHANCED SHARPENING
Since a RAW file is untouched, sharpening has not been applied within the camera. Much like demosaicing, better sharpening algorithms are often far more processor intensive. Sharpening performed on a personal computer can thus create fewer halo artifacts for an equivalent amount of sharpening (see "Sharpening Using an Unsharp Mask" for examples of sharpening artifacts).
Since sharpness depends on the intended viewing distance of your image, the RAW file format also provides more control over what type and how much sharpening is applied (given your purpose). Sharpening is usually the last post-processing step since it cannot be undone, so having a pre-sharpened JPEG is not optimal.
LOSSLESS COMPRESSION
 Compression:
| Lossless | Lossy |
The RAW file format uses a lossless compression, and so it does not suffer from the compression artifacts visible with "lossy" JPEG compression. RAW files contain more information and achieve better compression than TIFF, but without the compression artifacts of JPEG.
Note: Kodak and Nikon employ a slightly lossy RAW compression algorithm, although any artifacts are much lower than would be perceived with a similar JPEG image. The efficiency of RAW compression also varies with digital camera manufacturer. Right image shown at 200%; lossy JPEG compression at 60% in Adobe Photoshop "Save for Web" mode.
DISADVANTAGES
- RAW files are much larger than similar JPEG files, and so fewer photos can fit within the same memory card.
- RAW files are more time consuming since they may require manually applying each conversion step.
- RAW files often take longer to be written to a memory card since they are larger, therefore most digital cameras may not achieve the same frame rate as with JPEG.
- RAW files cannot be given to others immediately since they require specific software to load them, therefore it may be necessary to first convert them into JPEG.
- RAW files require a more powerful computer with more temporary memory (RAM).
OTHER CONSIDERATIONS
One problem with the RAW file format is that it is not very standardized. Each camera has their own proprietary RAW file format, and so one program may not be able to read all formats. Fortunately, Adobe has announced a digital negative (DNG) specification which aims to standardize the RAW file format. In addition, any camera which has the ability to save RAW files should come with its own software to read them.
Good RAW conversion software can perform batch processes and often automates all conversion steps except those which you choose to modify. This can mitigate or even eliminate the ease of use advantage of JPEG files.
Many newer cameras can save both RAW and JPEG images simultaneously. This provides you with an immediate final image, but retains the RAW "negative" just in case more flexibility is desired later.
SUMMARY
So which is better: RAW or JPEG? There is no single answer, as this depends on the type of photography you are doing. In most cases, RAW files will provide the best solution due to their technical advantages and the decreasing cost of large memory cards. RAW files give the photographer far more control, but with this comes the trade-off of speed, storage space and ease of use. The RAW trade-off is sometimes not worth it for sports and press photographers, although landscape and most fine art photographers often choose RAW in order to maximize the image quality potential of their digital camera.