UNDERSTANDING CAMERA LENS FLARE
Lens flare is created when non-image forming light enters the lens and subsequently hits the camera's film or digital sensor. This often appears as a characteristic polygonal shape, with sides which depend on the shape of the lens diaphragm. It can lower the overall contrast of a photograph significantly and is often an undesired artifact, however some types of flare may actually enhance the artistic meaning of a photo. Understanding lens flare can help you use it — or avoid it — in a way which best suits how you wish to portray the final image.
WHAT IT LOOKS LIKE

The above image exhibits tell-tale signs of flare in the upper right caused by a bright sun just outside the image frame. These take the form of polygonal bright regions (usually 5-8 sides), in addition to bright streaks and an overall reduction in contrast (see below). The polygonal shapes vary in size and can actually become so large that they occupy a significant fraction of the image. Look for flare near very bright objects, although its effects can also be seen far away from the actual source (or even throughout the image).

Flare can take many forms, and this may include just one or all of the polygonal shapes, bright streaks, or overall washed out look (veiling flare) shown above.
BACKGROUND: HOW IT HAPPENS
All but the simplest cameras contain lenses which are actually comprised of several "lens elements." Lens flare is caused by non-image light which does not pass (refract) directly along its intended path, but instead reflects internally on lens elements any number of times (back and forth) before finally reaching the film or digital sensor.

Note: The aperture above is shown as being behind several lens elements.
Lens elements often contain some type of anti-reflective coating which aims to minimize flare, however no multi-element lens eliminates it entirely. Light sources will still reflect a small fraction of their light, and this reflected light becomes visible as flare in regions where it becomes comparable in intensity to the refracted light (created by the actual image). Flare which appears as polygonal shapes is caused by light which reflects off the inside edges of the lens aperture (diaphragm), shown above.
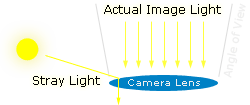
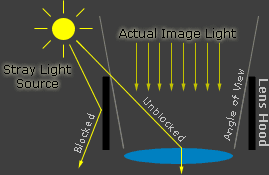
Although flare is technically caused by internal reflections, this often requires very intense light sources in order to become significant (relative to refracted light). Flare-inducing light sources may include the sun, artificial lighting and even a full moon. Even if the photo itself contains no intense light sources, stray light may still enter the lens if it hits the front element. Ordinarily light which is outside the angle of view does not contribute to the final image, but if this light reflects it may travel an unintended path and reach the film/sensor. In the visual example with flowers, the sun was not actually in the frame itself, but yet it still caused significant lens flare.
REDUCING FLARE WITH LENS HOODS
A good lens hood can nearly eliminate flare caused by stray light from outside the angle of view. Ensure that this hood has a completely non-reflective inner surface, such as felt, and that there are no regions which have rubbed off. Although using a lens hood may appear to be a simple solution, in reality most lens hoods do not extend far enough to block all stray light. This is particularly problematic when using 35 mm lenses on a digital SLR camera with a "crop factor," because these lens hoods were made for the greater angle of view. In addition, hoods for zoom lenses can only be designed to block all stray light at the widest focal length.
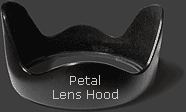
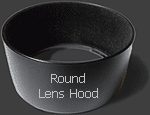
Petal lens hoods often protect better than non-petal (round) types. This is because petal-style hoods take into account the aspect ratio of the camera's film or digital sensor, and so the angle of view is greater in one direction than the other.
If the lens hood is inadequate, there are some easy but less convenient workarounds. Placing a hand or piece of paper exterior to the side of the lens which is nearest the flare-inducing light source can mimic the effect of a proper lens hood. On the other hand, it is sometimes hard to gauge when this makeshift hood will accidentally become part of the picture. A more expensive solution used by many pros is using adjustable bellows. This is just a lens hood which adjusts to precisely match the field of view for a given focal length.
Another solution to using 35 mm lenses and hoods on a digital SLR with a crop factor is to purchase an alternative lens hood. Look for one which was designed for a lens with a narrower angle of view (assuming this still fits the hood mount on the lens). One common example is to use the EW-83DII hood with Canon's 17-40 f/4L lens, instead of the one it comes with. The EW-83DII hood works with both 1.6X and 1.3X (surprisingly) crop factors as it was designed to cover the angle of view for a 24 mm lens on a full-frame 35 mm camera. Although this provides better protection, it is still only adequate for the widest angle of view for a zoom lens.
Despite all of these measures, there is no perfect solution. Real-world lens hoods cannot protect against stray light completely since the "perfect" lens hood would have to extend all the way out to the furthest object, closely following the angle of view.
Unfortunately, the larger the lens hood the better — at least when only considering its light-blocking ability. Care should still be taken that this hood does not block any of the actual image light.
INFLUENCE OF LENS TYPE
In general, fixed focal length (or prime) lenses are less susceptible to lens flare than zoom lenses. Other than having an inadequate lens hood at all focal lengths, more complicated zoom lenses often have to contain more lens elements. Zoom lenses therefore have more internal surfaces from which light can reflect.
Wide angle lenses are often designed to be more flare-resistant to bright light sources, mainly because the manufacturer knows that these will likely have the sun within or near the angle of view.
Modern high-end lenses typically contain better anti-reflective coatings. Some older lenses made by Leica and Hasselblad do not contain any special coatings, and can thus flare up quite significantly under even soft lighting.
MINIMIZING FLARE THROUGH COMPOSITION
Flare is thus ultimately under the control of the photographer, based on where the lens is pointed and what is included within the frame.

Although photographers never like to compromise their artistic flexibility for technical reasons, certain compositions can be very effective at minimizing flare. The best solutions are those where both artistic intent and technical quality coexist.
One effective technique is to place objects within your image such that they partially or completely obstruct any flare-inducing light sources. The image on the left shows a cropped region within a photo where a tree trunk partially obstructed a street light during a long exposure. Even if the problematic light source is not located within the image, photographing from a position where that source is obstructed can also reduce flare.
The best approach is to of course shoot with the problematic light source to your back, although this is usually either too limiting to the composition or not possible. Even changing the angle of the lens slightly can still at least change the appearance and position of the flare.
VISUALIZING FLARE WITH THE DEPTH OF FIELD PREVIEW
The appearance and position of lens flare changes depending on the aperture setting of the photo. The viewfinder image in a SLR camera represents how the scene appears only when the aperture is wide open (to create the brightest image), and so this may not be representative of how the flare will appear after the exposure. The depth of field preview button can be used to simulate what the flare will look like for other apertures, but beware that this will also darken the viewfinder image significantly.
The depth of field preview button is usually found at the base of the lens mount, and can be pressed to simulate the streaks and polygonal flare shapes. This button is still inadequate for simulating how "washed out" the final image will appear, as this flare artifact also depends on the length of the exposure (more on this later).
OTHER NOTES
Lens filters, as with lens elements, need to have a good anti-reflective coating in order to reduce flare. Inexpensive UV, polarizing, and neutral density filters can all increase flare by introducing additional surfaces which light can reflect from.
If flare was unavoidable and it produced a washed out image (due to veiling flare), the levels tool and local contrast enhancement can both help regain the appearance of contrast.
