NEUTRAL DENSITY FILTERS
Neutral density (ND) filters reduce the amount of light entering the camera, enabling a longer exposure time than otherwise possible. This can emphasize motion, or make an otherwise tumultuous scene appear surreal and quiescent. Alternatively, an ND filter also enables larger apertures, which can produce a shallower depth of field, or achieve a sharper photo. Either way, this is a useful and often under-appreciated filter that deserves a deeper look. ND filters are also one of the easiest filters to use, and their effect cannot be replicated digitally — at least not with a single shot.

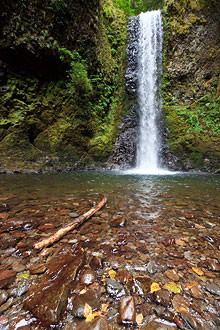
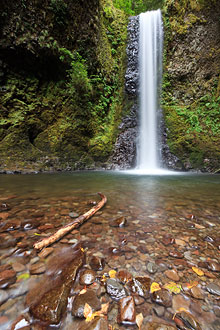
Exposure time:
1/8 second at f/10 and ISO100

Exposure time: 30 seconds at f/10 and ISO100
Examples courtesy of kyle kruchok.
OVERVIEW
An ND filter is nothing more than a semi-transparent piece of glass that gets placed in front of your lens. What makes it special, however, is that it obstructs a precisely controlled fraction of incoming light, and does so uniformly — thereby not altering image contrast or sharpness. The obstruction also aims to be equal across the visible spectrum, thereby not introducing a color cast (although this isn't always the case). This last characteristic also happens to be why it's called a neutral density filter.
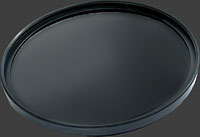
Example of a screw-on ND filter.
Even though they might appear gray or even opaque to our eyes, this isn't how your photo will appear; the camera's metering automatically compensates by letting in more light. However, the viewfinder will still appear very dark, so photographers often compose their image prior to placing the filter in front of the lens.
ND filters are specified by their light-reducing ability, where stronger filters appear as darker shades of gray. Some common specifications are summarized below:
| Filter Strength (in f-stops) |
Filter Terminology: | |||
|---|---|---|---|---|
| Light Reduction | Density | |||
| Common Uses | ||||
| 2 | 4X | 0.6 ND | → | Modest increases in exposure time, such as with waterfalls. |
| 3 | 8X | 0.9 ND | ||
| 10 | ~1,000X | 3.0 ND | → | Extreme increases in exposure time,such as blurring in broad daylight. |
| 13 | ~10,000X | 4.0 ND | ||
| 20 | ~1,000,000X | 6.0 ND | ||
Note: the light reduction factors above can also be thought of as exposure time multipliers.
Many other intermediate strengths exist, but high precision typically isn't needed with ND filters. One can often instead adjust the aperture, ISO or shutter speed by one stop without substantially changing the image.
Technical Note: Recall that each "stop" of light-reduction corresponds with a halving of light. A given filter strength therefore passes only 1/2strength of the initial incoming light, where "strength" is the filter strength in stops. For example, a 3-stop ND filter therefore only passes 1/8th the incoming light (since 1/23 = 1/(2*2*2) = 1/8).
SHARPER & LONGER EXPOSURES
Neutral density filters can be used to create any combination of (i) a longer exposure time, (ii) a shallower depth of field and (iii) a sharper photograph. Of these three, the first is by far the most common application, so that's where we'll start.
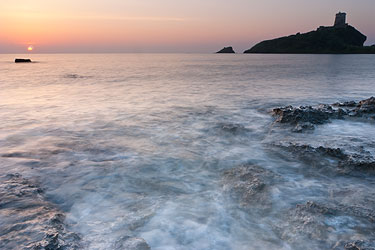
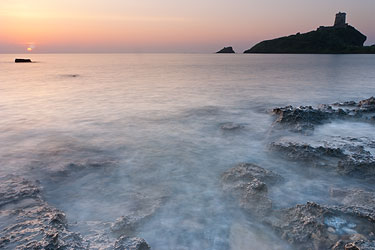
 |
|
| 2 seconds | 1/10 second |
Columbia River Gorge, Oregon
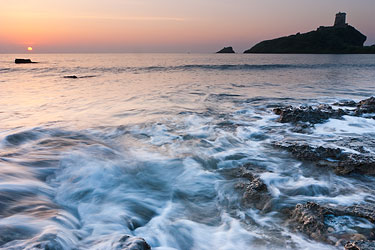
Longer exposure times can achieve a wide variety of artistic effects, including softening the appearance of turbulent water, blurring waves of blowing grass, or emphasizing motion within a crowd of people. For a full discussion of these and other examples, see the tutorial on using shutter speed creatively.
However, let's focus on a specific waterfall example. Without a filter, one would use both the smallest aperture and the lowest ISO speed available. With a waterfall under soft daylight, f/22 and ISO100 might yield an exposure of 1/10 second. Unfortunately, not only is this duration insufficient, but the f-stop also had to be increased to the point of reducing sharpness due to diffraction.
Using an ND filter allows you to address both of these problems, but the extent to which either is improved depends on how you choose to allocate its effect. With a 5-stop ND filter, the same settings would yield a 32X longer exposure time — giving the water a much silkier appearance. Alternatively, one might feel that a 16X (4-stop) exposure time increase is sufficient when weighed against the potential for having a sharper photo, and could instead also decrease the f-stop to f/16.
How long of an exposure does one typically need? For full effect, multi-second exposures are usually a must. These can render clouds as streaks in the sky, blur moving people beyond recognition, or make waves appear as a uniform, low-laying mist. However, this depends on the nature of the motion, the amount of subject magnification and the desired effect. The key is lots of experimentation.
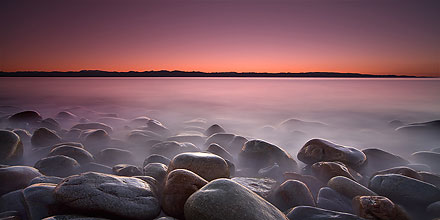
Exposure time: 60 seconds. Photo courtesy of colin southern.
During daylight, achieving this effect usually requires having a 10-stop or greater ND filter strength, which blocks all but a staggering 1/1000th of incoming light. Try revisiting the exposure settings from some of your past images to see what ND filter strengths would've been needed to achieve multi-second exposures. For example, if a given series of landscapes used a 1/50 second shutter speed at optimal aperture and ISO speed, then these would've required a 10-stop ND filter to extend this exposure time to 20 seconds.
SHALLOWER DEPTH OF FIELD
Although ND filters are primarily used to achieve longer exposures, a less common application is to enable a shallower depth of field in very bright light. For example, most SLR cameras have a maximum shutter speed of 1/4000 second, so a subject in direct sunlight might therefore require an f-stop greater than about f/4.0 (at ISO100). With a 2-stop ND filter, one could reduce this to f/2.0 — yielding a dramatic improvement in background blur and subject isolation.

Photo courtesy of alex campos. Note: above example doesn't use an ND filter, but does illustrate a situation where one could potentially help (depending on the camera's max shutter speed).
On the other hand, these situations are rare, and can usually benefit more from photographing the subject under dimmer (and likely less harsh) lighting. These situations are also unlikely to require anything stronger than a 2 or 3-stop ND filter.
DIGITAL NEUTRAL DENSITY FILTERS
Although ND filters cannot be replicated digitally, certain scenes and exposure times can be adequately emulated by employing a technique called image averaging. This works by combining several separate photos in a way that simulates a single, longer exposure:
 |
||||
| Choose Photo Averaging: | None | 2X | 4X | 16X |
In the above example, note how the water appears unusual when only two photos were averaged. Note the appearance of a double image from the distant wave crest. This effect is less pronounced with 4 photos, but hasn't been eliminated entirely.
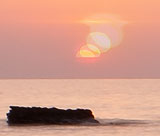
Sun appears to make
discrete jumps across sky.
In general, better results are achieved when (i) more photos are averaged, and (ii) the exposure time of each photo is long compared to the interval between them. The above example required about 16 averaged shots to adequately mimic an ND filter, in part because each individual exposure was so brief.
Perhaps the biggest problem with averaging is that moving objects aren't always rendered as continuous streaks — no matter how many photos are averaged. Photos containing people, a visible sun, stars or other moving objects are all particularly susceptible.
OTHER TYPES & ALTERNATIVES
Filter Mounting Systems. Since ND filters have the same effect regardless of how they're shifted or rotated, using a filter mounting system isn't as critical (unlike with GND filters). However, these still have some advantages, including quicker insertion and removal, or freeing up a hand from holding the ND filter in place.
Step-Up & Step-Down Adaptors. These prevent you from having to purchase a different screw-on filter size for each lens diameter (usually listed as 77 mm, 72 mm, etc.). One could then just purchase an ND filter that fits their largest lens, and use what's called a "step-up adaptor" to have this same ND filer fit on any smaller lenses.
Variable ND Filters & Stacking. With these, the strength can be adjusted without having to switch filters, but they're also much more expensive — often even more so than a few separate filters. For more flexibility on a budget, many photographers therefore just stack multiple ND filters when they need to reproduce the light-reducing ability of a single stronger (but unavailable) filter.
Substitutes. Sometimes other filter types can be used in place of an ND filter. Depending on the size of your GND filters, these can sometimes be used as ND filters if the darker region is large enough to cover the entire lens. Alternatively, polarizing filters can function as 2-3 stop ND filters, but only if one also wants the polarized look, and only when this filter is rotated for maximum effect. Some photographers don't purchase 2 or 3-stop ND filters for this reason, and instead opt for stronger varieties (such as a 10-stops).
Filter Color Casts. Some cheaper ND filters can introduce a color cast. Luckily this isn't a major problem with digital cameras, since this can usually be corrected by adjusting the photo's white balance in post-processing. However, in extreme cases, cheaper filters can introduce color casts which don't correlate with white balance settings — making color cast removal much more difficult.
FURTHER READING
For similar topics, also visit the following tutorials:
- Camera Lens Filters: Polarizers, UV, ND & GND filters
An overview of all the types of lens filters, including a summary of ND filters. - Understanding & Using Polarizing Filters
These can often be used in place of ND filters, amongst other benefits. - Using Graduated Neutral Density (GND) Filters
These are similar to ND filters, but they only reduce light within part of the photo.