GRADUATED NEUTRAL DENSITY FILTERS
Graduated neutral density (GND) or "grad" filters are an essential tool for capturing scenes with a broad dynamic range. They're also perhaps a hidden secret of successful landscape photographers. While they have been used for over a hundred years, nowadays the grad ND effect can also be applied digitally, either during RAW development or in subsequent photo editing. In either case, knowing how to make the most of GND filters will undoubtedly have a huge impact on the quality of one's photographs.


INTRODUCTION
As we look around a scene, our eyes adjust to varying brightness levels. A standard camera, on the other hand, captures the entire scene using the same exposure. This can cause bright and dark regions to appear washed out and void of detail — unlike how they appeared in person.
Although photographic filters are often looked down upon as artificial enhancements, GND filters can actually do the opposite: help you achieve a photo which more closely mimics how the scene appeared in person.
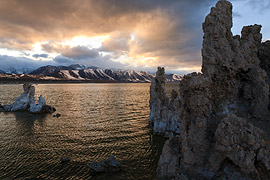
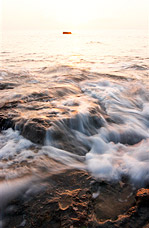 Original Scene
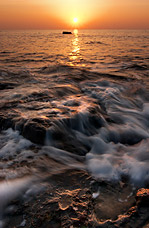 Camera Image
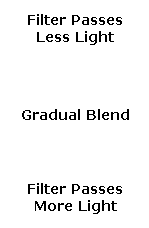
They work by obstructing progressively more light toward one side of the filter, and can be used in virtually any situation where brightness changes uniformly in one direction — either at a sharp boundary such as a horizon, or more gradually across the entire image. In general, wider angles of view are often enhanced more, primarily because these encompass a correspondingly greater range of brightness.
They're called graduated neutral density filters because they have (i) a graduated blend, (ii) this blend is from from clear to neutrally-colored gray and (iii) the effective density of this gray increases, thereby blocking more light.
Graduated ND filters affect two aspects of a photograph:
- Dynamic Range. One is able to capture scenes whose range of brightness exceeds the capabilities of your camera. This is the most commonly understood application.
- Local Contrast. Even though GND filters usually decrease the contrast between extreme light and dark regions, the contrast within each region actually increases* — thereby improving the appearance of color and detail. This is perhaps a less commonly known benefit, but likely causes the greatest improvement.
*This is because extreme tones are brought closer to the midtones, which are where a camera's tonal curve has the most contrast (and where our eyes are most sensitive to tonal differences).
The second advantage is why many photographers often apply GND filters even when the scene's dynamic range fits within the capabilities of the camera. This might include giving clouds more definition, for example, or making them appear more ominous by darkening them relative to everything else. The applications are amazingly diverse.
TYPES OF GND FILTERS
The effect of a given GND filter is determined by two properties:
- Strength. This refers to the difference between how much light is reduced at one side of the gradient as compared to the other.
- Rate of Transition. This refers to the rate at which the darkest side of the filter transitions into the clear side.
Of the two, the filter strength is perhaps the most important consideration. Commonly used strength specifications are listed below:
 |
 |
| Stronger | Weaker |
(white = clear)
| Strength (in f-stops) |
Brand-Specific Terminology: | |||
|---|---|---|---|---|
| Hoya, B+W & Cokin | Lee, Tiffen | Leica | ||
| 1 | → | ND2, ND2X | 0.3 ND | 2X |
| 2 | → | ND4, ND4X | 0.6 ND | 4X |
| 3 | → | ND8, ND8X | 0.9 ND | 8X |
recall that each "stop" of strength blocks twice as much light
What strength do you need? This can be estimated by first pointing your camera at the darker half of the scene, taking an exposure reading, and then pointing your camera at the lighter half and taking a second exposure reading. The difference between these two exposures is the maximum strength that you'll need to use, although you'll likely want something weaker for a more realistic-looking photo.
For example, if one placed their camera in aperture priority mode, and the camera's metering estimated shutter speeds of 1/100th second for the sky and 1/25th second for the ground, then you won't want anything stronger than a 2-stop GND filter. However, as you'll quickly realize, this isn't strictly a numbers game; the optimal strength is also highly dependent on the subject matter and look you're trying to achieve.
The most versatile strength is perhaps the 2-stop variety; anything weaker is often too subtle, and anything stronger may appear unrealistic. In either case, it's often not difficult to reproduce the results of a 1 or 3-stop GND filter in post-processing (by starting with an existing 2-stop GND photo).
| Rate of Transition: | ||
|---|---|---|
 |
 |
 |
| Softer Edge → Harder Edge | ||
white = clear (passes 100% of light)
The second important characteristic is the rate of transition. Most manufacturers have just two types: hard and soft. However, these terms unfortunately aren't standardized, so their precise rate can vary substantially from one filter brand to another.
In general, wide angle lenses require harder gradients, primarily because brightness varies more abruptly when a broader range is squeezed into the image frame. Softer transitions are often much more forgiving when they aren't optimally positioned, but their location is also much more difficult to identify in the camera's viewfinder.
HOW TO USE A GRADUATED ND FILTER
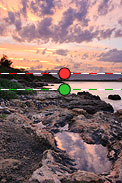
Although the GND transition region is clearly visible when looking at the filter on its own, it's location is often far from obvious when you're looking through the camera's viewfinder. The depth of field preview button can be of great help, but one ultimately needs to know what artifacts to look out for.
Three GND filter characteristics are under one's control: (i) the position, (ii) the strength and (iii) the rate of transition. Of these, only the first is controllable for a given filter, but all three are adjustable if you're applying the grad filter digitally (more on this later). Move your mouse over the filter placements below to see what happens:
 |
|
| Optimal | Higher | Stronger | Harder |
| No GND | Lower | Weaker | Softer |
Note: example uses a very abrupt gradient, even for GND filters designated as "hard."
This was done to make the different transition positions more easily identifiable.
(i) Position. Optimal placement is usually very near the horizon, although more realistic-looking results are sometimes achieved by placing it slightly lower. Be careful though: placing it too high can create a bright strip above the horizon, whereas placing it too low can make the distant land appear unrealistically dark. Pay particular attention to objects which extend above the horizon, such as trees or mountains.
(ii) Strength. Bringing the bright and dark regions into balance can be of great benefit, but this is easily overdone. Try to avoid violating the scene's tonal hierarchy; if the sky was brighter than the ground, it's almost always a good idea to keep it that way in your photo — if you want to achieve a realistic-looking result.
Note: In the above example, strength is assumed to control how much you want to brighten the foreground (as opposed to darkening the sky). The exposures for the stronger/weaker examples are therefore based on the sky (resulting in a longer exposure for the stronger filter).
(iii) Rate of Transition. This will depend heavily on the type and distribution of your subject matter. Sunsets and sunrises over water often benefit from softer gradients, for example. If your horizon is uneven and defined by trees and mountains, then a softer gradient can help avoid having the GND filter effect become too apparent within these objects. In the above example, the "harder" filter setting actually worked well for the right side of the horizon, but created an abrupt transition within objects to the left.
Note: With a physical GND filter, it's rate of transition also depends on the focal length and aperture setting of your lens. This transition will appear much softer on a telephoto lens, for example, because its gradient will be magnified more than with a wide angle lens. The gradient will also appear more blurred due to the shallower depth of field (at a given aperture setting).
Don't be afraid to get creative. In the above example, one might have been able to achieve better results by placing the transition at an angle, such that it roughly followed the rocky ocean front from the middle right up to the trees on the upper left. Similarly, one could also stack/combine multiple filters to address more complex lighting geometries.
COMPLICATIONS
Perhaps the biggest problem with grad ND filters is that one is usually restricted to gradients which transition along a line. If portions of the subject protrude above the light-dark transition, they can appear unevenly and unrealistically darkened. Susceptible subjects often include trees, the tops of mountains and people.
 Without GND Filter
 With GND Filter
(dark rock on top right)
right image uses a 2-stop GND filter
However, even darkened tops can be improved, but one usually has to resort to other tools. One can minimize their impact by using a layer mask in Photoshop (or other editing software) and manually retouching the regions that need more exposure, but this should be avoided if possible, since it's often difficult to achieve realistically, and requires a lot more work in post-processing.
DIGITAL VS PHYSICAL FILTERS
GND filters can either be applied physically, by placing one in front of the lens, or digitally, by applying an exposure gradient in RAW development (or using multiple exposures and combining these using digital editing).
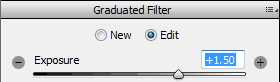 Example of a digital GND filter in Adobe Photoshop.
A physical filter is a little more restricting because one has to choose from amongst only certain pre-made types. The resulting image also already has the gradient applied, so it can be much more difficult to correct for misplacement.
On the other hand, physical GND filters often produce higher quality results. A physical GND works by darkening the brighter regions, whereas a digital GND filter works by brightening the darker regions. The physical GND filter will therefore require a much longer exposure, resulting in dramatically less noise within the (previously) darker regions.
One could always get around this limitation of digital GND filters by just taking two separate exposures (and combining these in image editing software), but this technique can be problematic with dynamic subjects. In addition, multiple exposures requires a tripod and a remote release device — otherwise the camera may move during or between each exposure.
OTHER CONSIDERATIONS WITH PHYSICAL GND FILTERS
If you choose to stick with physical GND filters, these can become much easier to use if you find the right filter system. GND filters can typically be mounted one of three ways:
- Standard Screw-On Mechanism. This is used for most other filters, including UV and polarizing filters. However, a screw-on mechanism can make it extremely difficult to adjust the location of the GND transition.
- Free-Floating/Hand-Held. These are often quick and easy to use, but one usually cannot keep the gradient in the same location for different shots, and this also ties up the use of one hand. It also makes small adjustments much more difficult.
- Filter Holders. These usually consist of an adapter ring that screws onto the front of the camera. The square GND filter can then slide into this — permitting fine control over placement of the transition. The Lee filter holder system is the most commonly used.
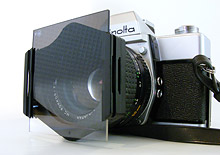
Example of a filter holder system.
Photo courtesy of scalespeeder.
Reverse grad filters. These are a variation of GND filters. Instead of an even blend from clear to gray, these special-purpose filters blend from clear to dark gray to lighter gray. This can sometimes be helpful with sunsets and sunrises, because this further darkens the otherwise bright strip near the horizon. On the other hand, one can almost always instead just darken this part later on in post-processing.
Image Quality. Anytime you place an additional glass element in between your subject and your camera's sensor, you run the risk of decreasing image quality. While this usually isn't a problem, filters which have smudges, deposits, micro abrasions or other defects can all reduce the sharpness and contrast of your photos. In addition, many GND filters aren't what are called "multi-coated," which may make them more susceptible to lens flare (especially considering that these are often used with harsh or dramatic lighting).
OTHER NOTES & FURTHER READING
Graduated ND filters are of course just one amongst many approaches to dealing with difficult lighting. Other common techniques include:
- Shadow/Highlight Recovery. This can be applied in photo editing, and is a great alternative to GND filters whenever (i) the brightness doesn't vary uniformly in one direction and (ii) the total dynamic range isn't too extreme.
- Waiting for Better Lighting. If you find that you're requiring a 3-stop or greater filter strength, consider instead just taking your photograph at a different time of day.
- High Dynamic Range. Whenever the above approaches aren't practical, another popular technique is to merge several exposures into a single high dynamic range (HDR) image, using Photoshop, Photomatix or other software packages.
For similar topics, also visit the following tutorials:
- High Dynamic Range Photography
Another powerful technique for dealing with difficult lighting. - Camera Lens Filters: Polarizers, UV, ND & GND filters
An overview of all the types of lens filters, including a summary of GND filters. - Understanding & Using Polarizing Filters
These often help reduce sky/ground brightness differences, amongst other benefits. - Understanding & Using Neutral Density Filters
These reduce incoming light similar to GND filters, but do so uniformly across an image.