CAMERA SHUTTER SPEED
A camera's shutter speed can control exposure, but it's also one of the most powerful creative tools in photography. It can convey motion, freeze action, isolate subjects and smooth water, amongst other abilities. This tutorial describes how to achieve these various effects, in addition to hopefully stimulating other creative ideas for using shutter speed in everyday shots. For a background on how it factors into exposure, also see camera exposure: aperture, ISO and shutter speed.
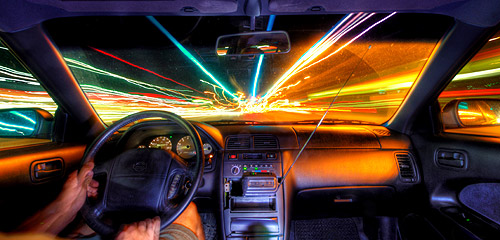
 Slow Shutter Speed
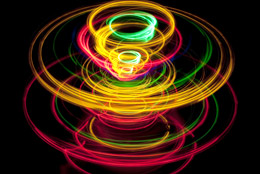
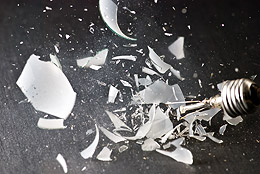 Fast Shutter Speed
Photos on left and right by creativity103 (spinning top) and kyle may (light bulb), respectively.
BACKGROUND
A camera's shutter is like a curtain* that opens and lets in light to start the exposure, then closes to end it. A photo therefore doesn't just capture a moment in time, but instead represents an average of light over a timeframe. The term "shutter speed" is used to describe this duration.
Whenever a scene contains moving subjects, the choice of shutter speed therefore determines which of these will appear frozen and which will be recorded with a blur. However, one cannot change the shutter speed in isolation — at least not without also affecting the exposure or image quality:
| Camera Settings | Adverse Side Effects | |
|---|---|---|
| Faster Shutter Speeds: | ↑ ISO Speed ↓ f-number |
↑ image noise ↓ depth of field |
| Slower Shutter Speeds: | ↓ ISO Speed ↑ f-number |
↓ hand-holdability ↓ sharpness** |
**only if the f-number increases so much that it causes visible diffraction
The above combinations of ISO speed and f-number (aperture) enable an amazingly broad range of selectable shutter speeds. Regardless of the combination, more light enables faster maximum shutter speeds, whereas less light permits slower minimum shutter speeds.
For a given exposure, SLR cameras also typically have a much greater range of selectable shutter speeds than compact cameras. For example, this range is roughly 13-14 stops (or 10,000X) with most SLR cameras, but often just 8-9 stops (or 500X) with compact cameras. See the tutorial on compact vs digital SLR cameras for more on this topic.
*Technical Note: At very short exposure times (typically 1/500 a second or faster) the shutter mechanism works more like a moving slit than a curtain. In that case, the shutter speed instead represents the amount of time that each region of the sensor is exposed to light, not the duration over which light reaches the entire sensor.
CONVEYING MOTION
While some might see still photography as restricting, many instead see this as liberating, because still capture enables nearly full control over how motion is conveyed. For instance, should the subject be rendered as an unrecognizable streak, or as a more defined blur? Or should the subject remain sharp, with everything else blurred? These and other choices are all under your control.


Photos on left and right by alan cleaver and tyler durden, respectively.
However, achieving the intended amount of blur can be difficult. For a given shutter speed, three* subject traits determine how blurred they will appear:
- Speed. Subjects which are moving faster will appear more blurred. This one is perhaps the most obvious of the three, but just as important.
- Direction of Motion. Subjects which are moving towards or away from the camera usually won't become as blurred as those moving side to side — even if both subjects are moving at the same speed.
- Magnification. A given subject will appear more blurred if they occupy a greater fraction of your image frame. This is perhaps the least obvious, but is also the one which is most under your control, since subject magnification is the combined effect of focal length and subject distance. Longer focal lengths (more zoom) result in more magnification for a given subject distance, but this also increases the likelihood of blur due to camera shake.
*Although not a subject trait, the display size may also be important. Blur which appears optimal in a small size on-screen may appear too pronounced in a large print, for example.
 |
||||
| Shutter Speed: |
1/2 | 1/10 | 1/30 | 1/400 |
Regardless, developing an intuition for shutter speed under different scenarios can be difficult, but with plenty of experimentation you'll be well on your way.
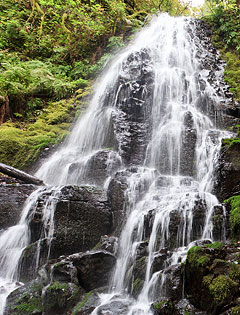
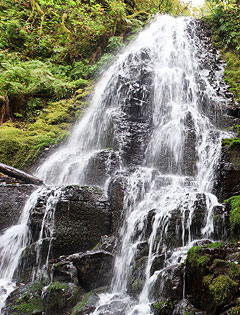
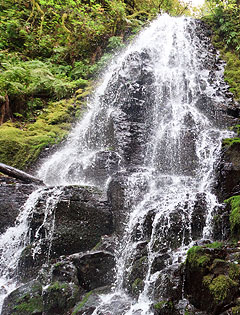
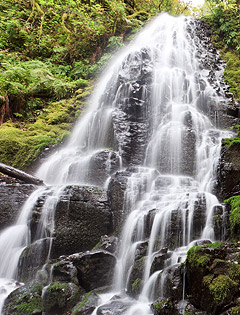
A specific but common application of using shutter speed to convey motion is with moving water. Shutter speeds of around 1/2 a second or longer can make waterfalls appear silky, or waves look like a surreal, low-lying mist.
Move your mouse over the various shutter speeds to the right to see this effect. Note how freezing the motion of splashing water required a shutter speed of 1/400 of a second. Since this is a wide angle photo, a shorter shutter speed could have achieved a similar look if one were instead zoomed into just a portion of the waterfall.
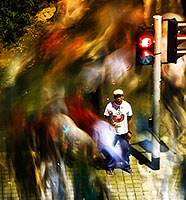
One can also use a slow shutter speed to emphasize a stationary subject amongst movement, such as a person standing still amongst a bustling crowd. Similarly, unique portraits can be achieved using moving trains as a background when the shutter speed is as slow as about 1/10 to 1/2 a second:
 1.3 seconds
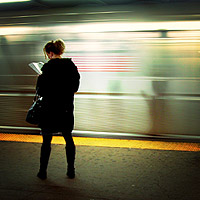 1/3 second
Photos on left and right by nathanhayag and moriza, respectively.
MOVING WITH THE SUBJECT & PANNING
Instead of blurring the subject, one could instead render everything else blurred. This requires the camera to either be located on the moving subject itself, or aimed in such a way that the image frame moves with the subject (called "panning").
shutter speed: 15 seconds; photo by dande chiaro
Try taking a photo from a moving car, an amusement park ride (be safe!), or another moving object to create an interesting effect. As before, the required shutter speed will depend on the speed of motion, potentially in addition to the stability of the moving object. Regardless, somewhere around 1/30 of a second is often a good starting point, then adjust accordingly after viewing the results on your camera's rear screen.
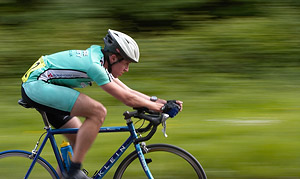
panning photo at 1/45 sec and 110 mm
Alternatively, the panning technique doesn't necessarily mean that the camera itself has to travel at the same speed as the subject — just that the image frame has to move this fast. Fortunately, even fast subjects can be captured by slowly pivoting the camera, especially if this subject is far away and you're using a telephoto lens.
Make sure to aim so that your image frame smoothly follows your subject, while also pressing the shutter button — all in one continuous motion.
A successful panning shot requires a shutter speed which is just slow enough to cause the background to streak, but just fast enough that the subject still appears sharp. This can be tricky to achieve, so the key with panning is to experiment and take many more shots than you would otherwise. Regardless, longer streaks produce a much more dramatic effect; using an image-stabilized lens that has one-axis* stabilization, or a tripod with a pan-tilt head can help you achieve this.
In addition, panning requires a textured background that isn't completely out of focus. Subject backgrounds which are closer will also appear to streak more for a given shutter speed and panning rate.
*Lens Panning Mode. This is called "mode 2" IS on canon lenses; nikon lenses with vibration reduction (VR) automatically switch to panning mode when the lens motion is in one direction.
An added benefit is that panning permits slower shutter speeds than would otherwise be needed to capture a sharp subject. For example, available light might only permit a shutter speed of 1/50 second — which might be insufficient to render a particular moving subject as sharp with a standard shot — but with panning, this shutter speed might be fast enough to make the subject appear sharp.
FREEZING FAST ACTION & HIGH-SPEED MOTION
High speed photography is capable of new and exciting representations of subjects in motion, in part because we are incapable of seeing and processing movements which are much faster than a running person. Examples include water droplets, birds in flight and moments in sports, amongst many others.

photo by lazlo
However, capturing fast-moving subjects can also be challenging. The key is to learn to anticipate when your subject will be in the desired position, since shutter speeds shorter than 1/5th of a second are faster than our own reaction time. Simply reacting and pressing the shutter button will likely miss the moment.
To make matters worse, many cameras also impart a delay between when the shutter button is pressed and the exposure begins (called "shutter lag"). With SLR cameras this is often just 1/10 to 1/20 of a second, but with compact cameras this can be as high as 1/2 a second. However, these times exclude the additional 1/2 to 1 second (or more) that it can take your camera to autofocus. Pre-focusing on or near your expected subject location can therefore greatly reduce shutter lag.
Sharp high speed photos also require one to be attentive to variations in subject motion, and to potentially time the shot to coincide with a relative pause in the action. For example, with jumping or racing subjects, try to time your shot for when they're at their highest point or are changing directions (and are thus moving the slowest). Even with proper timing, one might also need to set their camera to continuous shot mode (or similarly named setting). The camera can then take a burst of shots while you hold down the shutter button — and hopefully capture just the right moment with one of these.
In any case, knowing the necessary shutter speed also takes practice. The following calculator estimates the minimum shutter speed needed to make a moving subject appear sharp in an 8x10 inch print:
Notes: CF = "crop factor" (commonly referred to as the focal length multiplier)
Calculator assumes the same sharpness criteria as used to determine depth of field;
to instead calculate based on sharpness when viewed at 100% on-screen, use "show advanced" above.
The above results are only intended as a rough guide. In general, 1/250 to 1/500 of a second is sufficient to freeze everyday motion of people, but one may require 1/1000 to 1/4000 of a second if subjects are up-close or extraordinarily fast.
Notes on Subject Speed. Just because a subject is moving at a given speed doesn't preclude portions of this subject from moving even faster. For example, the arms and legs of a runner might be moving much faster than their body. Furthermore, the above subject speed refers to the speed in the direction across your frame (side to side); you can typically get away with a 4X longer shutter speed for subjects moving directly towards or away from you, and a 2X longer shutter speed for subjects which are moving towards/away from you at an angle.
Keep in mind that most cameras are only capable of shutter speeds up to 1/2000 to 1/8000 of a second. If the above calculator indicates that you'll need a shutter exceeding the capabilities of your camera, your only other options are to try panning with the subject to offset some of their motion, or to resort to using flash photography.
ZOOMING BLUR

Photo on right by jeremy vandel.
Another interesting technique is to change the zoom during the exposure itself (often called a "zoom burst"). You can achieve this look by (i) setting your camera on a tripod, (ii) using a shutter speed of 1/15 to 1/2 a second, and (iii) twisting the lens's zoom ring while also trying to avoid moving the camera itself. One can also try only zooming during part of the exposure to lessen the effect.
This causes subjects to have increasing radial blur near the edges of the frame, with the center appearing more or less unblurred. The effect can be used to draw attention to a central subject, or to make the viewer feel as though they're moving rapidly.
The zoom burst technique is usually only possible with SLR cameras, but may also be possible with compact cameras that have manual zoom capabilities. Alternatively, zooming blur can often be perfectly replicated using normal photos and post-processing, such as with Photoshop's radial blur filter.
ABSTRACT & ARTISTIC EFFECTS
Sometimes photographers will intentionally add camera-shake-induced blur to give their image a unique and artistic effect:
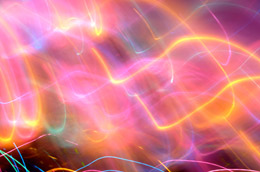 Abstract Blurred Light Effect
 Artistic Painted Effect
Photos on left and right by kevindooley and unukorno, respectively.
One typically needs to use shutter speeds of 1/30 - 1/2 a second (or more) since this is just beyond the limit of hand-holdability, but not too long that the subject will become smoothed out entirely. Predicting the end result can also be difficult, so these types of shots will likely require many attempts (at potentially different shutter speeds) before you are able to achieve the desired look. Also keep in mind that the painted look is often easier to achieve with filters in Photoshop or other editing software.
CONCLUSIONS & FURTHER READING
We've seen several creative ways of using shutter speed, but what if the amount of light required for a correct exposure prevents you from selecting the desired shutter speed — even after all combinations of ISO speed and aperture have been attempted?
For faster shutter speeds, one can try switching to a lens with a larger maximum aperture, or one can add more light to the scene itself by either changing the shooting location or using a flash. Alternatively, for even slower shutter speeds, one can block some of the light by using a neutral density filter or a polarizing filter, or can use the image averaging technique to create a longer effective exposure. In either case, also make sure that you're not accidentally over or under-exposing the photo — and thus potentially shifting your range of available shutter speeds.
Other important points and clarifications are listed below.
- Shutter Priority Mode. This camera setting can be a useful tool when the appearance of motion is more important than depth of field, or just for letting you know whether your desired shutter speed is even possible using available light. It allows you to pick a desired shutter speed, then the camera's metering tries to combine this with an aperture setting (and potentially ISO speed) that will achieve a correct exposure.
- Camera Shake. The above analysis assumes that subject motion is the primary source of blur, but in many photos camera shake can instead be more influential — particularly when using telephoto lenses or with unsteady hands.
For similar topics, also visit the following tutorials:
- Camera Exposure: Aperture, ISO & Shutter Speed
Discusses how shutter speed factors into the overall exposure. - Reducing Camera Shake with Hand-Held Photos
Tips for minimizing camera shake due to slow shutter speeds.