NOISE REDUCTION BY IMAGE AVERAGING
Image noise can compromise the level of detail in your digital or film photos, and so reducing this noise can greatly enhance your final image or print. The problem is that most techniques to reduce or remove noise always end up softening the image as well. Some softening may be acceptable for images consisting primarily of smooth water or skies, but foliage in landscapes can suffer with even conservative attempts to reduce noise.
This section compares a couple common methods for noise reduction, and also introduces an alternative technique: averaging multiple exposures to reduce noise. Image averaging is common in high-end astrophotography, but is arguably underutilized for other types of low-light and night photography. Averaging has the power to reduce noise without compromising detail, because it actually increases the signal to noise ratio (SNR) of your image. An added bonus is that averaging may also increase the bit depth of your image — beyond what would be possible with a single image. Averaging can also be especially useful for those wishing to mimic the smoothness of ISO 100, but whose camera only goes down to ISO 200 (such as most Nikon digital SLR's).
CONCEPT
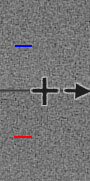
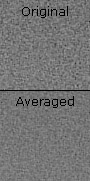
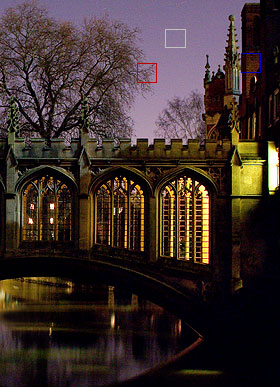
Image averaging works on the assumption that the noise in your image is truly random. This way, random fluctuations above and below actual image data will gradually even out as one averages more and more images. If you were to take two shots of a smooth gray patch, using the same camera settings and under identical conditions (temperature, lighting, etc.), then you would obtain images similar to those shown on the left.
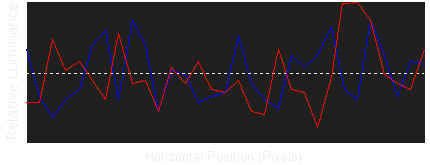
The above plot represents brightness fluctuations along thin blue and red strips of pixels in the top and bottom images, respectively. The dashed horizontal line represents the average, or what this plot look like if there were zero noise. Note how each of the red and blue lines uniquely fluctuates above and below the dashed line. If we were to take the pixel value at each location along this line, and average it with value for the pixel in the same location for the other image, then the brightness variation would be reduced as follows:
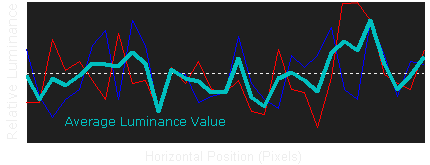
Even though the average of the two still fluctuates above and below the mean, the maximum deviation is greatly reduced. Visually, this has the affect of making the patch to the left appear smoother. Two averaged images usually produce noise comparable to an ISO setting which is half as sensitive, so two averaged images taken at ISO 400 are comparable to one image taken at ISO 200, and so on. In general, magnitude of noise fluctuation drops by the square root of the number of images averaged, so you need to average 4 images in order to cut the magnitude in half.
NOISE & DETAIL COMPARISON
The next example illustrates the effectiveness of image averaging in a real-world example. The following photo was taken at ISO 1600 on the Canon EOS 300D Digital Rebel, and suffers from excessive noise.
| 100% Crop of Regions on the Left | ||
| Original | 2 Images | 4 Images |
 |
 |
 |
 |
 |
 |
 |
 |
 |
Note how averaging both reduces noise and brings out the detail for each region. Noise reduction programs such as Neat Image are the best available arsenal against noise, and so this is used as the benchmark in the following comparison:
| Original | 2 Images | 4 Images | Neat Image | Median Filter |
|
|
|
 |
 |
|
|
|
 |
 |
|
|
|
 |
 |
Noise reduction with Neat Image Pro Plus 4.5 uses default settings and "auto fine-tune"
Neat Image is the best of all for reducing noise in the smooth sky, but it sacrifices some fine detail in the tree branch and vertical mortar/grout lines in the brickwork. Sharpening could be used to enhance the remaining detail and greatly improve the overall appearance of sharpness, but sharpening cannot recover lost information. The median filter is a primitive technique and is in most versions of Photoshop. It calculates each pixel value by taking the median value of all adjacent pixels. This is effective at removing very fine noise, but leaves larger fluctuations behind and eliminates pixel-level detail. Overall, Neat Image is your best option for situations where you cannot use image averaging (hand held shots). Ideally, one could use a combination of the two: image averaging to increase the SNR as much as possible, then Neat Image to reduce any remaining noise:
| Original | Averaging: 4 Images |
Neat Image | Neat Image + Averaging |
|
|
|
 |
|
|
|
 |
|
|
|
 |
Noise reduction with Neat Image Pro Plus 4.5 uses default settings and "auto fine-tune"
Note how neat image plus averaging is now able to both retain the vertical detail in the bricks and maintain a smooth, low noise look. Disadvantages of the averaging technique include increased storage requirements (multiple image files for one photo) and possibly longer exposure times. Image averaging does not work on images which suffer from banding noise or fixed pattern noise. Note how the bright white "hot pixel" in the lower left of both the top and bottom images does not diminish with averaging. Averaging, unlike other shots, requires zero camera movement *between* exposures in addition to during the exposure. Extra care should be taken with technique and averaging can only be used for photos taken on a very sturdy camera tripod.
AVERAGING IMAGES IN PHOTOSHOP USING LAYERS
Performing image averaging in Adobe Photoshop is relatively quick using layers. The idea is to stack each image in a separate layer, and have them blend together such that each layer contributes equally. If for some reason one layer receives more weighting than another, the blending of images will not be as effective.
One must first load all images into Photoshop which are to be averaged, and then copy and paste each image on top of each other so that they are all within the same project window. Once this is done, the averaging can begin. The key to averaging in Photoshop is to remember that each layer's opacity determines how much the layer behind it is "let through," and the same goes for each image underneath. This means that to properly average four images, for example, one should not set each layer's opacity to 25%. One should instead set the bottom (or background) layer's opacity to 100%, the layer on top of that to 50%, and then the next layer to 33%, and finally the top layer to 25%. This is illustrated below:
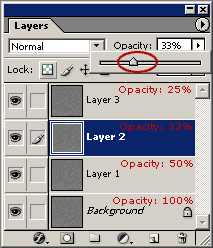
each layer's percent opacity is calculated by:
Note: All markings in red have been added for clarity;
they will not actually be visible in Photoshop.
RECOMMENDATIONS
When should one perform image averaging, as opposed to just taking a longer exposure at a lower ISO speed? The following list of situations may all prove useful:
- To avoid excessive fixed-pattern noise from long exposures
- For cameras which do not have a "bulb mode," you may be limited to 15-30 second exposures. For such cases, consider the following: taking two shots at ISO 800 and 30 seconds to produce the rough equivalent (both in brightness and noise levels) of a single 60 second exposure at ISO 400. Many other combinations are possible...
- For situations where you cannot guarantee interruption-free exposures beyond a given time. As an example, one might be taking a photo in a public place and want low noise, but cannot take a long enough exposure because pedestrians often pass through the shot. You could then take several short shots in between passers-by.
- To selectively freeze motion in low detail, faster moving areas while still retaining low noise in high detail, slower moving areas. An example of this is a starry night with foliage in the foreground.
- To reduce shadow noise (even in low ISO shots) where you wish to later bring out shadow detail through post-processing.
