NATURAL LIGHT IN PHOTOGRAPHY
Paying more attention to light is perhaps the single most important step you can take to improve your photography. With many landscapes, having good natural lighting can even be more important than the choice of subject itself. Different types of natural light can also produce a wide variety of subject appearances — even though these all have the same light source. Learn how to achieve the right light for your subject by utilizing the unique qualities of your particular time of day and weather.


Three factors influence how natural light renders a subject: time of day, camera direction and weather. We'll first explore time of day under clear skies, then move onto specific weather conditions; lighting directions will be saved for a future tutorial.
OVERVIEW
Even though all natural light originates from the sun, a subject's illumination is actually comprised of several components:
| Direct Sunlight (warmer, high contrast) |
Diffuse Skylight (cooler, low contrast) |
Bounced Light (has qualities of reflecting object) |
Move your mouse over each lighting component above to isolate its effect.
Depending on the time of day, the relative amount of each component changes — resulting in an overall illumination with a different white balance or contrast. We'll start with astronomical high noon (when the sun is at its highest), then see what happens as the day progresses to sunset (or reverses to sunrise).

| Time of Day | Contrast | Colors | Direction of Sun | |
|---|---|---|---|---|
| 1. Midday | → | Highest | Neutral White | Near Vertical |
| 2. Evening & Morning | → | High | Slightly Warm | Mid to Low |
| 3. Golden Hour & Sunrise/Sunset | → | Medium | Warm to Fiery | Near Horizontal |
| 4. Twilight, Dawn & Dusk | → | Low | Cool Pastel | Below Horizon |
note: the contrast characteristics are intended only for clear skies
Time of Day. Further from high noon, the sun dips closer to the horizon. This results in lower contrast, because sunlight has to pass through more atmosphere, and more easily bounces off the ground toward the subject. In addition, the atmosphere selectively filters more of the sun's blue light — resulting in warmer light overall.
Weather. Along with time of day, the type and extent of cloud cover is the other most influential cause of lighting variation. It primarily influences lighting because it changes the balance between direct sunlight and diffuse skylight, which in turn affects the apparent contrast and color temperature of the light source. We'll discuss this more at the end.
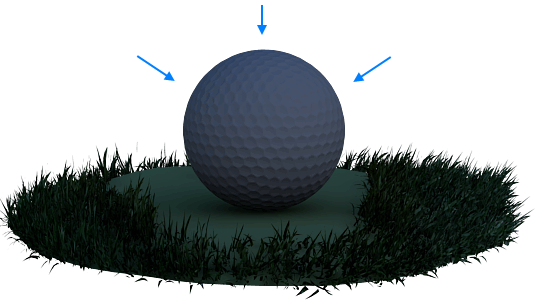
CLEAR MIDDAY SUNSHINE

Midday lighting is primarily comprised of direct, downward sunlight. Such light has little chance to scatter and diffuse through the atmosphere, or to bounce off the ground and illuminate the subject indirectly. This results in the hardest and most neutrally-colored lighting of any time of day, and is typically the least desirable type of natural light.
Due to these drawbacks, too often photographers put their camera away — potentially missing unique opportunities. For example, water may appear more transparent, since light penetrates deeper and direct reflections off the surface are less likely. Alternatively, other types of photographs are more about capturing a particular event, as opposed to achieving an image with optimal lighting.
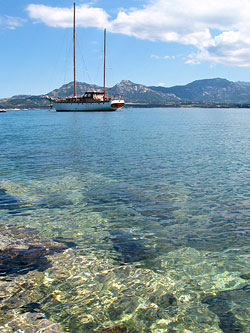
Overcoming Unique Challenges. Just be aware that color saturation is typically lower, and that downward shadows generally don't produce flattering portraits, or make other subjects appear as three-dimensional. Many photographers encourage liberal use of polarizing filters to manage contrast, since this is often when they're most impactful, but at this time these can also more easily make the sky appear unnaturally dark and blue. If shadows appear too harsh and colors aren't sufficiently saturated, try converting to black and white, since these may even benefit from the high contrast of midday light.
EVENING & MID-MORNING

Evening and mid-morning light becomes slightly warmer, and begins to cast noticeable shadows. Since direct light now originates from an upper side, subjects often appear much more three dimensional. Such lighting is usually much more predictable than sunsets and sunrises, primarily because this time is less dependent on the effect of surrounding mountains, or the location of the cloud line.

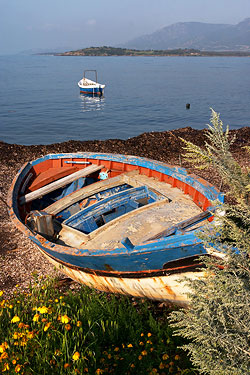
Overcoming Unique Challenges. Mid-evening and morning has perhaps the most compromised lighting: it's not as neutrally colored as during midday, but also not as warm or intense as a sunset. It's also less harsh and originates from a better angle than during midday, but also isn't as soft and diffuse as during twilight or overcast lighting. These qualities make it a good all-around time of day for photography, but also run the risk of making photos appear too ordinary, since one cannot use any uniquely exaggerated lighting traits to emphasize particular features in their subject.
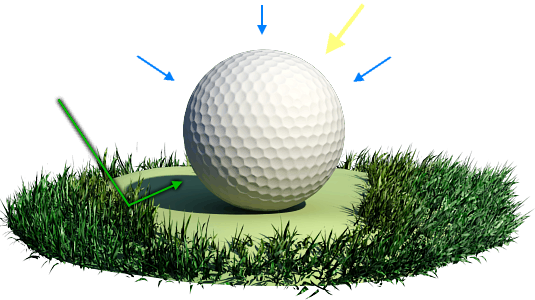
GOLDEN HOUR & SUNRISE/SUNSET

The hour just before sunset and just after sunrise (the "golden hour") is typically regarded as having the most desirable light for photography. This is characterized by horizontal light that casts long shadows and gives subjects a warm glow.
Sunsets and sunrises make for exciting and highly varied lighting, primarily because these are heavily influence by subtleties in the weather. Clouds are rendered using sunlight which reflects off them from underneath — as opposed to sunlight which has diffused through them from above — potentially causing the sky to light up with a soft, warm light.

Overcoming Unique Challenges. Sunsets and sunrises are often spectacularly vibrant in person, but this isn't always translated well into an image. Make sure that your camera's auto white balance doesn't counteract an otherwise warm-looking scene, or that the color saturation isn't overly conservative to minimize the risk of color clipping. Ironically, when the lighting is most dramatic is also when your camera is most likely to make an error with its exposure; try to take several photos, or use partial or spot metering just in case.
Sunrise vs. Sunset. Although sunsets and sunrises are in theory identical, weather patterns can cause these to be consistently different, so many photographers prefer one over the other. Some find that they're more prepared to photograph during sunset over sunrise, because light quality builds steadily prior to a sunset — whereas with sunrises, the light often starts at its best and gradually fades. In addition, being awake and on-location for a sunrise is often impractical in the summer months. On the other hand, sunrise photography is usually void of potentially distracting crowds, and more often has a low-laying mist and dew on foliage. Sunrises often also have a calm, quiescent quality — particularly with scenes involving water — that isn't present during sunsets.
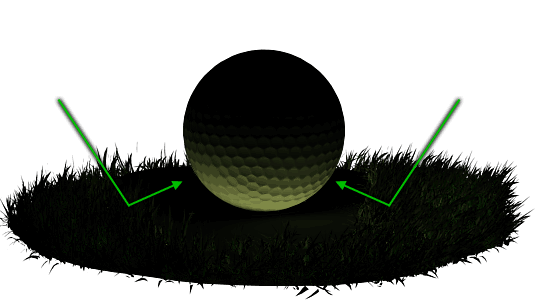
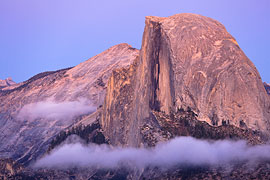
TWILIGHT, DAWN & DUSK

Twilight, dawn and dusk typically describe the half hour before sunrise or after sunset — when the sky is still bright but there's no longer any direct sunlight. The primary source of light effectively becomes the entire sky, with one side appearing warm and reddish and the other becoming a cool blue or purple. This can produce wonderfully soft, multicolored lighting that gives a calm, peaceful mood to subjects.

Overcoming Unique Challenges. Perhaps the biggest disadvantages are the lack of contrast and ambient light. Hand-held shots are therefore rarely possible, and achieving a sufficient sense of depth may require more attention to composition. Cameras also often over-expose twilight scenes when using automatic exposures — potentially washing out the otherwise delicate colors — since twilight almost never contains any fully white objects.
Alpenglow. If you're lucky, a phenomenon called "alpenglow" may appear as a red or pinkish glow in the sky furthest from the setting sun, but it's never a guarantee. Alpenglow can be a helpful effect for extending a sky's warmth well beyond sunset.
SHADE & OVERCAST SUNLIGHT

Shade and overcast light typically have a cool, soft appearance, since the source of such light is spread across the entire sky, and doesn't include any direct sunlight. Textures therefore appear much subtler, and reflections on smooth surfaces are more diffuse and subdued. The color of such light is also more heavily influenced by bounced light from nearby objects, so subjects shaded by foliage can even incur a greenish tint.
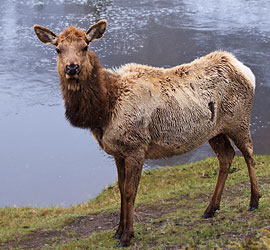
Many photographers shy away from this type of lighting, but doing so is often a mistake. For example, depending on the degree of cloud cover, bright overcast light can actually be ideal for outdoor portraits and wildlife (as long as the cool white balance is corrected), since it doesn't cast harsh shadows across the subject's face. Bright overcast light may also enhance close-up photography, such as with flowers, since the appearance and saturation of colors usually improve. Alternatively, low contrast light can also be better when the subject itself is high in contrast, such as subjects containing both dark and light colors.

Overcoming Unique Challenges. A common trick is to keep the gray sky out of the photo — unless the clouds are particularly moody and highly textured. Since shadows play much less of a role, achieving a sufficient sense of depth may be difficult — just as during twilight — but this time one also doesn't have the appealing pastel lighting to compensate. Images straight out of the camera often appear more bluish than desired, so shooting in RAW and adjusting the white balance afterwards is also encouraged. Liberal use of the levels tool and curves tool may also be helpful if one wishes to use the full contrast range in a print.
OTHER SPECIFIC WEATHER CONDITIONS
Weather is effectively just a massive filter that lies between the sun and your subject. At one extreme, light could be relatively warm and highly localized, such as sunlight from a clear sky. At the other extreme, light could be cooler and envelop the subject, such as diffuse sunlight through a densely overcast sky. The thickness and extent of cloud cover is what decides where in this continuum your particular weather will have its effect.
When the sky is partly cloudy, one can effectively use the sky to paint their scene with light — if one is willing to wait for just the right moment. This is an excellent and often overlooked opportunity, especially during the middle of the day.
Alternatively, stormy weather can produce extremely high contrast light since rain clears the air of haze and dust. Sunsets after a storm are also often the most dramatic, in part because the sky can become much darker than the land — providing a nice high contrast backdrop for front-lit subjects. This is also when rainbows are most likely to appear.


Other scenarios include photography in the fog, mist or haze. This not only greatly decreases light's contrast — just as during an overcast day — but also does so progressively for more distant objects.
FURTHER READING
We also have an online tool which will automatically calculate your times and direction:
Sunrise, Sunset & Twilight Calculator for Photography
For similar topics, also visit the following tutorials:
- Understanding White Balance
Discusses the types and terminology of light's color temperature. - Introduction to Portrait Lighting: One Light Source
Understand how light influences the appearance of a portrait. - Photography in Fog, Mist or Haze
Learn how these unique weather conditions influence lighting. - Common Obstacles in Night Photography
An introduction to some of the challenging technical hurdles.