CONVERTING A COLOR PHOTO
INTO BLACK & WHITE
Converting a digital color photo into black and white goes beyond simply desaturating the colors, and can be made to mimic any of a wide range of looks created by using color filters in black and white film photography. Conversion which does not take into account an image's color and subject of interest can dilute the artistic message, and may create an image which appears washed out or lacks tonal range. This section provides a background on using color filters, and outlines several different black and white conversion techniques — comparing each in terms of their flexibility and ease of use.
BACKGROUND: COLOR FILTERS FOR B&W FILM
Contrary to what one might initially assume, traditional black and white photographers actually have to be quite attentive to the type and distribution of color in their subject.
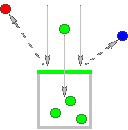
Color filters are often used in front of the lens to selectively block some colors while passing others (similar to how color filters are used for each pixel in a digital camera's bayer array). Filters are named after the hue of the color which they pass, not the color they block. These can block all but a primary color such as red, green or blue, or can partially block any weighted combination of the primary colors (such as orange or yellow). Careful selection of these filters allows the photographer to decide which colors will produce the brightest or darkest tones.
CONTROLLING TEXTURE AND CONTRAST
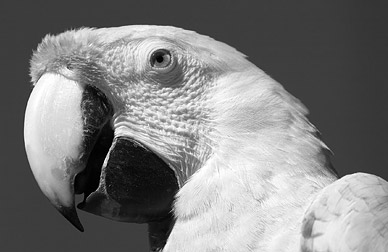
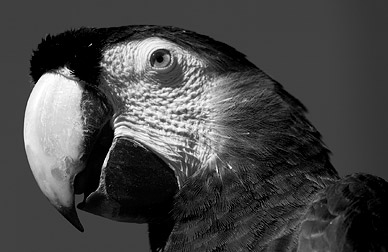
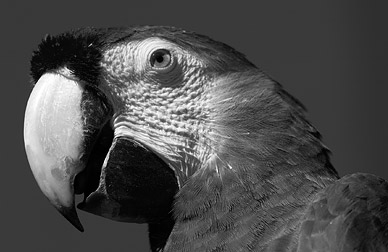
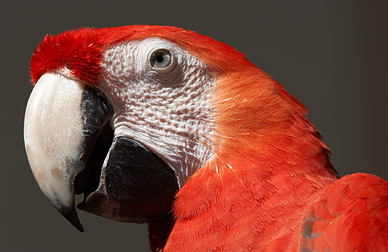
Just as with color photography, black and white photography can use color to make a subject stand out — but only if the appropriate color filters have been chosen. Consider the example below, where the original color image makes the red parrot stand out against the near colorless background. To give the parrot similar contrast with the background in black and white, a color filter should be chosen which translates bright red into a tone which is significantly different from the middle gray background. Move your mouse over the options below to view some of the possibilities.
 |
|||
| Original Color Photo | Red Filter | Green Filter | Red-Green Combination |
Note how the red and green filters make the parrot much brighter and darker than the background, respectively, whereas an intermediate combination of the two makes the parrot blend in more. Also note how the green and red-green filters enhance texture in the feathers, and that the red filter eliminates tonal separation between the feathers and the white skin.
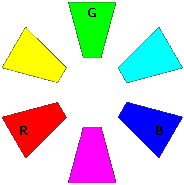
So which color filter is best? This depends on the goal of the image, but in general: one can increase contrast in a given region by choosing a filter color which is complimentary to that region's color. In other words, we want to choose a filter whose color is on the opposite side of the color wheel (right) to the image's color.
If we wished to maximize cloud contrast in a cyan-blue sky, then a reddish-yellow filter would achieve this goal. Of course, images rarely contain just one color. Although the red filter above decreases contrast in the feathers, it would do the opposite in a cyan-blue sky. Black and white conversion may therefore require interpretive decisions.
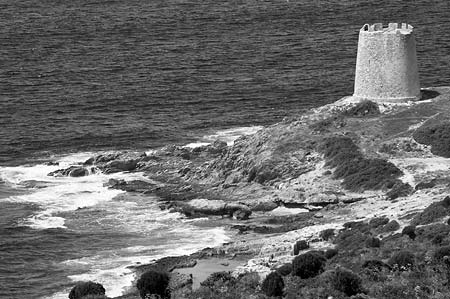
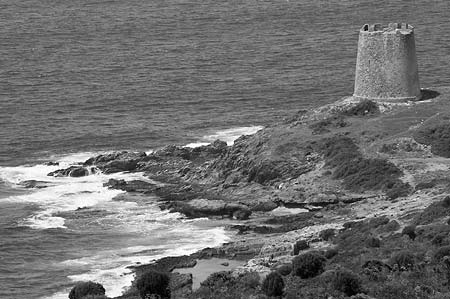
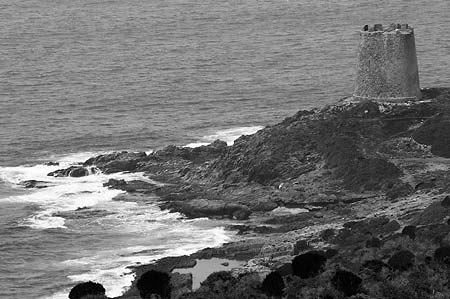
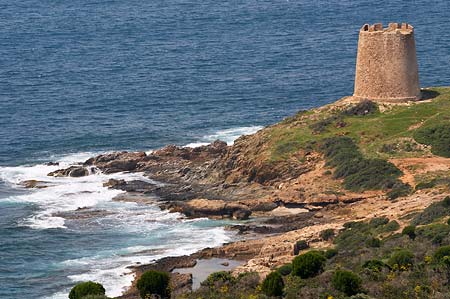
The image below contains regions of red, green and blue; move your mouse over each filter and note its influence on the red rocks, green foliage and blue sea:
 |
|||
| Original Color Filter | Red Filter | Green Filter | Blue Filter |
Notice the contrast changes both between and within regions of red, green and blue above. Pure red or primarily red color filters often work best for landscapes, as this increases texture in regions containing water, sky and foliage. On the other hand, color filters can also make contrast appear greater than what we would perceive with our eyes, or can darken/brighten some regions excessively.
One can visualize other possibilities since all color filters would produce some superposition of the three images above (yellow would be half red, half green and zero blue). Each image may therefore require its own combination of red, green and blue filtering in order to achieve the desired amount of contrast and tonal range.
DIGITAL COLOR INTO BLACK & WHITE
Converting a digital color photo into black and white utilizes the same principles as with color filters in film photography, except filters instead apply to each of the three RGB color channels in a digital image (see bit depth). Whether you specify it or not, all conversion techniques have to use some weighted combination of each color channel to produce a grayscale brightness. Some techniques assume a combination for you, although the more powerful ones give you full control. Each makes its own trade-offs between power and ease of use, and so you may find some techniques are best suited only to certain tasks.
CHANNEL MIXER
The channel mixer tool allows the user to control how much each of the three color channels (red, green and blue) contribute to the final grayscale brightness. It is undoubtedly one of the most powerful black and white conversion methods, however it may take some time to master since there are many parameters which require simultaneous adjustment.
Open this tool by clicking on Image > Adjustments > Channel Mixer in Adobe Photoshop. GIMP and many other image editing programs also offer this tool, however its menu location may vary.
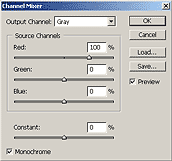
Be sure to first click on the lower left tick box entitled "Monochrome" for black and white conversion.
You can get a feel for the distribution of color by first setting each of the color channels to 100% individually.
Then adjust each of the red, green and blue sliders to produce an image to your liking. For an even more pronounced effect, some colors can even have negative percentages.
The sum of the red, green, and blue percentages need to equal 100% in order to maintain roughly constant brightness, although overall brightness can also be adjusted by using the "Constant" slider at the bottom. If the aim is to mimic the luminosity perceived by the human eye, set: red=30%, green=59% and blue=11%.
HUE - SATURATION ADJUSTMENT LAYER
This technique is particularly elegant because it allows you to apply any of the entire spectrum of color filters just by dragging the hue slider. This allows one to quickly assess which of the many combinations of color filters work best, without necessarily having one in mind when starting. It takes a little longer to setup than the channel mixer, but is actually faster to use once in place.
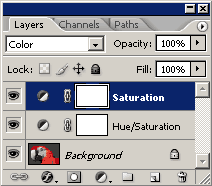
Open the image in Photoshop and create two separate "Hue/Saturation Adjustment Layers" by following the menus: Layers > New Adjustment Layer > Hue/Saturation...
Each window will be named "Hue/Saturation 1 or 2," however I have given these custom names for this tutorial.
On the top adjustment layer (Saturation), set the blending mode to "Color" and set the saturation to its minimum of "-100," shown below.

On the bottom adjustment layer, change the "Hue" slider to apply any of the entire spectrum of color filters. This is the main control for adjusting the look from this technique.
The saturation slider can also be adjusted in this layer, but this time it fine-tunes the magnitude of the filter effect for a given hue.
Once all adjustments have been made, merge/flatten the layers to make these final.
An alternative technique which may be a bit easier is to only add one Hue/Saturation adjustment layer and change the hue of the image itself. On the other hand, this does not allow one to go back and change the color filter hue if it is no longer in Photoshop's undo history (at least not without unnecessarily destroying bit depth).
LIGHTNESS CHANNEL IN LAB MODE
Using the lightness channel in lab mode is quick and easy because it converts based on the luminosity value from each pixel's RGB combination. Please see "Understanding Histograms: Luminosity and Color" for further reading on this topic.
First convert the image into the LAB color space by clicking on Image > Mode > Lab Color in Photoshop.
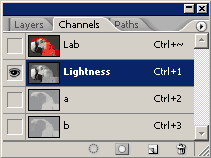
View the "Lightness" channel by clicking on it (as shown to the left) in the channel window. If not already open, the channel window can be accessed by clicking on Window > Channels.
Delete both the "a" and "b" channels to leave only the lightness channel ("a" and "b" refer the red-green and blue-yellow shift, or "chrominance").
Note that the lightness channel may subsequently require significant levels adjustments as it may not utilize the entire tonal range of the histogram. This is because it requires all three color channels to reach their maximum for clipping, as opposed to just one of the three channels for an RGB histogram.
DESATURATE COLORS
Desaturating the colors in an image is the simplest type of conversion, but often produces inadequate results. This is because it does not allow for control over how the primary colors combine to produce a given grayscale brightness. Despite this, it is probably the most commonly used way of converting into black and white. In Photoshop, this is accomplished by going from Image > Adjustments > Desaturate.
OTHER CONSIDERATIONS
Ordinarily the best results are achieved when the image has the correct white balance. Removal of color casts means that the colors will be more pure, and so the results of any color filter will be more pronounced.
Any black and white conversion which utilizes a significant boost in color saturation may begin to show artifacts, such as increased noise, clipping or loss of texture detail. On the other hand, higher color saturations also mean that each color filter will have a more pronounced effect.
Shoot in RAW mode if possible, as 16-bit (per channel) images allow for the smoothest grayscale tones and greatest flexibility when using color filters. This also gives the ability to fine-tune the white balance based on the desired black and white look.
Recall that the noise levels in each color channel can be quite different, with the blue and green channels having the most and least noise, respectively. Try to use as little of the blue channel as possible to avoid excess noise.
Levels and curves can be used in conjunction with black and white conversion to provide further control over tones and contrast. Keep in mind though that some contrast adjustments can only be made by choosing an appropriate color filter, since this adjusts relative contrast within and between color regions. Care should also be taken when using these because even slight color clipping in any of the individual color channels can become quite apparent in black and white (depending on which channel(s) is/are used for conversion).
There are also a number of third party plug-ins for Photoshop which help automate the process of conversion, and provide additional features such as sepia conversion or adding film grain.