DIGITAL PHOTO EDITING WORKFLOW
This article summarizes the most important steps to incorporate into your digital photo editing workflow (aka "post-processing workflow"). It isn't necessarily a procedure that you'll want to implement with all of your photos, but whenever you want to get that "keeper" looking just right, these steps can make all the difference.
 |
|
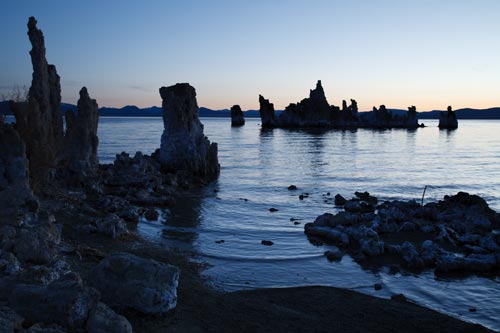
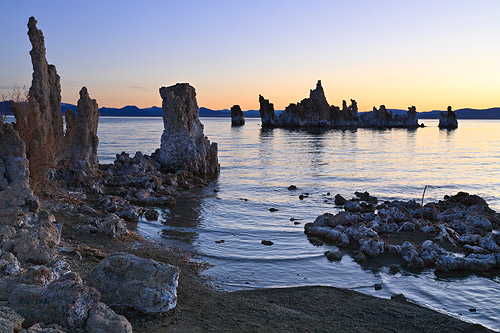
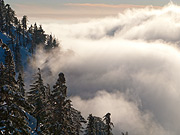
| Before | After |
The "after" image more accurately depicts how the scene appeared in person — a good goal for most photo editing. Only white balance, exposure compensation, shadow recovery and sharpening were applied to produce the "after" image above — all steps described in the workflow below.
OVERVIEW: TOP 10 POST-PROCESSING STEPS
Each is listed roughly in the order that they should be applied:
- White Balance - temperature and tint adjustment sliders
- Exposure - exposure compensation, highlight/shadow recovery
- Noise Reduction - during RAW development or using external software
- Lens Corrections - distortion, vignetting, chromatic aberrations
- Detail - capture sharpening and local contrast enhancement
- Contrast - black point, levels and curves tools
- Framing - straighten and crop
- Refinements - color adjustments and selective enhancments
- Resizing - enlarge for a print or downsize for the web or email
- Output Sharpening - customized for your subject matter and print/screen size
Note: Clicking on any of the steps above (or scrolling down this page) will take you to a quick summary of the most important considerations for each. Within these sections, you can also click on links which will lead you to more in-depth reading on each topic.
The above steps are virtually universal, so most photo editing software should work. If you've captured your images using the RAW file format (highly recommended), then the order of the above steps isn't as important, since they'll be intelligently applied when you develop using your RAW software. Otherwise it's critical that you follow the above sequence — especially with steps involving sharpening, resizing and noise reduction. Be careful though, extreme edits can easily cause image posterization with JPEG files.
1. WHITE BALANCE
Simply getting the white balance right can often make the single biggest improvement in your photo's colors. An incorrect white balance will give your image a color cast, and can dramatically reduce both contrast and color saturation:


-
Controls. First adjust the "temperature" slider, then refine using the "tint" slider. The former controls the relative warmth of the image, whereas the latter controls the magenta-green shift.
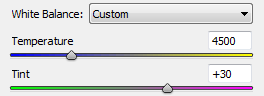
- Problem Scenes. Paradoxically, cameras typically make the biggest white balance mistakes with scenes that are the most dramatically lit (and often could have benefited the most). Pay extra attention to white balance when shooting sunsets, indoor lighting and low-light photos, etc.
- Other Tools. If there's an object somewhere in the image which ought to be neutral gray, you can also use a "white point dropper" (or similarly named tool) to automatically set the white balance so that this object's color cast is subtracted from the entire image.
2. EXPOSURE: COMPENSATION & RECOVERY
This step presumes that you've done everything possible to get an accurate exposure at the time of capture. However, this isn't always possible (or practical).
 Under-Exposure
(clipped shadows in blue)
 Ideal Exposure
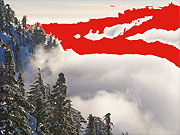 Over-Exposure
(clipped highlights in red)
Fortunately, exposure can be fine-tuned by using the "exposure compensation" adjustment tool. Some general tips include:
- Image Histogram. Use this as an objective guide.
Refer to the following tutorial: Image Histograms: Tones & Contrast - Viewing. View the photo at a small size on-screen to make it easier to judge exposure. Also keep in mind that exposure isn't something that necessarily has a "right" answer; it often also depends on your artistic intent and just "looks right."
Refer to the tutorial on digital exposure techniques for more on this topic. - Extreme Tones. Pay careful attention to whether there are any blown highlights or lost shadow detail. If your software supports it, you might be able to recover these by using the "fill light," "recovery" or "black point" tools.
- Limitations. Avoid excessive compensation; if you increase exposure too much, noise will become visibly worse in the shadows, whereas decreasing it too much will make blown highlights more apparent. In either case, this probably means that your original exposure was way off, and you're likely better off working on a different photo.
3. NOISE REDUCTION
If your image was taken at a high ISO speed, it will likely benefit from noise reduction:
 High Image Noise Original
(taken at high ISO)
 Photo on Left
After Noise Reduction
 Best Case Scenario
(taken at low ISO)
- Order. Noise reduction is most effective when applied before any other image editing (with the exception of steps 1 & 2 above: exposure compensation and white balance).
- Types. Image noise has many types; some are easily removed while others aren't. Fortunately, noise from a high ISO speed is the type that is most easily addressed. Refer to the tutorial on image noise for a background on this topic.
- Limitations. Aim for noise reduction as opposed to complete removal, since the latter can make subjects appear unnaturally smooth. Some noise is OK and even expected.
- Dedicated Software. For problematic images, it is worth experimenting with dedicated noise reduction software such as Neat Image, Noise Ninja, Grain Surgery, or others.
- Sharpening. Noise reduction often goes hand in hand with sharpening, so this step may need to be applied in conjunction with step 4 (depending on your software). This is because they can offset eachother: sharpening increases noise, but noise reduction often decreases sharpness.
- In special cases, another technique is Noise Reduction by Image Averaging
4. LENS CORRECTIONS
The three most problematic (but correctable) lens imperfections include:


")
- Vignetting is most prevalent when you're using low f-stops, although some lenses are also more susceptible to this than others. A little vignetting is often beneficial, since this can draw attention to the image's center and make the frame's edges less abrupt. Also be aware that correcting for vignetting increases image noise near the corners. However, if your vignetting is actually due to physical blockage (such as a lens hood or filter), then this unfortunately cannot be corrected.
- Distortion will be most prevalent when you're using wide angle or telephoto lenses (or are using a zoom lens at either extreme). Don't try to fix this unless it's clearly visible, since doing so can slightly reduce corner resolution and alter your composition. Distortion is often acceptable with landscapes, but not in architectural photos.
- Chromatic Aberration will be most apparent at low f-stops, near the corners of your image and in regions with high contrast detail. When correcting for CA, use a high contrast edge near the image's extreme corner as a guide.
However, be aware that not all types of CA can be easily removed. If the CA doesn't appear to be helped using standard tools, you might also want to try other settings. For example, Lightroom and Adobe Camera RAW have a "fringing" tool which can reduce the more persistent types of CA (but potentially at risk of reducing detail).
For more, also see the tutorial on Improving Image Quality with Lens Corrections
5. DETAIL: SHARPENING, CLARITY & LOCAL CONTRAST
The aim of this step is to offset any inherent softening caused by your camera's sensor and lens ("capture sharpening"). It's also important that it be applied conservatively since you'll also be applying "output sharpening" in a later step. Sharpening should be performed with care because it can exacerbate other image quality issues (such as noise, chromatic aberrations, etc.). However, when done right, it can make a tremendous difference in the perceived quality of your photo:


For a background and specific techniques, refer to these tutorials:
- Guide to Image Sharpening (practical overview)
- Sharpening Using an Unsharp Mask (background on how the USM tool works)
- Understanding Sharpness (background on what factors contribute to sharpness)
- Using Local Contrast Enhancement (a technique for improving clarity)
6. CONTRAST: LEVELS & CURVES TOOLS
Images taken into the sun or near a bright indoor light source often suffer from low contrast (since these are leading causes of lens flare). Improving contrast often gives the long sought after "pop" or 3D look to your images:


- Too much contrast can make your subject look unrealistic if this was actually a trait of your scene (such as photos in the fog or haze).
- Higher contrast can also make colors appear more saturated.
Also refer to the following tutorials:
- Using the Levels Tool (in Photoshop & Other Image Editing Software)
- Using the Curves Tool (in Photoshop & Other Image Editing Software)
7. FRAMING: ROTATE & CROP
The vast majority of snapshots can be dramatically enhanced simply by cropping them to strengthen their composition. While there's no universal rules, some good principles are outlined in the tutorial on composition: the rule of thirds.


You may also want to crop your image so that it exactly matches a given print size (such as 8x10 inches). The aspect ratio of your crop can often be specified within your photo editing software — making this process much easier.
8. REFINEMENTS - COLORS & SELECTIVE ENHANCEMENTS


This is really a catch-all category, but typical adjustments might include:
- Colors - saturation, vibrance and other color adjustments. However, these are often overdone, and frequently aren't necessary if white balance, exposure and contrast have all been properly set.
- Selective Enhancements - spot removal of dust/blemishes (as shown above), creative sharpening (such as at the eyes of someone in a portrait) and selective noise reduction (in otherwise smooth areas such as the sky or skin). Important tools include: the healing brush, clone tool, layer masks and adjustment brushes. Consult your software's help file or manual to browse what options are available.
Once these have been applied, make sure to save a copy of your image, since all subsequent editing steps only depend on how and whether you intend to share this photo. This way you don't have to redo everything each time you plan on using your image for something else. Regardless, at this stage the image should now appear finished when viewed on your screen.
9. RESIZING: UPSIZE FOR PRINT, DOWNSIZE FOR WEB
Whenever you alter the display size of your image, you need to resize the file (using a process called "digital image interpolation"). The resize strategy can be quite different, depending on whether you want to make it larger or smaller.
When enlarging your image for a print:
- Always try to perform enlargements yourself instead of having this done by the printer
(otherwise it's easy to accidentally create prints which appear digital/pixelated). - If you see haloes around sharp edges, then your earlier capture sharpening may have been applied too aggressively (or with too high a radius value).
- Also refer to this tutorial: Optimizing Digital Photo Enlargement
When downsizing your image for the web or email display:
- Avoid introducing non-image patterns such as the moiré artifacts shown below.
- Also refer to this tutorial: Image Resizing for the Web and Email
 Original Image
 Downsized 50%
(unrealistic moiré artifacts)
Either way, what's often even more important than how you resize is that you make sure to follow this up with output sharpening (in the next step).
10. OUTPUT SHARPENING
Output sharpening is generally the very last image editing step applied to an image. Its settings are therefore customized for a particular output device, which may include special considerations based on the size, type and viewing distance of a print. Output sharpening can also offset any softening caused by resizing an image for the web or e-mail.
Refer to the guide to image sharpening for more on this topic.
OTHER RECOMMENDATIONS
- Backups. Once you're done, it's a good idea to make sure that you're properly archiving your digital photos using backup files. It would be a shame to lose all of this hard work spent in photo editing (and in the original photo capture).
- Monitor Calibration. The time spent photo editing is only beneficial if what you see on your screen is accurate. This is absolutely critical. If you haven't done so already, see the tutorial on monitor calibration for digital photography for more on this topic.