
 Helpful Posts:
 Thanks John.Originally Posted by ajohnw

I see what you mean and understand your workflow. Maybe some simple maths can help us to see where we stand. I hope my rusty brain won't let me down, please help me out if you spot any errors.
You stated DOF is your priority and you chose to use f/13. At ISO1250 the camera shot at 1/640sec. Reduce by about four stops, which is what you would lose by going back to ISO100 [1250 > 625 > 312.5 > about 160, take off some more to get to 100] and you would get to roughly 1/60 sec. This, at 34mm and if you have a steady hand, should give you a reasonably sharp image. If not, open up to f/11 or f/8 to get to a more comfortable 1/100sec or faster. I am reasonably confident that if you focused on the tennis table at f/8 you would end up with all the items that matter still in focus.
So you would now have: ISO100, f/8, something around or faster than 1/100 sec. This is a pretty good recipe for an optically well defined image, very low noise, and a steady shot. Exposure would still be a problem in this particular image because the contrast is very high and the sky will tend to clip, but you would have much more latitude for correction and improvement as the image quality would be better.
Also, I would drop P mode altogether and for a case like this use A instead. P mode rarely, if ever, gives you an advantage. I am guilty of not having read the manual of my camera from the beginning to the end, and this is purely my speculation, but I wouldn't be surprised if the camera in P mode did something with its electronics to "improve" your image with some side effects on it. In cases like this it would make little sense to use M mode as for snapshots it just adds extra burden to the user, but A mode and +/- compensation are a cup of tea and perfectly manageable on the fly. It's a solution that will help you being more in control and ultimately save you a lot of processing time and work.
I hope this helps.
Raul
Results 41 to 60 of 60
Thread: A NEF challenge.
-
8th February 2014, 07:07 PM #41

- Join Date
- Jan 2014
- Location
- London, UK
- Posts
- 27
- Real Name
- Raul
Re: A NEF challenge.
-
8th February 2014, 07:14 PM #42

- Join Date
- Jan 2011
- Location
- Whitburn, Sunderland
- Posts
- 2,422
- Real Name
- Robin
Re: A NEF challenge.
Raul - thats a really good point. Dropping the ISO would have significantly increased the DR which would have stopped or at the very least minimised the highlights clipping.
-
8th February 2014, 08:05 PM #43
- Join Date
- Dec 2008
- Location
- New Zealand
- Posts
- 17,660
- Real Name
- Have a guess :)
Re: A NEF challenge.
I work on the basis of losing a stop of DR for each doubling of the ISO - and a scene like that would have had a DR considerably more than your standard 4 stop purely reflective scene. Having said that though, I didn't have any issues with blown highlights; the top left corned was heading that way, but a GND fixed that; so I'd say the exposure ended up being pretty ideal all things considered. Originally Posted by black pearl
@ John, one thing to keep in mind with ISOs ... not all cameras work this way, but many only have fixed gains for amplifying the signal before it hits the ADC. What this means is if you use ISO 200, 400, 800 etc then it'll amplify the signal by 2, 4, 8 etc, but where you have a partial ISO step like 1250 it can't amplify it by 12.5 so it goes for the next highest full stop ISO and then shifts the remainder digitally, which gives you more noise. It doesn't make a lot of difference at low ISO settings anyway, but yours was starting to get up there a bit, which may (or may not) have contributed something.
You could have approached the shot like yours a number of ways; personally, if I was being paid to take that shot I would have shot it on a tripod at 100 ISO and bracketed for gook luck, but at the end of the day, the noise wasn't a big issue, and a quick surface blur killed it pretty much with impunity (it softened the image slightly, but sharpening fixed that) (a surface blur is one of the few occasions where sharpening doesn't increase the noise again if done properly).
-
8th February 2014, 09:30 PM #44

- Join Date
- Aug 2012
- Location
- S, B'ham UK
- Posts
- 3,337
- Real Name
- John
Re: A NEF challenge.
I'm well aware of the high ISO problems. Just seeing what the camera can do. 2000,1250 and probably 800 next. I agree not the sensible thing to do on a shot like this.
 I'll stick with P mode. I came up with it all on my own a long time ago without having seen KR's comments about it - The Professional Mode. I think people often don't understand it. Basically it keeps metering "correct" and will scan though all possible aperture and speed settings at a given ISO. I chose F13, I could do the same with ISO at any setting providing there is sufficient light but the speed would change.
") Lazy mode might be another name for it. I often use it in aperture mode. If at some point I need shutter speed it can be used that way too. It suits some cameras better than others. Usually when a camera has 2 thumb wheels one will switch through the P settings that are available and the other will set compensation. A third to change ISO setting would be wonderful.
Lazy mode might be another name for it. I often use it in aperture mode. If at some point I need shutter speed it can be used that way too. It suits some cameras better than others. Usually when a camera has 2 thumb wheels one will switch through the P settings that are available and the other will set compensation. A third to change ISO setting would be wonderful.
I usually treat ISO like film - look out of the window and say oh a 400 ASA day or what ever.
Looking at pixel values I am surprised how much DR is there but there is loads of noise.
Sort of taking Colin's advice I did yet another one. The tone curve can only be adjusted at the expense of tone elsewhere so as per the last one I posted. I adjusted each end as I wanted it leaving the building flat and then brushed in another curve on the building surface and windows. (Actually I used the same file so clouds could be better but couldn't leave the rest like it was.).

 I could have done it a little more evenly in a couple of places but i have a feeling that's the building. On the other hand cooking toad in the hole while doing it might have done something as well. This version will take a 50% reduction only. Larger than that and more noise removal would be needed. That relates to why I am using higher ISO's just to see what I might be able to crop out of say a bird or animal shot. They often don't fill the frame.
John
-
-
8th February 2014, 10:25 PM #45
- Join Date
- Dec 2008
- Location
- New Zealand
- Posts
- 17,660
- Real Name
- Have a guess :)
Re: A NEF challenge.
Tone-wise, that's the best yet, but it's awfully soft -- needs some serious sharpening (which will in-turn affect the tones, but I think they'll be fine in this case). Originally Posted by ajohnw
-
8th February 2014, 10:38 PM #46
- Join Date
- Jan 2011
- Location
- Whitburn, Sunderland
- Posts
- 2,422
- Real Name
- Robin
Re: A NEF challenge.
Definitely needs a fair bit of sharpening but it still looks....unusual.
I'm searching for a word and can't decide between plasticy or fake. I don't want to come across in the wrong way but none of your edits look anyway near real. They either have an overly harsh, tone-mapped look to them or a weird paleness with a lack of bite. It could be the screens on my iMac/iPhone/iPad as they all display things in a similar manner but I don't have access to a MS computer to compare on a different platform.
The edit I did had very little major done to it other than mild shadow adjustment - mild noise reduction - ticking the CA box and a few minor tweaks.
Can you post an image without the multiple (complicated) processes you have done previously and just tweak it?
-
8th February 2014, 10:46 PM #47
- Join Date
- Dec 2008
- Location
- New Zealand
- Posts
- 17,660
- Real Name
- Have a guess :)
Re: A NEF challenge.
I'm afraid that I have to agree with Robin on this one. To be honest, it almost seems like you're missing the "easy" approach, and trying to over-compensate with other approaches. Originally Posted by black pearl
Honestly, this was VERY straight-forward edit - no complicated selects or masks required, just basic tone control & sharpening with (due to the ISO) a touch of noise reduction (and in some cases CA reduction, that I didn't bother with since I was only presenting a low-res final result). Over and above that, all I did was a tiny amount of local contrast enhancement by virtue of a burn tool set to shadows over the building, and minor different sharpening treatment due to the different frequency of the grass -v- the building.
It really shouldn't take more than 2 or 3 minutes to get a 98% optimal result.
-
8th February 2014, 11:41 PM #48

- Join Date
- Mar 2012
- Location
- Madrid
- Posts
- 155
- Real Name
- Patrick
Re: A NEF challenge.
Hi Colin, your edit of the image is excellent as always so I'd like to ask you a couple things if you don't mind. Originally Posted by Colin Southern
How do you identify the different frequencies of the grass and building (with the histogram?) and how much difference does there need to be before you think they should be treated separately? (Generally speaking)
Also, is there any difference between using a surface blur instead of noise reduction software/plug-in?
-
9th February 2014, 12:20 AM #49
- Join Date
- Aug 2012
- Location
- S, B'ham UK
- Posts
- 3,337
- Real Name
- John
Re: A NEF challenge.
I reckon it's a soft lens and there must be something wrong with it but noise removal which mostly relates to the building walls seems to make it go that way. The word I used was pasty. The grass on the other hand is realistic, roof fairly so and the other bits and pieces. The white window frames aren't too bad. I had to use a very steep tone curve to get it were it is and doubt if a steeper one is feasible.
It turns out Fotoxx has a feature. I can apply the tone curve to the whole image and see what it does to the bits that need it. Apply and undo it and then use a brush recalling the last tone curve settings.  It doesn't work out so well if a tone curve has been applied to the whole image - recall then and it does it again rather than just waiting for the user to change it.
The thing I noticed regarding Colin and sharpening is the row of doors and the lattice brick work on the balcony. It's definitely fuzzy and shouldn't be. I could reduce it more which would help but suggested 1600 or so pixel wide shots. It already had rather a lot.
Interesting point on ISO values Colin. Things like that usually go in steps of 8,16,32 etc all the way up to 256 or even more is feasible. I think I will set base ISO and switch to 1/2 stop or whole stop changes - having 1/3 on that is a bit pointless anyway.
Using Rawtherapee's clever sharpening which can be tone controlled the highest I could get was rather a lot with a small rad. Convention numbers 55 with a rad of 1 but without the tone control more noise came up and the halo effects were more apparent.. Basically the amount applied is tapered of to zero at full white and max at say 70%. I also limited the range into black a bit as it helped with the noise on the end wall and in the shutters. Upping the rad made it worse.

John
-
-
9th February 2014, 12:31 AM #50
- Join Date
- Dec 2008
- Location
- New Zealand
- Posts
- 17,660
- Real Name
- Have a guess :)
Re: A NEF challenge.
Hi Patrick,
Thanks and yep, that's fine. Originally Posted by Sponge
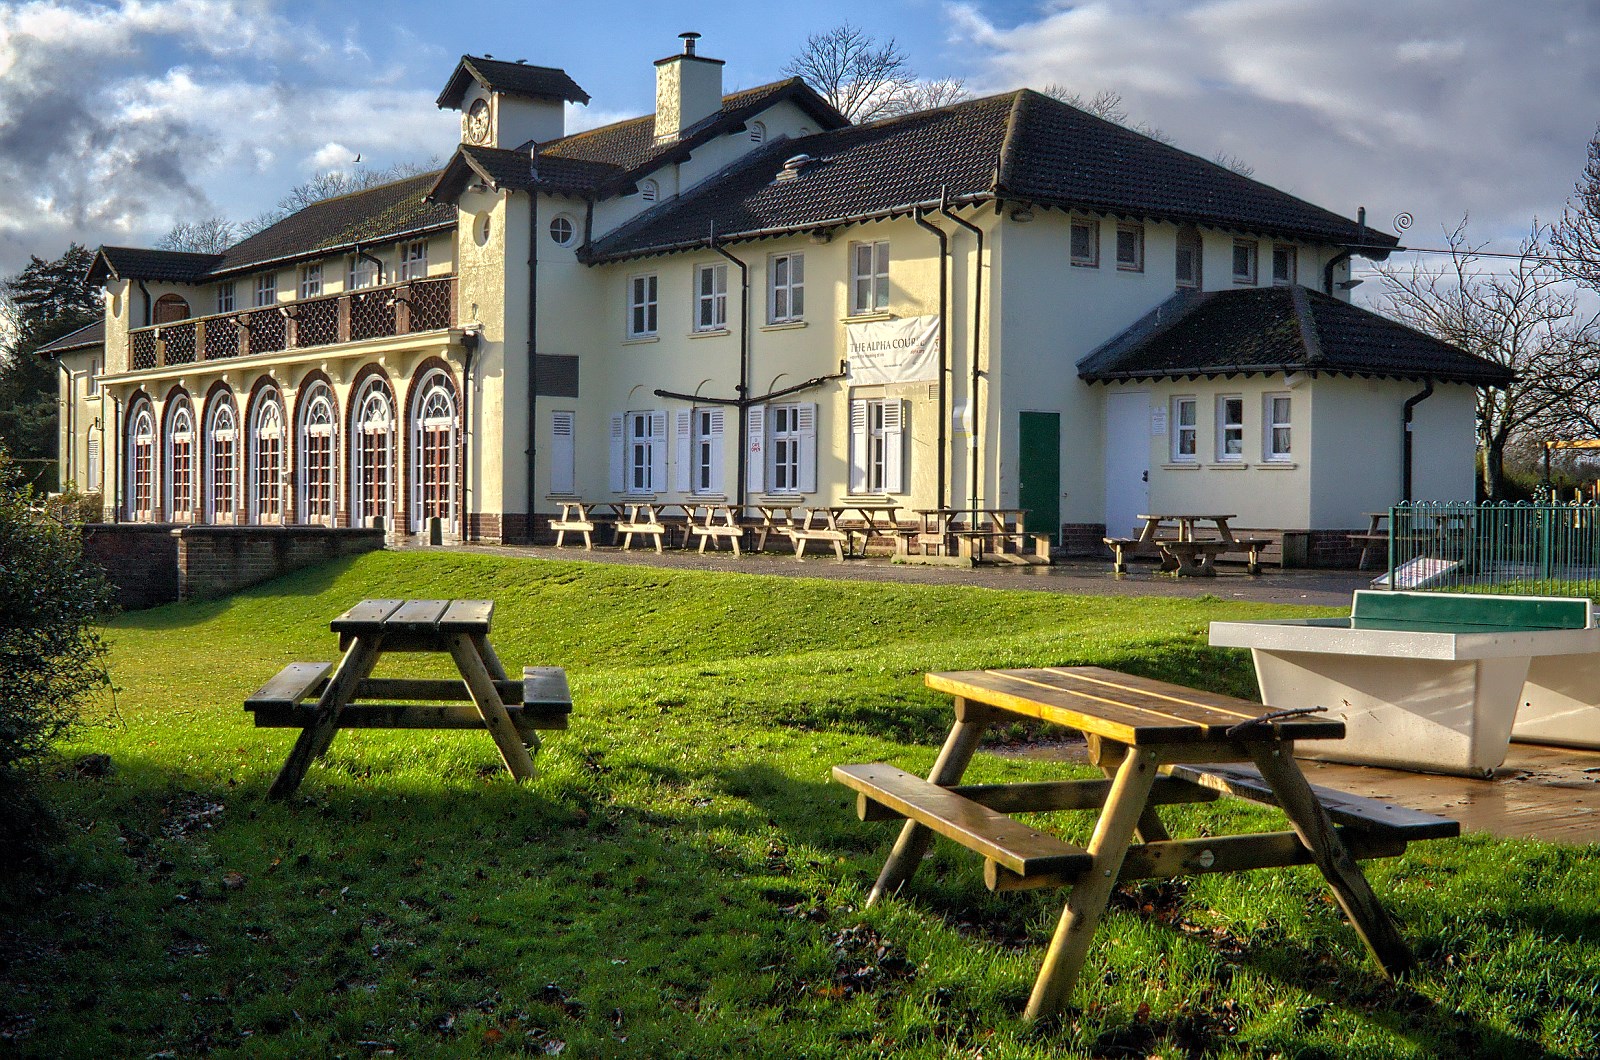
"Frequency" is a fancy-sounding word, but in reality it's simply meaning how much small detail is in the shot. Ex grass has a lot of detail and a photo of a plain wall in a house would have very little detail (low-frequency). That in turn affects sharpening. Take the following image as an example ...How do you identify the different frequencies of the grass and building (with the histogram?) and how much difference does there need to be before you think they should be treated separately? (Generally speaking)
Look closely at the pillars below the deck that extend down to the water; you'll see a single pixel outline that makes them standout from the gray surrounds. That's a very low frequency area and the single pixel high-contrast halo has the effect you see; on this occasion you wouldn't want a halo that was, say, 15 pixels (it would be too obvious). Similarly, if you used this the same type of sharpening in John's photo you'd get "frosting" as the single pixel halo was applied around each blade of grass.
In contrast, where you have large low-frequency areas like the building, you don't need a sharpening halo to be as intense, but you do need it to be wider (it has the effect of defining edges and drawing the eye to them).
All sounds rather complicated, but usually it's simply a case of starting sharpening with an educated guess, and then just looking at the results. Usually I don't need to apply separate sharpening treatments to different areas, but if I do, it's a piece of cake; usually I'll just duplicate the layer then erase what's not needed or use the history brush to roll back only affected areas. It may sound like that's going to be a lot of detailed work, but the reality is that with a soft brush you can be VERY ham-fisted and it's nigh-on impossible to see any issues.
Does that help?
PS: I should add that one needs to be VERY careful to consider the resolution of the image they're working with; I'm mentioning 1 pixel halos above, but that's on a resulting down-sampled image; at the time (on a full resolution image) they were probably applied as a 4 pixel halo
To be honest, I've tried quite a few plugins and in my opinion, they're all a waste of money. Looking at the big picture I don't believe that they do anything any better than what's already built into Photoshop; Photoshop just requires a bit of experience with equivalent techniques, which aren't hard. Probably the single best example I know is "portrait professional" (which in my opinion is somewhat of a paradox in that the results I've seen are anything but professional) (fastest way I know to turn a model into a mannequin!); I'll guarantee I can do a better job manually working through many different areas. So IMO anyway, often (but not always) plugins are for lazy people who don't make the effort to learn their craft) (note: often, but not always).Also, is there any difference between using a surface blur instead of noise reduction software/plug-in?
-
9th February 2014, 12:54 AM #51
- Join Date
- Mar 2012
- Location
- Madrid
- Posts
- 155
- Real Name
- Patrick
Re: A NEF challenge.
You bet it does! Thank you for taking the time to explain it so well. Originally Posted by Colin Southern
-
9th February 2014, 09:31 AM #52
- Join Date
- Jan 2011
- Location
- Whitburn, Sunderland
- Posts
- 2,422
- Real Name
- Robin
Re: A NEF challenge.
John, I'm with Colin on this one - you still seem to be over-complicating things and using all sorts of unusual techniques where they simply aren't needed.
This isn't perfect as I've dropped down to the very minimum number of steps I possibly can but I still feel the end example looks far more real and less plastic than the ones you have posted.
This is the file as presented with every slider in the default position:

A quick adjustment of the various controls (took about a minute) to get an image that looks fairly decent:

That same file above now in Photoshop and resized to 1600 pixels shown with some Smart Sharpen applied:

I've down sized these as the original screen shots are huge but on the last one you can clearly see there is no visible noise and it is biting sharp. I did apply some basic noise reduction in Camera RAW (it is on a separate tab and didn't grab the screen but all I did was push the slider to 30) and I did tick the Remove Chromatic Aberrations box as they were quite harsh. Nothing else though. No layers, no other bits of software, by passes, brushes, tone mapping, curves....now't.
Quite often when creating a photograph - less is more.
-
9th February 2014, 10:04 AM #53
- Join Date
- Dec 2008
- Location
- New Zealand
- Posts
- 17,660
- Real Name
- Have a guess :)
Re: A NEF challenge.
Or at least that's what you tell the scantily-clad model! Originally Posted by black pearl
-
9th February 2014, 10:48 AM #54
- Join Date
- Jan 2014
- Location
- London, UK
- Posts
- 27
- Real Name
- Raul
Re: A NEF challenge.
Thanks Robin. I know that many images can be adjusted and fixed, however I came a while ago to the conclusion that the best improvement you can make is to set your camera to deliver the best possible quality for the circumstances and avoid extra work as much as possible. Originally Posted by black pearl
-
9th February 2014, 12:32 PM #55
- Join Date
- Aug 2012
- Location
- S, B'ham UK
- Posts
- 3,337
- Real Name
- John
Re: A NEF challenge.
I use a totally different tool chain Robin and always will. My initial aims are also different to both yours and Colin's. My aim was a decent shot at 100% resoluton. Raul came closest to that but if you look at the image at 100%
http://farm8.staticflickr.com/7356/1...86465a4d_o.jpg
you will see some remaining problems. That approach doesn't take all that long really. I suggested 1600 pixel wide shots as that ties down how much noise removal is needed. Seems more like 2000 is feasible. My last one was aimed at 50% and an easier approach. A few mins converting from raw + another playing with 2 controls in it that I haven't used before. Brushing the building took longer mainly because I did it twice - the 1st one was too weak. Basically this was following Colin's advice - leaving room for manoeuvre except I left it in the middle not at the ends of the histogram. It's soft because of the noise removal and what the lens produces - more size reduction would help mask both.
Next comes taste. It varies. When I looked at the scene the shadows where no where near as apparent as in any of the attempts. Looks like Raul feels the same. This aspect particularly applies to the shadow from the bushes bottom left. I will always brighten that sort of thing up as much as I can. That means that I can't allow any significant black clipping from raw but it's a fact that a camera wont match and eye view in many similar situations. It can if HDR is used such as the shot Colin posted of his parents home - I suspect.
When I use tone mapping it isn't PS style. In fact the image hardly changes at all - just a note.
Frankly having played with it and as it's running on Linux I have to make things update by clicking all over the place if I was a Nikon owner running windows and wanted a quick solution I would use NEX2. I can't fine tune but have to guess an adjustment and then make both the adjustment and the image update. Tongue in cheek I pushed "Nikon Colours" a bit too far. Sorry about that. If some one can tell me how to save image files from it I will have a go at seeing what it can produce - that aspect doesn't seem to be obvious. This is a screen shot taken out of ViewNX2. Noise can be seen. It's obviously reduced it some what. It wont allow any more shadow recovery than this. That probably needs NX2 and in all probability need the use of curves or maybe levels. It curious not seeing an image save anywhere in ViewNX2

Nikon do there own thing in several places as was noted in a recent post after a fashion. I'm having that problem as well in respect to ICC files. This was a 2min job despite the difficulties.
Rawtherapee offers very similar controls that Robin posted but tastes vary again. I don't favour working that way. There is another package that interests me that I may take the time to get into at some point but more for it's "unusual" photo capabilities. That's this one. It's mostly slider based but does have curves. I prefer working with those.
http://www.flickr.com/groups/photivo/pool/
It seems I need to repeat that my approach to this all along has been 100% resolution results. Raul's shown there may be some mileage in that. Me I have used less and less noise reduction shot by shot but still to much at the size I have posted at. Real / natural. Other than softening the last one was more real than any of the others in a number of respects but mostly tone.
Size matters.
John
-Last edited by ajohnw; 9th February 2014 at 12:38 PM.
-
11th February 2014, 09:47 PM #56

- Join Date
- Mar 2010
- Posts
- 26
Re: A NEF challenge.
-
12th February 2014, 11:40 AM #57
- Join Date
- Aug 2012
- Location
- S, B'ham UK
- Posts
- 3,337
- Real Name
- John
Re: A NEF challenge.
Another successful one Pebal.
I had yet another go aiming for 50% full sized and no local retouching. Maybe a bit contrasty and a touch too sharp? Also wish that I had bought the shadow up more. Building colour much more correct now - RB manual balance so it looks like I need a better ICC file.
80% quality jpg

Looks too dark at a small size. Something else I need to watch for. Fill the screen and it's ok to me.
Take that back - if I fill the screen with the 100% image brightness is ok. 50% won't fill it.
John
-Last edited by ajohnw; 12th February 2014 at 11:46 AM.
-
12th February 2014, 12:03 PM #58
- Join Date
- Aug 2012
- Location
- S, B'ham UK
- Posts
- 3,337
- Real Name
- John
Re: A NEF challenge.
The full sized version.
http://www.23hq.com/ajohnw/photo/15418721/original
John
-
-
12th February 2014, 12:21 PM #59

- Join Date
- Jun 2012
- Location
- Suva, Fiji
- Posts
- 7,076
- Real Name
- Grahame
Re: A NEF challenge.
John, Originally Posted by ajohnw
To save an image in ViewNX2 you can use the 'Convert File' function at the far right end of the menu buttons.
You may also be interested in what I have come across in ViewNX2 posted on a thread today.
Grahame
-
12th February 2014, 01:40 PM #60
- Join Date
- Aug 2012
- Location
- S, B'ham UK
- Posts
- 3,337
- Real Name
- John
Re: A NEF challenge.
It wont save correctly running under Wine on Linux. I did one with a little more care using Neutral Picture Control aka tone curve and took a screen shot. As you can see colours are near perfect. Nikon just wont allow people to have a camera ICC/ICM file. There are bits and pieces about on the web concerning viewing NEF files in ViewNX2 and finding the ICM file it generates on the fly. Doesn't work. They must use there own added information to get the final result. In fact from what I have seen the colour channel scaling is entirely different as well and corrected during processing. Originally Posted by Stagecoach
No specific noise control and couldn't keep clouds in and shadows up - I suspect NX2 is needed to do that.

John
-

 Reply With Quote