GUIDE TO IMAGE SHARPENING
Image sharpening is a powerful tool for emphasizing texture and drawing viewer focus. It's also required of any digital photo at some point — whether you're aware it's been applied or not. Digital camera sensors and lenses always blur an image to some degree, for example, and this requires correction. However, not all sharpening techniques are created equal. When performed too aggressively, unsightly sharpening artifacts may appear. On the other hand, when done correctly, sharpening can often improve apparent image quality even more so than upgrading to a high-end camera lens.
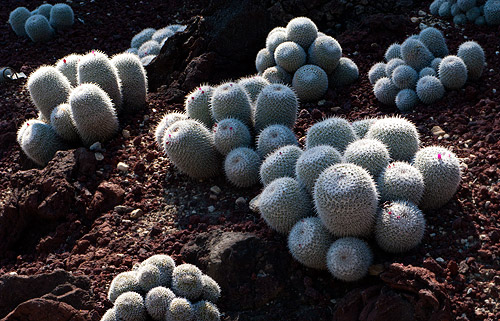
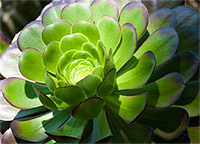
sharp cacti at the Huntington Gardens - Pasadena, California
HOW IT WORKS
Most image sharpening software tools work by applying something called an "unsharp mask," which despite its name, actually acts to sharpen an image. Although this tool is thoroughly covered in the unsharp mask tutorial, in a nutshell it works by exaggerating the brightness difference along edges within an image:

 Original

 Sharpened
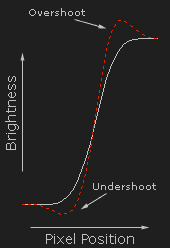
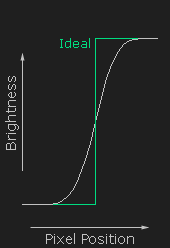
Note that while the sharpening process isn't able to reconstruct the ideal image above, it is able to create the appearance of a more pronounced edge (see sharpness: acutance & resolution). The key to effective sharpening is walking the delicate balance between making edges appear sufficiently pronounced, while also minimizing visible under and overshoots (called "sharpening halos").


note: all images shown at 200% zoom to improve visibility
SETTINGS
Fortunately, most of the sharpening settings within image-editing software are reasonably standardized. One can usually adjust at least three settings:
| Setting | How It Works |
|---|---|
| Radius | Controls the size of the edges you wish to enhance, where a smaller radius enhances smaller-scale detail. You'll usually want a radius setting that is comparable to the size of the smallest detail within your image. |
| Amount | Controls the overall strength of the sharpening effect, and is usually listed as a percentage. A good starting point is often a value of 100%. |
| Threshold (Masking) |
Controls the minimum brightness change that will be sharpened. This can be used to sharpen more pronounced edges, while leaving more subtle edges untouched. It's especially useful to avoid sharpening noise. |
| Detail (if avail.) |
Controls the relative sharpening of fine versus coarse detail (within a given radius value), in addition to affecting the overall strength of sharpening. Higher values emphasize fine detail, but also increase the overall sharpening effect. You will therefore likely need to adjust this setting in conjunction with the amount/percent setting. |
It's generally advisable to first optimize the radius setting, then to adjust the amount, and then finally to fine-tune the results by adjusting the threshold/masking setting (and potentially other settings such as "detail"). Optimal results may require a few iterations.
SHARPENING WORKFLOW
Most photographers now agree that sharpening is most effective and flexible when it's applied more than once during image editing. Each stage of the sharpening process can be categorized as follows:

 Accounts for your image's source device, along with any detail & noise characteristics
 Uniquely accounts for your image's content & artistic intent

 Accounts for final output medium, after editing/resizing
(1) Capture sharpening aims to address any blurring caused by your image's source, while also taking image noise and detail into consideration. With digital cameras, such blurring is caused by the camera sensor's anti-aliasing filter and demosaicing process, in addition to your camera's lens. Capture sharpening is required for virtually all digital images, and may be applied automatically by the camera for photos which are saved as JPEG files. It also ensures the image will respond well to subsequent rounds of sharpening.
(2) Creative sharpening is usually applied selectively, based on artistic intent and/or image content. For example, you might not want to apply additional sharpening to a smooth sky or a person's skin, but you may want to crank up the sharpness in foliage or a person's eye lashes, respectively. Overall though, its use may vary wildly from photo to photo, so creative sharpening is really a "catch all" category. It's also the least used stage since it can also be the most time-consuming.
(3) Output sharpening uses settings customized for a particular output device, and is applied at the very end of the image editing workflow. This may include special considerations based the size, type and viewing distance of a print, but it can also be used to offset any softening caused by resizing an image for the web or e-mail.
Overall, the above sharpening workflow has the convenience of being able to save edited images at a near-final stage. When printing or sharing one of these images, all that is needed is a quick top-off pass of sharpening for the output device. On the other hand, if all sharpening were applied in a single step, then all image editing would have to be re-done every time you wished share/print the photo using a different output device.
Note: the above capture, creative and output sharpening terminology was formally introduced in
Real World Image Sharpening by Bruce Fraser & Jeff Schewe. Highly recommended.
STAGE 1: CAPTURE SHARPENING
Capture sharpening is usually applied during the RAW development process. This can either occur automatically in your camera, when it saves the image as a JPEG, or it can occur manually using RAW software on your computer (such as Adobe Camera RAW - ACR, Lightroom or any other RAW software that may have come with your camera).
Automatic Capture Sharpening. Although most cameras automatically apply capture sharpening for JPEG photos, the amount will depend on your camera model and any custom settings you may have applied. Also be aware that the preset shooting modes will influence the amount of capture sharpening. For example, images taken in landscape mode are usually much sharper than those taken in portrait mode. Regardless, optimal capture sharpening requires shooting using the RAW file format, and applying the sharpening manually on your computer (see below).
Manual Capture Sharpening requires weighing the advantages of enhancing detail with the disadvantages of amplifying the appearance of image noise. First, to enhance detail, sharpen using a radius value that is comparable to the size of the smallest details. For example, the two images below have vastly different levels of fine detail, so their sharpening strategies will also need to differ:
 Coarse (Low Frequency) Detail
Sharpening Radius: 0.8 pixels
 Fine (High Frequency) Detail
Sharpening Radius: 0.4 pixels
Note: The sharpening radii described above are applied to the full resolution images
(and not to the downsized images shown above).
Shooting technique and/or the quality of your camera lens can also impact the necessary sharpening radius. Generally, well-focused images will require a sharpening radius of 1.0 or less, while slightly out of focus images may require a sharpening radius of 1.0 or greater. Regardless, capture sharpening rarely needs a radius greater than 2.0 pixels.
 Soft Original
 Radius Too Small
(0.2 pixels)
 Radius Too Large
(2.0 pixels)
 Radius Just Right
(1.0 pixels)
When trying to identify an optimum sharpening radius, make sure to view a representative region within your image that contains the focal point and/or fine detail, and view it at 100% on-screen. Keep an eye on regions with high contrast edges, since these are also more susceptible to visible halo artifacts. Don't fret over trying to get the radius "accurate" within 0.1 pixels; there's an element of subjectivity to this process, and such small differences wouldn't be distinguishable in a print.
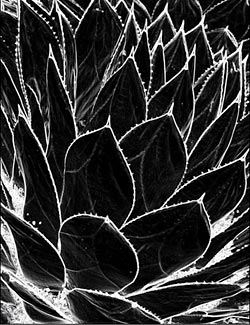
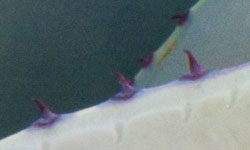
When noise is pronounced, capture sharpening isn't always able to be applied as aggressively and uniformly as desired. One often has to sacrifice sharpening some of the really subtle detail in exchange for not amplifying noise in otherwise smooth regions of the image. Using high values of the threshold or masking settings help ensure that sharpening is only applied to pronounced edges:

| Original Image | Sharpening Mask |
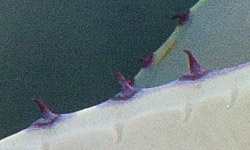
With sharpening threshold/masking:

Move your mouse over above images
to see the unsharpened original.
The value used for the "masking" setting above was 25.
Note how the masking/threshold setting was chosen so that only the edges of the cactus leaves are sharpened (corresponding to the white portions of the sharpening mask above). Such a mask was chosen because it doesn't worsen the appearance of image noise within the otherwise textureless areas of the image. Also note how image noise is more pronounced within the darker regions.
If image noise is particularly problematic, such as with darker tones and/or high ISO speeds, one might consider using a creative sharpening technique, or using a third-party noise reduction plug-in. At the time of this writing, common plug-ins include Neat Image, Noise Ninja, Grain Surgery & Noiseware. However, noise reduction should always be performed before sharpening, since sharpening will make noise removal less effective. One may therefore need to postpone sharpening during RAW development until noise reduction has been applied.
STAGE 2: CREATIVE SHARPENING
While creative sharpening can be thought of as just about any sharpening which is performed between capture and output sharpening, its most common use is to selectively sharpen regions of a photograph. This can be done to avoid amplifying image noise within smooth areas of a photo, or to draw viewer attention to specific subjects. For example, with portraits one may want to sharpen an eye lash without also roughening the texture of skin, or with landscapes, to sharpen the foliage without also roughening the sky.
The key to performing such selective sharpening is the creation of a mask, which is just a way of specifying where and by how much the creative sharpening should be applied. Unlike with the output sharpening example, this mask may need to be manually created. An example of using a mask for creative sharpening is shown below:
 Image Used for Creative Sharpening
Move your mouse over the image to see
selective blurring applied to background
Sharpening Mask:
 Selective Sharpening Using a Mask
Top layer has creative sharpening applied;
mask ensures this is only applied to the white regions.
To apply selective sharpening using a mask:
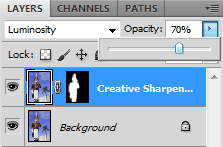
- Sharpen Duplicate. Make a duplicate of your image (with capture sharpening and all other editing applied), then apply creative sharpening to the entire image. This sharpening can be very aggressive since you can always fine-tune it later.
- Create Mask. In Photoshop, use the menus Layer > New > Layer..., or the Shift+Ctrl+N keys.
- Paint Mask. Select the layer mask (by left-clicking on it). Paint regions of the image with white and/or black when you want creative sharpening to remain visible or hidden in the final image, respectively. Shades of gray will act partially.
- Fine-Tune. Reduce the opacity of the top layer if you want to lessen the influence of creative sharpening. You can also change the blending mode of this layer to "Luminosity" to reduce color artifacts.
Alternatively, sometimes the best technique for selectively sharpening a subject is to just blur everything else. The relative sharpness difference will increase — making the subject appear much sharper — while also avoiding over-sharpening. It can also lessen the impact of a distracting background. Move your mouse over the top left image to see this technique applied to the previous example.
Another way of achieving the same results is to use a brush, such as a history, "sharpen more" or blurring brush. This can often be simpler than dealing with layers and masks. Sometimes this type of creative sharpening can even be applied along with RAW development by using an adjustment brush in ACR or Lightroom, amongst others.
Overall, the options for creative sharpening are virtually limitless. Some photographers also apply local contrast enhancement (aka "clarity" in Photoshop) during this stage, although one could argue that this technique falls into a different category altogether (even though it still uses the unsharp mask tool).
STAGE 3: OUTPUT SHARPENING FOR A PRINT
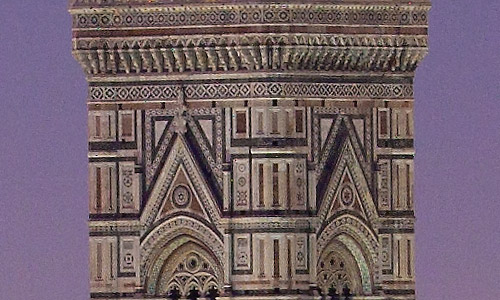
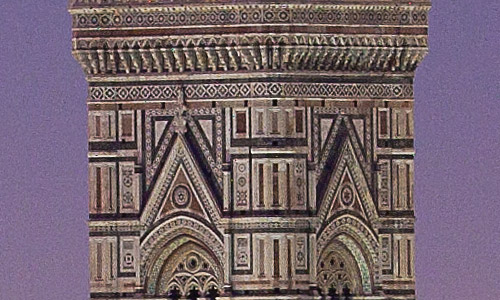
After capture and creative sharpening, an image should look nice and sharp on-screen. However, this usually isn't enough to produce a sharp print. The image may have also been softened due to digital photo enlargement. Output sharpening therefore often requires a big leap of faith, since it's nearly impossible to judge whether an image is appropriately sharpened for a given print just by viewing it on your computer screen. In fact, effective output sharpening often makes an on-screen image look harsh or brittle:
 |
||
| Original Image | Output Sharpening Applied for On-Screen Display |
Output Sharpening Applied for a 300 PPI Glossy Print |
Photograph of the Duomo at dusk - Florence, Italy (f/11.0 for 8.0 sec at 150 mm and ISO 200)
Output sharpening therefore relies on rule of thumb estimates for the amount/radius based on the (i) size and viewing distance of the print, (ii) resolution of the print (in DPI/PPI), (iii) type of printer and (iv) type of paper. Such estimates are often built into RAW development or image editing software, but these usually assume that the image has already had capture sharpening applied (i.e., it looks sharp when viewed on-screen).
Alternatively, one can also estimate the radius manually using the calculator below:
**PPI = pixels per inch; see tutorial on "Digital Camera Pixels." DPI is often used interchangeably with PPI, although strictly speaking, the two terms can have different meanings.
*It's generally a good estimate to assume that people will be viewing a print at a distance which is roughly equal to the distance along the print's diagonal.
The above radius estimates should only be taken as a rough guideline. In general, a larger viewing distance demands a larger output sharpening radius. The key is to have this radius small enough that it is near the limit of what our eyes can resolve (at the expected viewing distance), but is also large enough that it visibly improves sharpness.
Regardless, the necessary amount of sharpening will still likely depend on the image content, type of paper, printer type and the look you want to achieve. For example, matte/canvas papers often require more aggressive sharpening than glossy paper. A good starting point is always the default amount/percent value used by your image editing software. However, for mission-critical prints this best solution is often just trial and error. To save costs, you can always print a cropped sample instead of the full print.
STAGE 3: OUTPUT SHARPENING FOR THE WEB & EMAIL
Even if an image already looks sharp when viewed on-screen, resizing it to less than 50% of its original size often removes any existing sharpening halos. One usually needs to apply output sharpening to offset this effect:
 Original Image

| Softer Downsized Image |
| Downsized Image (after output sharpening) |
Move your mouse over the buttons on the right to see the effect of output sharpening.
For downsized images, an unsharp mask radius of 0.2-0.3 and an amount of 200-400% works almost universally well. With such a small radius value, one doesn't have to worry about halo artifacts, although new problems such as aliasing/pixelation and moiré may become apparent if the amount/percent is set too high.
For more on image downsizing, see the tutorial on image resizing for the web and e-mail.
ADDITIONAL SHARPENING ADVICE
- Sharpening is irreversible; also save unsharpened originals whenever possible.
- RAW & TIFF files respond much better to sharpening than JPEG files, since the former preserve more detail. Furthermore, sharpening may amplify JPEG compression artifacts.
- Blurring due to subject motion or some types of camera shake may require advanced techniques such as deconvolution or Photoshop's "smart sharpen" tool.
- Some camera lenses do not blur objects equally in all directions (see tutorial on camera lens quality - astigmatisms). This type of blur tends to increase farther from the center of the image, and may be in a direction which is either (i) away from the image's center or (ii) perpendicular to that direction. This can be extremely difficult to remove, and usually requires creative sharpening.
- Images will often appear sharper if you also remove chromatic aberrations during RAW development. This option can be found under the "lens corrections" menu in Adobe Camera RAW, although most recent photo editing software offers a similar feature.
- Grossly over-sharpened images can sometimes be partially recovered in Photoshop by (i) duplicating the layer, (ii) applying a gaussian blur of 0.2-0.5 pixels to this layer 2-5 times, (iii) setting the blending mode of this top layer to "darken" and (iv) potentially decreasing the layer's opacity to reduce the effect.
- The light sharpening halos are often more objectionable than the dark ones; advanced sharpening techniques sometimes get away with more aggressive sharpening by reducing the prominence of the former.
- Don't get too caught up with scrutinizing all the fine detail. Better photos (and more fun) can usually be achieved if this time is spent elsewhere.
RECOMMENDED READING
If you're thirsting for additional examples, along with a more thorough technical treatment of the above topics, a great book is Real World Image Sharpening (2nd Edition) by Bruce Fraser & Jeff Schewe.