LOCAL CONTRAST ENHANCEMENT
Local contrast enhancement attempts to increase the appearance of large-scale light-dark transitions, similar to how sharpening with an "unsharp mask" increases the appearance of small-scale edges. Good local contrast gives an image its "pop" and creates a three-dimensional effect — mimicking the look naturally created by high-end camera lenses. Local contrast enhancement is also useful for minimizing the effect of haze, lens flare, or the dull look created by taking a photograph through a dirty window.
VISUALIZING LOCAL CONTRAST


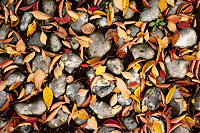
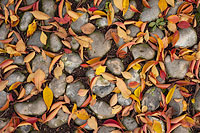
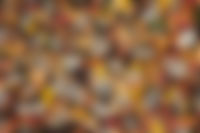
When viewed at a distance, note how the large-scale features are much more pronounced for the image with high local contrast, despite the lack of resolution. Both resolution and local contrast are essential to create a detailed, three-dimensional final image.
CONCEPT
The trick with local contrast enhancement is that it increases "local" contrast in smaller regions, while at the same time preventing an increase in "global" contrast — thereby protecting large-scale shadow/highlight detail. It achieves this feat by making some pixels in the histogram cross over each other, which is not possible when enhancing contrast using levels or curves.
Local contrast enhancement works similarly to sharpening with an unsharp mask, however the mask is instead created using an image with a greater blur distance. This creates a local contrast mask which maps larger-scale transitions than the small-scale edges which are mapped when sharpening an image.
and Create Mask
–
Original
–
Blurred Copy
=
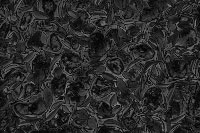
Local Contrast Mask
Contrast at Transitions
–
Higher Contrast Original
+
Local Contrast Mask
+
Original
=
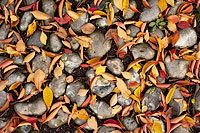
Final Image
Note: The "mask overlay" is when image information from the layer above the local contrast mask passes through and replaces the layer below in a way which is proportional to the brightness in that region of the mask. The upper image does not contribute to the final for regions where the mask is black, while it completely replaces the layer below in regions where the local contrast mask is white.
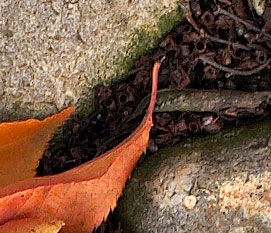
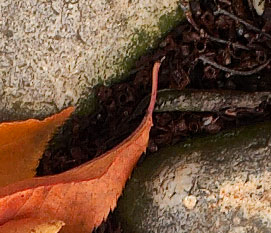
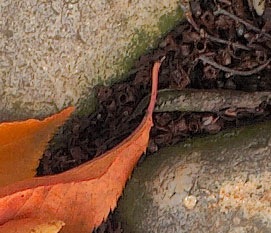
The difference between the original and final image is often subtle, but should show a noticeable increase in clarity. In order to fully see this effect, one needs to examine the images up close. Move your mouse on and off of "local contrast enhancement" and then "high contrast" in order to see their influence on the tones within the image below:
 See the Differences:
| Original | Local Contrast Enhancement | High Contrast |
Note how it creates more contrast near the transition between the rocks and dirt, but preserves texture in large-scale light and dark regions. Pay special attention to the dirt in between the rocks and how this region becomes very dark for the high contrast image, but is preserved for local contrast enhancement. The effect above is quite strong to aid in visualization; local contrast enhancement is often less pronounced.
IN PRACTICE
Fortunately, performing local contrast enhancement in Photoshop and other image editing programs is quick and easy. It is identical to sharpening with an unsharp mask, except the "radius" is much larger and the "percentage" is much lower. The unsharp mask can be accessed in Adobe Photoshop by clicking on the following drop-down menus: Filter > Sharpen > Unsharp Mask.
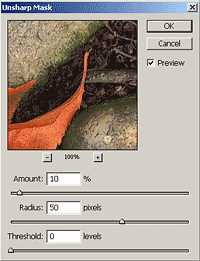
Amount is usually listed as a percentage, and controls the magnitude of each overshoot. This can also be thought of as how much contrast is added at the transitions. Amount is typically 5-20%.
Radius controls the amount to blur the original for creating the mask, shown by "blurred copy" in the illustration above. This affects the size of the transitions you wish to enhance, so a smaller radius enhances smaller-scale detail. Radius is typically 30-100 pixels.
Threshold sets the minimum brightness change that will be sharpened. This is rarely used in local contrast enhancement, but could be set to a non-zero value to only enhance contrast at the most prominent edges. Threshold is typically set to 0.
Much more so than with sharpening, the radius setting is strongly influenced by your image size and the scale of the light-dark transitions you wish to enhance. High resolution images, or those where light-dark transitions are large, require using a larger radius value. Very low resolution images may require a radius even less than 30 pixels to achieve the effect.
COMPLICATIONS
Local contrast enhancement, as with sharpening, can also create unwanted color changes if performed on all three color channels. In addition, Local contrast enhancement can increase color saturation significantly. You can eliminate these unwanted effects by either performing local contrast enhancement in the lightness channel of the LAB color space, or in a separate layer (while still in an RGB working space) and blending using "luminosity" in the layers window.
Local contrast enhancement can also clip highlights in regions which are both very bright and adjacent to a darker region. For this reason, it should be performed before adjusting levels (if levels are used bring tones to the extreme highlights within the image histogram). This allows for a "buffer zone" when local contrast enhancement extends the lightest and darkest tones to full white or black, respectively.
Care should also be taken when using this technique because it can detract from the "smoothness" of tones within your image — thereby changing its mood. Portrait photography is one area where one should be particularly cautious with this technique.
FURTHER READING
Other websites which discuss local contrast enhancement can be found at:
- The Luminous Landscape: Understanding Local Contrast Enhancement
- Lone Star Digital: Targeted Contrast Enhancement