DIGITAL PHOTO ENLARGEMENT
Digital photo enlargement to several times its original 300 PPI size, while still retaining sharp detail, is perhaps the ultimate goal of many interpolation algorithms. Despite this common aim, enlargement results can vary significantly depending on the resize software, sharpening and interpolation algorithm implemented.
BACKGROUND
The problem arises because unlike film, digital cameras store their detail in a discrete unit: the pixel. Any attempt to magnify an image also enlarges these pixels — unless some type of image interpolation is performed. Move your mouse over the second image below to see how even standard interpolation can improve the blocky, pixelated appearance.
 Original
→
 Visible pixels without interpolation
Before proceeding with this tutorial, know that there is no magic solution; the best optimization is to start with the highest quality image possible. Ensuring this means using proper technique, a high resolution camera, a low noise setting and a good RAW file converter. Once all of this has been attempted, optimizing digital photo enlargement can help you make the most of this image.
OVERVIEW OF NON-ADAPTIVE INTERPOLATION
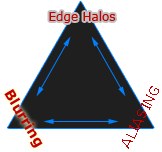
Recall that all non-adaptive interpolation algorithms always face a trade-off between three artifacts: aliasing, blurring and edge halos. The following diagram and interactive visual comparison demonstrate where each algorithm lies in this three-way tug of war.
A small sampling of the most common algorithms are included below. Move your mouse over the options below to see how each interpolator performs for this enlargement:
| 1. Nearest Neighbor |
| 2. Bilinear |
| 3. Bicubic Smoother |
| 4. Bicubic * |
| 5. Bicubic Sharper |
| 6. Lanczos |
| 7. Bilinear w/ blur |
 Type Selected:
Nearest Neighbor
Type Selected:
Nearest Neighbor
 Test Image
*default interpolation algorithm for Adobe Photoshop CS and CS2

The qualitative diagram to the right roughly demonstrates the trade-offs of each type. Nearest neighbor is the most aliased, and along with bilinear these are the only two that have no halo artifacts — just a different balance of aliasing and blur. You will see that edge sharpness gradually increases from 3-5, but at the expense of both increased aliasing and edge halos. Lanczos is very similar to Photoshop bicubic and bicubic sharper, except perhaps a bit more aliased. All show some degree of aliasing, however one could always eliminate aliasing entirely by blurring the image in Photoshop (#7).
Lanczos and bicubic are some of the most common, perhaps because they are very mild in their choice of all three artifacts (as evidenced by being towards the middle of the triangle above). Nearest neighbor and bilinear are not computationally intensive, and can thus be used for things like web zooming or handheld devices.
OVERVIEW OF ADAPTIVE METHODS
Recall that adaptive (edge-detecting) algorithms do not treat all pixels equally, but instead adapt depending on nearby image content. This flexibility gives much sharper images with fewer artifacts (than would be possible with a non-adaptive method). Unfortunately, these often require more processing time and are usually more expensive.
Even the most basic non-adaptive methods do quite well at preserving smooth tonal gradations, but they all begin to show their limitations when they try to interpolate near a sharp edge.
| 1. Nearest Neighbor |
| 2. Bicubic * |
| 3. Genuine Fractals |
| 4. PhotoZoom (default) |
| 5. PhotoZoom (graphic) |
| 6. PhotoZoom (text) |
| 7. SmartEdge ** |
 Type Selected:
Nearest Neighbor
Type Selected:
Nearest Neighbor
*default interpolation algorithm for Adobe Photoshop CS and CS2
**still in research phase, not available to public
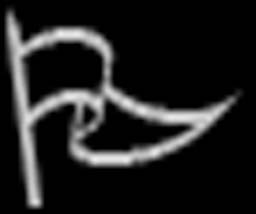
Genuine Fractals is perhaps the most common iterative (or fractal) enlargement software. It tries to encode a photo similar to a vector graphics file — allowing for near lossless resizing ability (at least in theory). Interestingly, its original aim was not for enlargement at all, but was instead intended for efficient image compression. Times have changed since storage space is now more plentiful and fortunately, so has its application.
Shortcut PhotoZoom Pro (formerly S-Spline Pro) is another common enlargement program. It takes into account many surrounding pixels when interpolating each pixel, and attempts to re-create a smooth edge that passes through all known pixels. It uses a spline algorithm to re-create these edges, which is similarly used by car manufacturers when they design a new smooth-flowing body for their cars. PhotoZoom has several settings — each geared towards a different type of image.
Note how PhotoZoom produces superior results in the computer graphic above, as it is able to create a sharp and smooth-flowing edge for all the curves in the flag. Genuine fractals adds small-scale texture which was not present in the original, and its results for this example are arguably not much better than those of bicubic. It is also worth noting though that Genuine Fractals does the best job at preserving the tip of the flag, whereas PhotoZoom sometimes breaks it up into pieces. The only interpolator which maintains both smooth sharp edges and the flag's tip is SmartEdge.
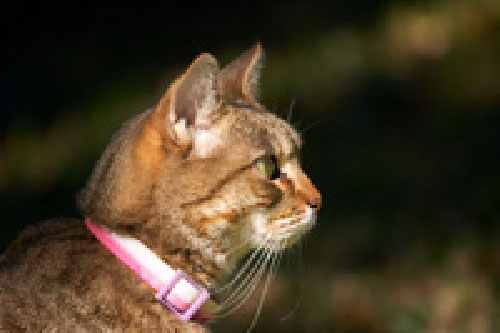
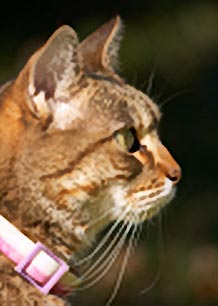
REAL-WORLD EXAMPLES
The above comparisons demonstrate enlargement of theoretical examples, however real-world images are seldom this simple. These also have to deal with color patterns, image noise, fine textures and edges that are not as easily identifiable. The following example includes regions of fine detail, sharp edges and a smooth background:
Original Enlarged by 250%
| Nearest Neighbor | Bicubic | Bicubic Smoother | PhotoZoom | Genuine Fractals | SmartEdge |
| Bicubic | Bicubic Smoother | PhotoZoom (Default) | Genuine Fractals | SmartEdge |
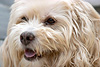
All but nearest neighbor (which simply enlarges the pixels) do a remarkable job considering the relatively small size of the original. Pay particular attention to problem areas; for aliasing these are the top of the nose, tips of ears, whiskers and purple belt buckle. As expected, all perform nearly identically at rendering the softer background.
Even though genuine fractals struggled with the computer graphic, it more than holds its own with this real-world photo. It creates the narrowest whiskers, which are even thinner than in the original image (relative to other features). It also renders the cat's fur with sharp edges while still avoiding halo artifacts at the cat's exterior. On the other hand, some may consider its pattern of fur texture undesirable, so there is also a subjective element to the decision. Overall I would say it produces the best results.
PhotoZoom Pro and bicubic are quite similar, except PhotoZoom has fewer visible edge halos and a little less aliasing. SmartEdge also does exceptionally well, however this is still in the research phase and not available. It is the only algorithm which does well for both the computer graphic and the real-world photo.
SHARPENING ENLARGED PHOTOS
Thus far, most of our attention has focused on the type of interpolation, but the sharpening technique can be just as influential.
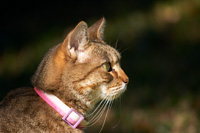
Apply your sharpening after enlarging the photo to the final size, not the other way around. Otherwise previously unperceivable sharpening halos may become clearly visible. This effect is the same as if one were to apply an unsharp mask with a larger than ideal radius. Move your mouse over the image to the left (a crop of the enlargement shown before) to see what it would have looked like if sharpening were applied before enlargment. Notice the increase in halo size near the cat's whiskers and exterior.
Also be aware that many interpolation algorithms have some sharpening built into them (such as Photoshop's "bicubic sharper"). A little sharpening is often unavoidable because the bayer interpolation itself may also introduce sharpening.
If your camera does not support the RAW file format (and therefore have to use JPEG images), be sure to disable or decrease all in-camera sharpening options to a minimum. Save these JPEG files at the highest quality compression, otherwise previously undetectable JPEG artifacts will be magnified significantly upon enlargement and subsequent sharpening.
Since an enlarged photo can become significantly blurred compared to the original, resized images often stand to benefit more from advanced sharpening techniques. These include deconvolution, fine-tuning the light/dark over/undershoots, multi-radius unsharp mask and PhotoShop CS2's new feature: smart sharpen.
SHARPENING & VIEWING DISTANCE
The expected viewing distance of your print may change the requirements for a given depth of field and circle of confusion. Furthermore, an enlarged photo for use as a poster will require a larger sharpening radius than one intended for display on a website. The following estimator should be used as no more than a rough guide; the ideal radius also depends on other factors such as image content and interpolation quality.
*PPI = pixels per inch; see tutorial on "Digital Camera Pixels"
A typical display device has a pixel density of around 70-100 PPI, depending on resolution setting and display dimensions. A standard value of 72 PPI gives a sharpening radius of 0.3 pixels using the above calculator — corresponding to the common radius used for displaying images on the web. Alternatively, a print resolution of 300 PPI (standard for photographic prints) gives a sharpening radius of ~1.2 pixels (also typical).
WHEN INTERPOLATION BECOMES IMPORTANT
The resolution of a large roadside billboard image need not be anywhere near as high as that of a closely viewed fine art print. The following estimator lists the minimum PPI and maximum print dimension which can be used before the eye begins to see individual pixels (without interpolation).
You can certainly make prints much larger — just beware that this marks the point where you need to start being extra cautious. Any print enlarged beyond the above size will become highly dependent on the quality of interpolation and sharpening.
CONSIDER YOUR SUBJECT MATTER
Both the size and type of texture within a photo may influence how well that image can be enlarged. For landscapes, the eye often expects to see detail all the way down near their resolving limit, whereas smooth surfaces and geometric objects may be less demanding. Some regions may even enlarge better than others; hair in portraits usually needs to be fully resolved, although smooth skin is often much less demanding.
HARDWARE vs. SOFTWARE ENLARGEMENT
Many professional printers have the ability to use a small image and perform the photo enlargement themselves (hardware interpolation), as opposed to requiring a photo that has already been enlarged on a computer (software interpolation). Many of these printers claim better enlargement quality than is possible with the bicubic algorithm, so which is a better option? Performing the enlargement in software beforehand allows for greater flexibility — allowing one to cater the interpolation and sharpening to the needs of the image. On the other hand, enlarging the file yourself means that the file sizes will be MUCH larger, which may be of special importance if you need to upload images to the online print company in a hurry.
For further background reading, please visit:
Digital Image Interpolation
For reading on the opposite (shrinking an image), please visit:
Image Resizing for the Web & Email

