CAMERA SHAKE WITH HAND-HELD PHOTOS
We've all likely encountered this problem many times: blurry photos due to camera shake with hand-held shots. It's especially prevalent for those of us who are unfortunate enough to have unsteady hands. While it cannot be eliminated entirely, fortunately there's a number of steps you can take to greatly reduce its impact — and hopefully prevent it from becoming visible in the first place.


Photo from the base of the Eiffel Tower at night - Paris, France.
OVERVIEW
Camera shake is visible whenever your shutter speed is slow compared to the speed of unintended camera motion. Reducing its impact may therefore include:
- Methods for increasing the shutter speed (shorter exposure time)
- Methods for reducing camera motion
On the one hand, many who are new to photography often don't appreciate the importance of using fast shutter speeds or a tripod, but on the other hand, many experienced photographers often overestimate their impact. More often than not, it is one's shooting technique — not high-end lenses or high megapixel cameras — that ultimately limits the resolution of a photograph.
While either method alone can be of great help, the most effective solution is to take both into consideration. Even the calmest hands cannot hold a camera sufficiently steady during a several second exposure, for example, and fast shutter speeds are unlikely to freeze motion from a telephoto lens held by shaky hands. Also, increasing the shutter speed helps freeze a moving subject, whereas reducing camera motion does not.
METHODS FOR INCREASING THE SHUTTER SPEED
There are unfortunately only three ways to increase your shutter speed: (i) optimize your exposure settings, (ii) avoid over-exposure and (iii) improve how your subject is lit.
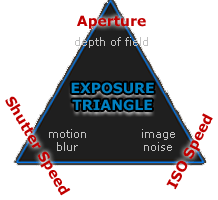
Choose optimal exposure settings. Make sure you're making the best trade-offs with the camera exposure triangle; are you really using the highest ISO speed and/or the lowest f-stop possible with your subject matter? Make sure to consider whether you need an extended depth of field when choosing the aperture.
However, if you're using your camera in automatic mode, then it's likely already doing whatever it can to increase the shutter speed.
Avoid accidental over-exposure. A common cause of blurred shots is due to the camera's metering system mistakenly choosing a longer exposure time than was necessary. Dark shaded subject matter and uneven indoor light can easily trick your camera into over-exposure.
Use a flash or improve ambient lighting. If you're using a compact camera with a built-in flash, also try getting closer to your subject so that they'll be more brightly illuminated. If you're shooting people without a flash, try relocating closer to the light source(s), or waiting until the subject passes through a more brightly lit area.
If none of these are sufficient, then you'll also need to employ one or more of the techniques discussed in the subsequent sections below (but ideally one should use both).
IMPROVE YOUR HAND-HELD TECHNIQUE
Although increasing the shutter speed is often the easiest technique to implement, how you take hand-held photographs can often times make even more of a difference. Try one or more of the following tips:
Example of a photographer leaning
against a wall to brace the camera.
Brace yourself and your camera. This might include leaning up against a wall, kneeling or sitting, or using the viewfinder instead of the rear LCD (since the camera gets braced against your face). Just try to have at least three points of contact between your body and the ground, walls or other stable objects. Always avoid situations where your position or equipment causes you to strain while taking the photograph. Holding your camera directly against a wall or other object also improves stability even further. Make sure to stand in a position that leaves you calm and comfortable.
Optimize how you grip the camera. It's important to hold your camera firmly but not tensely, and to use both hands. With large telephoto lenses, make sure to place one hand under the lens and the other on your camera. Make sure that your arms remain close to your body and in a comfortable position. Using your camera more often can also make your grip feel more natural and get your hand muscles more acclimated to the task. Also make sure that you keep yourself nice and warm.
Practice better shutter button technique. Always try to press the shutter button half-way first, then gently press the button with no more pressure/speed than necessary. It might also help to pay attention to breathing. Try taking a deep breath, exhaling about halfway, then pressing the shutter button.
Take three shots in rapid succession. Often the very act of knowing you'll have to hold your hands steady can make it more difficult to do so.
 First Photo
(most blurred)
 Second Photo
(sharpest - keeper)
 Third Photo
(medium blur)
You'll likely find that there's a big difference in sharpness between each successive image, in part because you're less concerned about individual shots. Just make sure to review these at full resolution; differences often won't be as pronounced as the above example.
OTHER TECHNIQUES & EQUIPMENT ADVICE
Clearly, the best way to minimize hand-held camera shake is not to hold your camera in the first place. While this article focuses on situations where a tripod isn't available, you can also see the tutorial on camera tripods for specifics on improving your tripod technique. However, there's fortunately several alternatives:

Example of a photograph taken by
setting the camera on the ground
and aiming using a lens cap.
Set your camera on a hard surface. While this can often produce even sharper photos than using a tripod, it can also greatly restrict available compositions. On the other hand, it can provide a unique and interesting perspective on your subject. Shots at eye-level often appear ordinary since that's what we're used to seeing.
You can always aim your camera by choosing an appropriate position on uneven ground, or by placing your lens cap or a pebble underneath the camera body. Just make sure to either use a remote release switch, or to set your camera to self-timer mode. With SLR cameras, using your camera's mirror lock-up (MLU) setting will also improve results (if available).
Use lenses with image stabilization (IS) or vibration reduction (VR), or cameras with shake reduction (SR). These features can greatly reduce camera movement — especially with telephoto lenses. This often enables hand-held shots at shutter speeds which are 5-10X+ slower than otherwise possible. However, such features cannot work miracles, and they usually work best only in conjunction with proper hand-held technique.
Avoid telephoto lenses whenever possible. A fancy image stabilized lens isn't the only way to reduce the appearance of shake. Getting a little closer to your subject (and using a shorter focal length / wider angle lens) will reduce the impact of shaky hands, and often has the added benefit of creating a more interesting perspective. More on this topic can be found within the tutorial on camera lenses & focal length.