IMAGE RESIZING FOR THE WEB & EMAIL
Resizing images for the web and email are perhaps the most common ways to share digital photos. Particularly for web presentation, being able to retain artifact-free sharpness in a downsized image is critical — yet may prove problematic. Unlike in photo enlargement where jagged edges are a problem, downsizing results in the opposite aliasing artifact: moiré. The prevalence of moiré largely depends on the type of interpolator used, although some images are much more susceptible than others. This tutorial compares different approaches of how to resize an image for web and email, and makes recommendations based on their results.
BACKGROUND: MOIRE ARTIFACTS
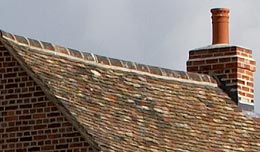
Moiré (pronounced "more-ay") is another type of aliasing artifact, but may instead occur when downsizing an image. This shows up in images with fine textures which are near the resolution limit. These textures surpass the resolution when downsized, so the image may only selectively record them in a repeating pattern:
 Original Image
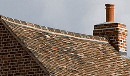 Image Downsized to 50%
 Downsized Image Shown at 200%
Note how this pattern has no physical meaning in the picture because these lines do not correlate with the direction of roof shingles. Images with fine geometric patters are at the highest risk; these include roof tiles, distant brick and woodwork, wire mesh fences, and others.
RESIZE-INDUCED SOFTENING
In addition to moiré artifacts, a resized image can also become significantly less sharp. Interpolation algorithms which preserve the best sharpness are more susceptible to moiré, whereas those which avoid moiré typically produce a softer result. This is unfortunately an unavoidable trade-off in resizing.
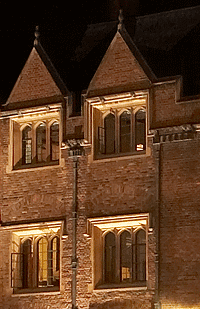 Original Image
90%
→
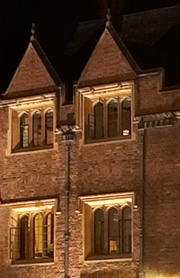 Softer Resized Image
One of the best ways to combat this is to apply a follow-up unsharp mask after resizing an image — even if the original had already been sharpened. Move your mouse over the image above to see how this can regain lost sharpness.
INTERPOLATION PERFORMANCE COMPARED
As an example: when an image is downsized to 50% of its original size, it is impossible to show detail which previously had a resolution of just a single pixel. If any detail is shown, this is not real and must be an artifact of the interpolator.
 Original Image
50%
→
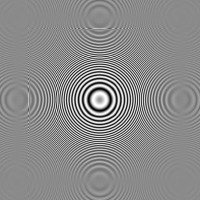
Using this concept, a test was designed to assess both the maximum resolution and degree or moiré each interpolator produces upon downsizing. It amplifies these artifacts for a typical scenario: resizing a digital camera image to a more manageable web and email resolution of 25% its original size.
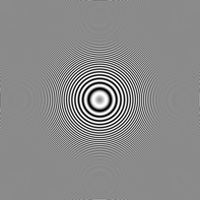
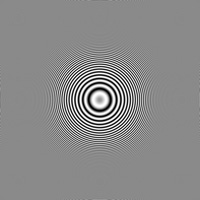
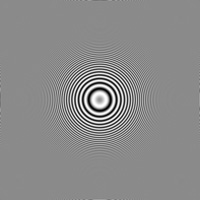
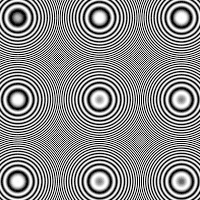
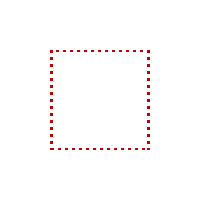
The test image (below) was designed so that the resolution of stripes progressively increases away from the center of the image. When the image gets downsized, all stripes beyond a certain distance from the center should no longer be resolvable. Interpolators which show detail all the way up to the edge of this resolution limit (dashed red box shown below) preserve maximum detail, whereas interpolators which show detail outside this limit are adding patterns to the image which are not actually there (moiré).
| 1. Nearest Neighbor |
| 2. Bilinear |
| 3. Bicubic ** |
| 4. Sinc |
| 5. Lanczos |
| 6. Bicubic, 1px pre-blur |
| 7. #6 w/ sharpening |
| 8. Genuine Fractals |
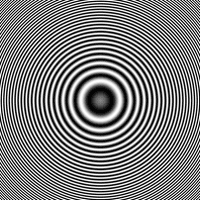 Test Image*
*Above test image has been modified for viewing;
actual image is 800x800 pixels and stripes extend to max resolution at that size.
**Bicubic is from the default setting used in Adobe Photoshop CS & CS2
Test chart conceived in a BBC paper and first implemented at www.worldserver.com/turk/opensource/;
all diagrams and custom code above were performed in Matlab for the above use.
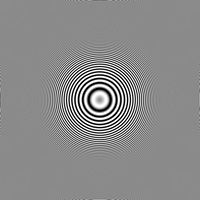
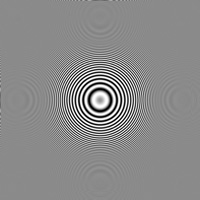
Sinc and lanczos algorithms produce the best results; they are able to resolve detail all the way to the theoretical maximum (red box), while still maintaining the fewest artifacts beyond. Photoshop bicubic comes in second, as it has visible moiré patterns far outside the box. Furthermore, note how bicubic also does not show as much detail and contrast just inside the red box. 6 & 7 are variants of the bicubic downsize, and are discussed below. Genuine Fractals 4.0 was included for comparison, although it does poorly at downsizing (not its intended use). This highlights a key divide: some interpolation algorithms are much better at increasing than decreasing image size, and vice versa.
Technical Note: interpolation algorithms vary depending on the software used, even if the algorithm has the same name. Sinc interpolation, for example, has variations which take into account anywhere from 256-1024+ adjacent known pixels. This may or may not be explicitly stated in the software. Furthermore, software may also vary in how much weighting they give to close vs. far known pixels in their calculations, which is often the case with "bicubic."
PRE-BLUR TO MINIMIZE MOIRÉ ARTIFACTS
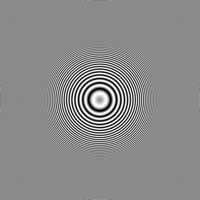
One approach which can improve results in problem images is to apply a little blur to the image *before* you downsize it. This allows you to eliminate any detail smaller than what you know is impossible to capture at a lower resolution. If you do not have a problem with moire artifacts, then there is no need to pre-blur.
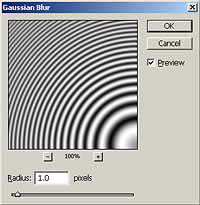
Since the above image was downsized to 1/4 its original size, any repeating patterns smaller than 4 pixels cannot be resolved. A radius as high as 2 pixels (for a total diameter of 4 pixels) could have been used in #6, however 1 pixel is all that was needed to virtually eliminate artifacts outside the box. Too high of a pre-blur can lead to softening in the final image.
The pre-blurred photoshop image above (#6) eliminates most of the moiré (found in #3), however additional sharpening (performed in #7) is required to regain sharpness for detail just inside the red box. After pre-blur and sharpening, photoshop bicubic performs close to the more sophisticalted sinc and lanczos algorithms.
PHOTOSHOP BICUBIC SHARPER vs. BICUBIC SMOOTHER
Adobe Photoshop versions CS (8.0) and higher actually have three options for bicubic interpolation: bicubic smoother, bicubic (intermediate default), and bicubic sharper. All variations provide similar results to #3 in the interpolation comparison, but with varying degrees of sharpness. Therefore if your image has moiré, the sharper setting will amplify and the smoother setting will reduce it (relative to default).
 Original Image
75%
→
| Show Bicubic Type: | |
| Smoother | Sharper |
Many recommend using the smoother variation for upsizing and the sharper variation for downsizing. This works well, but my preference is to use the standard bicubic for downsizing — leaving greater flexibility to sharpen afterwards as the image requires. Many find the built-in sharpening in the sharper variation to be a little to strong and coarse for most images, but this is simply a matter of preference.
RECOMMENDATIONS
All of this analysis is directed at explaining what happens when things go wrong. If resizing is artifact-free, you may not need to change a thing; photographic workflows can become complicated enough as is. Many photos do not have detail which is susceptible to moiré — regardless of the interpolation. On the other hand, when things do go wrong this can help explain why — and what actions you can take to fix it.
The ideal solution is to use a sinc or lanczos algorithm to avoid moiré artifacts in the downsized image, then follow-up with a very small radius (0.2-0.3) unsharp mask to correct for any interpolation-induced softening. On the other hand, the sinc algorithm is not widely supported and software which uses it is often not as user-friendly.
An alternative approach would be to use bicubic, pre-blur problematic images and then sharpen after downsizing. This prepares the image for the interpolator in a way which minimizes aliasing artifacts. The main disadvantage to this approach is that the required radius of blur depends on how much you wish to downsize your image — therefore you have to use this technique on a case-by-case basis.
 Original Computer Graphic
→
Finally, you can ensure that you do not induce any anti-aliasing in computer graphics if you use the nearest neighbor algorithm. Just be particularly cautious when the image contains fine textures, as this algorithm is the most prone to moiré artifacts.
For further reading, please visit:
Digital Image Interpolation, Part 1