CAMERA EXPOSURE
A photograph's exposure determines how light or dark an image will appear when it's been captured by your camera. Believe it or not, this is determined by just three camera settings: aperture, ISO and shutter speed (the "exposure triangle"). Mastering their use is an essential part of developing an intuition for photography.
UNDERSTANDING EXPOSURE

Achieving the correct exposure is a lot like collecting rain in a bucket. While the rate of rainfall is uncontrollable, three factors remain under your control: the bucket's width, the duration you leave it in the rain, and the quantity of rain you want to collect. You just need to ensure you don't collect too little ("underexposed"), but that you also don't collect too much ("overexposed"). The key is that there are many different combinations of width, time and quantity that will achieve this. For example, for the same quantity of water, you can get away with less time in the rain if you pick a bucket that's really wide. Alternatively, for the same duration left in the rain, a really narrow bucket can be used as long as you plan on getting by with less water.
In photography, the exposure settings of aperture, shutter speed and ISO speed are analogous to the width, time and quantity discussed above. Furthermore, just as the rate of rainfall was beyond your control above, so too is natural light for a photographer.
EXPOSURE TRIANGLE: APERTURE, ISO & SHUTTER SPEED
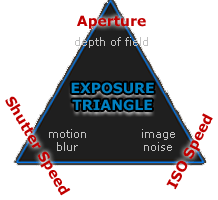
Each setting controls exposure differently:
Aperture: controls the area over which light can enter your camera
Shutter speed: controls the duration of the exposure
ISO speed: controls the sensitivity of your camera's sensor to a given amount of light
One can therefore use many combinations of the above three settings to achieve the same exposure. The key, however, is knowing which trade-offs to make, since each setting also influences other image properties. For example, aperture affects depth of field, shutter speed affects motion blur and ISO speed affects image noise.
The next few sections will describe how each setting is specified, what it looks like, and how a given camera exposure mode affects their combination.
SHUTTER SPEED
A camera's shutter determines when the camera sensor will be open or closed to incoming light from the camera lens. The shutter speed specifically refers to how long this light is permitted to enter the camera. "Shutter speed" and "exposure time" refer to the same concept, where a faster shutter speed means a shorter exposure time.
By the Numbers. Shutter speed's influence on exposure is perhaps the simplest of the three camera settings: it correlates exactly 1:1 with the amount of light entering the camera. For example, when the exposure time doubles the amount of light entering the camera doubles. It's also the setting that has the widest range of possibilities:
| Shutter Speed | Typical Examples |
|---|---|
| 1 - 30+ seconds | Specialty night and low-light photos on a tripod |
| 2 - 1/2 second | To add a silky look to flowing water Landscape photos on a tripod for enhanced depth of field |
| 1/2 to 1/30 second | To add motion blur to the background of a moving subject Carefully taken hand-held photos with stabilization |
| 1/50 - 1/100 second | Typical hand-held photos without substantial zoom |
| 1/250 - 1/500 second | To freeze everyday sports/action subject movement Hand-held photos with substantial zoom (telephoto lens) |
| 1/1000 - 1/4000 second | To freeze extremely fast, up-close subject motion |
How it Appears. Shutter speed is a powerful tool for freezing or exaggerating the appearance of motion:


With waterfalls and other creative shots, motion blur is sometimes desirable, but for most other shots this is avoided. Therefore all one usually cares about with shutter speed is whether it results in a sharp photo — either by freezing movement or because the shot can be taken hand-held without camera shake.
How do you know which shutter speed will provide a sharp hand-held shot? With digital cameras, the best way to find out is to just experiment and look at the results on your camera's rear LCD screen (at full zoom). If a properly focused photo comes out blurred, then you'll usually need to either increase the shutter speed, keep your hands steadier or use a camera tripod.
For more on this topic, see the tutorial on Using Camera Shutter Speed Creatively.
APERTURE SETTING
A camera's aperture setting controls the area over which light can pass through your camera lens. It is specified in terms of an f-stop value, which can at times be counterintuitive, because the area of the opening increases as the f-stop decreases. In photographer slang, when someone says they are "stopping down" or "opening up" their lens, they are referring to increasing and decreasing the f-stop value, respectively.

By the Numbers. Every time the f-stop value halves, the light-collecting area quadruples. There's a formula for this, but most photographers just memorize the f-stop numbers that correspond to each doubling/halving of light:
| Aperture Setting | Relative Light | Example Shutter Speed |
|---|---|---|
| f/22 | 1X | 16 seconds |
| f/16 | 2X | 8 seconds |
| f/11 | 4X | 4 seconds |
| f/8.0 | 8X | 2 seconds |
| f/5.6 | 16X | 1 second |
| f/4.0 | 32X | 1/2 second |
| f/2.8 | 64X | 1/4 second |
| f/2.0 | 128X | 1/8 second |
| f/1.4 | 256X | 1/15 second |
The above aperture and shutter speed combinations all result in the same exposure.
Note: Shutter speed values are not always possible in increments of exactly double or half another shutter speed, but they're always close enough that the difference is negligible.
The above f-stop numbers are all standard options in any camera, although most also allow finer adjustments of 1/2 or 1/3 stops, such as f/3.2 and f/6.3. The range of values may also vary from camera to camera (or lens to lens). For example, a compact camera might have an available range of f/2.8 to f/8.0, whereas a digital SLR camera might have a range of f/1.4 to f/32 with a portrait lens. A narrow aperture range usually isn't a big problem, but a greater range does provide for more creative flexibility.
Technical Note: With many lenses, their light-gathering ability is also affected by their transmission efficiency, although this is almost always much less of a factor than aperture. It's also beyond the photographer's control. Differences in transmision efficiency are typically more pronounced with extreme zoom ranges. For example, Canon's 24-105 mm f/4L IS lens gathers perhaps ~10-40% less light at f/4 than Canon's similar 24-70 mm f/2.8L lens at f/4 (depending on the focal length).
How it Appears. A camera's aperture setting is what determines a photo's depth of field (the range of distance over which objects appear in sharp focus). Lower f-stop values correlate with a shallower depth of field:
 Wide Aperture
f/2.0 - low f-stop number
shallow depth of field
 Narrow Aperture
f/16 - high f-stop number
large depth of field
ISO SPEED
The ISO speed determines how sensitive the camera is to incoming light. Similar to shutter speed, it also correlates 1:1 with how much the exposure increases or decreases. However, unlike aperture and shutter speed, a lower ISO speed is almost always desirable, since higher ISO speeds dramatically increase image noise. As a result, ISO speed is usually only increased from its minimum value if the desired aperture and shutter speed aren't otherwise obtainable.
 Low ISO Speed
(low image noise)
 High ISO Speed
(high image noise)
note: image noise is also known as "film grain" in traditional film photography
Common ISO speeds include 100, 200, 400 and 800, although many cameras also permit lower or higher values. With compact cameras, an ISO speed in the range of 50-200 generally produces acceptably low image noise, whereas with digital SLR cameras, a range of 50-800 (or higher) is often acceptable.
CAMERA EXPOSURE MODES
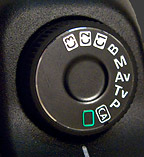
Most digital cameras have one of the following standardized exposure modes: Auto (![]() ), Program (P), Aperture Priority (Av), Shutter Priority (Tv), Manual (M) and Bulb (B) mode. Av, Tv, and M are often called "creative modes" or "auto exposure (AE) modes."
), Program (P), Aperture Priority (Av), Shutter Priority (Tv), Manual (M) and Bulb (B) mode. Av, Tv, and M are often called "creative modes" or "auto exposure (AE) modes."
Each of these modes influences how aperture, ISO and shutter speed are chosen for a given exposure. Some modes attempt to pick all three values for you, whereas others let you specify one setting and the camera picks the other two (if possible). The following table describes how each mode pertains to exposure:
| Exposure Mode | How It Works |
|---|---|
| Auto ( |
Camera automatically selects all exposure settings. |
| Program (P) | Camera automatically selects aperture & shutter speed; you can choose a corresponding ISO speed & exposure compensation. With some cameras, P can also act as a hybrid of the Av & Tv modes. |
| Aperture Priority (Av or A) | You specify the aperture & ISO; the camera's metering determines the corresponding shutter speed. |
| Shutter Priority (Tv or S) | You specify the shutter speed & ISO; the camera's metering determines the corresponding aperture. |
| Manual (M) | You specify the aperture, ISO and shutter speed — regardless of whether these values lead to a correct exposure. |
| Bulb (B) | Useful for exposures longer than 30 seconds. You specify the aperture and ISO; the shutter speed is determined by a remote release switch, or by the duration until you press the shutter button a second time. |
In addition, the camera may also have several pre-set modes; the most common include landscape, portrait, sports and night mode. The symbols used for each mode vary slightly from camera to camera, but will likely appear similar to those below:
| Exposure Mode | How It Works |
|---|---|
| Portrait |
Camera tries to pick the lowest f-stop value possible for a given exposure. This ensures the shallowest possible depth of field. |
| Landscape |
Camera tries to pick a high f-stop to ensure a large depth of field. Compact cameras also often set their focus distance to distant objects or infinity. |
| Sports/Action |
Camera tries to achieve as fast a shutter speed as possible for a given exposure — ideally 1/250 seconds or faster. In addition to using a low f-stop, the fast shutter speed is usually achieved by increasing the ISO speed more than would otherwise be acceptable in portrait mode. |
| Night/Low-light | Camera permits shutter speeds which are longer than ordinarily allowed for hand-held shots, and increases the ISO speed to near its maximum available value. However, for some cameras this setting means that a flash is used for the foreground, and a long shutter speed and high ISO are used to expose the background. Check your camera's instruction manual for any unique characteristics. |
However, keep in mind that most of the above settings rely on the camera's metering system in order to know what's a proper exposure. For tricky subject matter, metering can often be fooled, so it's a good idea to also be aware of when it might go awry, and what you can do to compensate for such exposure errors (see section on exposure compensation within the camera metering tutorial).
Finally, some of the above modes may also control camera settings which are unrelated to exposure, although this varies from camera to camera. Such additional settings might include the autofocus points, metering mode and autofocus modes, amongst others.
