
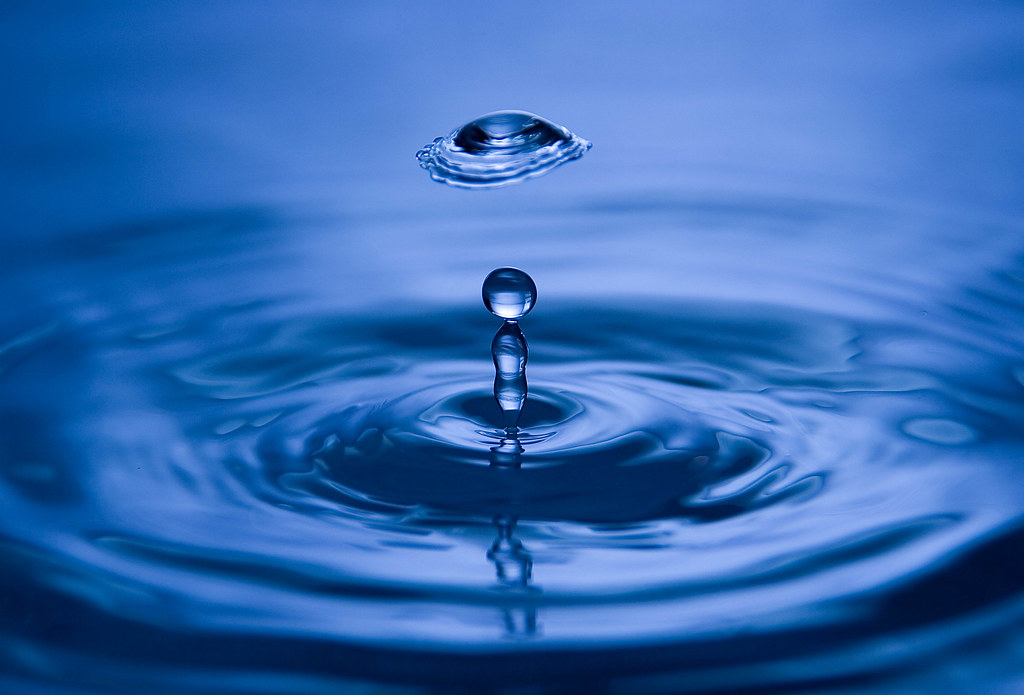
Today I dripped about 4 litres of water with a camera in front of it. I tried some new things and one of them is capturing a water drop collision.
Unfortunately I have to time the shot's by hand so it's difficult to get it all like I want it.
Nevertheless, what do you think of this attempt.
0.6s . f/13.0 . ISO 200 . 125 mm Flash: manual 1/64
Things to work on are still
- only shooting the first two drops for a smoother surface
- a deeper bin with more equal surface (you can see the bin through the water at some places)
- Different colours
- something for the timing to make that easier
 Helpful Posts: 0
Results 1 to 14 of 14
Thread: Deep Blue Sea
-
30th April 2010, 04:54 PM #1


- Join Date
- Mar 2009
- Location
- The Netherlands
- Posts
- 610
- Real Name
- Jeroen
Deep Blue Sea
-
30th April 2010, 05:06 PM #2
- Join Date
- Aug 2009
- Posts
- 4,049
Re: Deep Blue Sea
Jeroen
Very good effort there. Four litres, eh?
I can't remember now, did you see Ash's tutorial on Talk Photography? this one http://www.talkphotography.co.uk/for...d.php?t=208624 He uses aquarium pumps and lines (quite cheap) to pump the droplets - he gives the Amazon reference link.
I think a little less exposure in yours, it seems on the point of blowing out. Do you use food dye for the colour? Why not use f/22 as you have plenty of flash power, or do you want some of the shot to be OOF?
Ash also uses washing machine rinse to add viscosity to the water. I read somewhere else that a deeper dish creates a higher plume - which presumably affects the collision when it happens. I'm redoing my study/studio this week so I can't try this, but I'm keen to have a go next week.
We could try the Hadron Collider next?")
-
30th April 2010, 05:24 PM #3
- Join Date
- Mar 2009
- Location
- The Netherlands
- Posts
- 610
- Real Name
- Jeroen
Re: Deep Blue Sea
Well, as said before ( I don't know who said it) but it's quite addictive.
I use something similar like on Ash's tutorial. The exposure was about correct, though I pushed it a bit in PS (too much?). I was looking for this bright and clear look with intense colours.
For the colour I set the white balance to tungsten, though food dye would be interesting to experiment with in the future. So is the washing machine rinse, though I wonder what it'll do with the surface tension. Generally speaking soap eliminates surface tension and I doubt if that's preferable. Maybe it bit less surface tension would enable the drop to dig out a larger crater. I don't know yet.
Well, if you want to risk yourself and your gear, the Hadron Collider would provide some spectacular sights for sure
-
30th April 2010, 07:06 PM #4
- Join Date
- Aug 2009
- Posts
- 4,049
Re: Deep Blue Sea
It's up to you, but if you want to post the RAW file http://uploading.com/ here I'll download it and try processing it. Send me the link if you do it. Originally Posted by JK6065

-
1st May 2010, 08:57 AM #5
- Join Date
- Mar 2009
- Location
- The Netherlands
- Posts
- 610
- Real Name
- Jeroen
Re: Deep Blue Sea
well, here it is. You may have a try, just tell me exactly what you did
-
1st May 2010, 10:14 AM #6
- Join Date
- Aug 2009
- Posts
- 4,049
Re: Deep Blue Sea
Thanks, Jeroen. I won't pretend - this wasn't easy. The main problem was there seemed to be quite a lot of noise/dust in the shot - probably just the surface of the water causing that. Originally Posted by JK6065
Here are the settings for RAW process. I used a lot of recovery to get rid of the blow-outs, but then increased the light areas on th the curves. Used vibrancy to boost the colour slightly.


In CS4 I added a 'linear' curves layer to give a tad more contrast. The main problem was noise and debris. I used the healing tool to get rid of the debris and blotchy spots. I then selected the area outside the central plume and used /noise/dust and scratches in CS4 with a setting of '3'. This got rid of most of the 'dust' but also made the water more softer. Not sure if that really worked well. I cropped some off the top, and I also did a much tighter crop to match the original that you posted here.
It strikes me that you need to get a very smooth even finish, and as you say, the colouring is important. I think you also need to get a lower angle, but the problem there is you will get the edge of the tin. How about (brainwave cap on here) putting a sheet of coloured waxed paper on the floor of the tin and curve it up at the back of the tin to create an 'infinity curve' as you would in a studio? That way you get the colour, you get a lower angle, and you might get a more interesting light.
With slight crop off top

With full crop

-
3rd May 2010, 08:03 PM #7
- Join Date
- Mar 2009
- Location
- The Netherlands
- Posts
- 610
- Real Name
- Jeroen
Re: Deep Blue Sea
Again a splashing evening today
The aim was a better tin, less surface reflection and better lighting. Therefore I used a larger white tin (instead of black), white light from the back and blue light from the top.
I also adjusted my drop system for better control of the drop rate.
(the hardest one to crack will be the timing of the shot, still figuring out...)
Well here's just a nice cornet to begin with:

1s . f/18.0 . ISO 100 . 125 mm Flash: 1/64 manual
and an "Umbrella" collision
1s . f/18.0 . ISO 100 . 125 mm Flash: 1/64 manual
-
3rd May 2010, 08:30 PM #8
- Join Date
- Aug 2009
- Posts
- 4,049
Re: Deep Blue Sea
Excellent, Jeroen. Very good blue colour, and I love that umbrella. They are getting better, I think.
I was looking at the latest from Ash over on Talk Photography earlier. It made we want to give up photography and take up sewing patchwork blankets.
-
4th May 2010, 07:14 AM #9

- Join Date
- Jun 2009
- Location
- Southland, New Zealand
- Posts
- 104
Re: Deep Blue Sea
Amaizing shots there Jeroen!
-
4th May 2010, 08:23 AM #10
- Join Date
- Mar 2009
- Location
- The Netherlands
- Posts
- 610
- Real Name
- Jeroen
Re: Deep Blue Sea
Thank you for your kind words,
Rob, I don't know if you're familiar with Martin Waughs work, but if you would need an extra reason to quit you'll find it here. It so amazing how he's able to get about any shape and situation in the water with colours everywhere. It's so inspiring!
-
4th May 2010, 08:33 AM #11
- Join Date
- Nov 2009
- Location
- Chandigarh, India
- Posts
- 1,542
- Real Name
- Sahil Jain
Re: Deep Blue Sea
Wow! The umbrella Collision is fantastic!
-
4th May 2010, 02:12 PM #12
- Join Date
- Oct 2009
- Location
- Maryland, USA
- Posts
- 1,015
- Real Name
- Rick
Re: Deep Blue Sea
Hi, Jeroen;
These are wonderful shots! I especially love the "umbrella." You're really hitting it (no pun intended).
Cheers,
Rick
-
4th May 2010, 07:55 PM #13Moderator

- Join Date
- May 2008
- Location
- Windsor, Berks, UK
- Posts
- 16,769
- Real Name
- Dave Humphries :)
Re: Deep Blue Sea
Hi Jeroen,
Just a line to add my not inconsiderable physical bulk to the well deserved congratulations.
You have a fine set of images, but as you say, when you look at Martin Waugh's work ... it makes you want to try harder.
I wonder if his colours are done in PP (I don't think so), using disimilar liquids, and/or by narrow slit lit with gelled flash(es)?
Cheers,
-
5th May 2010, 07:08 AM #14
- Join Date
- Mar 2009
- Location
- The Netherlands
- Posts
- 610
- Real Name
- Jeroen
Re: Deep Blue Sea
a lot of things in his work are still a mystery for me, but there are some things you can do in colouring your droplets.
At first you can ad colour to the flash light. The colour you ad to the background light will give any flat surfaces in the water that colour. The colour you ad to the light from above will give the verticals in the water a colour (the light hits the sculptures in an angle an reflects towards the camera). In my last two shots I used blue light from above and white light from the back.
For visualisation I recommend this video. I know it's been posted several time but it's worth watching.
You can also ad some colour to the drop liquid, by using food dye or something. This will only give the drops a colour and can be quite useful for collisions.
Ash, the author of the tutorial Rob pointed out says about this:
The basic rule is: the splash will be the colour of the droplets, the spout will be the colour of the base liquid and the water surface will be the colour of the reflector/back-lighting box.


 Reply With Quote