
 Helpful Posts:
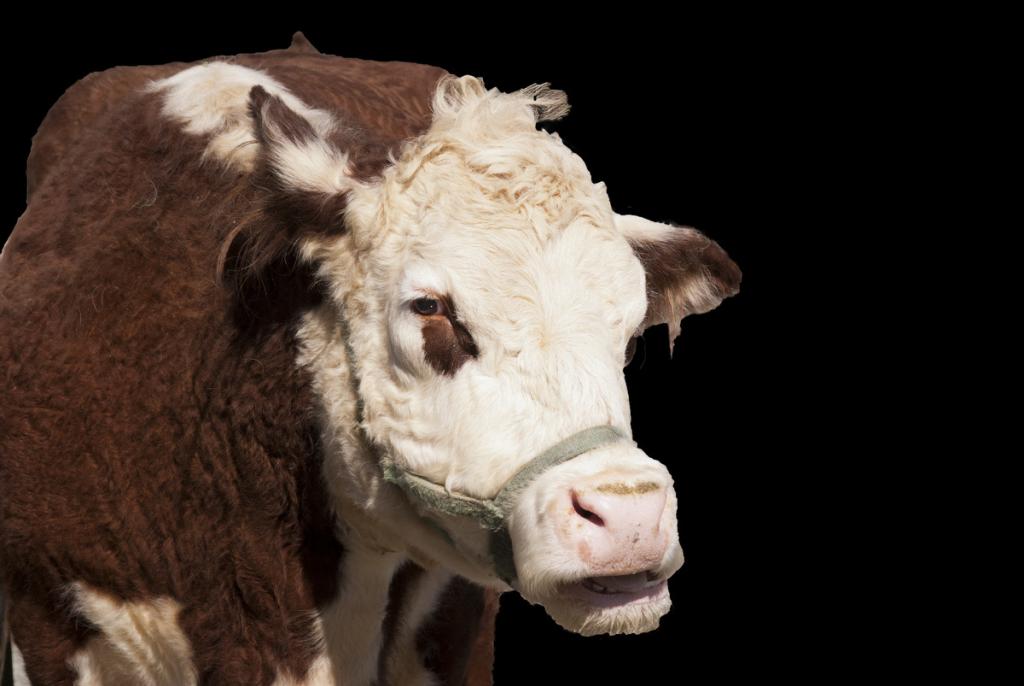
 I'm still learning how to edit and yesterday for the first time I tried to blur away a less than attractive background. I liked the blur effect but the photo sure looks bad. I think it must have something to do with my selection technique combined with the Gaussian blur? ie; the outline of the cow is ragged, funny looking and obvious and not apparent until after I applied the blur, and even more obvious with more blur. I did refine the selection and feathered the edges.
Mild Blur
Big Blur
Thank you in advance.
Results 1 to 20 of 22
-
28th March 2013, 04:57 PM #1


- Join Date
- Jul 2011
- Location
- British Columbia, Canada
- Posts
- 7,244
- Real Name
- Christina
Gaussian Blur in Photoshop Elements 9
-
28th March 2013, 05:13 PM #2

- Join Date
- Dec 2009
- Location
- WNY
- Posts
- 36,716
- Real Name
- John
Re: Gaussian Blur in Photoshop Elements 9
The mild blur isn't bad, I had to zoom in to see the defect. Which selection tool did you use, magnetic lasso?
-
28th March 2013, 05:25 PM #3
- Join Date
- Jul 2011
- Location
- British Columbia, Canada
- Posts
- 7,244
- Real Name
- Christina
Re: Gaussian Blur in Photoshop Elements 9
I used the quick selection too, and I'm still using my mouse but hope to buy one of those wands in April. Is it my selection skills or?
-
28th March 2013, 06:07 PM #4
- Join Date
- Dec 2009
- Location
- WNY
- Posts
- 36,716
- Real Name
- John
Re: Gaussian Blur in Photoshop Elements 9
It depends on how closely you were able to get the tool to wrap around the object. I use the magnetic lasso which gets you pretty close and I still get the type of artifact you are experiencing. I think there is a tool feathering tool that helps clean up the edges. Originally Posted by Christina S

Last edited by Shadowman; 28th March 2013 at 06:12 PM. Reason: edit
-
28th March 2013, 06:58 PM #5
- Join Date
- Oct 2011
- Location
- Grand Cayman, GT
- Posts
- 830
- Real Name
- Graham Heron
Re: Gaussian Blur in Photoshop Elements 9
Hi Christina,
May I suggest using layers. Place blurred background version over the original. Use a layer mask and apply a gradient so that the ground lower (and closer to the beastie) is revealed, leaving the stronger blur higher up (and supposedly further away).
That would help the perspective.
To remove the excess blur from around the cow, select cow, enlarge a little and post back in so it covers the excess blur.
Many other methods exist and doubtless some will be offered by others.
Graham
(likes beef well done)
-
28th March 2013, 07:34 PM #6
- Join Date
- Nov 2009
- Location
- Provence, France
- Posts
- 993
- Real Name
- Remco
Re: Gaussian Blur in Photoshop Elements 9
I think what you see in the mild blur is 'bleed' from the white patches on the cow:
Gaussian blur works by replacing pixels values with the average value (more or less) of a circle centred on that pixel.
That works very well away from the edges, where there are enough pixels around the treated one. At edges you have
a problem though. If it's the edge of the image, not much choice. If it's the edge of the selected zone, you can just grab
values beyond the edge to calculate your average. Result if you have a high contrast edge (like here): the light area
seems to 'bleed' into the blurred zone.
I see two ways of handling this:
- use a second layer for the blur, and a mask for combining the two layers, where the mask is slightly larger than the area
you want to keep and 'feathered' (i.e. with a blurred edge)
- or use several stages of blurring: first with a selection about 1-2 px larger than the cow and a small blur radius, then
progressively enlarge the selection and the blur radius until the effect you want.
Remco
(Likes his steaks rare )
-
28th March 2013, 08:26 PM #7
- Join Date
- Jul 2011
- Location
- British Columbia, Canada
- Posts
- 7,244
- Real Name
- Christina
Re: Gaussian Blur in Photoshop Elements 9
Thank you John, Graham and Remco for sharing your knowledge and for your advice. I am going to save this cow photo (he's mighty handsome and has no plans to be anyone's meal
 ... ) I will also try using the lasso tool, layers and all your suggestions
Hopefully I will post a better edit in a few days time. Thank you to all.
-
28th March 2013, 09:16 PM #8
- Join Date
- Jan 2009
- Location
- South Devon, UK
- Posts
- 14,859
Re: Gaussian Blur in Photoshop Elements 9
That is a difficult subject to use for a selection, Christina, with few really firm edges having good contrast.
But after looking at an enlargement of the image I suspect a lot of your problems have been caused by having too large a feather area which has caused an obvious 'outline haze'.
When feathering for this sort of use I tend to use 1 or 2 pixels for the feather; and sometimes I contract the selection by 1 pixel before feathering.
I have had a quick tweak with your photo by going around the edges using a small size Clone Tool to replace the 'foggy areas'.

-
28th March 2013, 09:39 PM #9
- Join Date
- Jul 2011
- Location
- British Columbia, Canada
- Posts
- 7,244
- Real Name
- Christina
Re: Gaussian Blur in Photoshop Elements 9
As always, thank you Geoff. It looks much better... I will make this my practice editing project for next week. I have noted and tried the contracting and feathering, and did so with this photo but for some reason I just could not get it right. Thank you for sharing the specifics and for editing my photo so I could see.
I also tried the healing brush and cloning on the edges with no success. Seems that just when I thought I was great at selecting, I learn that is not the case
Thank you
-
29th March 2013, 08:15 PM #10
- Join Date
- Jan 2009
- Location
- South Devon, UK
- Posts
- 14,859
Re: Gaussian Blur in Photoshop Elements 9
For tidying up the edges, Christina, I found the Clone Tool worked best; but used with a fairly small brush size and a pick up point close to the lay down area.
In some instances, this did leave a noticeable difference in colour/texture in which case I went over it with a Healing Brush afterwards. Keep changing the brush size and hardness to suit the conditions.
Today, I had a play around with the Quick Selection Tool on a similar image and was often getting similar problems to you. The Magnetic Edge Tool gave the best results, eventually. But it also had problems.
I started by using the high contrast trick. Created a Duplicate Image on a different layer and changed the Blend Mode to Hard Light (Overlay, Multiply, Screen, Dodge or Burn etc can also work). This produced firmer edges.
After the selection was complete I deleted the layer so the selection dropped down on the required original image.
Where the Magnetic Edge Tool failed to create a good edge, I touched up with the basic Lasso Tool and kept changing from positive to negative use as required. This can take a bit of time.
The Magnetic Edge Tool settings need to be suitable so a little experimentation is usually necessary.
A couple of things which I found. Do not feather too early; if you are going to invert the selection or make any refining adjustments, do them first. I actually found that a feather of 0.5 pixel often worked best.
And of course, keep zooming in to closely examine the selection edges.
-
29th March 2013, 08:23 PM #11
- Join Date
- Jul 2011
- Location
- British Columbia, Canada
- Posts
- 7,244
- Real Name
- Christina
Re: Gaussian Blur in Photoshop Elements 9
Thank you Geoff. I am printing out your reply and will follow your recommendations. Good to know that you have challenges, too. Keep in mind that my skills are no where near yours, so it will take me a while but I am learning a lot.
I'd love to see your edit if you are willing to post it here...
Also I suppose it is not possible to get good depth of field with a blurred background, in camera, unless one is positioned far enough away?Last edited by Brownbear; 29th March 2013 at 08:36 PM.
-
29th March 2013, 11:06 PM #12
- Join Date
- May 2012
- Location
- northern Virginia suburb of Washington, DC
- Posts
- 19,064
Re: Gaussian Blur in Photoshop Elements 9
To follow up on all the other great posts, I would just like to reiterate the importance of Graham's method of using a gradient to replicate the effect of using a wide aperture when the objects that are farther away in the background are more blurred.
I will surmise that the one thing you'll learn the most from going through this exercise is that this kind of composition begs for using a wide aperture, which will also eliminate the post-processing time.
-
30th March 2013, 12:57 PM #13
- Join Date
- Jul 2011
- Location
- British Columbia, Canada
- Posts
- 7,244
- Real Name
- Christina
Re: Gaussian Blur in Photoshop Elements 9
Thank you Mike, yes I intend to try Graham's method, too. It's a good learning exercise for me in terms of practicing my editing and photography. Wide aperture... yes indeed, lesson learned
-
30th March 2013, 08:00 PM #14
- Join Date
- Jan 2009
- Location
- South Devon, UK
- Posts
- 14,859
Re: Gaussian Blur in Photoshop Elements 9
Here are a couple of examples using the Quick Selection Tool option.
I haven't used this tool very often so it has been a case of going back to the book then doing a little thinking.
So I have tried adjusting the same scene using both the Quick Selection tool and the Magnetic Edges which I am more familiar with using.
There was little difference in reality. Possibly the Quick Mask was a little faster but both methods included quite a bit of cleaning up the initial selection with the basic lasso tool, switching between positive + and negative - options as required.
The Refine Edges adjustment using the Edge Detection Brush certainly helped with the really tricky areas. But this tool seems to require exactly the right settings to get the best from it, and somebody with more experience than me would probably do better. It is also a rather slow tool to use as there is a lot of sitting around waiting for the computer to catch up.
I found, using the Layers view worked well. Before this experiment, I never realised there were so many Refine Edge view options.
A small radius (say 1 to 5) is best for good definition sharp areas while something larger (say 8 to 20 pixels) could give better results on those 'woolly areas'.
A bit of Contrast can help, but I haven't done much with this yet.
I found I needed to keep changing the Edge Detection Brush sizes and the radius value as I moved around the image. And I often switched back to the normal screen view, frequently doing a little more with the lasso tool as I discovered more problems.
Zooming in certainly helps. Using a drawing tablet and pen is much easier for these fiddly variations than using a mouse.
My first try was a simple sky change.

The Quick Selection Tool did this fairly easily although I needed to change brush sizes occasionally and use the + or - options a few times to get everything well selected.
Probably not the best sky to have used but it was handy! The sky had to be blurred and adjusted for brightness to mix with the background. Not completely sure that I have it correct, but it is just an experimentation of working methods.
Then I tried doing the horse which was far more tricky.

This version, using the Quick Selection Tool had a feather of 15 pixels, just as an experiment; and that probably looks more natural than the sharper 1 pixel feather.
In reality, of course, I would have applied the Blur as a gradient not as an overall effect. But this is more about experimenting with creating selections than producing an actual 'hang on the wall' image.
The tail is still a bit of a mess, but the Magnetic Edges version was even worse.
-
30th March 2013, 09:30 PM #15
- Join Date
- Jul 2011
- Location
- British Columbia, Canada
- Posts
- 7,244
- Real Name
- Christina
Re: Gaussian Blur in Photoshop Elements 9
Thank you Geoff. I was off taking photos of birds, but I will have my attempted edit up by tomorrow. Promise.
Very helpful. I prefer your original sky and sharp mountain (1st photo). The horse stands out better in the 2nd photo but it kind of looks like he/she is walking on air, which I find to be a kind of magical effect.
Thank you.
-
31st March 2013, 02:02 AM #16
- Join Date
- Jul 2011
- Location
- British Columbia, Canada
- Posts
- 7,244
- Real Name
- Christina
Re: Gaussian Blur in Photoshop Elements 9
Here are my edits. This was very challenging for me, especially trying to use layers (as per Graham's and Revi's guidelines) simply because this is the first time I've tried it... And it was just as challenging to erase the blur as it was to select. Mostly because I'm unfamiliar with all the effects one can apply using layers but at least I now understand the concept of layers and know where these things are.
I apologize for using a different cow photo (which I just noticed now) and also for my incompetence. But thank you and please know that I learned a few new things from this... Including the fact that editing photos is not so easy, and it's time consuming.
Here is my edit using Grahams and Revi's guidelines

And using Geoff's guidelines

I'm not so fond of this cow anymore If I see him again I will photograph him at a wide open aperture or have someone hold a white sheet behind him.
-
31st March 2013, 06:13 PM #17
- Join Date
- Jan 2009
- Location
- South Devon, UK
- Posts
- 14,859
Re: Gaussian Blur in Photoshop Elements 9
There appears to be different levels of blur on these shots. The second one, with more blur, looks best to me because it lacks that little bit of a brighter 'band' particularly around the head. But that might simply be caused by the amount of blur.
I have gone back to my book; but this is likely to get a bit more complicated because he uses Layer Masks instead of a simple selection; and I'm using CS5. Also, I started thinking - which is always dangerous!
It should be possible to convert Raw images as Smart Objects then have the main subject plus the background on separate layers, with a mask on the main subject, but be able to return either layer to ACR for extra tweaking as necessary. Although this would work with a mask but without being Smart Objects.
Whether using a mask instead of a straight selection offers any major benefits may be open to opinions. But it does give a little more certainty over where the edges actually are and of course the mask can easily be varied using the 'black/white' mask adjustment brushes instead of having to fiddle with moving part of a selection or cloning around an edge after merging everything together.
Here is a quick example where I moved the same horse as previously shown onto a new background. Not quite perfect yet, possibly a little more feathering is required and its tail is still a problem.

I think it needs some foliage cloning over its feet to look more natural compared with the other horses. But this is about the method so I have left it like this.
-
31st March 2013, 06:22 PM #18
- Join Date
- May 2012
- Location
- northern Virginia suburb of Washington, DC
- Posts
- 19,064
Re: Gaussian Blur in Photoshop Elements 9
Nice job, Geoff.
-
31st March 2013, 06:46 PM #19
- Join Date
- Jan 2009
- Location
- South Devon, UK
- Posts
- 14,859
Re: Gaussian Blur in Photoshop Elements 9
And the method (using Adobe CS5):
Using Smart Objects
Edit the Raw images and convert to Smart Objects by holding Shift when converting. In the main edit window, drag one layer thumbnail line (from Layers Panel) into the other image so they both appear as layers. I use the Window Menu to show a split screen view. ~Just click on the image to be moved then drag and drop anywhere in the other image.
They should now appear as separate layers. The source image can now be closed.
These layers will work as normal layers but double clicking on a layer thumbnail icon at any time will return the layer image to ACR where it can have further editing directly as a Raw image. Click OK after adjustment to return to the main edit window.
From here on, this should work the same as images which aren't Smart Objects.
Apply a Quick Mask to the area requiring change. Try to get the mask fairly good by using both + and - brushes and vary the brush size as required. Magnetic Edge selection tool could be used instead.
Add a Layer Mask to the layer. I used the Add Layer Mask button in the bottom line of the Layer Panel (third button from left side) but there are other alternatives.
Use Refine Mask from the Mask Panel (if the mask needs further adjustment) and set radius, contract, feather, etc as previously mentioned. Also use Edge Detection if that helps. Vary the View options to see the mask against different backgrounds.
After using Refine Mask, other edits can be done directly on the mask (when the mask is 'live') using the normal 'black or white' brush, vary the size and opacity as required. This can be useful for any areas which don't mask well, even after the Refine Mask adjustment.
For example, I sometimes find odd little patches which are just clear of the main mask lines but cannot easily be removed by other means.
All in all, something which I will have to spend more time experimenting with; before the warmer weather arrives.
Anybody else using Smart Objects or editing with masks in this manner, who can offer more information?
-
31st March 2013, 06:49 PM #20
- Join Date
- Jul 2011
- Location
- British Columbia, Canada
- Posts
- 7,244
- Real Name
- Christina
Re: Gaussian Blur in Photoshop Elements 9
Thank you Geoff. Your edit is gorgeous.. Are you using one of those pens or a mouse? How long did it take you to edit your photo?
Yes, their are likely different levels of blur... I had a challenging time working with a layer mask and selecting in reverse ie; erasing. it felt very uncoordinated. I also put a gradient mask on the first photo but again this was a first for me.
When I get my pen and learn more about layers I will practice.
Your horse photo is stunning.


 Reply With Quote