
Thanking you in advance for any comments!
 Helpful Posts: 0
Results 1 to 10 of 10
Thread: Request for critique
-
25th April 2009, 08:46 PM #1


- Join Date
- Oct 2008
- Location
- Middle East
- Posts
- 86
Request for critique
Last edited by Dave Humphries; 25th April 2009 at 10:00 PM. Reason: insert image inline
-
25th April 2009, 10:13 PM #2Moderator

- Join Date
- May 2008
- Location
- Windsor, Berks, UK
- Posts
- 16,769
- Real Name
- Dave Humphries :)
Re: Request for critique
Hi Greentea,
Well I guess the most obvious suggestion is to not have a patch of burnt out sky in the corner of frame, but I'm sure you knew that already.
If possible, take with an angle that excludes it, that may in turn mean slightly adjusting which way the rose bloom is pointing, so you still get to see up inside it. Can't predict which way is best for that, holding, tying, etc. depends on lots of things.
Other than that, the exposure of the bloom itself looks good, and has nice colours, well done.
Beyond that, since it's a bit small and has jpg artefacts, I cannot fairly pass comment on image quality.
Not sure how much PP you might want to do, but it should be possible to reduce the impact of some of the background branches and twigs, and/or give the rest of the picture a blur treatment to keep attention on the bloom itself.
Regards,
-
26th April 2009, 04:56 PM #3
- Join Date
- Jan 2009
- Location
- South Devon, UK
- Posts
- 14,811
Re: Request for critique
Possibly a bit too tight on the top and bottom. Although I wouldn't want too much gap here, perhaps the same amount as on the left side.
Then, I wonder if you would get away with a 5 x 4 ratio crop which would lose some of the sky and drab leaves from the right side. Easier to chop it away than to edit it.
Otherwise no problems. It is never easy getting those pale shades to look good and that rose looks fine to me; exposure appears spot on.
-
27th April 2009, 05:10 AM #4
- Join Date
- Oct 2008
- Location
- Middle East
- Posts
- 86
Re: Request for critique
Thank you both! Very useful comments for me!
Here's a bigger version of the photo.
Last edited by Dave Humphries; 27th April 2009 at 12:08 PM. Reason: added image inline
-
27th April 2009, 12:16 PM #5Moderator
- Join Date
- May 2008
- Location
- Windsor, Berks, UK
- Posts
- 16,769
- Real Name
- Dave Humphries :)
Re: Request for critique
Hi Greentea,
Thanks for the bigger picture, looking at this, the sharpening may be a touch overdone, but it's not by very much, the main benefit of the bigger picture is to be able to enjoy the rose more.
I agree with Geoff's suggestion regarding cropping.
Overall it confirms a good picture, well done,
-
27th April 2009, 05:25 PM #6
- Join Date
- Jan 2009
- Location
- South Devon, UK
- Posts
- 14,811
Re: Request for critique
Looking at the larger image I can see a small rust spot on the bottom petal (not your fault) and I wonder if it could be cloned out.
If it doesn't perfectly disappear I would leave it. But cloning is worth a go.
-
27th April 2009, 08:54 PM #7

- Join Date
- Jan 2009
- Location
- McAllen, Texas
- Posts
- 18
Re: Request for critique
Please go back to the first picture and tell me exactly what is meant by "jpg artifacts" and where they are on the picture?
What is it about the picture that makes you say it is "oversharpened?"
I'm not questioning the evaluation, I just want to see what you saw.
BillTexas a/k/a "Just Trying to Learn Something"
-
27th April 2009, 10:23 PM #8Moderator
- Join Date
- May 2008
- Location
- Windsor, Berks, UK
- Posts
- 16,769
- Real Name
- Dave Humphries :)
Re: Request for critique
Hi Bill,
Ok, no problem, first the jpg artefacts.
On the first, small picture, if you look carefully at the pixels either side of the transition from petal to background, you'll see blocks of incorrectly coloured pixels, most easily seen on the petal as lower saturation (i.e. more grey than pink), they might be mistaken for a crinkly edge of the petal.
If you download the pic to your HDD, then use a program to zoom into more than 100%, it's easier to see, although when you know what it looks like, you'll see it on many lower quality saved jpgs.
If you compare with the second picture, you'll notice that the crinklies in the first don't really exist, and where they do, they're still the same small size, whereas they ought to be twice as big.
The slight oversharpening is where I can see 'overshoots' on (mostly) the petal edges.
As you may know, sharpening usually works by taking an edge transition, say from dark to light and just before the rise, putting a dip and just after the rise, putting a spike. This gives a quicker rise transition and also the super bright/dark edges make it look even more effective when viewed at certain resolutions.
See Sean's tutorial here at CiC on Sharpening: Unsharp Mask. The first graphic diagram with "undershoot" (= dip) and "overshoot" (= spike) on is what I just described. However, it's not just used on text as in Sean's example (but is easier to see on a text example), it's also not just used when you pick USM sharpening.
Anyway, if you look at the second, bigger rose picture, and you may need to click the bar to get it to widen to the full 1377 x 1034 pixels, you can see a white ridge on the petal, and a dark ridge outside of it, like little black and white lines drawn around each petal edge, whether they be over backgound or other petals. Have a look at the top edge of the top petal, or left edges of left petals.
To complicate things, around the lower and right hand edges, there maybe some chromatic abberation (CA) happening which is giving a blue fringe to the petal edges.
Regardless, the over-sharpening here really is quite small, some may not even call it over-sharpened, and I know I have been guilty of far worse myself; a look through some of my older posts would no doubt be quite embarrassing for me.
While we're looking (pixel peeping) at this bigger view, note also the jpg artefacts; still tiny and consequently less noticeable if not zoomed to 100%, but still there.
If anyone disagrees with my diagnosis, please do correct me, I don't know it all, and I do foul up (more often than I'd like).
If I have described this so badly you can't see the effects I'm wittering on about, let me know and I'll do some cropped enlargements to illustrate.
Hope that helps,Last edited by Dave Humphries; 27th April 2009 at 10:33 PM.
-
4th May 2009, 04:42 AM #9
- Join Date
- Oct 2008
- Location
- Middle East
- Posts
- 86
Re: Request for critique
Thank you, guys, I'm learning a lot here!
Dave, if and whenever you can spare the time, I'd be very interested in seeing that cropped enlargement you mention.
-
4th May 2009, 05:12 PM #10Moderator
- Join Date
- May 2008
- Location
- Windsor, Berks, UK
- Posts
- 16,769
- Real Name
- Dave Humphries :)
Re: Request for critique
Hi Greentea and Bill,
OK, here's a 100% crop from top of the LARGE picture
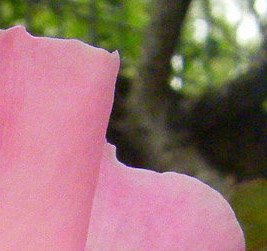
Now compare against a similar area, this is a 300% enlargement from the SMALL (originally posted) picture.
Note the jpg artefacts are now quite clear in the pic above, I think, and how they make critical analysis almost impossible.
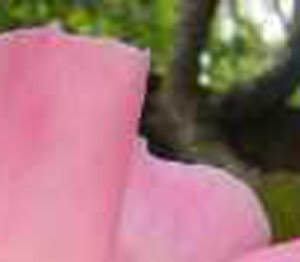
Same for the lower right petals;
100% from LARGE image;

Note the blue edges which I think maybe lens chromatic abberation?
Note also that noise is quite evident in both the crops from LARGE, but is invisible in the enlarged crops from SMALL?
300% from SMALL image;

Disclaimer:
There's always a risk when doing this and demonstrating with jpgs, that the enlargement process may hide or exagerate the problem, I chose an re-size method that seemed most representative. If anyone else (more experienced than I) wants to add their comments on these examples, feel free, as I said above, I'm not infallible.
Cheers,

 Reply With Quote