PHOTO STITCHING DIGITAL PANORAMAS
Digital photo stitching for mosaics and panoramas enable the photographer to create photos with higher resolution and/or a wider angle of view than their digital camera or lenses would ordinarily allow—creating more detailed final prints and potentially more dramatic, all-encompassing panoramic perspectives. However, achieving a seamless result is more complicated than just aligning photographs; it also involves correcting for perspective and lens distortion, identifying pixel-perfect matches between subject matter, and properly blending each photo at their seam. This tutorial aims to provide a background on how this process works, along with discussing common obstacles that one may encounter along the way—irrespective of panorama software type.
OVERVIEW: SEEING THE BIG PICTURE
Stitching a photo can require a complex sequence of steps, which may change depending on subject matter, or type of panoramic stitch. This procedure can be simplified into several closely related groups of steps, which can then each be addressed in separate stages. Later sections of this tutorial go into each stage with greater detail, including terminology and alternative approaches.
STAGE 1: physically setting up the camera, configuring it to capture all photos identically, and then taking the sequence of photos. The end result is a set of images which encompasses the entire field of view, where all are taken from virtually the same point of perspective.

STAGE 2: the first stage to begin using photo stitching software; involves choosing the order and precise positioning which mutually aligns all photos. This may occur automatically, or require manually selecting pairs of control points which should ideally overlay exactly in the final image. This stage may also require input of camera and lens settings so that the panorama software can estimate each photo's angle of view.
STAGE 3: defining the perspective using references such as the horizon, straight lines or a vanishing point. For stitched photos that encompass a wide angle of view, one may also need to consider the type of panoramic projection. The projection type influences whether and how straight lines become curved in the final stitched image.
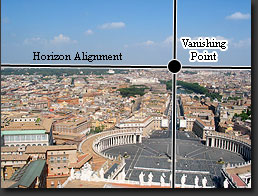
STAGE 4: shifting, rotating and distorting each of the photos such that both the average distance between all sets of control points is minimized, and the chosen perspective (based on vanishing point) is still maintained. This stage requires digital image interpolation to be performed on each photo, and is often the most computationally intensive of all the stages.
STAGE 5: reducing or eliminating the visibility of any seam between photos by gradually blending one photo into another. This stage is optional, and may sometimes be combined with the previous stage of moving and distorting each image, or may also involve custom placement of the seam to avoid moving objects (such as people).
STAGE 6: cropping the panorama so that it adheres to a given rectangular (or otherwise) image dimension. This may also involve any necessary touch-up or post-processing steps for the panorama, including levels, curves, color refinements and sharpening.
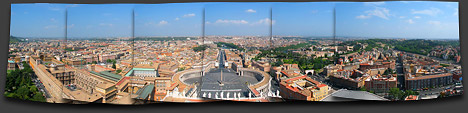
The resulting panorama is 20 megapixels, even though the camera used for this was under 4 megapixels. This provides a much greater level of detail—something ordinarily only attainable with much more expensive equipment—by using a compact, handheld and inexpensive travel camera. The above stages can be summarized as:
| Stage 1 | Equipment setup and acquisition of photographs |
| Stage 2 | Selection of desired photo alignment and input of camera and lens specifications |
| Stage 3 | Selection of perspective and projection type |
| Stage 4 | Computer shifts, rotates and distorts photos to conform with requirements of stages 2 and 3 |
| Stage 5 | Manual or automatic blending of seams |
| Stage 6 | Cropping, touch-up and post-processing |
Note how stages 2-6 are all conducted on the computer using a panorama software package, after the photos have been taken. The rest of this tutorial takes an in-depth look at stage 1, with details on stages 2-6 being presented in the second part of the tutorial. These stages will show that panoramas are not always straightforward, and require many interpretive decisions to be made along the way.
BACKGROUND: PARALLAX ERROR & USING A PANORAMIC HEAD
The size and cost of panoramic equipment can vary drastically, depending on the intended use. Being able to identify when you need additional equipment can save time and money. Here we identify two typical stitching scenarios, based on required equipment:
| Scenario #1 |
| Handheld or tripod-mounted photographs with no close foreground subject matter. |
| PANORAMIC HEAD NOT REQUIRED |
|---|
| Scenario #2 |
| Tripod-mounted photographs with foreground subject matter in multiple frames. |
| REQUIRES A PANORAMIC HEAD |
|---|
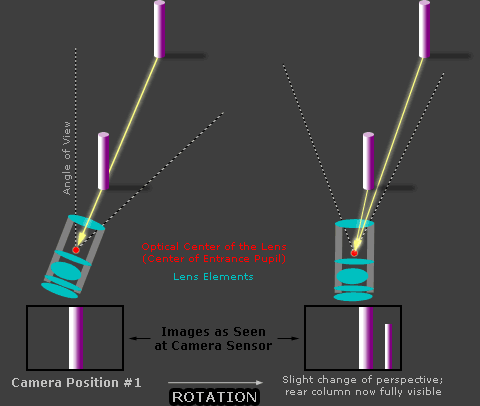
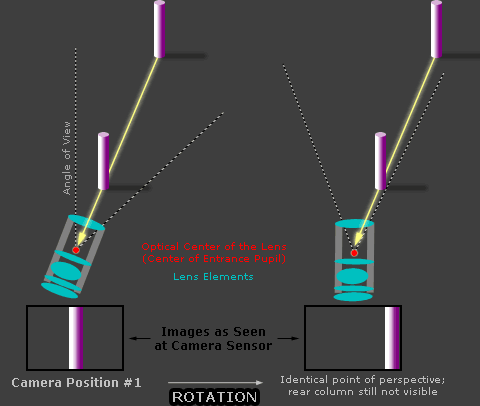
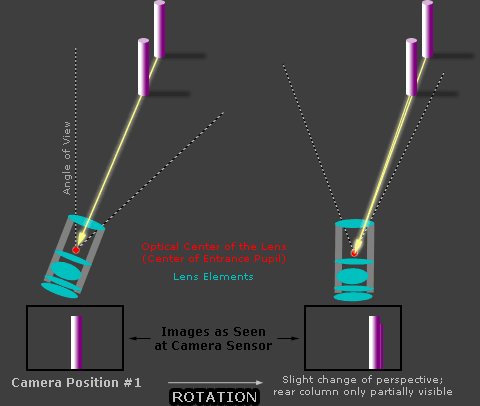
Panoramas require that the camera rotates about the optical center of its lens, thereby maintaining the same point of perspective for all photographs. If the camera does not rotate about its optical center, its images may become impossible to align perfectly; these misalignments are called parallax error. A panoramic head is a special device that ensures your camera and lens rotate about their optical center.
Note: The optical center of a lens is often referred to as its nodal point, although this term is not strictly correct. A more accurate term is the entrance pupil, but even this refers to a small area and not an individual point. The location which we refer to is therefore the point at the center of the entrance pupil, which may also be called the "no parallax point" or "perspective point."
Scenario 2 is far more sensitive to parallax error due to foreground subject matter. With scenario 1, small movements deviating from the lens's optical center have a negligible impact on the final image—allowing these photos to be taken handheld.
To see why foreground subject matter is so important, this can be illustrated by looking at what happens for two adjacent, overlapping photos which comprise a panorama. The two pink pillars below represent the background and foreground subjects. The photo angle shown on the left (below) is the initial position before camera rotation, whereas the angle shown on the right is after camera rotation.
For incorrect rotation, the change in perspective that results is due to parallax error, because the camera was not rotated about its optical center. Move your mouse over the three buttons below to see the effect of each scenario:
| Incorrect Rotation: | Scenario #1 | Scenario #2 |
| Correct Rotation: | Scenario #2 with Panoramic Head | |
Note: incorrect rotation assumes that the camera is rotated about the front of the lens;
correct rotation assumes rotation about the optical center
SCENARIO #1: The problem with the second image (right) is that each photo in the panorama will no longer see the same image perspective. Although some degree of misalignment may occur from this, the problem is far less pronounced as when there are close foreground objects, as illustrated for scenario #2.
SCENARIO #2: Here we see that the degree of misalignment is much greater when foreground objects are present in more than one photo of the panorama. This makes it absolutely essential that the camera is rotated precisely about its optical center, and usually necessitates the use of a special panoramic head (as shown in the final scenario).
SCENARIO #2, PANORAMIC HEAD: Here we see that the perspective is maintained because the lens is correctly rotated about its optical center. This is apparent because for the image on the right, the light rays from both pillars still coincide, and the rear column remains behind the front column. Panoramic photos of building interiors almost always require a panoramic head, while skyline vistas usually never do. Multi-row or spherical panoramas may also require a tripod-mounted panoramic head that keeps the lens at the center of rotation for up and down rotations.
With care, parallax error can be made undetectable in handheld panoramas which do not have foreground subject matter. The trick is to hold the camera directly above one of your feet, then rotate your body about the ball of that foot while keeping the camera at the same height and distance from your body.
STAGE 1: DIGITAL CAMERA SETUP & PANORAMA ACQUISITION
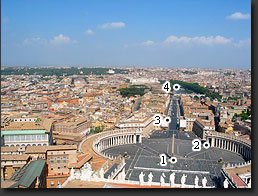
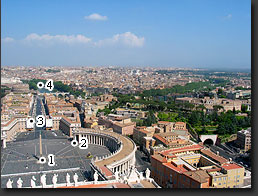
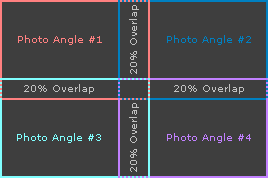
Taking a digital panorama involves systematically rotating your camera in increments to encompass the desired field of view. The size of each rotation increment and the number to images in total depends on the angle of view for each photo, which is determined by the focal length of the camera lens being used, and the amount of overlap between photos. The image below is composed of two rows of four photographs; the camera first scanned from left to right across the top row, then down to the second row, and back across the bottom half of the image from right to left.

Other than minimizing parallax error, the key to creating a seamless panorama is to ensure that each of the panorama photos are taken using identical settings. Any change in exposure, focus, lighting or white balance between shots creates a surprising mismatch. If you are using a digital SLR camera, it is highly recommended that all photos be taken in manual exposure mode using the RAW file format. This way white balance can be customized identically for all shots, even after the images have been taken.
If using a compact digital camera, many of these include a panoramic preset mode, which shows the previous image on-screen along with the current composition. This can be very helpful with handheld panoramas because it assists in making sure each photo is level and overlaps sufficiently with the previous photo. Additionally, the panoramic preset modes use manual exposure settings, where they lock in the white balance and exposure based on the first photograph (or at least based on the first time the shutter button is held down half-way).
Panoramas can encompass a very wide angle of view, up to 360 degree panoramic views, and may therefore encompass a drastic range of illumination across all photo angles. This may pose problems when choosing the exposure settings, because exposing directly into or away from the sun may make the rest of the panorama too dark or light.

Often the most intermediate exposure is obtained by aiming the camera in a direction perpendicular to one's shadow, using an automatic exposure setting (as if this were a single photo), and then manually using that setting for all photographs. Depending on artistic intent, however, one may wish to expose based on the brightest regions in order to preserve highlight detail. For a compact digital camera, the exposure can be locked in by using the panoramic preset mode, holding the shutter button down halfway at the intermediate angle, then taking the photos in any particular order (while ensuring that the shutter button remains pressed halfway before taking the first photo).
 Single Row Panorama
 Multi-Row Panorama or Stitched Mosaic
Ensure that each photograph has roughly 10-30% overlap with all other adjacent photos. The percent overlap certainly does not have to be exact; too high of an overlap could mean that you have to take far more photos for a given angle of view, but too little of an overlap may provide too short a region over which to blend or redirect the placement of seams.

Note that if your panorama contains regions which are moving, such as water or people, it is best to try and isolate movement in a single camera angle. This way you do not run into problems where someone appears in the panorama twice, or photo misalignment occurs because a moving objects is on the seam between two stitched images. In the image to the left, the colorful Swiss guards were marching side to side, but the lower third of the image was contained within a single photo.
Another consideration is whether to stitch a single row panorama in landscape or in portrait orientation. Using portrait orientation can achieve nearly 2.25X the number of megapixels (for the same subject matter) for cameras with a 3:2 aspect ratio digital sensor (for the same 20% overlap). The disadvantage to this is that portrait orientation requires a longer focal length, and thus a smaller aperture to achieve the same depth of field (since magnification has increased).
Other considerations when taking photos include total resolution and depth of field. One can increase the number of megapixels in their stitched photo dramatically by comprising them of progressively more images. However, the disadvantage of this is that in order to achieve the same depth of field, one has to use progressively smaller lens aperture settings (larger f-numbers) as the number of stitched images increases (for the same angle of view). This may make achieving certain resolutions nearly impossible with some subject matter, because of the resulting exposure time required, or because the small aperture induces significant photo blurring due to diffraction.
The following calculator demonstrates how the number of megapixels and camera lens settings change when attempting to make a stitched photo mosaic out of a scene which could have otherwise been captured in a single photograph. This could also be used to quickly assess what focal length is needed to encompass a given scene.
Note: Calculator assumes that photographs are all taken in the same orientation, whether this all be in landscape or portrait orientation, and that photos are of low magnification.
The depth of field requirements are calculated assuming that the single photo and mosaic will be printed at the same size. In reality, mosaics are often designed to be printed even larger, in which case the mosaic will need an even higher f-stop than that shown above.
Here we see that even small photo mosaics can quickly require impractical lens apertures and exposure times in order to maintain the same depth of field. Hopefully this makes it clear that digital panoramas and stitched photo mosaics are more difficult to technically master than single photographs. Also note that image overlap may reduce the final resolution significantly (compared to the sum of megapixels in all the individual photos), implying that photo stitching is definitely not an efficient way to store image data on a memory card. The calculator below estimates the total megapixels of a stitched photo mosaic as a percentage of all its individual photos.
*note: "photo efficiency" is defined as the megapixels attained in the final stitched photo, divided by the total megapixels used for all the input images.
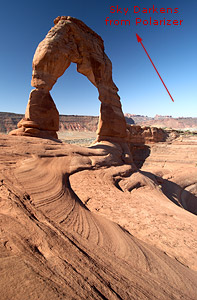
Use of a polarizing filter should be avoided for extremely wide angle panoramas, as strong changes in sky lightness may appear. Recall that polarizing filters darken the sky most when facing at a 90 degree angle to the direction of the sun, and least when facing directly into or away from the path of sunlight. This means that any panorama which spans 180 degrees of the sky may see regions where the polarizer both darkens fully and not at all. A strong, unnatural sky gradient can be observed in the photo of an arch to the right. Additionally, polarizing filters may make the edges of each photograph much more difficult to stitch without showing visible seams.
Also, be wary of attempting panoramas of scenes with rapidly changing light, such as when clouds are moving across the sky and selectively illuminating a landscape. Such scenes can still be stitched, but try to avoid having any moving patches of light (or dark) lie onthe seams.
Finally, try to ensure that each of your photographs rotates across the sky in a systematic, grid-like direction. With large panoramas it can become very easy to drift upwards or downwards, requiring that an unacceptable amount of the final panorama be cropped out (as shown below).
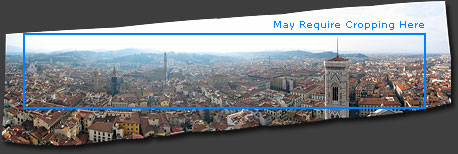
The above result can be prevented by carefully placing the horizon at a pre-defined position in each photograph (such as halfway down the photo, or one third, etc.).
For further reading on this topic, please continue to:
Part 2: Using Photo Stitching Software