
We've covered quite a bit on outdoor portraiture to date, including a brief look at flash - so let's kick it up a notch with something different; studio portraiture with high-power studio strobes. This is something that some of you may decide to invest in - and although not all of you will probably go "the whole hog" as we say, it's none-the-less possible to produce a great result with just one or two lights, and very rewarding. I like to think of studio portraiture -v- outdoor portraiture as being like a CD of a band in a sound studio -v- a CD recorded at a live event. The studio recorded album will have better managed sound quality, and the outdoor concert will have technically inferior sound, but more "ambience". Substitute "light" for "sound" when it comes to studio shooting; Outdoors I typically use just a shoot through umbrella with a single flash - in the studio we use up to 5 strobes (with various light modifiers) and several reflectors.
Studio strobes work in a similar way to the humble flash that we use on our camera - the big differences are that studio strobes are a LOT more powerful (each one of mine is somewhere in the order of 20 times the power of a single Canon 580EX II - peeking at in the order of 1.2 million watts, for around 1/1000th of a second), and of course they're mains powered - and what that means in terms of our photography is that we can spread the light over a large area (so that it's soft), and we don't have to worry about running out of batteries (so we can work these babies as hard as we like, and they STILL laugh at us!)
With studio portraiture - generally - we want soft light (especially for women) and the softness of the light is proportional to (a) the size of the lightsource and (b) how close the light source is to our model. So for our primary light (called the "key light") I typically use what's termed an "octabox" (an 8 sided softbox about a "metre and a bit" in diameter). Because we want the lighting to be directional, we put this light off to the side - raise it up high (so it mimics the position of the sun), but contrary to what some might think, we don't point it directly at the model - rather - we try to catch the model's face with the edge of the light. Why? For a number of reasons (a) because we want the light to fall off towards the back of the head and further down the body (it's all about the light on the face) (assuming head & shoulders type portraiture here) - (b) the light is softer at the edges - (c) it lets the light wrap aboud the front of the face more, and - (d) it gives us some excess light that we can bounce into various reflectors.
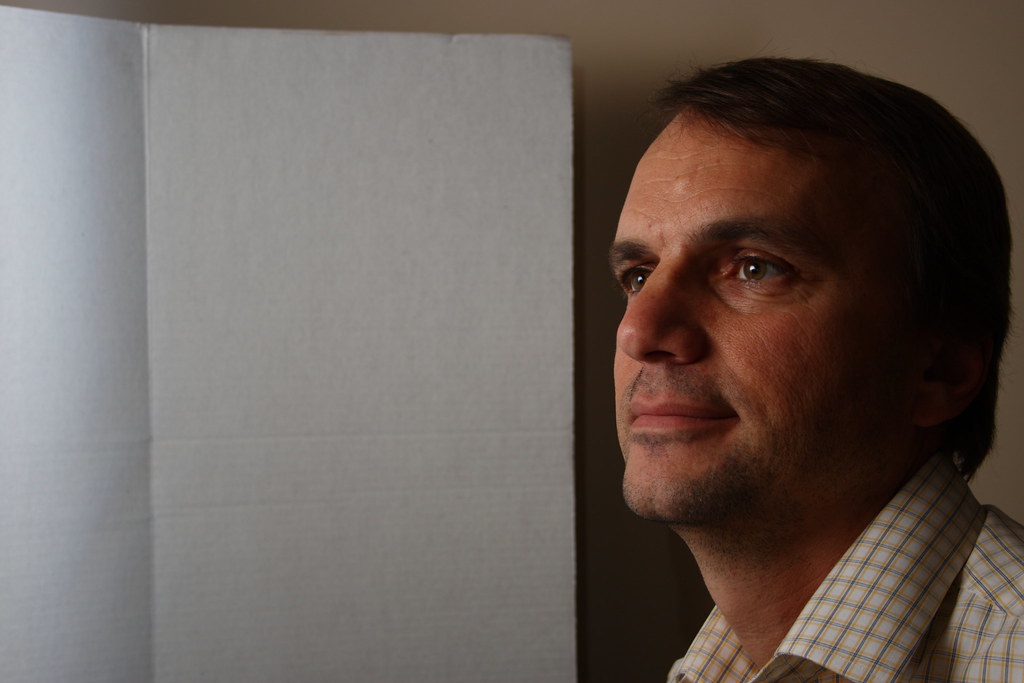
In this first image, I've used only 1 key light, as described above. At first glance it might appear "OK", but in reality there are a number of problems that need addressing:
1. There's poor seperation between the black parts of the model's clothing and the background
2. The model's hair is poorly lit
3. There are dark areas under the model's left ear and under the chin
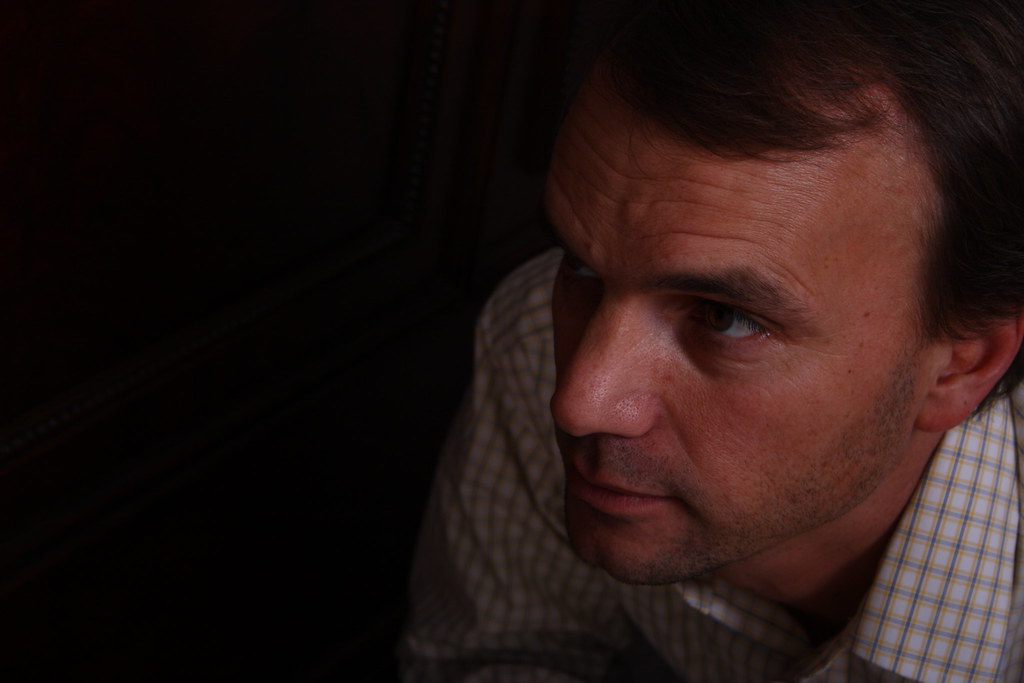
There are a number of ways to get around the first issue (lack of seperation) - one of my favourite techniques is to use "kicker" lights (another pair of strobes with a fairly tight grid) (a grid keeps the light from spreading) - this introduces a degree of what's called rim lighting. Traditionally it's a popular technique when shooting guys, but recently I've been applying some of these techniques to women, and I'm liking the results. In this case, the strobes are placed behind the model, pointed back at the camera ...
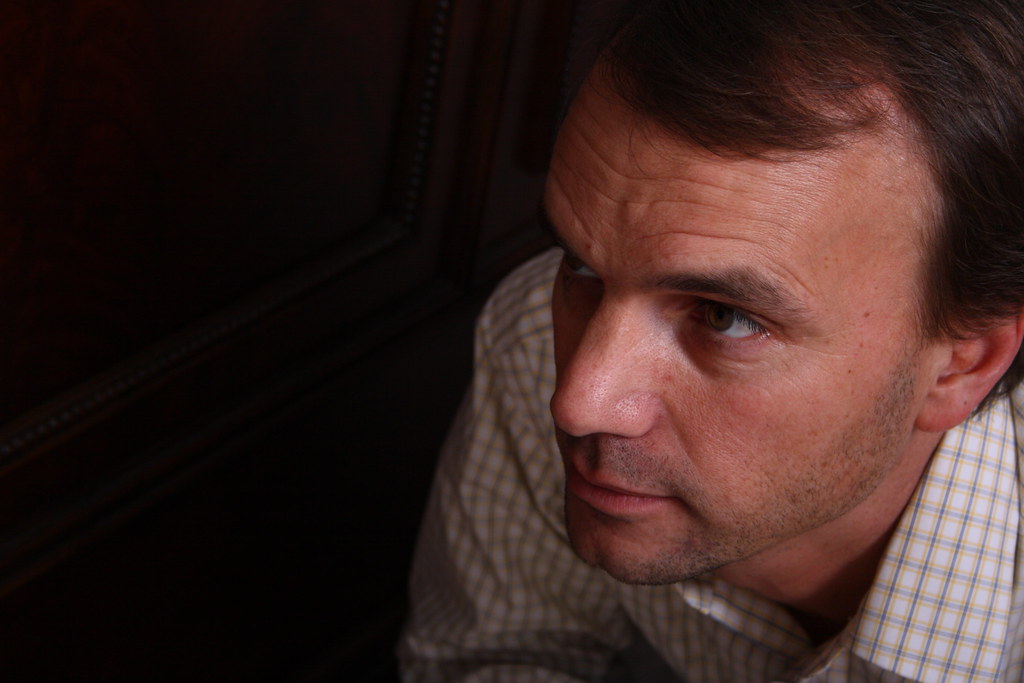
The kicker lights do a nice job of seperating the model from the background - and also provide a significant degree of hair lighting, but you'll notice that it does a poor job of lighting the hair at the top of the head - and to get around that, we use a seperate hair light (yep, strobe #4!). We want this light to be the same quality as our key light - so we use a small softbox, but we don't want it affecting the light on the model's face, so we place it slightly behind the model and angle it slightly forward.
By itself it looks like this ...
To get around the issue of dark areas under the chin and under the left ear (and to a degree the camera right / model left side of the face) we need a degree of fill light. This can be achieved a number of ways; one way is to use strobe #5 with another softbox (see, this studio stuff gets expensive!), but the way I prefer is to simply use one or two large sheets of white polystyrene on wheels for the basic fill light (it's a VERY diffused light source, and the degree of reflection can be adjusted simply by moving them closer to, or further away, from the model. Unfortunately, this STILL doesn't get light up under the model's chin - so I normally use a white / silver reflector mounted on a boom arm (mostly just the white side). I usually place a cane mat on the floor for the model to stand on (so they don't move relative to the lighting) and then setup the reflector so that I can see the key light reflected in it's surface.
Unfortunately, I don't have a seperate shot showing just this part of the lighting setup, but it's readily apparent in the following shot with all of the above lighting switched on ...
So that's all there is too it eh? Well, no, not quite ...
... all of the above really just covers the basic lighting positions - from here they have to have power levels adjusted to give the desired lighting patterns (in the above example the light is a bit too flat), and after THAT, then we're pretty much all set to go ... for that set. For the next set we pretty much strip it all down and start againAnd of course for each set we have to work out what works for each model - and then bracket a variety of shots with different expressions / eye position / body position etc with the hope of capturing "the chosen few" that makes it all worthwhile
In terms of "the basics", I typically shoot at 1/125th @ F11 @ ISO 100. I don't want to go any faster than 1/125th because the strobes won't sync and I'll end up with banding, and there's no point in going much below about 1/100th as it just lets in more ambient light (but it's still not really an issue). I typically shoot F11 to F22 - it sounds pretty extreme, but the bottom line is I'm limited by the minimum output of the strobes ... if I have a fill light set to minimum then other lights (like the key light) has to be set higher, and F11 to F22 is pretty much where we always end up. The good news is that the "house lights" are usually on all the time, and if I take a shot with the strobes switched off then I get a totally dark frame - takes a bit of getting used to, but that's the way it is!
If I want to have a reduced DoF then I switch to ISO 50 and put a ND filter on the camera. Works "OK", but slows AF considerably.
Hope you all enjoyed ... any questions?
 Helpful Posts: 0
Results 1 to 20 of 36
-
27th December 2010, 04:22 AM #1

- Join Date
- Dec 2008
- Location
- New Zealand
- Posts
- 17,660
- Real Name
- Have a guess :)
"School of Portraiture" - Lesson 06 - Introduction to Basic Studio Lighting
Last edited by Colin Southern; 27th December 2010 at 06:22 AM.
-
27th December 2010, 07:19 AM #2
- Join Date
- Feb 2010
- Location
- Victoria Australia
- Posts
- 2,634
- Real Name
- Kay
Re: "School of Portraiture" - Lesson 06 - Introduction to Basic Studio Lighting
Thankyou Colin
It definitely makes sense with each image shown in turn with some of the lighting - I imagine if the model had had black hair as well as a black dress, then the kicker lights would have been even more important? - maybe even needing to be stronger?
I don't know what you mean by 'tight grid' though in that point.
I will have another thorough read through tomorrow - but I have 1 question for now and it applies to our outdoor setting as well as maybe inside and that is model's/subjects or in my case random family or friends who I practice on...what about glasses?
I have thought it's been easy to practice on young Fashionista and her friends but realistically a lot of my own friends when I have asked can i practice on them have mentioned a shot of their kids with 1 or other grandparent would be nice.
I haven't had a chance to set up any of these practice sessions yet but hope to over January, now These grandparents I'm expecting might be wearing specs...do you have any problems with or how do you get around reflections from glasses in the studio lighting setup?
And probably a lot more relevant to what I am likely to be doing - how would you manage the 'transitions' lenses in the outdoor setting.
Easy answer of course would be ask them to take the glasses off - but I'm thinking they may not feel comfortable doing that.
Do you have a plan B suggestion if they insist the glasses are a full time thing and part of their personality?
I myself had to resort to transitions lenses - as if I wore normal sunglasses in the car - popped into the shops - oops can't read the packaging - suddenly I've rented a Bananas in Pyjamas movie - so I couldn't do without mine.
Anyway thankyou again for part 6 - I'm sure i'll think of another question after we watch tonight's movie.
I chose 'Salt' with the benefit of my glasses
-
27th December 2010, 09:45 AM #3
- Join Date
- Dec 2008
- Location
- New Zealand
- Posts
- 17,660
- Real Name
- Have a guess :)
Re: "School of Portraiture" - Lesson 06 - Introduction to Basic Studio Lighting
Hi Kay,
Finally, something "near and dear" to my heart to talk about
Basically, grids are honeycomb structures that fit into the front of reflectors that inturn mount onto the front of strobes. The thicker the grid, the less the light spreads (they vary between 8 & 30 degree beams). If I don't use one then the light bounces around so much inside the studio that it's hard to control.
To be honest, I really don't worry too much about power levels; the strobes can be set over a 6 stop range and I just set them to where-ever they need to be set - the trick is though (and this is an important one) ... SET THEM UP ONE LIGHT AT A TIME. Having seperate lights for the model and either background or kickers means you're effectively working 2 zones of light (I try to get the model about 5 metres in front of the backdrop) so it opens up a world of total control (everything from "whiter than white" (eg blown white background) to medium gray (white background with no lights) to darker gray (black background with lights) to black background. Black items on a black background REALLY make the skin tones pop, but kickers can add a nice new dimension in these kinds of shots.
In terms of glasses ...
there are a number of ways around them ...
- Take them off
- Take the lenses out
- Have a fake pair without lenses
- Take 2 shots - one with glasses, one without - then Photoshop what the glass in the frames may cover
- Keep transitional lenses covered until you're ready to take the shot (they react to UV light)
- but last and best ... if you're using a flash, angle it so that it doesn't bounce light back towards the camera (in essence the glass is only a mirror). (or as we say, keep it "outside of the family of angles").
Inside the studio it's easy because there's no UV coming from the modeling lights in the strobes, and it's easy to check the angles, although having just said that, they can still darken things a little. As an example, in this recent portrait I used the pen tool to create a path around the inside of the rim - ctrl+J to duplicate the selected portion to a new layer - select screen blending - reduce the opacity - and "hey presto", no more light attenuation due to the glasses

Last edited by Colin Southern; 27th December 2010 at 09:53 AM.
-
29th December 2010, 11:32 PM #4

- Join Date
- Nov 2010
- Location
- Owensboro, KY
- Posts
- 1,530
- Real Name
- Brian
Re: "School of Portraiture" - Lesson 06 - Introduction to Basic Studio Lighting
Great, now I need to buy 3 strobes????
-
30th December 2010, 01:24 AM #5
- Join Date
- Nov 2010
- Location
- Owensboro, KY
- Posts
- 1,530
- Real Name
- Brian
Re: "School of Portraiture" - Lesson 06 - Introduction to Basic Studio Lighting
Well, it's dark outside, I only have one flash, and I don't have any models.... so I substituted myself as a model - ugh! I used some bounce flash and a reflector at first, but those shots weren't contrasty enough for what I was trying for, so... I used only bounce and got some contrast, and I think these 3 photos are OK lighting wise, but I wasn't paying much attention to the background...

-
30th December 2010, 05:05 AM #6
- Join Date
- Dec 2008
- Location
- New Zealand
- Posts
- 17,660
- Real Name
- Have a guess :)
Re: "School of Portraiture" - Lesson 06 - Introduction to Basic Studio Lighting
Nah - at least 5 Originally Posted by speedneeder
 (that's what I have, plus 4 speedlites, but to be honest, sometimes I could do with a couple more) (2 for background, 2 for kickers, 1 for key, 1 for hair, 1 for fill).
Last edited by Colin Southern; 30th December 2010 at 05:22 AM.
-
30th December 2010, 05:11 AM #7
- Join Date
- Dec 2008
- Location
- New Zealand
- Posts
- 17,660
- Real Name
- Have a guess :)
Re: "School of Portraiture" - Lesson 06 - Introduction to Basic Studio Lighting
Hi Brian, Originally Posted by speedneeder
If I only had one flash in the studio then I would fire it through a diffuser that was relatively close to the subject (closer for girls, further away for guys), and then use a V-flat (2x 1.2 x 2.4m polystyrene sheets joined in the middle with ducktape) for fill light, and another reflector on a boom arm to bounce light up under the chin more.
In the setup you have here, you could probably aim the flash at the reflector to get a reasonably good spread of light too (or use a shoot-through umbrella, which is also good for outdoor work).
Is that making any sense?
PS: All of these are showing as severely under-exposed at my end
-
30th December 2010, 01:27 PM #8
- Join Date
- Nov 2010
- Location
- Owensboro, KY
- Posts
- 1,530
- Real Name
- Brian
Re: "School of Portraiture" - Lesson 06 - Introduction to Basic Studio Lighting
Colin, thank you for the feedback.
This was a first attempt at portraiture with a bounce flash, so definitely lots to learn. Right now I'm bouncing my shoe mount flash off the wall or a 'reflector' ($3 walmart poster board). Also, my subject was less than ideal I was going for a subdued background with a high degree of contrast on the subject, which I think turned out OK, though I do need to pay more attention to exposure and shadows. As previously mentioned, I payed no attention to the background, as I was just interested to see how the lighting worked out on the 'subject'.
I think these are an improvement over my typical roof bounce flash that I have done in the past.
Right now I'm doing some research on off shoe flash gadgets, like the pocket wizards that I've seen you post about before. Though I'm sure they work great and are well made, their cost is a little more than I would care to spend at this time. I have been considering the chinese RF-602 remote triggers as they are far less expensive. After that I'll be looking for a light flash stand and an umbrella. If you only had one, would you recommend a bounce umbrella or a shoot through? And for that matter, maybe I should be looking at adding a soft box first? I was thinking I would get more use and flexibility from a single umbrella than a single soft box (for a speedlite type flash). *edit: I just reread your previous post and it looks like you already answered this *
Thanks again for commenting. I appreciate you taking the time to host these portraiture lessons! I'm just beginning this portraiture stuff, and I do look forward to reading yours and others' comments on this forum.
-
30th December 2010, 08:29 PM #9
- Join Date
- Dec 2008
- Location
- New Zealand
- Posts
- 17,660
- Real Name
- Have a guess :)
Re: "School of Portraiture" - Lesson 06 - Introduction to Basic Studio Lighting
Hi Brian,
There are two kinds of wireless triggers; "cheap" and "good"! Seriously, ones that will fire a strobe manually are a dime a dozen, but if you swallow the bitter pill and invest in a PocketWizard TT1 / TT5 / AC3 combination then you've got fingertip control over 3 zones of light and complete ETTL control too if you want it. I appreciate that it's not for everyone, but keep in mind that if you get more serious about this - but start with something cheaper - then you'll probably end up buying them later anyway (so you'll have wasted the money on the no-name triggers).
Softness of light is a function of how close the light source is - so I'd go with the shoot-through as you can get it closer. Reflector umbrellas spray the light everywhere.
Soft boxes are the ultimate, but you won't get enough power out of a speedlite; you're definately into studio strobe territory at that point (at which point you're better of getting Elinchome, and using Skyports to again have zone control) (4 channels, although I wish I had more at times!).
Sorry - got to run - will post more later!
-
30th December 2010, 11:45 PM #10
- Join Date
- Nov 2010
- Location
- Owensboro, KY
- Posts
- 1,530
- Real Name
- Brian
Re: "School of Portraiture" - Lesson 06 - Introduction to Basic Studio Lighting
Well, if you had choice to have no wireless trigger, or an RF-602, which would you choose!? That's about where I'm at. Does ETTL work on the PW with a rebel XTi? I didnt' think it would?
Anyway, I altered the exposure on one of my self portraits per Colin's input, and I do think I prefer these results.
-
31st December 2010, 12:21 AM #11
- Join Date
- Dec 2008
- Location
- New Zealand
- Posts
- 17,660
- Real Name
- Have a guess :)
Re: "School of Portraiture" - Lesson 06 - Introduction to Basic Studio Lighting
Hi Brian,
I think I'm possibly getting myself confused here. What light sourse are you planning to use for studio shots? Speedlite or Studio Strobes?
-
31st December 2010, 12:35 AM #12
- Join Date
- Nov 2010
- Location
- Owensboro, KY
- Posts
- 1,530
- Real Name
- Brian
Re: "School of Portraiture" - Lesson 06 - Introduction to Basic Studio Lighting
Speedlite
-
31st December 2010, 12:36 AM #13

- Join Date
- May 2008
- Location
- Setubal - Portugal
- Posts
- 5,034
- Real Name
- António Correia
Re: "School of Portraiture" - Lesson 06 - Introduction to Basic Studio Lighting
Great lesson Colin.
and great work of yours...
Health to your family and yourself is my wish for 2011 !
-
31st December 2010, 01:42 AM #14
- Join Date
- Dec 2008
- Location
- New Zealand
- Posts
- 17,660
- Real Name
- Have a guess :)
Re: "School of Portraiture" - Lesson 06 - Introduction to Basic Studio Lighting
Hi Brian, Originally Posted by speedneeder
Here begins a journey ...
There are a number of option for studio lighting - unfortunately - they don't necessarily tie in particularly well with lighting for outdoor portraiture. Outside you can get by with a single speedlite firing into a shoot-through umbrella (essentially what I'm using, albeit I use two into the one brolly) because we're mostly in a fill flash situation. Studio lighting is different though in that ambient light is more of a curse than a blessing - so we typically use studio strobes to light everything.
The principles of using a speedlight in the studio doesn't really change - but - there's a MASSIVE difference in power output; you're looking somewhere in the region of 80 watt/seconds for a 580EX II (lot of debate over the exact figure) -v- up to 1200 watt seconds for my 1200RXs (and I run up to 5 of them) (for a peak power output of up to about 6 MILLION watts); so obviously a single speedlight is going to struggle.
In reality, I see 4 options ...
1. Speedlight, fired by a cheap wireless device (manual control of output)
2. Speedlight, fired by PocketWizard (offering manual power adjustment and/or ETTL options) (via AC3 zone controller)
3. Studio strobe, fired by cheap wireless device (manual control of output)
4. Studio strobe, remote control or power output
In reality I use option 2 for most outdoor work, and option 4 for studio shoots, so different equipment for different situations which works best, but of course is also the most expensive. For studio work - ultimately - there's really no getting away from studio strobes, but the good news is that the range in price from "expensive" all the way down to "pretty darn inexpensive", and all the expensive ones do is give you a degree of luxury in terms of faster recycle times / remote and centralised power management etc ... something that - for me - is a life saver in that it stops a 4 hour shoot turning into an 8 hour shoot if I don't have an assistant that day, but if you're not gearing up for a state of the art studio then the basic models are more than adequate; they're cheap - still kick the living daylights out of a speedlite ... you just have to adjust power levels manually.
So that would be my recommendation. The other thing to keep in mind is that there's still many more things you're going to need (backdrops, light stands, diffusers, reflectors, snoot, barn doors, grids, softboxes to name just a few) - not all at once, but each has a place that allows you to tap into a different style or push things a little further.
Hope this helps (or at least doesn't put you off too much). For me, the floorspace - backdrops - lighting etc was just the beginning; there's ALWAYS something more needed ... just the other day I spent close to 1/2 a grand on makeup and hair products (straightener, curler, drier, eye liner - eye shadow - powder - blush - gloss - glitter) (and no, not all of that is for me to wear!)
Just some food for though ... if you can give me more of an idea as to what you'd like to be able to do then I might be able to refine things for you a bit more.
-
3rd January 2011, 06:12 AM #15
- Join Date
- Sep 2010
- Posts
- 23
- Real Name
- Scott
Re: "School of Portraiture" - Lesson 06 - Introduction to Basic Studio Lighting
Hey Colin!
Long time no talk to. Happy New Years by the way. Hope your family is doing well and continues to enjoy health and success in this new year.
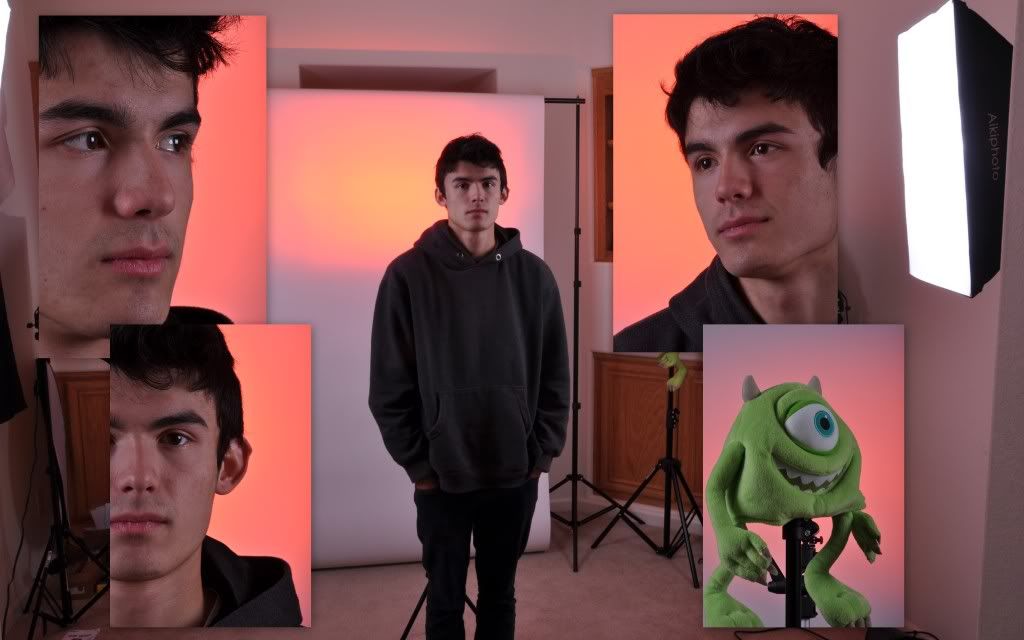
Just yesterday I read an article about a three flash setup I thought I would try. I don't have a nice diagram to post but imagine stobes with softboxes set at equal power directly to the left and right of the model; then, flash hidden behind the back with colored filter to spot the backdrop.
I tried that for fun and did a little collage that hints at the setup and colors. I spent no time whatsoever in photoshop cleaning up the images at all. Nor, did the model spend any time on makeup or wardrobe (couldn't get my son to be bothered with any of that if I wanted to anyway).
Here goes just for the fun of it.
PS I don't know how often you get thanked for all the time and hard work you put into this site (and forums), but Thanks. I also work in a tiny space and can tell you that spill over from having the model too close to the backdrop is a constant challenge. And, feathering the lighting away from the model is not only soft and pleasing lighting for the model but keeps the light away from the backdrop.
ScottLast edited by plankton; 3rd January 2011 at 06:25 AM.
-
3rd January 2011, 01:44 PM #16
- Join Date
- Nov 2010
- Location
- Owensboro, KY
- Posts
- 1,530
- Real Name
- Brian
Re: "School of Portraiture" - Lesson 06 - Introduction to Basic Studio Lighting
Colin, right now I'm just trying to learn how to take a decent family portrait. I do on occassion use my shoe mounted speedlight for outdoor fill, though I will probably get a 'cheap' wireless flash trigger to try some off camera stuff. With that I plan to get a flash stand and a shoot through umbrella to dabble in portraits. From reading your posts and others, it looks like I'll eventually need more than one fash though
In the mean time I'll see what I can do with natural light and one speedlite. I looked at some studio strobes after your suggestion, and I just don't see myself spending that kind of money on portraiture lighting.
Thanks again for your input.
-
3rd January 2011, 08:04 PM #17
- Join Date
- May 2010
- Location
- Nashville Tennessee USA
- Posts
- 386
- Real Name
- Chriss Goyenechea


Re: "School of Portraiture" - Lesson 06 - Introduction to Basic Studio Lighting
Colin, what's the cheapest 2 strobe lighting kit you would recommend? I'm not sure if this question is to generalized but I've been looking at amazon.com and saw strobe kits that are $100-$300. Are the good enough to start and play around for studio portraiture? or i'm just wasting my money on them?
Here's one that interest me
-
4th January 2011, 03:58 AM #18
- Join Date
- Dec 2008
- Location
- New Zealand
- Posts
- 17,660
- Real Name
- Have a guess :)
Re: "School of Portraiture" - Lesson 06 - Introduction to Basic Studio Lighting
Hi Scott, Originally Posted by plankton
Happy new year to you and your family too.
Looks like you're having fun with the setup. My only suggestion is to experiment with the power coming out of yout two key light and get a bit of direction to the lighting and see if you like that any better.
-
4th January 2011, 04:11 AM #19
- Join Date
- Sep 2010
- Posts
- 23
- Real Name
- Scott
Re: "School of Portraiture" - Lesson 06 - Introduction to Basic Studio Lighting
Hi Colin - Was a fun 15 min shoot and yes will spend a bit more time on the lighting direction (ratios) and get my sons face a bit brighter relative to the backdrop.
@Crovean - the cheapest strobes and modifiers (softboxes, etc) are those you borrow from your friends!!
Colin can go into much more detail, but you don't want to get such limited heads that you cannot adequately control their power, color shifts or strobe dies after a few months.
Seriously think about making some friends with nice equipment, trying it out (and taking them to lunch), then investing in some nice equipment of your own. There are lots of manufacturers out there : AlienBees, Calumet, etc.
Scott
-
4th January 2011, 04:56 AM #20
- Join Date
- Dec 2008
- Location
- New Zealand
- Posts
- 17,660
- Real Name
- Have a guess :)
Re: "School of Portraiture" - Lesson 06 - Introduction to Basic Studio Lighting
Hi Brian, Originally Posted by speedneeder
I'd suggest just starting with outdoor stuff with a shoot-through. If you have a VAL (Voice Activated Lightstand!) then so much the better. Manual triggering is certainly quite workable - just remember to keep your umbrella to subject distance consistant for a given flash output / aperture.
Outdoor stuff is easy - only 2 light sources to worry about, and the camera pretty much takes care of one of those for you anyway


