
 Helpful Posts:
 OK - so I get the general concept of sharpening. I have read the tutorials and understand where it sits in the workflow. I understand pretty much what sharpening does in theory. Trouble is I can't really recognize an image that is in dire need of sharpening.
I took a few photos over the weekend and have included these below. Some I have played around with in Lightroom to sharpen a little bit but I haven't yet tried selective sharpening via Gimp. What I was hoping is that someone could point out and say "Yes - that image is in dire need of sharpening. Look at area xyz which is really blurry and could use some help. Try using method abc to sharpen this". Alternatively the answer of "no the images look pretty good and don't need anything further" would also help (although would be slightly more boring as I wouldn't learn a great deal more).
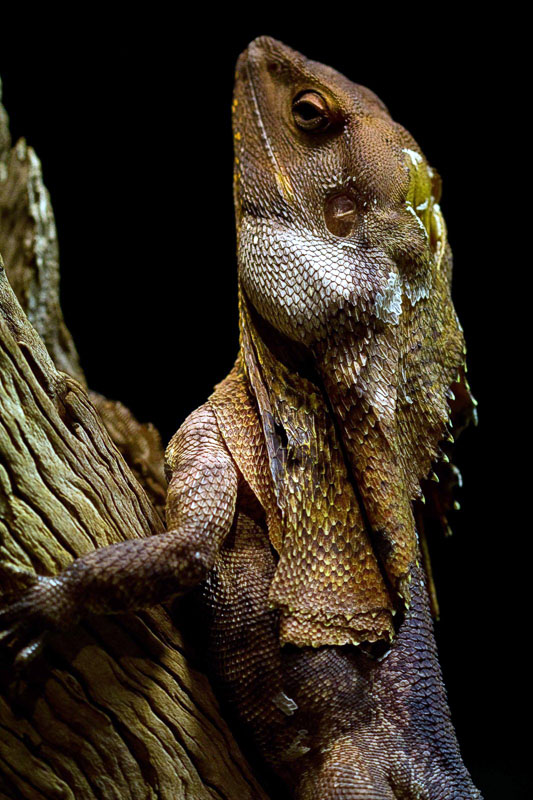
So here goes, a lizard, roo and flower.
My view is (for confirmation by those more knowledgable):
* The roo is pretty good and doesn't need anything further
* The flower probably could use some sharpening around it - it is a little blurry (mind you it is quite delicate to balance the exposure in this shot)
* The lizard isn't bad and probably doesn't need anything
Thanks in advance
Results 1 to 17 of 17
-
4th April 2011, 01:23 PM #1


- Join Date
- Jan 2011
- Location
- Perth, Australia
- Posts
- 254
- Real Name
- Peter
Knowing when to apply sharpening and by how much
-
4th April 2011, 03:20 PM #2
- Join Date
- Aug 2009
- Posts
- 2,342
- Real Name
- Steve
Re: Sharpening
Sharpening does more than just sharpen an image, it can be used for contrast as well. To sharpen properly, you need to use layers. I usually sharpen an image 4 times before it is displayed on the web. 2 contrast layers, 1 output layer, and one after resizing.
Here is your first image with some contrast sharpening ............output sharpening........color correction............and a little sharpening after resizing..................
-
4th April 2011, 06:32 PM #3
- Join Date
- Jan 2009
- Location
- South Devon, UK
- Posts
- 14,859
Re: Sharpening
Steve, the lizard's nose still appears slightly soft too me. Would I be correct in assuming that you have tried to improve this but it is too far from the focus point for any extra selective sharpening to work?
Ricco, I suspect that a little sharpening on the Roo's body hair would still work. Not the head which looks fine to me. I would probably do this on a layer plus mask; but don't overdo this, just a little will suffice.
And personally, I would ditch the flower. It would be possible to add a bit of selective brightness, once again with a layer/mask but unless there is a definite need for this photo, i wouldn't bother.
Although having said that, I suppose it would be an interesting training experience.
-
4th April 2011, 06:59 PM #4
- Join Date
- Aug 2009
- Posts
- 2,342
- Real Name
- Steve
Re: Sharpening
The problem with this image is the focus. It wasn't on the lizards eye. Not much you can do about a bad focus. The color correction and various sharpening did however improve the image. The small scale contrast/large scale contrast/color contrast were all improved. Originally Posted by Geoff F

-
4th April 2011, 07:01 PM #5
- Join Date
- Mar 2009
- Posts
- 2,522
Re: Sharpening
Peter
It looks as if you may be working with a very narrow dof on the lizard. The lizards scales on the shoulder are sharp but the nose and the leg are soft. I don't know what your aperture setting was but I would try with smaller aperture for this type of shot in future. Steve's P&P is a very good fix but there is only so much you can do if the depth composition was out at capture. The roo looks fine in terms of depth composition but still looks a tad soft to me. As said above the flower has more wrong with it than sharpness and I am not sure there is a great deal you could do to fix it.
-
4th April 2011, 11:22 PM #6
- Join Date
- Jan 2011
- Location
- Perth, Australia
- Posts
- 254
- Real Name
- Peter
Re: Sharpening
Yep - most were posted here primarily as a learning experience moreso that whether I liked the shots or not (although I did kind of like the flower
 ). I looked at the shots with the finer detail that would give me more learning with regards to this and these are the ones I posted.
The lizard was shot with a large aperture and high iso as it was pretty low light - so yes agree that the focus probably wasn't ideal.
Steve - what were the types of things you were looking for when you did your PP? Was there anything that you looked at and said "gee that doesn't look right." Or did you just play around with the various settings until you got something that appeared a little more natural? From my original shot, I can see that the back is a bit sharper and likewise it's cheek.
Similar with the roo - is there anything that jumps out that says "needs sharpening" or is it a case of just play with the settings and see how it looks.
I guess like many things photographic, one of the first steps to fixing things is recognising what is wrong and that is what I'm trying to understand a bit more - in this case I'm trying to get my head around the sharpening.
Thanks
-
5th April 2011, 02:30 AM #7
- Join Date
- Aug 2009
- Posts
- 2,342
- Real Name
- Steve
Re: Sharpening
Ricco, the first thing i do on every image is fix the color if needed. Most images only need a tweek of the WB sliders. Some images you need to adjust the R G B channels with the levels tool independently (just the black and white sliders---move them to the edge of the histogram) Some images, if the R G B histograms are clipped, you need to use the gray point to adjust the whitebalance. If the image looks too cool (often it will because of a neutral WB) you can then warm it up a bit to your liking. Originally Posted by Ricco
The next thing i do is adjust the large scale contrast with the curves tool. Make shure you set the blend mode to luminosity so you don't change the colors you just worked so hard at correcting.
Next is small scale contrast.............use unsharp mask to adjust this.(blend mode luminosity) (Usually a larger radius and small amount. This takes a little practice to get right, every image is different. I usually set the amount to 100 to start and slowly increase the radius untill the image starts to degrade, then move the radius down a little and the amount to around 40 or 50. Then adjust the opacity to my liking.) You can also do this with the clarity slider in LR
Then just look the image over and see what else it needs...............something cloned---saturation----etc.
When done, i sharpen with an edge mask..........save a copy
Resize...........sharpen again at 100/0.2 rad. ...adjust the opacity and save a copy
-
5th April 2011, 04:41 AM #8
- Join Date
- Jan 2011
- Location
- Mumbai&Delhi-India. Also LA USA.
- Posts
- 29
- Real Name
- Amol Sandil
Re: Sharpening
Originally Posted by Ricco
-
5th April 2011, 01:08 PM #9New Member

- Join Date
- Mar 2011
- Location
- Wakefield, RI, USA
- Posts
- 9
- Real Name
- Nelson
Re: Sharpening
Steve, I have even less experience than Ricco, so I went to the tutorials to try to figure some of this out. Your post of yesterday answered some questions. In "Guide to Image Sharpening" they distinguish between "capture sharpening", "creative sharpening", and "output sharpening". I think you have addressed some of the latter two. But I think one elementary question is still unanswered. How did you get the original image and what influence did that have on sharpening it? Is it a simple screen capture (CTRL-OPT-Shift-4 on the Mac)? Originally Posted by Steve S
-
5th April 2011, 02:57 PM #10
- Join Date
- Aug 2009
- Posts
- 2,342
- Real Name
- Steve
Re: Sharpening
I just copied the first image. It's not a full resolution image . I had to add the sharpening accordingly. Originally Posted by nhweid
I start my sharpening with the raw editor. (i use dxo) The sharpening in most raw editors(including dxo) doesn't do a great job, but it works rather well as a contrast enhanser.(larger radius and small amount) I don't capture sharpen, i use the raw sharpening and a layer of noise reduction (these two things kind of counteract each other a little.) as a contrast boost/capture sharpening.
Next i send the image to LR, where i adjust the fill light and recovery sliders add some clarity and another layer of contrast enhansement with the sharpening.
Next i send the image to PS for any other edits it needs and another layer of sharpening used with an edge mask so i can control what parts of the image i want sharpened.
Next after resizing for the web, i add another layer of sharpening.
Every image is different, so the amount you sharpen will change. You have to develope an eye for what is sharp enough and what is oversharpened.
Hope this helps.
-
5th April 2011, 06:53 PM #11
- Join Date
- Jan 2009
- Location
- South Devon, UK
- Posts
- 14,859
Re: Sharpening
Just as an experiment, Ricco, I have had a quick play around with that flower. But I can't easily do much about the over exposed light source.

Basically just 2 layers, one adjusted for the flower and one for the over exposure. Then a bit of editing on a mask using a soft edged low opacity brush.
And here is a quick bit of subtle sharpening on your roo.
Once again using a layer and mask.
Created a duplicate layer and sharpened it to suit the softer areas, ignore any oversharpened bits for now. Added a Hide All Mask which hid the sharpening from view. Then used a soft low opacity 'white' brush to gradually reveal the areas which I thought to be in need of extra sharpening. Anything which I considered to already be sufficiently sharp was unaffected.
Have you also read this tutorial http://www.ronbigelow.com/articles/s...1/sharpen1.htm
or this one http://www.thelightsrightstudio.com/tutorials-pdf.htmLast edited by Geoff F; 5th April 2011 at 07:07 PM. Reason: photos added
-
5th April 2011, 11:22 PM #12
- Join Date
- Jan 2011
- Location
- Perth, Australia
- Posts
- 254
- Real Name
- Peter
Re: Sharpening
Steve / Geoff - thanks for the assistance.
With the above advice in hand, I might dig out another photo from the weekends shots and see if I can go through the processes stated above to see where I end up at.
I think I'm starting to hate photography - just when I think I have something under control, I learn something else that I am well and truly behind on....
Thanks
-
6th April 2011, 11:42 AM #13
- Join Date
- Jan 2011
- Location
- Perth, Australia
- Posts
- 254
- Real Name
- Peter
Re: Sharpening
Hi guys - I'm hoping you can bear with me because the advice is great so far. I have selected another photo out of my weekend collection and tried to sharpen. At this point I haven't left Lightroom so maybe if there is some feedback about "hey you should have stopped at this point and moved to Gimp" - that would be great.
This is the image directly exported from the RAW image in lightroom (well actually I have cropped it a little).

At this point I have adjusted my WB to a level that looked about right - a bit above the "auto" on LR.
Increased my exposure by 1/2 a stop
Increased the saturation a bit to get colours nicer
Using the curves tool went to a higher contrast. At this point I ended up with this.

It is worth noting that LR has a default on its sharpening slide bar of about 25.
At this point I upped my sharpening to 84, radius 2.6 and detail 34 - based around what the snake looked at around it's eye - trying to avoid introducing too much noise.
Tweaked the noise reduction slide bars a little
This is where I ended up.

So - how was my process? Should I have looked at importing into GIMP after the contrast adjustment? Is the final image sharp enough or should I have given it a little more?
Thanks in advance......
Peter
-
6th April 2011, 02:12 PM #14
- Join Date
- Aug 2009
- Posts
- 2,342
- Real Name
- Steve
Re: Sharpening
Looks way oversaturated to me.......................................just with lightroom adjustments.

-
25th April 2011, 01:06 AM #15

- Join Date
- Dec 2009
- Location
- New England, NSW Australia
- Posts
- 311
- Real Name
- Pete
Re: Sharpening
Pete,
Do the snake again and only sharpen that which falls into the focal plane (i.e. that which is in focus, not the blurry [bokeh] bits)
I'd do it in GIMP after you play around with colour, local contrast/defogging etc in Lightroom.
I usually use CaptureNX2 but PS would look like this (you'll have to translate for GIMP as I don't have it):
Duplicate image (ctrl + J)
Apply USM settings to duplicated image (Filter>Sharpen>USM)
Add layer mask and invert (ctrl + I ...mask turns black instead of white)
Select a feathered brush tool, smallish (200 or so), Harness 0% with a white forground colour
Paint over only the sharp areas that you want to emphasis with a 15-20% opacity. Repeat until you like the result
I use this with portraits to aviod noise in the blurry background and non-sharp portions of the photo.
Nice nature pics...love the snake
-
26th April 2011, 12:57 PM #16New Member

- Join Date
- Apr 2011
- Posts
- 8
Re: Sharpening
Being impressed with Steve's job, I have had a go at it myself; result attached for your scrutiny. Originally Posted by Steve S
Corrrecting WB in ACR as the first step was the key (had tired in PS first, but couldn't get it right)

-
26th April 2011, 01:14 PM #17New Member
- Join Date
- Apr 2011
- Posts
- 8
Re: Sharpening
...and since I liked Geoff's recovery of the flower, have tried my best at it too Originally Posted by Geoff F
(his version is more subtle, which I prefer but couldn't match :)

Gotta check out these tutorials now...Last edited by Kiwigrest; 26th April 2011 at 01:33 PM.


 Reply With Quote