
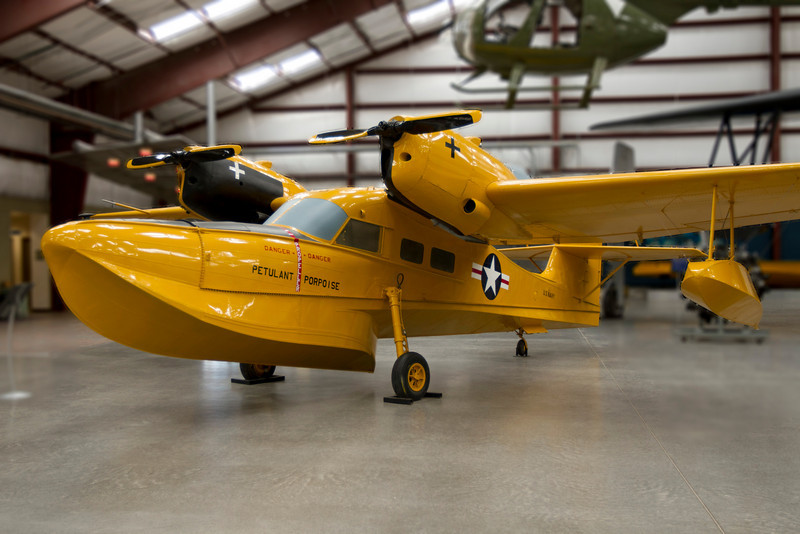
Here's a problem I've been working on for a while. The photo below was taken at a local aviation museum that has a lot of great aircraft, but the airplanes are large, close together, and the background is awful. I'd like to blur everything but the airplane, but blur filters in PP just doesn't work right up to the edge... the colors from the airplane diffuse into the blurred background and the sharpness of the plane is lost. You can see this in a few places in the photo below if you look closely, and at larger scales, it's very noticable. Any suggestions/ideas on how to produce a sharp image with a blurred background in this environment? I've tried stacking images to selectively blur parts of the image with only limited success... I need at least a dozen shots for just the medium-size Widgeon shown below, and it's a very popular museum, so getting that many shots without people in the frame takes hours. Then all the photos have to be blended by hand in PP, which is just as time-consuming. There are over 300 aircraft at this museum, and most are worth shooting, so I'd like a technique that's a bit more practical.
Any advice/suggestions greatly appreciated... including any other ideas (besides blurring) on how to deal with the cluttered background.
 Helpful Posts: 0
Results 1 to 14 of 14
Thread: The blur stops here
-
21st March 2011, 04:23 AM #1


- Join Date
- Dec 2010
- Location
- Tucson, AZ USA
- Posts
- 468
- Real Name
- Al
The blur stops here
Last edited by Snarkbyte; 21st March 2011 at 04:32 AM.
-
21st March 2011, 08:15 AM #2

- Join Date
- Dec 2009
- Location
- WNY
- Posts
- 36,716
- Real Name
- John
Re: The blur stops here
Hi Al, Originally Posted by Snarkbyte

What lens aperture did you use, the larger the aperture (small f/stop) the more DOF you will get, the more the background will be blurred. I've had difficulty getting the type of DOF you describe at f/3.5 and its usually because the background is too close to the sujbect or I am too not far enough away from the subject.
-
21st March 2011, 12:13 PM #3
- Join Date
- Nov 2009
- Location
- Provence, France
- Posts
- 993
- Real Name
- Remco
Re: The blur stops here
I had a similar problem recently. My solution was to select the main subject, inverse the selection and blur in a number of steps, each stronger than the previous one. Between each blurring step I reduced the selection (getting the border farther away from the subject) and applied a bit of feathering. Final correction were done with a blurring brush.
This allowed me to use a very strong blurring on the background, while preventing halos to form around the subject.
I use the GIMP, so instructions about which buttons to press might not be helpful...
-
21st March 2011, 01:17 PM #4

- Join Date
- Sep 2009
- Location
- Burton on Trent, UK
- Posts
- 4,788
- Real Name
- Steve
Re: The blur stops here
I have this problem at museums and have not found a general solution. But since each aircraft is a bright colour have you tried turning the colours down on the others; basically you want it to stand out.
I do a lot of layer adjustments, and have developed a technique of duplicated the base image 9 times not necessarily using all of them. But it is important that layer 5 is multiply blend and a Gaussian blur of greater than 30 pixels is applied.
Layers under that just bring the light back up and are screen blend.
A luminosity layer 8 is set at 10% opacity initially, and I mess around with the blur looking to highlight something. Unused layers invisible.
Layer 6 is either Pin Light, Linear Light, Difference ect ect different opacity to taste.
Layer 7 goes with layer 6 to bring colour back to normal and is Color blend 100% opacity.
I create a levels adjustment layer above layer 8 using Pin Light blend hence Layer 9 is a Color blend 100%
On top of this in this case I created a Hue/Saturation adjustment layer on yet again Colour blend, took out green, cyan and some red.
Not as hard as it sounds, and worth messing with.

-
21st March 2011, 01:53 PM #5
- Join Date
- Dec 2010
- Location
- Tucson, AZ USA
- Posts
- 468
- Real Name
- Al
Re: The blur stops here
Thanks for the replies, everyone.
John, I understand the relationship of DOF to aperature well enough, but the aircraft are large and space is limited, so they are packed close together. An aperature small enough to focus the subject inevitably brings a lot of the background into focus as well, which is why I've tried the image stack approach.
Remco, the image I posted was done using the technique you described. It works somewhat for small images sizes, but it's just not good enough for a decent size print.
The one approach I've thought of that should work well enough:
Select the subject and cut and paste into a new layer. This will leave the original layer with a transparent "hole" where the subject was.
Make the new layer invisible temporarily and use the clone tool to extend the background into the hole of the original layer. The entire hole doesn't need to be filled in, but more pixels than the blur.
Blur the original layer, then make the layer with the subject visible again. The result won't have any halos because the subject was removed from the original layer before the blurring was done. The blur can be varied in the original layer using a gradient mask for a more realistic appearance. Personally, I think the lens blur looks better than gaussian blur, but that's a minor point.
I was hoping to find something simpler, as getting a good selection all around the aircraft can be time-consuming, and there are a LOT of planes I want to shoot.
-
21st March 2011, 02:27 PM #6
- Join Date
- Sep 2009
- Location
- Burton on Trent, UK
- Posts
- 4,788
- Real Name
- Steve
Re: The blur stops here
If you got layer masks; just apply a linear gradient, then touch up closer items with grey 50%.

-
21st March 2011, 11:12 PM #7
- Join Date
- Dec 2009
- Location
- WNY
- Posts
- 36,716
- Real Name
- John
Re: The blur stops here
PSE8 has a vivid blur tool and I think if you protect the plane the blur will be applied to the rest of the drawing. Originally Posted by arith
-
22nd March 2011, 04:10 AM #8
- Join Date
- Dec 2010
- Location
- Tucson, AZ USA
- Posts
- 468
- Real Name
- Al
Re: The blur stops here
Here's the latest attempt using the "select and blur separately" technique I described earlier. Unfortunately, I just don't think there's going to be any easy short-cut to the results I'm looking for. It's still not quite there yet, but I think I'm on the right track, and I've learned a few things on this attempt.
The "lens blur" filter in CS5 doesn't work with smart object layers. I resorted to the gaussian blur, which just doesn't look quite right to me, so future work will not involve smart object layers. Also, I need more feathering on the selection and judicious use of the eraser tool (instead of selection) for some areas. Also, the healing brush would likely do a better job than cloning in some parts of the image.

-
22nd March 2011, 09:01 AM #9

- Join Date
- Jan 2010
- Location
- California, USA
- Posts
- 304
- Real Name
- Troy
Re: The blur stops here
I know exactly what you mean. Areas outside the selection contribute to the blur.
Here I've made a textured background and merged it with a yellow bunny:

If I simply blur the background, the yellow from the bunny "bleeds" onto the background:

This time I'll make the background its own layer, blur it, duplicate it five times, merge all five, select the bunny and press delete on the newly merged background layer:

You can then merge onto the original if you want.Last edited by pwnage101; 22nd March 2011 at 09:22 AM.
-
22nd March 2011, 08:00 PM #10
- Join Date
- Dec 2010
- Location
- Tucson, AZ USA
- Posts
- 468
- Real Name
- Al
Re: The blur stops here
Thanks, Troy, but could you please explain this last part in a bit more detail? It gets a bit confusing... Originally Posted by pwnage101
Presumably this means in a layer without the bunny? Originally Posted by pwnage101
The duplication and merge gets rid of the transparency that bleeds into the image from the transparent "hole" where the bunny was? Originally Posted by pwnage101
Select the bunny from where? Is there a bunny in this layer or not? And what are you deleting on the merged background layer? This just doesn't seem consistent with everything that has been done before. Confused Originally Posted by pwnage101

I'm completely lost at this point, and have no idea what you've done or what I'm supposedly merging with the "original". Originally Posted by pwnage101
-
22nd March 2011, 09:31 PM #11
- Join Date
- Sep 2009
- Location
- Burton on Trent, UK
- Posts
- 4,788
- Real Name
- Steve
Re: The blur stops here
Actually I think dof is a gradual smooth transition between sharp and not sharp; affecting everything in the image, including the subject. Anything else will look wrong.
But dof is only used in photography because it is one of the very few in camera techniques to highlight a subject; many more things can be done to achieve that.
Could be light , dark, colour or anything.
-
22nd March 2011, 10:47 PM #12

- Join Date
- Nov 2010
- Location
- Manila, Philippines
- Posts
- 3,804
- Real Name
- Willie or Jiro is fine by me.
-
23rd March 2011, 09:05 AM #13
- Join Date
- Jan 2010
- Location
- California, USA
- Posts
- 304
- Real Name
- Troy
Re: The blur stops here
At this point the bunny has been merged with the background and I now have one layer.
This means I've created a selection of the bunny, inversed the selection and copied that onto a new layer. Originally Posted by Snarkbyte
Exactly. I'm sure there are ways of removing the alpha channel, but five duplications seems to be enough. Originally Posted by Snarkbyte
I assume you have somehow saved the outline or selection from the first step. At this point you should have two layers: one background layer (blurred, duplicated, and merged) and the original one under it. Select the background (top) layer and snip off the excess blur by selecting the outline and pressing delete. Originally Posted by Snarkbyte
Again, you should still have two layers at this point. You should be able to alternate between "before" and "after" by hiding the background (top) layer. Originally Posted by Snarkbyte
However, I should add one important fact: If you use "lens blur" photoshop is smart enough to not allow such bleeding (but I'm sure it's just the nature of the algorithm) so long as you provide it with a properly constructed depth map. Keep in mind that a valid depth map must encapsulate the entire original image.
I hope this helps
-
23rd March 2011, 11:57 AM #14
- Join Date
- Dec 2010
- Location
- Tucson, AZ USA
- Posts
- 468
- Real Name
- Al
Re: The blur stops here
Thanks for the input, everyone.
Troy, I figured out what you had done last night, so I should have posted another reply. Thanks again for the explanation, anyway.
Jiro, great work as usual. I played around with lighting last night after I got the blurring issue figured out. My efforts didn't work out as well, largely because I need to better understand the order in which to apply the changes and I need to improve my selection technique. I also tend to attempt to do too much within a single layer, so I'm learning all the beginner mistakes by experience. But I'm learning a lot by trying, lol.
Steve, lighting and factors other than blur will be very important for photos of many of the other aircraft. I started with the Widgeon because the biright color and contrast makes things a bit easier, and mistakes more visible. Many of the other airplanes (especially the military aircraft) are quite drab, and basically have the same tonal value as the concrete floor, so I wanted to use an easier image for practice. Also, there are no elevated shooting positions in this museum, and images of airplane bellies aren't that interesting. I just learned a trick that I hope will allow some better angles, but it will take some practice.

 Reply With Quote
