
 Helpful Posts:
 Hi,
I am responsible for completing a task that I find myself utterly unprepared for. Please provide experienced suggestions/advice/recommendations. Thank you in advance.
Task: Take clear photographs of laminated drawings to be used in book printing.
Problem: Laminate plastic causes glare and reflection in photographs.
Equipment available: Nikkon D7000, one led lamp, one spirit level, cardboard boxes, 20+ years of inexperience in handling a camera.
Attempts/Methods: Indirect lighting - led lamp light reflected off an adjacent wall, and sunlight reflected from kitchen counter/wall. Spirit level placed on camera screen to check tilt before taking pictures. Tripod-free camera positioning.
Results thus far: Indirect lighting by using methods mentioned above results in(mostly) reflection free pictures to be taken of laminated drawings, but picture is blurry on some parts. This usually happens on the opposite sides from direction of incoming light.
Question: How do I resolve the blurriness? I have thought of using two sources of light (two lamps) but, reflection becomes a major issue. How can I stabilise the camera better without using a spirit level before every series of shots. I have not found a tripod suitable enough for the weight of Nikkon D7000. I am happy to do DIY.
Thank You.
Results 1 to 15 of 15
-
12th July 2017, 02:10 AM #1New Member

- Join Date
- Jul 2017
- Location
- Cambridge
- Posts
- 2
- Real Name
- Myat
How to take reflection free non-blurry picture of laminated paper (with Nikon D7000)
-
12th July 2017, 03:53 AM #2Moderator

- Join Date
- Mar 2012
- Location
- Ottawa, Canada
- Posts
- 22,460
- Real Name
- Manfred Mueller
Re: How to take reflection free non-blurry picture of laminated paper with a Nikkon D
Welcome to CiC. If you wouldn't mind clicking the my profile button on the top of the page and adding at least your first name and where you are from to your profile, this would be appreciated. We are a fairly friendly group here at CiC and go on a first name basis.
I've never taken photos of a laminated drawing, but have definitely reproduced images of framed pictures that are behind glass.
First of all, how large are these images and how many will you have to photograph? What lens(es) do you have for the D7000?
You are on the right track with two light sources. There is likely a bit of an issue with the LED lamp, as these tend to be fairly small light sources and don't give you particularly good light (unless you either have a very large LED or a very small subject). The light source has to be quite large, i.e. around the size of the object being photographed. I use studio flash and soft boxes as my light source, placed at a 45 degree angle just outside of the camera frame. This gives me a nice soft and diffuse light.
You need to shoot in a dark room so that ambient light does not reflect off the subject or complicate the lighting colour temperature.
The light source also needs to give off a fairly good spectral range so that the colours are recorded properly. If you are shooting raw, then a neutral target that is hit by the same light as the subject. If you are shooting jpeg, then a custom white balance would be in order.
The camera should be square to the subject and have a long enough focal length to frame the entire piece you are shooting, yet give you enough space to have the light source not get into the frame. I just use my normal lenses for this work and generally an aperture of f/8 to f/11 will give you both a decent depth of field and will be in the "sweet spot" for most lenses. I shoot using a heavy duty tripod with an arm to hold the camera if I am shooting down on a floor or table top.
Positioning the material to be reproduced will be somewhat dependent on its size. If the piece I am photographing is large, I prefer to have it mounted on a vertical surface like a wall. If it is small, shooting down on a floor or table can work as well. I used to have an old enlarger mount that worked well as a copy table. A remote release for the camera is useful.
The subject must be completely flat. If shooting down on a table or floor, putting a heavy piece of glass to hold it flat is quite useful.
It really is a lot less complicated than it sounds.
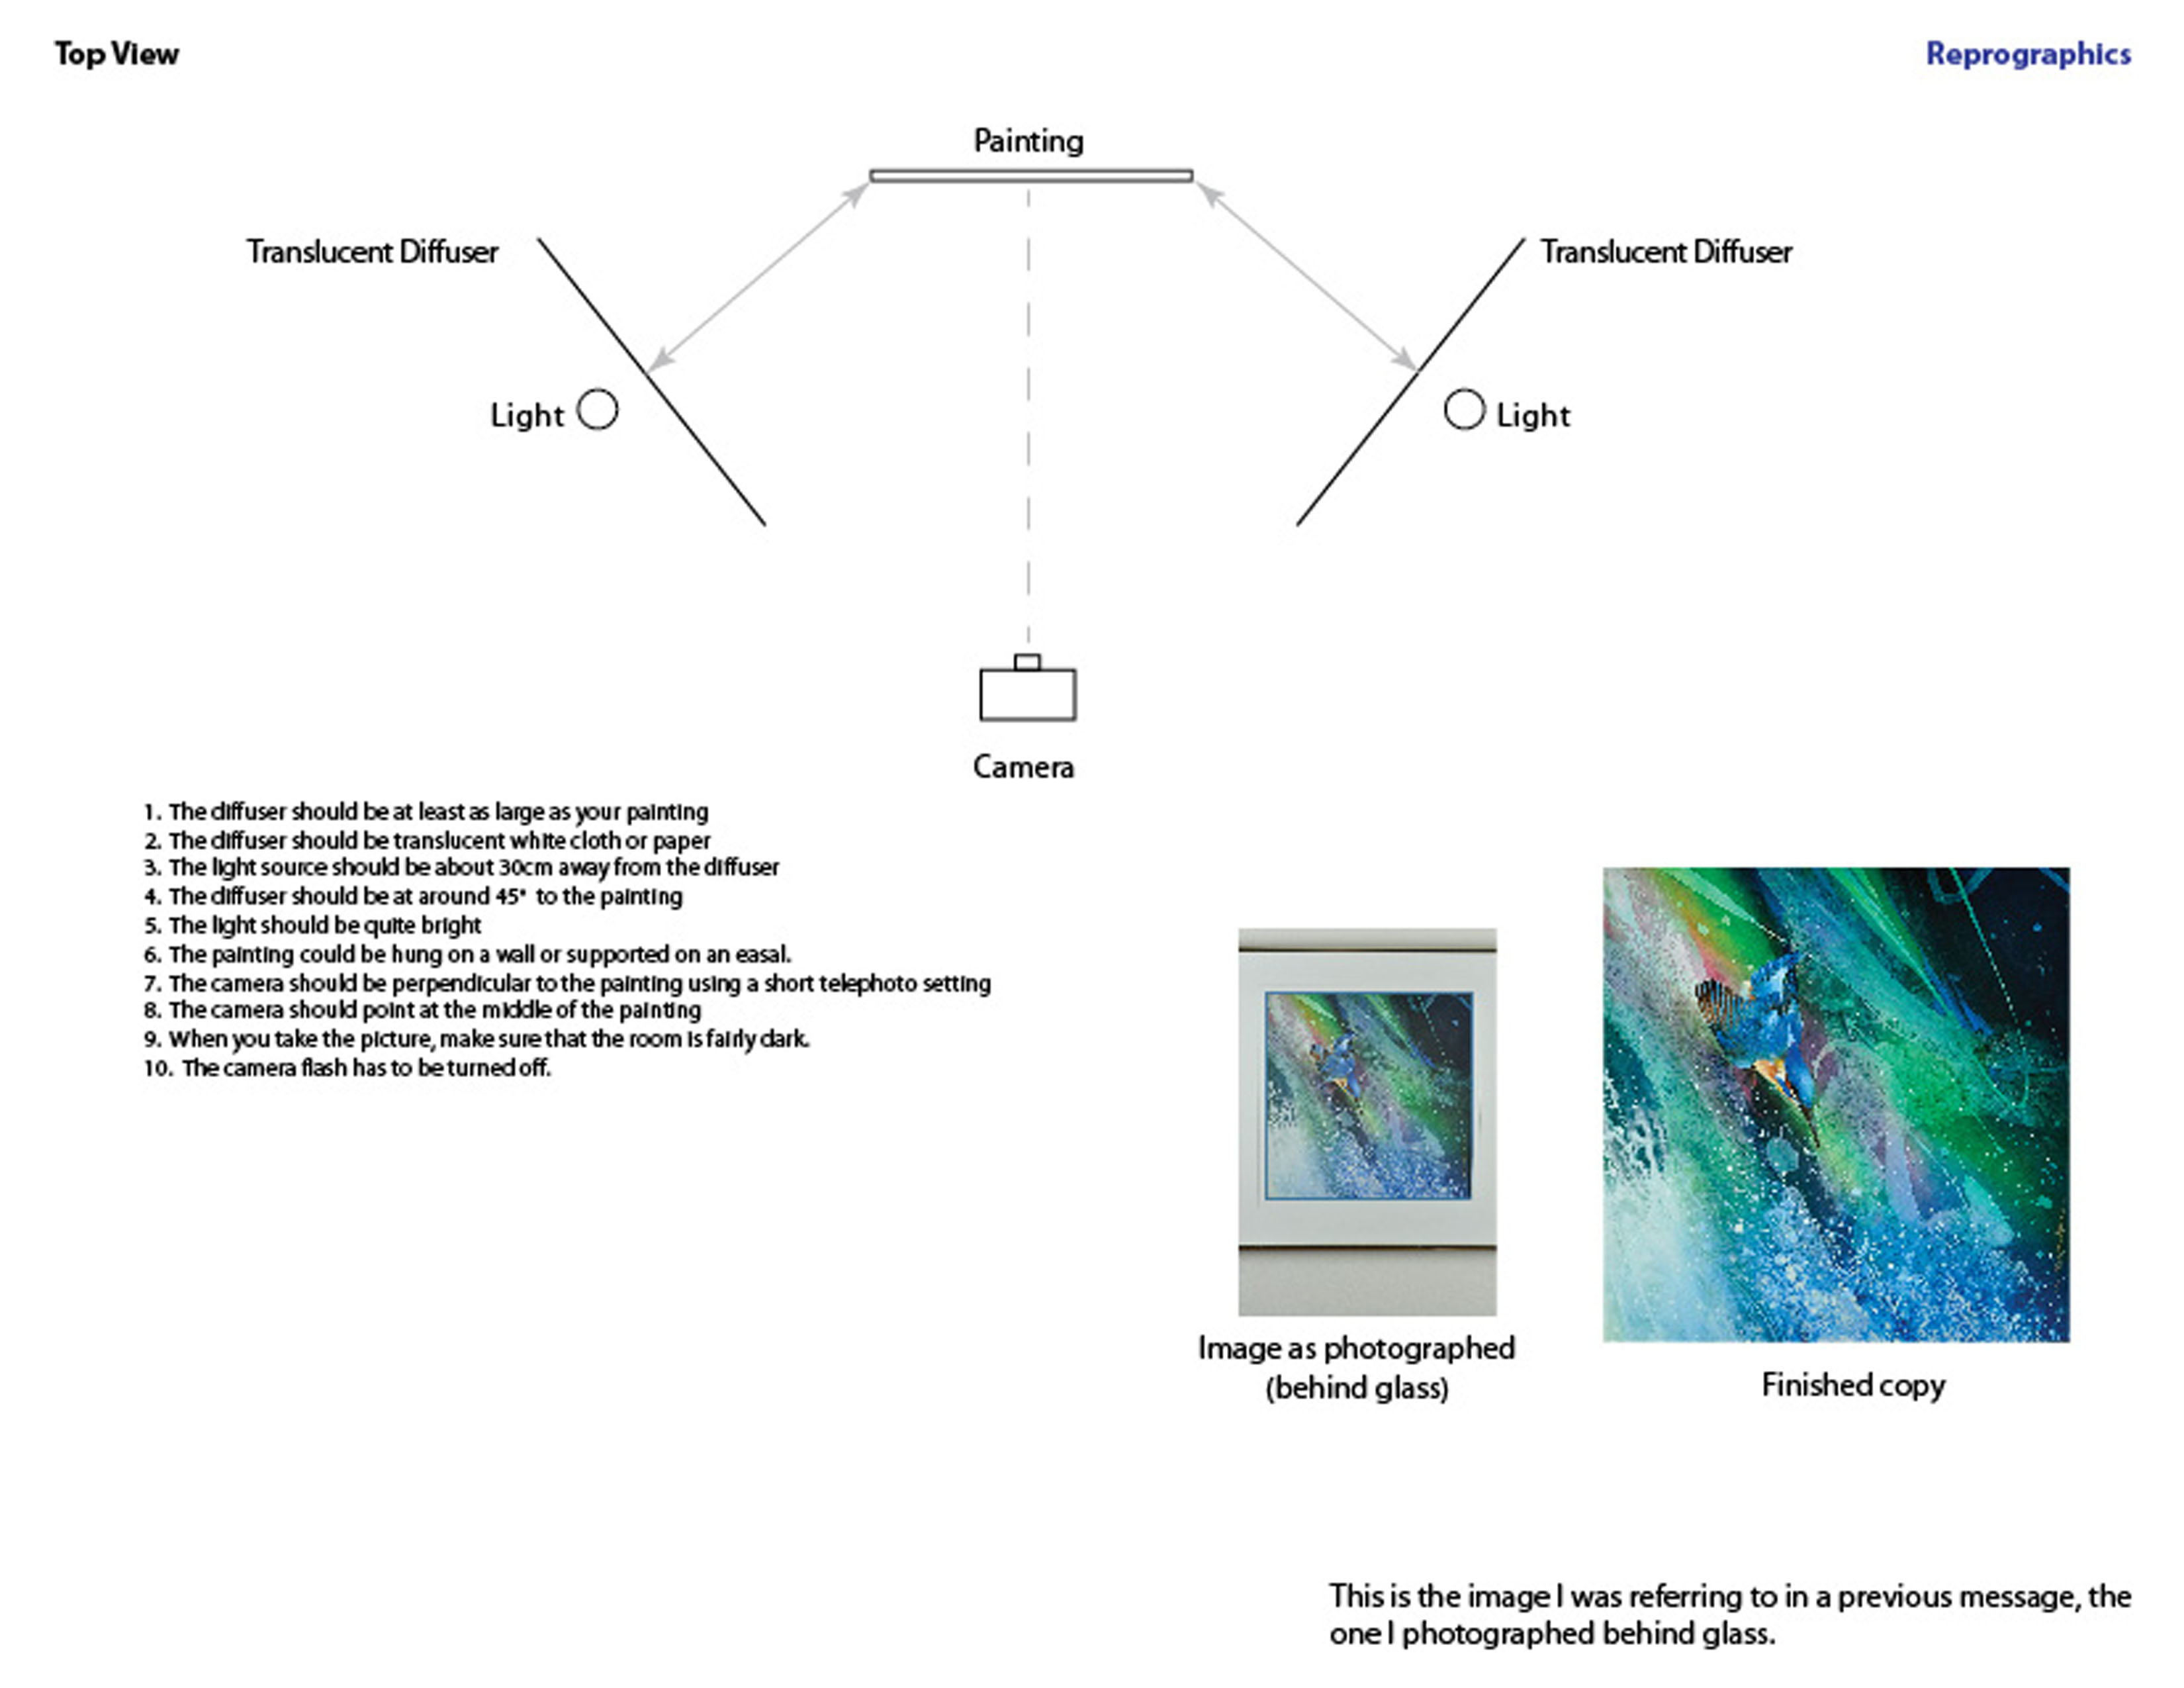
Click on this image to enlarge it using the forum Lightbox functionality.Last edited by Manfred M; 12th July 2017 at 04:40 AM. Reason: Added diagram
-
12th July 2017, 03:55 AM #3

- Join Date
- Sep 2012
- Location
- Nomadic but not homeless, ex N.Z. now Aust.
- Posts
- 4,167
- Real Name
- Paul

Re: How to take reflection free non-blurry picture of laminated paper with a Nikkon D
Scan them.....

P.S. A polarizing filter may help.
-
12th July 2017, 05:01 AM #4

- Join Date
- Jan 2009
- Location
- Sraylya
- Posts
- 4,955
- Real Name
- William (call me Bill)
Re: How to take reflection free non-blurry picture of laminated paper with a Nikkon D
No point yet as we need more information from you. Please answer questions asked: Originally Posted by eeelllpp

> regarding what lenses do you have?
> the size of the documents that require copying?
> (additionally) are the drawings monotone or colour?
Poor technique: Originally Posted by eeelllpp
> Colour casts from reflection lighting and also from mixed lighting sources
> Tripod or Copy stand is essential
*
Sample image with full EXIF data would assist in diagnosis of blurriness my best guesses, without that information: Originally Posted by eeelllpp
> Inferior lens apropos Curvature of Plane of Sharp Focus
> Drawings not flat
> Camera not at 90 degrees to all Planes of the Drawings
*
If setting studio / copy lighting, then two equal light sources are necessary. Originally Posted by eeelllpp
Manfreds outline is suitable; there are other methods, but all will be similar.
Fulfilling the task on the cheap, you can try shooting outside on a very cloudy day, in which case the use of a CPL filter is VERY useful.
Scanning the drawings is a very sensible idea.
It should be reasonably easy to find a tripod which is suitable enough for the weight of a Nikkon (sic) D7000.
WW
-
12th July 2017, 05:03 AM #5
- Join Date
- Jan 2009
- Location
- Sraylya
- Posts
- 4,955
- Real Name
- William (call me Bill)
Re: How to take reflection free non-blurry picture of laminated paper with a Nikkon D
Excellent Training Diagram, Manfred.
-
12th July 2017, 03:55 PM #6
- Join Date
- May 2012
- Location
- northern Virginia suburb of Washington, DC
- Posts
- 19,064
Re: How to take reflection free non-blurry picture of laminated paper with a Nikkon D
For a complete understanding of your lighting options in various situations not discussed yet in the thread, refer to probably any edition of Light: Science and Magic. I can confirm that the discussion of the topic in the fourth and fifth editions are word-for-word exactly the same.
-
12th July 2017, 06:26 PM #7New Member
- Join Date
- Jul 2017
- Location
- Cambridge
- Posts
- 2
- Real Name
- Myat
Re: How to take reflection free non-blurry picture of laminated paper with a Nikkon D
Hey William,
Thanks for replying.
My lens is 16-85 mm AF-S NIKKOR.
Sizes of documents: 14.5x11.2 inch, 11.2x7.2 inch.
Drawings are in colour.
Cheers!
-
13th July 2017, 12:47 AM #8
- Join Date
- Aug 2012
- Location
- Norfolk, UK
- Posts
- 511
- Real Name
- Yes
Re: How to take reflection free non-blurry picture of laminated paper with a Nikkon D
This is not easy to resolve.
First, why not try to source a non laminated copy, or even a digital version.
If this is not possible note the following: Laminated images may not be 100% stuck to the inderlying image, so you may have optical effects as a result, laminated images will appear less sharp for the simple reason the lamination film is rarely 100% flat or optically transparent. Whilst glass is usuallt optically flat, lamination film is not.
You may get better results scanning on a flatbed scanner - even if you have to stich parts together. However you may get reflection from the lamination film.
If you have to photograph the drawings there are two maain issues to be resolved, lighting and reflection.
Lighting from the side, diffuse for eveness, but also a distance away so as to reduce fall off from inverse square law. However a beam will reduce light spill lighting the background. Though ideally one would use two lighrs either side, in practice this gives two light sources to avoid reflections of so it may be easier with one. Again use a darkened room to avoid uncontrolled light sources.
The second problem of reflection, of lights and also the camera and background. Depending how uneven the lamination is will determine the angle of lighting and ease to avoidinng reflection. Secondly a black sheet with a hole for the lens can remove the reflection of the background and camera, and usually the lens as well.
However in some cases I shoot from an angle, alongside the light. with the black sheet opposite to stop room reflections, then correct the image in photoshop.
For completness I mention that Tilt shift lenses help, but are expensive so probably ouside the budget of the original poster.
-
13th July 2017, 12:58 AM #9Moderator
- Join Date
- Mar 2012
- Location
- Ottawa, Canada
- Posts
- 22,460
- Real Name
- Manfred Mueller
Re: How to take reflection free non-blurry picture of laminated paper with a Nikkon D
They are not required as it is relatively easy to line up the camera on the material in question. Originally Posted by loosecanon
Regardless, they do not fit on a small body like the D7000. The Nikon PC-E lenses only work on large full frame camera bodies as there isn't enough clearance under the pentaprism housing for the locking screw on the crop frame models. I'm not sure that they would work on anything smaller than the D5 / D810 (and equivalent older) models.
-
13th July 2017, 01:28 AM #10
- Join Date
- May 2012
- Location
- northern Virginia suburb of Washington, DC
- Posts
- 19,064
Re: How to take reflection free non-blurry picture of laminated paper with a Nikkon D
They do mount on the D7000 and work as designed except that the range of motion is limited. Originally Posted by GrumpyDiver
-
13th July 2017, 02:22 AM #11Moderator
- Join Date
- Mar 2012
- Location
- Ottawa, Canada
- Posts
- 22,460
- Real Name
- Manfred Mueller
Re: How to take reflection free non-blurry picture of laminated paper with a Nikkon D
Thanks Mike; I wrong. Sort of; I guess I should have said it does not have full functionality. Originally Posted by Mike Buckley
Yes it mounts on the D90 (which is more or less the same size as the D7000). The locking screw is a bit difficult to use, but it can be done. Range of motion is normal in both the shift and tilt in both horizontal and vertical orientations. I have read that the lens will not work in vertical orientation on the D7000.
https://www.bhphotovideo.com/c/produ..._E_Nikkor.html from the Q&A section:
"D7000: Both shift knobs hit the built-in flash when either are in the 12:00 position, so a perfectly straight shift isn't possible in the vertical. Horizontal works fine."
The lens has one horizontal and two vertical orientations, and it only works in one vertical orientation. It has to be returned to horizontal orientation to mount and dismount, otherwise the lens will not clear the pentaprism housing.
Again, on the D90 (as I don't have a D7000), it has to be shot on manual as the electronic aperture control does not work. The D90 does not have a focus indicator, so the only way to get an accurate focus is to shoot using LiveView.
-
13th July 2017, 02:50 AM #12
- Join Date
- May 2012
- Location
- northern Virginia suburb of Washington, DC
- Posts
- 19,064
Re: How to take reflection free non-blurry picture of laminated paper with a Nikkon D
That's probably accurate. It has been years since I used one, but I do remember that it worked fine in one orientation and not so much in the other one. Originally Posted by GrumpyDiver
-
11th December 2017, 08:48 AM #13
- Join Date
- Feb 2011
- Posts
- 10
Re: How to take reflection free non-blurry picture of laminated paper with a Nikkon D
2 lamps at 45 degrees with linear polarising filters at the same setting/polarising angle.
All reflections are then polarised.
Polarising filter at the camera lens removes the reflections
-
11th December 2017, 12:43 PM #14Moderator
- Join Date
- Mar 2012
- Location
- Ottawa, Canada
- Posts
- 22,460
- Real Name
- Manfred Mueller
Re: How to take reflection free non-blurry picture of laminated paper with a Nikkon D
The polarizing filter is not needed. The 45 degree positioning of lights ensures that there is no reflection. Originally Posted by bralk
-
11th December 2017, 03:29 PM #15

- Join Date
- Jul 2008
- Location
- Southern California, USA
- Posts
- 17,409
- Real Name
- Richard
Re: How to take reflection free non-blurry picture of laminated paper with a Nikkon D
This may or may not be the case... I have noticed that some large laminations (especially laminations done non-professionally) actually tend to blur the image of the material that has been laminated. If this is the case, here is not much you can do.
Could you post a result from your previous tries at photographing the item.
I am wondering if the entire subject is "blurry" or if it is relatively sharp in the center and blurry out towards the edges. This might be the result of the lens inability to capture a flat field. A macro type lens "might" help in this case.
I can definitely agree with Manfred's observation that the photo attempt should be done in a darkened room so that there are no lights other than the photo lights to cause reflections.
Additionally, the subject you are photographing may not be totally flat. Even a slight bulge "could" cause blurriness.The sensor plane of your camera needs to be exactly parallel to the surface of the material being photographed and that material needs to be perfectly flat. I have found that large sheets of laminated material do not always lay flat.
When I worked in the Photo Lab of the Naval Staff College in Norfolk Virginia we had a large copy camera setup with two banks of lights at exactly 45 degrees to the flat images we were photographing. The documents (line copy or photographs) were held in place extremely flat by the glass which closed over it. This setup was (or is) quite common to printing companies. It ensures that the material and the focal plane are parallel all over the image area. Of course, our lens was designed for flat field work.
Having the copy material flat is so important that we had a vacuum platen which sucked the copy right up to the copy board. The glass which closed over the copy completed the process.
However, this setup did not work well for subjects like oil paintings which have texture. We had a project at one time in which we needed to shoot a large number of historic oil paintings to use in an instructional book the college was preparing. We used two large polarized light sources at 45 degree angles to illuminate these paintings. The light sources themselves were polarized with very large and very expensive sheets of polarizing material. No polarizing filter was used on the lens. This eliminated any reflections from the brush strokes of the painting. Of course, again, our shooting was in a totally dark room which eliminated the chances of reflections from ambient light.
Again, it might help if you could post the results of your tries and if possible post an image of your setup.Last edited by rpcrowe; 11th December 2017 at 04:04 PM.

 Reply With Quote