
 Helpful Posts:
 Al least this is new to me. I have not tried it yet but, wonder how others feel about this system?
https://www.youtube.com/watch?v=dPBdizq_POA
Results 1 to 15 of 15
-
17th October 2016, 02:40 AM #1


- Join Date
- Jul 2008
- Location
- Southern California, USA
- Posts
- 17,409
- Real Name
- Richard
Unique way to dodge and burn portraits
-
17th October 2016, 08:45 AM #2
- Join Date
- Jun 2013
- Location
- North West of England
- Posts
- 7,178
- Real Name
- John
Re: Unique way to dodge and burn portraits
I sometimes use a layer in a similar way to infill colour to overcome blemishes but retain the underlying texture - e.g. on a flower petal - but this is much more sophisticated. Filed away for future reference. Thanks for posting Richard.
Last edited by John 2; 17th October 2016 at 09:04 AM.
-
17th October 2016, 09:43 AM #3

- Join Date
- Dec 2013
- Location
- Chesterfield, Missouri/Melbourne, Australia
- Posts
- 17,827
- Real Name
- Izzie
Re: Unique way to dodge and burn portraits
This will be good to have in my file too.. thanks Richard.
-
18th October 2016, 12:43 AM #4
- Join Date
- Jul 2008
- Location
- Southern California, USA
- Posts
- 17,409
- Real Name
- Richard
Re: Unique way to dodge and burn portraits
I decided to file this away for some rainy day when I have absolutely nothing to do. However with my multitude of rescue dogs and the lack of rain in Southern California, I don't forsee me doing this at any time soon...
-
18th October 2016, 01:28 AM #5Moderator

- Join Date
- Mar 2012
- Location
- Ottawa, Canada
- Posts
- 22,486
- Real Name
- Manfred Mueller
Re: Unique way to dodge and burn portraits
Thanks for posting this Richard.
I use somewhat similar methods for dodging and burning, but I use the Overlay blending mode and use Flow rather than Opacity when I brush. Opacity increases the density by the percentage that is selected and it takes a release of the mouse button and new click to increase the density the same amount whereas flow increases the amount with every pass. As I use a Wacom tablet, the flow which is linked to pen pressure is a great way to build up the amount of dodging or burning.
I also do my dodging and burning on separate layers. One reason for that is that burning this way increases the saturation and the colour can shift if the burning is fairly heavy duty, so I use a clipping mask to control the saturation.
-
18th October 2016, 04:30 PM #6
- Join Date
- Jul 2008
- Location
- Southern California, USA
- Posts
- 17,409
- Real Name
- Richard
Re: Unique way to dodge and burn portraits
I have a Wacomm Tablet but I have not installed it yet. It is still waiting in the box... Originally Posted by GrumpyDiver

-
19th October 2016, 12:59 PM #7

- Join Date
- Aug 2012
- Location
- S, B'ham UK
- Posts
- 3,337
- Real Name
- John
Re: Unique way to dodge and burn portraits
I thought I would try this on some work in progress. YES in progress. It looks like the same sort of technique can be used for other things as well.

I removed some light reflection from the eye. And very subtle changes to, eyes, lips and nose. I used layer opacity as the main control using the GIMP. It's a lot easier to do than it looks.
Some one else's photo. He had toned his and I wonder if lighting played some part in the result.
John
-
-
19th October 2016, 05:38 PM #8
- Join Date
- Aug 2012
- Location
- S, B'ham UK
- Posts
- 3,337
- Real Name
- John
Re: Unique way to dodge and burn portraits
Done with a bit more care. Thanks for posting the video link. Useful even with the GIMP much easier than using the dodge and burn tool.

In the GIMP I used a separate layer for each feature change and used various degrees of gaussian blur or none and tidied up with the eraser and the thumb. I found the thumb best for doing the wavelet cosmetic work. Some select an areas and blur but I think the thumb gives more control of how much is removed.
 Given the skin colouration of the original and that I've not tried this before I'm pleased with the result.
John
-
-
19th October 2016, 05:53 PM #9

- Join Date
- Dec 2011
- Location
- New England
- Posts
- 9,282
- Real Name
- Dan
Re: Unique way to dodge and burn portraits
Hi Manfred, Originally Posted by GrumpyDiver
would you be willing to describe how you do this?
Thanks
Dan
-
21st October 2016, 02:07 AM #10Moderator
- Join Date
- Mar 2012
- Location
- Ottawa, Canada
- Posts
- 22,486
- Real Name
- Manfred Mueller
Re: Unique way to dodge and burn portraits
Sorry about the delay in getting back to you - I've been rather busy over the past few days. Originally Posted by DanK
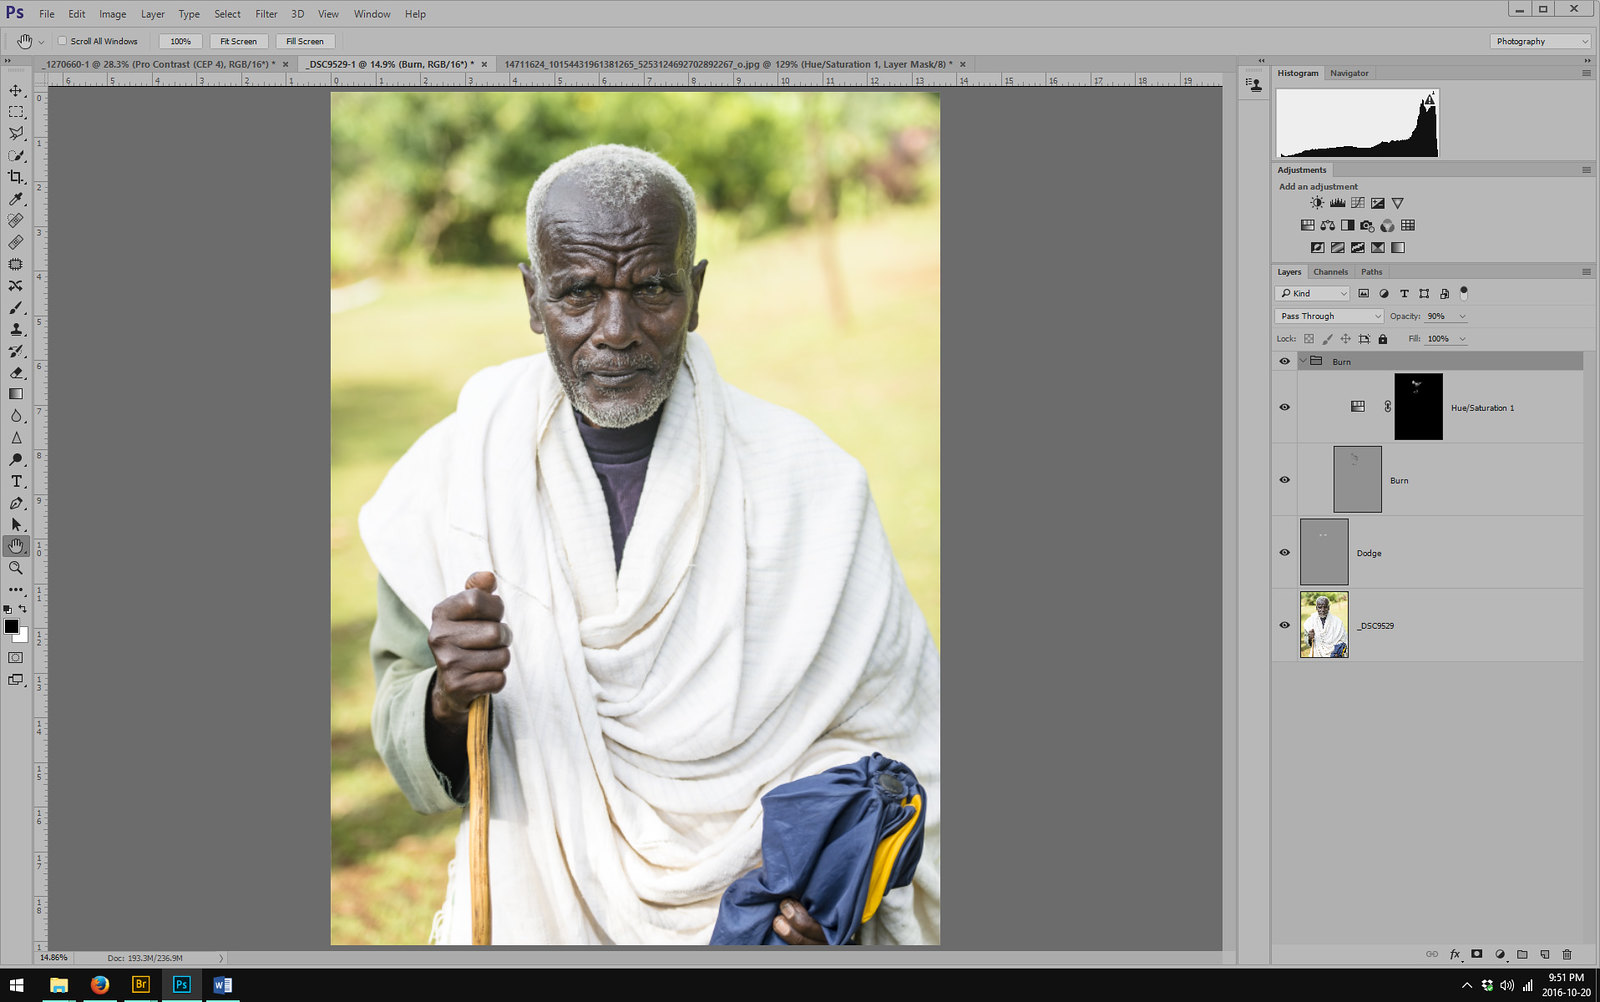
Here is a screen shot of a burn and dodge that I use fairly regularly. Both the burn and dodging layers is done using a 50% gray layer that uses the overlay blending mode. To dodge, I paint with a white brush set to 100% opacity and around 3 - 4% flow. I will adjust the opacity of the layer to tone down the dodge intensity, as required.
The burn work is put into a Group, with both the 50% gray layer using overlay blending mode. I use a black brush, with 100% opacity and 3-4% flow. On top of this layer I have a hue / saturation adjustment layer so that I can take some of the saturation out of the spots that I burn. The reason that I use a group is so that I can tone down the burn effect, as required.
-
21st October 2016, 09:35 AM #11
- Join Date
- Dec 2013
- Location
- Chesterfield, Missouri/Melbourne, Australia
- Posts
- 17,827
- Real Name
- Izzie
Re: Unique way to dodge and burn portraits
John (ajohnw) -- considering the colourization of the skin (purplish?) of your first load (post #7), the second one is very nicely done (Post #8).
-
21st October 2016, 12:39 PM #12
- Join Date
- Aug 2012
- Location
- S, B'ham UK
- Posts
- 3,337
- Real Name
- John
Re: Unique way to dodge and burn portraits
Manfred does the hue saturation layer start from mid grey as well. The GIMP has this layer type available but I have never found out how to make use of it. If it is variations in grey levels that controls the changes that would explain why.
Thanks Izzie. I'm not sure what was going on with the raw file from this shot. It was posted by Pat David for people to play with. He uses it in one of his blog posts. He seems to like toning things and I have a feeling that there is something odd about the lighting he used so I initially just fiddled with a chromasity slider a bit. I've no idea what the ladies skin tone should be which doesn't help.
John
-
-
21st October 2016, 01:16 PM #13

- Join Date
- Aug 2014
- Location
- Germany
- Posts
- 460
- Real Name
- Erik
Re: Unique way to dodge and burn portraits
Quick Question - Do you separate the dodge and burn into two separate layers to allow the Saturation Adjust? Originally Posted by GrumpyDiver
I do nearly the same method except just on a single layer. I cycle between White and Black to burn and dodge as needed on the single layer.
-
21st October 2016, 03:44 PM #14Moderator
- Join Date
- Mar 2012
- Location
- Ottawa, Canada
- Posts
- 22,486
- Real Name
- Manfred Mueller
Re: Unique way to dodge and burn portraits
There are a couple of reasons to do it on two separate layers: Originally Posted by TheBigE
1. I will often reduce the opacity of the burn and dodge layers and the amount they need to be reduced is rarely identical. This is easy to do if you separate your burn and dodge but impossible to do if they are done on the same layer.
2. The saturation adjustment is only required for the burn, so again, another good reason not to do both processes on the same layer.
-
21st October 2016, 04:27 PM #15
- Join Date
- Dec 2011
- Location
- New England
- Posts
- 9,282
- Real Name
- Dan
Unique way to dodge and burn portraits
Manfred,
Thanks very much
Dan
Sent from my iPad using Tapatalk

 Reply With Quote