
 Helpful Posts:
 The previous quarter is here
2016 Project 52 Challenge 3rd Quarter by Geoff F
Week 39. Dartmouth Boats in a rough sea. The wind and tide were right for photos of boats entering or leaving the harbour so I went to a rocky point just outside of the harbour and tried my big lens for some distant shots. Obviously this was going to mean a bit of compromise between shutter speed, aperture and Iso settings even with bright clear light. Mostly shot between 300 and 500 mm.
Excel
7D with Sigma 150-600 Sport lens. 1/800 F11 Iso 400
K649. I think this boat could be named Sonata but I can't quite make out the name which is more visible in other shots.
Switched to the Canon 70-200 lens 1/500 F11 Iso 400
Leader
1/800 F11 Iso 400
Northern Clipper
Back to the big lens for some more distant shots. 1/640 F11 Iso 400
Outcast and unknown sailing boat
1/800 F 11 Iso 400
Superb-Us
1/500 F11 Iso 400
William Harvey
1/320 F11 Iso 400
Most images are a merge of two or three different conversions from a single Raw file.
More images from this day are here:
http://www.pbase.com/crustacean/dartmouth_boats_2016
Results 1 to 20 of 124
-
5th October 2016, 07:52 PM #1

- Join Date
- Jan 2009
- Location
- South Devon, UK
- Posts
- 14,854
2016 Project 52 - 4th Quarter by Geoff F
Last edited by Geoff F; 5th October 2016 at 08:19 PM.
-
5th October 2016, 08:12 PM #2
- Join Date
- Jan 2009
- Location
- South Devon, UK
- Posts
- 14,854
Re: 2016 Project 52 - 4th Quarter by Geoff F
I did take a few other scenes from the general area and tried some experiments; like this one which was looking directly into the light.

Still the 150-600 lens at 600. 1/250 F11 Iso 100. This should have been shot at Iso 200 and 1/500 but I kept experimenting with different settings and I thought this one had a better composition than the others with a faster speed.
-
5th October 2016, 09:59 PM #3
- Join Date
- Jun 2013
- Location
- North West of England
- Posts
- 7,178
- Real Name
- John
Re: 2016 Project 52 - 4th Quarter by Geoff F
Nice set Geoff. Nothing like a bit of weather to make things interesting. Had a look at your pbase site. I particularly liked the Salcombe Boats series. I love old wooden sailing boats and some of those appealed a great deal. The very last one is a bit flat and I would be tempted to cut back the highlights and mid tones a little for some drama. Something like:

-
5th October 2016, 10:11 PM #4

- Join Date
- May 2012
- Location
- Canada (west coast)
- Posts
- 2,086
- Real Name
- Bruce
Re: 2016 Project 52 - 4th Quarter by Geoff F
Geoff, one reason I like this image is that it does a good job of showing the almost blinding light when a somewhat rough sea is backlit. So my preference is probably for this version rather than John's darker and more dramatic version. Originally Posted by Geoff F

Like John, I had a look at the collection in your pbase. I particularly liked the photo where the sailing boat is all but obliterated by heavy seas.
-
5th October 2016, 10:17 PM #5

- Join Date
- Dec 2009
- Location
- WNY
- Posts
- 36,716
- Real Name
- John
Re: 2016 Project 52 - 4th Quarter by Geoff F
Nice series.
-
6th October 2016, 06:36 PM #6
- Join Date
- Jan 2009
- Location
- South Devon, UK
- Posts
- 14,854
Re: 2016 Project 52 - 4th Quarter by Geoff F
Thanks for the replies.
That backlit shot started out similar to John's edit when straight from camera but I thought the rather harsh contrast was a bit unnatural and overpowered the boat so I lightened it up a little. Maybe somewhere between the two?
-
8th October 2016, 12:23 AM #7

- Join Date
- Dec 2013
- Location
- Chesterfield, Missouri/Melbourne, Australia
- Posts
- 17,827
- Real Name
- Izzie
Re: 2016 Project 52 - 4th Quarter by Geoff F
I like these series too...some bits of rough seas there. 'Reminds me of our recent cruise trip.
-
8th October 2016, 10:37 AM #8

- Join Date
- Sep 2014
- Location
- Ontario, Canada
- Posts
- 2,420
- Real Name
- Joe
Re: 2016 Project 52 - 4th Quarter by Geoff F
Great images Geoff! I particularly liked Leader for its style a d William Harvey for its composition
-
8th October 2016, 02:50 PM #9
- Join Date
- Jul 2016
- Location
- Ireland
- Posts
- 2,195
- Real Name
- Maurice
Re: 2016 Project 52 - 4th Quarter by Geoff F
Nice series of images.
-
11th October 2016, 07:01 PM #10
- Join Date
- Jan 2009
- Location
- South Devon, UK
- Posts
- 14,854
Re: 2016 Project 52 - 4th Quarter by Geoff F
Week 40. More Boats but this time in Salcombe Harbour. I had plans for the day but uncertain looking weather made me dither until midday when some clear area arrived; but as it was now too late to go anywhere I tried walking along a path overlooking the harbour.
Shot from a rocky point - no alternative angles available.

7D with Canon 70-200 lens. 1/640 F11 Iso 200.
Across the harbour from a field path.

Tamron 24-70 lens 1/400 F11 Iso 200
The Fish Quay. I tried an angle and time to show an overall busy scene with things happening everywhere, but not appearing excessively congested. Other shots were more zoomed in. Difficult light angle.

70-200 lens 1/400 F11 Iso 200. I had to move one of the foreground boats, during editing.
Looking up the creek. I was wondering about this scene but thought it was lacking foreground interest when these two women walked past with their dogs and one started running towards me. So no thinking time, just aim, shoot and hope for the best. I did move the running dog to the right to create a better grouping. Shooting across the light so I have done what I can with editing to balancing things up a bit.

24-70 lens 1/250 F11 Iso 200. A bit on the slow shutter side but no time to change Iso.
All images are a merge of two Raw conversions to balance out harsh tricky angle light.
-
11th October 2016, 07:22 PM #11
- Join Date
- Dec 2013
- Location
- Chesterfield, Missouri/Melbourne, Australia
- Posts
- 17,827
- Real Name
- Izzie
Re: 2016 Project 52 - 4th Quarter by Geoff F
Despite the difficulty, your exposures are just great. Reading your narrative here, something caught my attention -- you said you moved the running dog to the right for better grouping -- did you do this with your focus or when you were editing? Just curious...as it can be done with Photoshop if I remember right...
-
11th October 2016, 08:01 PM #12
- Join Date
- Jan 2009
- Location
- South Devon, UK
- Posts
- 14,854
Re: 2016 Project 52 - 4th Quarter by Geoff F
Very easy with scenes like this Izzie. Just draw around the object to be moved with the lasso tool, very roughly and well outside of the actual object outline. Feather the selection by something like 10 to 20 pixels then copy the selection and paste back, as a layer. Clone out the original object which needed to be moved. Position the pasted object as required then merge the layer.
Sometimes if the colour or brightness is slightly different you may need to adjust the object layer brightness a little. Also, if there is a slightly different texture you may need to feather in the object edges a bit more. I find just using an Eraser Brush usually works OK.
It is a bit more difficult where the surrounding areas are more complex but usually easy with backgrounds like grass or water.
-
11th October 2016, 08:21 PM #13Moderator

- Join Date
- May 2008
- Location
- Windsor, Berks, UK
- Posts
- 16,769
- Real Name
- Dave Humphries :)
Re: 2016 Project 52 - 4th Quarter by Geoff F
Hi Geoff,
All excellent as usual, but I also have a question.
Do you do this because it gives better results than judicious use of the Highlights, Whites, Shadows and Blacks sliders in ACR?All images are a merge of two Raw conversions to balance out harsh tricky angle light.
I am finding full application (e.g. + or - 100) of one (or more) of those sliders is very useful at dealing with challenging skies, without going to the trouble of merging two different conversions.
TIA, Dave
-
11th October 2016, 09:20 PM #14
- Join Date
- Jan 2009
- Location
- South Devon, UK
- Posts
- 14,854
Re: 2016 Project 52 - 4th Quarter by Geoff F
Yes, Dave, it gives more control over adjustments made in two directions and those adjustments can then be combined selectively using masks. Very similar to a hand made HDR effect.
For example with a scene where the highlights, and to a lesser extent midtones, are on the point of over exposure while the shadows are also about to clip in the other direction. So I use the ACR sliders to suit the midtones, or highlights, and save that edit. Then return to ACR and get the shadows correct with another image.
After that it is just a case of arranging each edit as a layer and using masking to edit in which ever version I decide to be the masked layer; the other edit becomes the background layer.
Sometimes I make three edits, one for highlights, one for midtones and the other for shadows.
Doing it this way allows you to get each Raw edit correct instead of attempting to push an image into different directions at the same time.
At the end of my third Project 52 quarter I explained the use of Smart Objects with Adobe CC which allows you to keep returning the edited layers to ACR for any further edits as you go along. For example, I often think I have the midtones correct until I try to edit in the other layers when I realise my original attempt was actually too light/dark. So with Smart Objects it is just a couple of clicks to return any of the Raw layers to ACR for a little bit more non destructive editing.
You can achieve a similar result with just one image by getting the midtones correct then using Curves, or similar, Adjustment Layers to selectively push the image into different directions by using masks. But the downside is that you will then be starting off with an image where the highlights or shadows have already been clipped while you were working on the midtones.
You mention skies. Well it is possible to adjust one edit solely for the sky then merge that into the midtones for maximum dramatic effect.
-
11th October 2016, 10:41 PM #15Moderator
- Join Date
- May 2008
- Location
- Windsor, Berks, UK
- Posts
- 16,769
- Real Name
- Dave Humphries :)
Re: 2016 Project 52 - 4th Quarter by Geoff F
You're probably right Geoff and thanks for the detailed reply.
There is the option of gradient and radial filters in ACR, so not all the image has to be aggressively edited, but I accept that relies on simple compositions; straight horizons, etc., so yes, Smart Objects and separate layers must give more control.
Thanks, Dave
-
12th October 2016, 06:35 PM #16
- Join Date
- Jan 2009
- Location
- South Devon, UK
- Posts
- 14,854
Re: 2016 Project 52 - 4th Quarter by Geoff F
Yes Dave, Smart Objects to produce layers which can be masked give very fine control over adjustments. For example, with Week 40 most of the white stern on boats had exposure levels which were bordering on over exposure in places, the sky was about right while the midtones and shadows were on the dark side because the camera exposed for the sky; with a little bit of exposure compensation.
So working with more than one Raw conversion plus a mask which gave me variable opacity through brushing with a low opacity brush (about 25%) gave me a lot of options with creating a mixture of brightness levels on the same image.
Using a Hide All Mask which was selectively edited as required.
I have used Gradient Masks at times but generally found that by the time I worked out whether it was a positive or negative gradient, so where should I start and finish, and which direction to drag the gradient, I could have done the job more simply by just using a low opacity brush to gradually build up the effect. A wide brush of say 400 pixels soon covers over an average sky and a few passes with 25% opacity gets the required result.
-
12th October 2016, 06:55 PM #17
- Join Date
- Dec 2013
- Location
- Turkey
- Posts
- 12,779
- Real Name
- Binnur
Re: 2016 Project 52 - 4th Quarter by Geoff F
Nice compositions and colors Geoff

-
13th October 2016, 02:23 PM #18
- Join Date
- Dec 2013
- Location
- Chesterfield, Missouri/Melbourne, Australia
- Posts
- 17,827
- Real Name
- Izzie
Re: 2016 Project 52 - 4th Quarter by Geoff F
Thanks Geoff...I've done only two of these moving stuff in Photoshop so I was guessing. You did a good job there... Originally Posted by Geoff F
-
13th October 2016, 08:45 PM #19
- Join Date
- Jan 2009
- Location
- South Devon, UK
- Posts
- 14,854
Re: 2016 Project 52 - 4th Quarter by Geoff F
Thanks for the comments.
Week 41 - Uncovering the ruins. Today was volunteer maintenance day at the wood where I do a lot of wildlife photography. The first job was removing undergrowth from an old ruined farmhouse which is several hundred years old. Rather dark under the trees with a grey sky so I started with F8 and Iso 800 but that only gave me 1/40 which was far too slow for real life shots. The only alternative was to use flash, but obviously that was going to cause nearly as many problems as it solved on a scene like this.
However, after a bit of editing and more merging of Raw files, this is my best of the bunch.
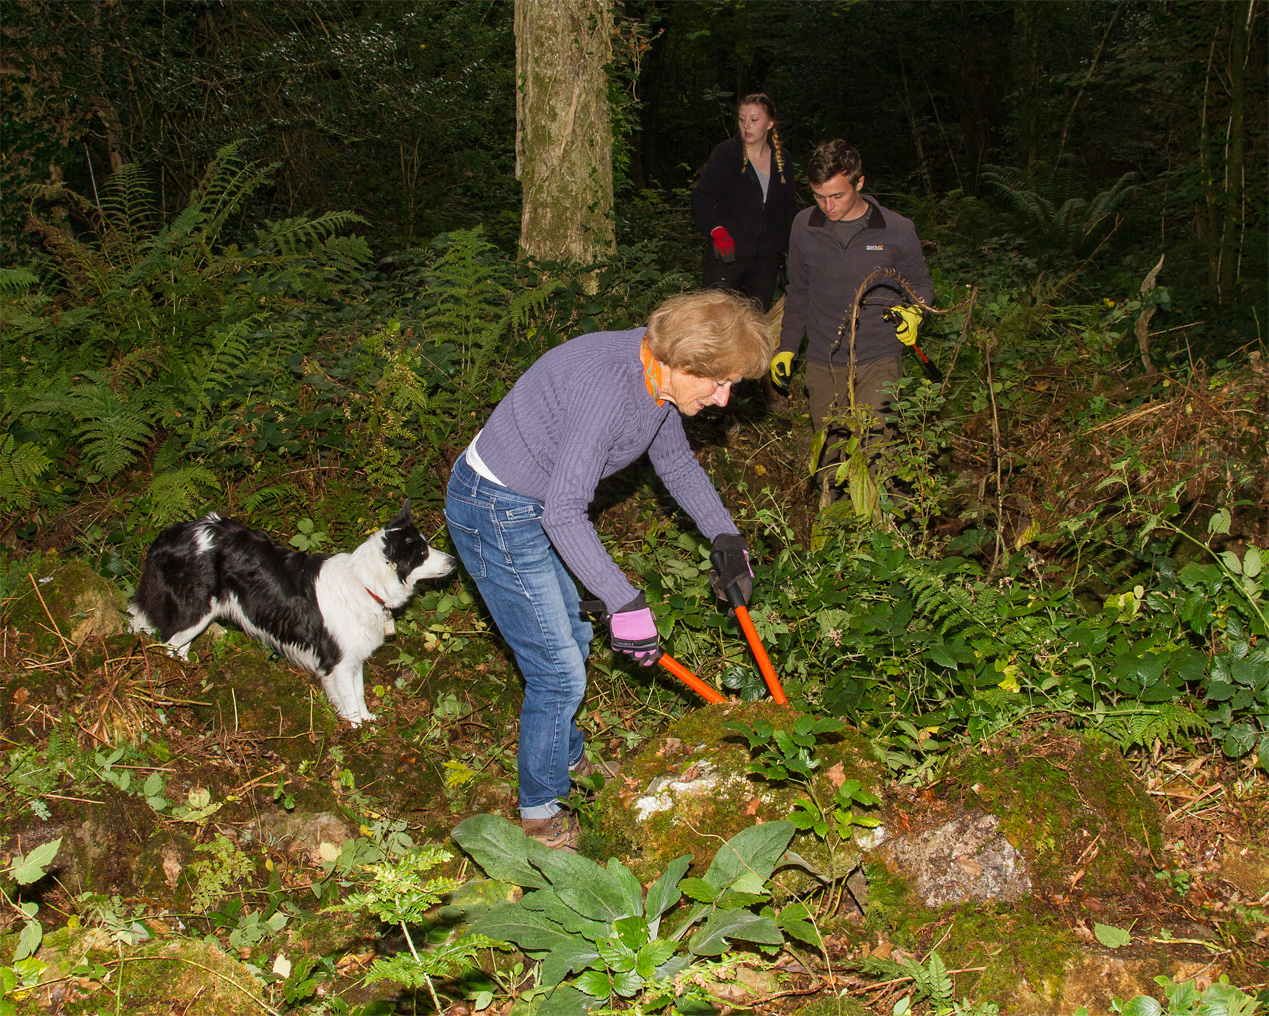
7D with Canon 24-105 lens. 1/160 F10 Iso 400 with flash.

1/200 F11 Iso 400 flash


1/160 F10 Iso 400.
An additional problem was attempting to get clean foreground with all that foliage and bits of old building etc.
-
13th October 2016, 11:07 PM #20
- Join Date
- May 2012
- Location
- Canada (west coast)
- Posts
- 2,086
- Real Name
- Bruce
Re: 2016 Project 52 - 4th Quarter by Geoff F
Geoff, this is an interesting collection of photos taken in adverse lighting conditions. Were the ruins of the entire farmhouse eventually exposed?


 Reply With Quote