
 Helpful Posts:
 here it gets back to full size in the lightbox so there is more detail. But it looks horrible on my blog at full size.
Results 1 to 8 of 8
-
23rd April 2016, 04:46 AM #1

- Join Date
- Oct 2013
- Location
- Philippines
- Posts
- 12,181
- Real Name
- Brian
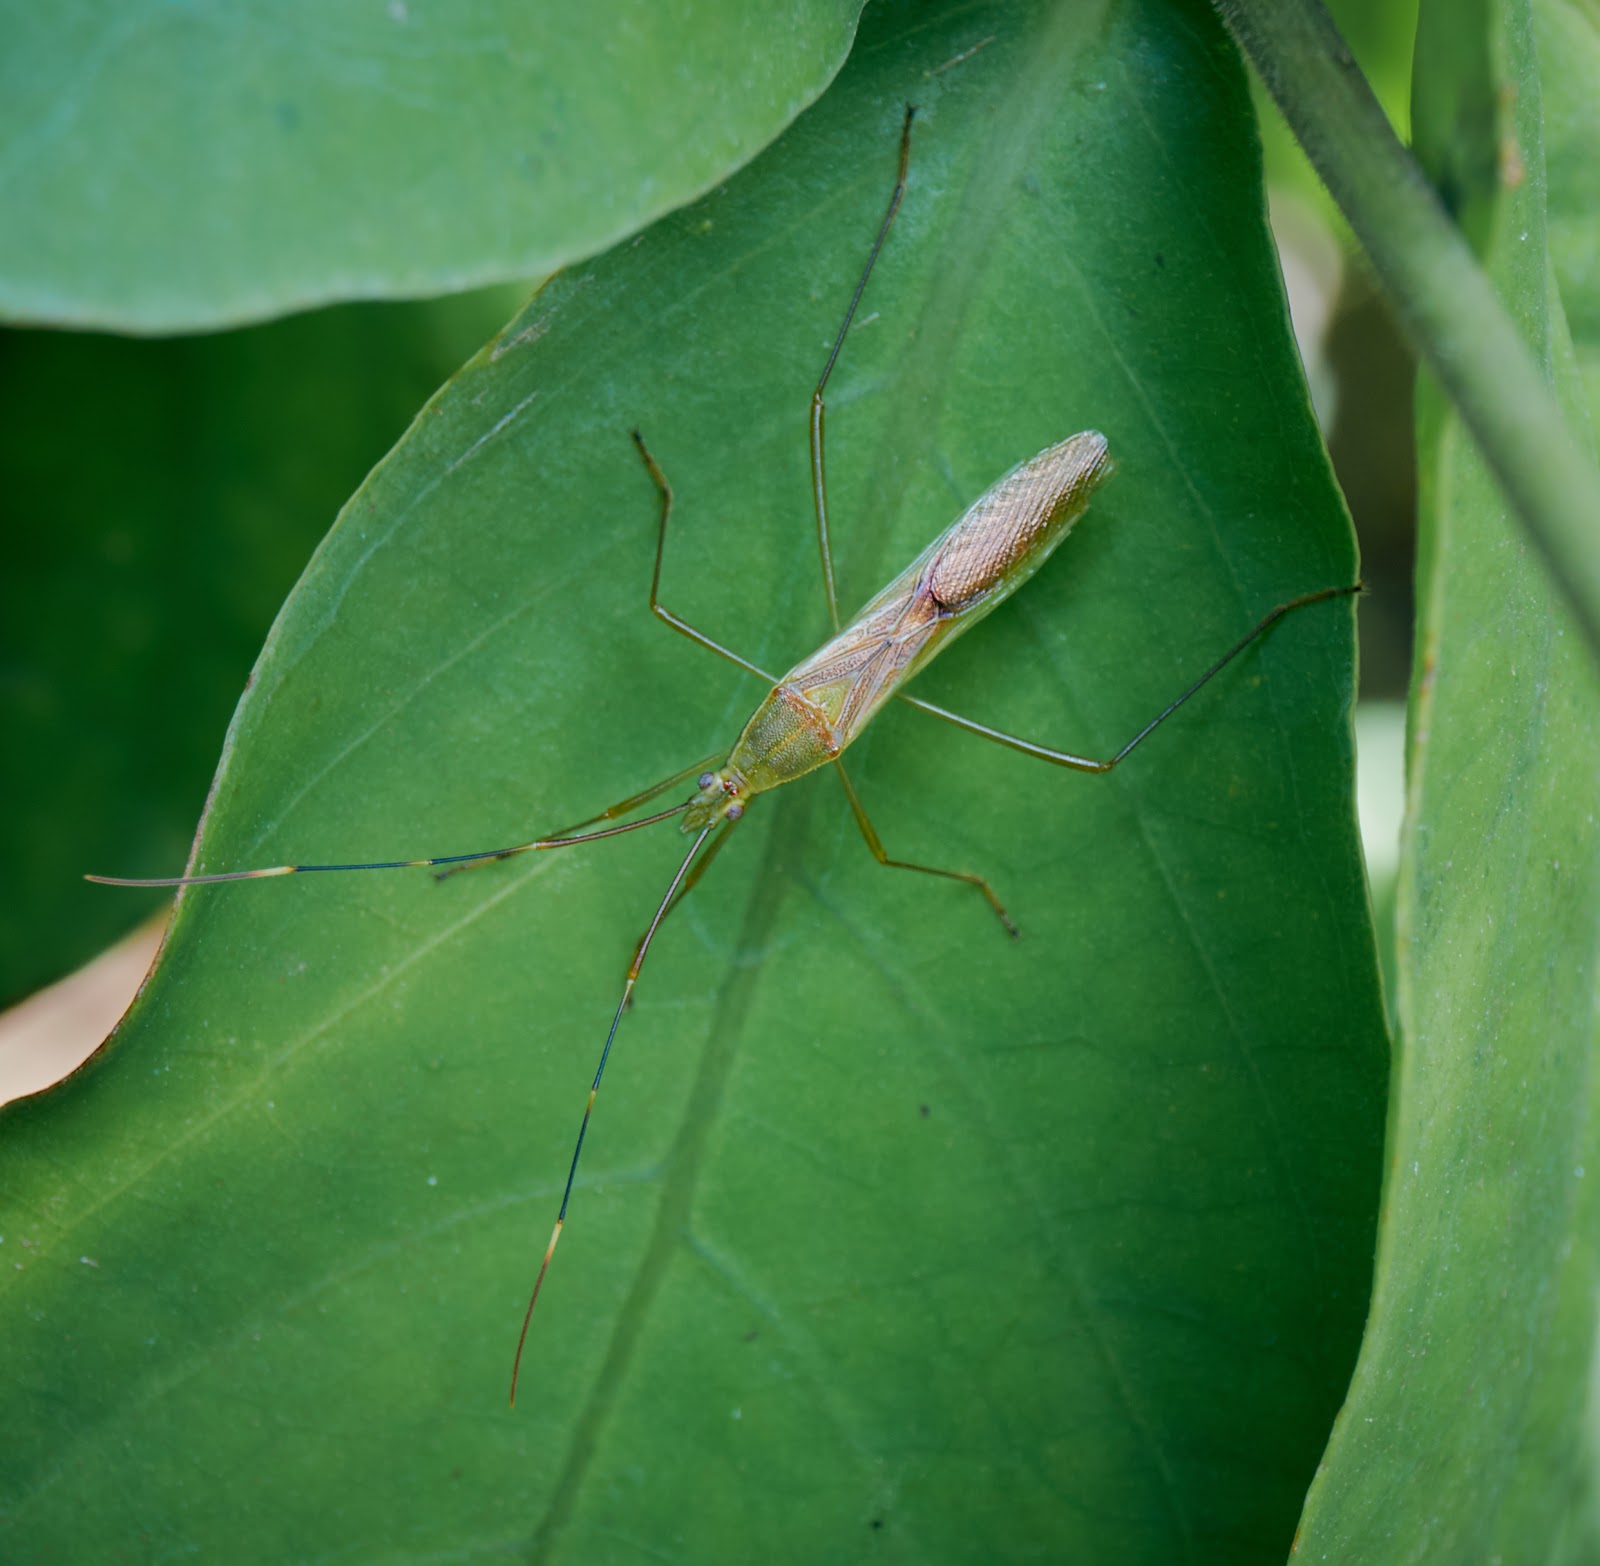
Practicing: tried the Stilt Bug without scaling down. Not good on blog. Here?
-
23rd April 2016, 10:10 AM #2

- Join Date
- Dec 2009
- Location
- WNY
- Posts
- 36,716
- Real Name
- John
Re: Practicing: tried the Stilt Bug without scaling down. Not good on blog. Here?
Nice as a shape/pattern but not much contrast on the bug.
-
23rd April 2016, 10:30 AM #3Moderator

- Join Date
- May 2008
- Location
- Windsor, Berks, UK
- Posts
- 16,762
- Real Name
- Dave Humphries :)
Re: Practicing: tried the Stilt Bug without scaling down. Not good on blog. Here?
Hi Brian,
I couldn't see it this full size on your blog when I tried, the height there is limited by whatever monitor someone (me) is using, plus any browser banners that eat in to that, even when the image is clicked, it never reaches the 1,600px × 1,566px you posted here. Therefore, on your blog, I think what you and anyone else sees, has been downsized by their web browser. (this is not a good thing!)
In the LyteBox here at CiC, I can see it full size, but obviously then I have to scroll about to see it all.
I could re-iterate that for general on-line viewing*, I see no point in uploading images taller than the average viewer's screen size, since optimal sharpness will only be achieved for them if they view it at 100% (one image pixel to one LCD screen pixel). I never upload anything taller than 950 pixels these days. If you do that, it means you can downsize and final sharpen (USM: 100%, 0.3px, 1 Th) and many will stand the chance of seeing the benefit.
* such as in a blog
I accept there are occasions when it is valid to upload an image larger than I normally recommend (950h x 1600w maximum), because people may want/need to view it at 100% to study fine detail.
Anyway, climbing off my hobby-horse ...
I have been thinking that your last few posts, while good, would benefit from a bit more 'computer love' (PP)
That said, I think I can see that you had tried some of the things I have been suggesting on this already, I have just taken it a bit further.
Here's what I achieved with the above bug, it should look better at any resolution (I hope - but I'll only know after posting).
Please compare by switching between yours and mine in CiC LyteBox several times, I have made lots of small changes, (I think) every one improves the image in some small way and hope the sum of these changes results in a better final result that (if viewers hadn't seen the original) would still think looks natural.
What did I do?
Well, I tried to stick to processes you can use in your image editor, rather than use 'ACR/PS only' tools:
a) Reduced contrast range in levels dialog to avoid problems with next step (you shouldn't need to do this if you start from an unprocessed capture), anyway, I raised the (output) black point to 20 and lowered the (output) white point to 230.
b) Applied Local Contrast Enhancement via UnSharp Mask using settings of 50% Amount, 200 pixel Radius and 0 Threshold. I have a version with just these two steps saved, but not yet shown here.
c) Spot healing to remove a few blobs, especially any sharpened ones.
d) Blur brushed on certain leaf edges.
e) Burned certain highlight areas.
f) Dodged the insect's head and thorax area.
g) Locally sharpen brushed over the insect and its legs and antennae
I did not apply any over all sharpening, nor did I downsize.
I did not increase the saturation, although that may seem increased, caused by the LCE applied in step b).
Let me end by saying that I'm constantly amazed by the shots you get without a macro lens and this is no exception, your capture skills, borne of much practice, are excellent.
Hope that's helpful, Dave
-
23rd April 2016, 11:57 AM #4
- Join Date
- Oct 2013
- Location
- Philippines
- Posts
- 12,181
- Real Name
- Brian
Re: Practicing: tried the Stilt Bug without scaling down. Not good on blog. Here?
VERY VERY helpful. I followed your corrections with two changes. Originally Posted by Dave Humphries

(1) I resized to 800 by 900. It is the ideal size for my blog.
(2) In levels i adjusted the red down just a tad.
I did the suggested mods in Gimp which means to me that I could get a better result by figuring out the best way to combine the strengths of Capture One and Gimp.
I have no idea why I am fixated on NOT pushing my pp. It didn't use to be a problem. Perhaps 'Subtlety' has taken too big a place at the table?
In any case thanks for taking the time to teach me. here's my latest effort:

Last edited by JBW; 23rd April 2016 at 12:04 PM.
-
24th April 2016, 07:45 PM #5
- Join Date
- Dec 2013
- Location
- Turkey
- Posts
- 12,779
- Real Name
- Binnur
Re: Practicing: tried the Stilt Bug without scaling down. Not good on blog. Here?
A very nice image Brian, I like the green on your last edit
-
25th April 2016, 04:47 AM #6
- Join Date
- Oct 2013
- Location
- Philippines
- Posts
- 12,181
- Real Name
- Brian
Re: Practicing: tried the Stilt Bug without scaling down. Not good on blog. Here?
the colors are better Originally Posted by bnnrcn
-
25th April 2016, 07:33 AM #7Moderator
- Join Date
- May 2008
- Location
- Windsor, Berks, UK
- Posts
- 16,762
- Real Name
- Dave Humphries :)
Re: Practicing: tried the Stilt Bug without scaling down. Not good on blog. Here?
Yes, that is better Brian.
Has it been on a diet?
-
25th April 2016, 07:45 AM #8
- Join Date
- Oct 2013
- Location
- Philippines
- Posts
- 12,181
- Real Name
- Brian
Re: Practicing: tried the Stilt Bug without scaling down. Not good on blog. Here?
I have been and as I shrink so do my shots Originally Posted by Dave Humphries


 Reply With Quote