
 Helpful Posts:
 The idea of this thread was sparked by a post made by Marstar.
It prompted me to look through my layered images and see if there were any that would lend them selves to a detailed breakdown of the process of moving from the raw file through to the finished image.
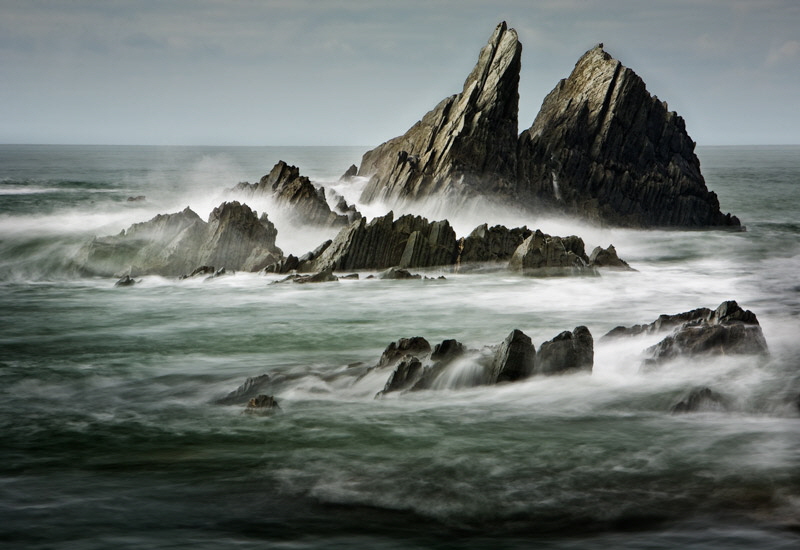
This is an old one I found. Taken back in 2009 at Morte Hoe.
This is taken from the Raw file with no adjustments apart from noise reduction and mild sharpening.
Brought into PhotoShop with Lightroom Adjustments under process 2003: Exposure +0.80, Recovery 69, Fill light 5, Blacks 17, Brightness +18, Contrast +28, Clarity +50, Vibrance +50 and an S curve applied.
Midtone contrast added with a High Pass filtered layer set to Overlay blend mode. Layer then masked to reduce contrast at edge of rocks.
Two Soft Light Graduation layers.
(Add layer, set blend mode to Soft Light and then add Black to Clear graduation.)
The top graduation has been masked from the rocks with a layer mask.
The brightest spray is then darkened using a curve layer, masked out with a black mask and then brushed in with a soft white brush at 25% opacity.
Stamped to a flat copy layer, converted to smart object and then given a Shadows/Highlights Smart adjustment and a brush applied curve to reduce some highlights near the edge.
An Edge Burn applied using a Soft Light Graduation layer as above.
Another Soft Light Graduation applied to the sky, masked from the rocks again.
A much stronger burn in now , again applied with a soft Light layer and the graduation tool but masked from the sky.
A curve added, masked with black and applied to the rocks with a soft white brush at 25% opacity.
Neat trick this one. Apply a Black and White conversion layer, set the blend mode to Luminosity and then you can adjust the luminosity of the colours up or down.
A curve layer applied over all to give a bit more weight.
Stamped to a flat layer, converted to a Smart Object and then a Shadows/Highligh Smart adjustment, masked to black and applied with a soft white brush at 25% opacity to lift some texture from the waves.
Having re-examined this after so long I have now decided it needs a slightly stronger sky.
So a final Soft Light Graduation layer in the sky area, masked from the rocks to give the image better balance overall.
And then a touch of output sharpening to finish the job.
Feel free to ask any questions.
Results 1 to 20 of 25
-
7th April 2013, 04:59 PM #1


- Join Date
- Mar 2013
- Location
- Saddleworth
- Posts
- 482
- Real Name
- Wayland ( aka. Gary Waidson )
The Anatomy of an Image - Morte Hoe
Last edited by Wayland; 23rd April 2013 at 02:12 PM. Reason: Added new final image.
-
7th April 2013, 05:37 PM #2
- Join Date
- Dec 2012
- Location
- Honolulu, Hawaii
- Posts
- 1,651
- Real Name
- Shane
Re: The Anatomy of an Image - Morte Hoe
Wayland, this will take a couple of reads through for me to absorb but thank you for sharing your step by step PP process.
-
7th April 2013, 07:00 PM #3
- Join Date
- Mar 2013
- Location
- Saddleworth
- Posts
- 482
- Real Name
- Wayland ( aka. Gary Waidson )
Re: The Anatomy of an Image - Morte Hoe
You're welcome Shane.
-
7th April 2013, 07:27 PM #4

- Join Date
- Jul 2011
- Location
- British Columbia, Canada
- Posts
- 7,244
- Real Name
- Christina
Re: The Anatomy of an Image - Morte Hoe
Amazing... Way beyond my skills and knowledge but thank you so much for sharing.
-
7th April 2013, 09:50 PM #5
- Join Date
- Mar 2013
- Location
- Saddleworth
- Posts
- 482
- Real Name
- Wayland ( aka. Gary Waidson )
Re: The Anatomy of an Image - Morte Hoe
Actually most of it is fairly simple in practice, the trick is to set things up as actions.
Most of the layers are then created, set and labeled with just one mouse click. Some of the actions even select the next tool and it's settings too.
In most cases all I have to then do is brush the effect in where it is needed or apply a gradient on a layer or it's mask.
-
7th April 2013, 10:02 PM #6

- Join Date
- Jul 2012
- Location
- Cheshire, England
- Posts
- 3,668
- Real Name
- Dave
Re: The Anatomy of an Image - Morte Hoe
At this point I have to kneel down. Great series mate. Mind you, you have to do summat oop Saddleworth. Me having been born and brought up way down south in Owdham.
-
7th April 2013, 10:25 PM #7

- Join Date
- Jun 2012
- Location
- Colorado & Texas, USA
- Posts
- 2,031
- Real Name
- Terri
Re: The Anatomy of an Image - Morte Hoe
No, I think the trick is in actually seeing an issue in the photo that needs to be dealt with and secondly knowing which tool is the best to use. I think the problem that most of us novices have is in actually identifying what needs to be fixed. A lot of us see a picture as pretty darn good after only a few minor tweaks (or maybe none at all). So many training videos tell you how to make an adjustment but not really WHY. And I think too many people just start moving sliders to see what happens rather than studying the photo first and targeting what needs to be done. I yearn for structured training in pre-processed image critique. Originally Posted by Wayland

Thanks, though, for showing all the steps that you went through. It is helpful. I don't think I would have ever seen that final image in my head from the original.
-
8th April 2013, 04:09 AM #8
- Join Date
- Oct 2011
- Location
- Grand Cayman, GT
- Posts
- 830
- Real Name
- Graham Heron
Re: The Anatomy of an Image - Morte Hoe
Typical Yorkshireman, brevity is close to the heart
 .
.
How long would this take you now from start to finish?
How much of the final image do you see before the shot is taken?
Thanks for the images.
Waylander? From Gemmell or another source?
Graham
-
8th April 2013, 07:02 AM #9
- Join Date
- Mar 2013
- Location
- Saddleworth
- Posts
- 482
- Real Name
- Wayland ( aka. Gary Waidson )
Re: The Anatomy of an Image - Morte Hoe
My folks came from Westmoreland and they were a really taciturn bunch, sorry if I've skipped stuff I should have said, it's not intentional, I really don't try to keep secrets.
I'm not sure how long this one took because some things get reworked when you come back to an image after a while, that's one of the reasons I use layers so much, I can go back and rework things at any time in the future.
To put into some kind of perspective there are 12 usable images from my trip to Anglesey last week and the downloading, tagging and editing of those up to this stage was done in less than eight hours on the day after. I also had lunch, walked the dog and did some paperwork in that time.
I think "seeing" what needs to be done comes largely from looking at pictures as much as possible and working out what works for you and what doesn't. That doesn't necessarily mean following everyone else's way of doing things but it will help you to find your own way.
I also think that part of it comes from knowing what can be done, that is best learned by playing around with the tools and that is also helped by doing as much as possible on layers, which can be removed if not needed or setting the history pallet to a much higher setting than the default so that you can go back further if you need to.
Make copies of your work and mess about for a while, if it doesn't work, bin it. If it does work, learn by it.
The Wayland moniker comes from Weyland, the Germanic smith of the Gods.
In my Living History work I sometimes run a silver and metal working display and picked up the name years ago from that.
The nick name really stuck when friends realised that in the mythology, Weyland was the son of the giant, Wade.
Wade's son = Waidson...
I been using the name so long now, both personally and in my work that more people know me as Wayland than actually know my real name.Last edited by Wayland; 8th April 2013 at 12:25 PM. Reason: Typo.
-
8th April 2013, 07:06 AM #10
- Join Date
- Mar 2013
- Location
- Saddleworth
- Posts
- 482
- Real Name
- Wayland ( aka. Gary Waidson )
Re: The Anatomy of an Image - Morte Hoe
I'm living on the Crompton side of Shaw, I walk the dog on the moors there so I guess I have the best of both worlds, the amenities of the city on one side with the wilderness on the other. Originally Posted by davidedric
-
8th April 2013, 12:52 PM #11
- Join Date
- Dec 2012
- Location
- French Catalunia
- Posts
- 232
- Real Name
- mat
Re: The Anatomy of an Image - Morte Hoe
Hey Wayland, Great piece I really enjoyed looking and reading the step by step stuff. It's really interesting to watch your thread as a slideshow and observe the image changing shot by shot. Everyone should do this it's fun.
Some of the changes are quite dramatic and I can see why you used them but others are so subtle that even after several looks I fail to notice the difference. Did you use this specific series of adjustments as you saw necessary for the shot or was it part of a workflow that you use? I guess I'm wondering if you have a series of steps that you go through regardless (if one makes no discernable difference just move on to the next anyway) or if you look at the image and think will it be improved by this? and then discard that option and move on ? Actually I think what I'm asking is ' is this series a workflow that you use and could therefore be adapted by someone (me) to be aplied, in degrees, to their own work ?
Having a ball reading all the replies to your 10 types of photographer thread, seems you like to stir it up a bit !(nice). I hope you don't get bored and drift off to another site, it feels you level of editing is pretty advanced what was your learning curve like and which stuff did you watch/read?
mat
-
8th April 2013, 01:39 PM #12
- Join Date
- Mar 2013
- Location
- Saddleworth
- Posts
- 482
- Real Name
- Wayland ( aka. Gary Waidson )
Re: The Anatomy of an Image - Morte Hoe
Looking at the small images (800px wide) some of the differences are very subtle but when working on the full sized image, things like mid tone contrast show up a lot more.
I have thought of setting up an action that would add many of the layers that I regularly use, ready for adjustments but for me I think that would take the automation a step too far.
I prefer to look at each image, and stage on it's own merits. Some need one type of alteration others something else entirely.
By having actions that do the donkey work of creating the layers and setting the tools ready for use it means I can work quickly without faffing around with the mechanics if you know what I mean.
The actual choices about what to alter and how much have to be more intuitive and specific though.
For example, setting up a dodging and burning layer.
In one click the Action will:
Create a layer filled with mid grey (128 in all channels.)
Set the blending mode to Soft Light and the opacity 75%.
Select a pre set soft brush with a 200 pixel radius and 25% opacity.
Set the pallet to black and white. (Always black on top because I most often darken rather than lighten.)
Set the history brush to the current state.
All I have to then do is:
Paint over the image with black to make the area darker or white to lighten.
The [ ] buttons increase or decrease the brush diameter, The X button swaps between black and white.
A single sweep of the brush adds 25% of tone but multiple sweeps can be built up for more effect.
If I need to remove a brush stroke I can step back on the history pallet or if I want to return an area to the original state I can switch to the history brush which will return the layer to mid grey or just in that direction if I lower the opacity.
If the whole adjustment is too strong, just lower the layer opacity.
If I want to make the whole effect stronger, I can increase the layer opacity up to 100%. If that is not enough I can drag the layer down to the new layer button to create a duplicate layer and I have another 100% to play with.
If the whole thing doesn't work delete the layer and start again.
Sometimes I can do everything I need, lightening or darkening with one layer, other times I will work on each adjustment or area on a separate layer.
Doing it separately creates bigger files but is much more controllable of course.
It sounds complicated when written like that but in reality I just click the action button, and brush to darken or X then brush to lighten.
Simple and intuitive.
Apply the same thinking to other adjustments and the world is your small bi-valved mollusc.
-
8th April 2013, 02:09 PM #13
- Join Date
- Mar 2013
- Location
- Saddleworth
- Posts
- 482
- Real Name
- Wayland ( aka. Gary Waidson )
Re: The Anatomy of an Image - Morte Hoe
I hope I'm not upsetting anyone, that's certainly not my intention, but I have to admit I do like to make people think about things from time to time. Originally Posted by moopy goops
I actually post a lot on another forum, completely unrelated to photography, and through that I have made lots of good friends and learned an enormous amount. I hope to do the same here.
As for learning about photography I am one of the fortunate people that can learn from books. The big problem has been finding books that actually go beyond the basics.
I've tried at a few photographic forums but usually been put off by old members that just want to big themselves up and aren't actually willing to tell anybody what they know.
I suspect it's because so many people make their living from photography that they don't really want to give away what they think of as their secrets. That's just not how I think.
By the time I feel able to advise on something, I'm probably looking ahead for the next challenge.
What brought me here was the really good information held in the tutorials. Somebody around here knows an awful lot more than I do and, most importantly, is willing to share it.
That's attractive to me right now because I'm trying to push my own boundaries as a landscape worker and the only way I can see of doing that is by shooting further into the night.
I do hope people realise that I'm not here to cause trouble but I am just not the sort to sit quietly in the corner.Last edited by Wayland; 8th April 2013 at 02:54 PM. Reason: Typo.
-
8th April 2013, 02:58 PM #14
- Join Date
- Mar 2013
- Location
- Saddleworth
- Posts
- 482
- Real Name
- Wayland ( aka. Gary Waidson )
Re: The Anatomy of an Image - Morte Hoe
Hey that's cool isn't it? Originally Posted by moopy goops
I hadn't thought of doing it that way, I've just gone back and put the crop on the original so it works better.Last edited by Wayland; 8th April 2013 at 03:22 PM. Reason: Last line added.
-
23rd April 2013, 02:26 PM #15
- Join Date
- Mar 2013
- Location
- Saddleworth
- Posts
- 482
- Real Name
- Wayland ( aka. Gary Waidson )
Re: The Anatomy of an Image - Morte Hoe
As if just to prove a point I made in post 9, I've had another look at this image and re-worked the sky a bit.
-
23rd April 2013, 03:02 PM #16
- Join Date
- Jul 2011
- Location
- A Pacific Island
- Posts
- 941
- Real Name
- Andrew
Re: The Anatomy of an Image - Morte Hoe
Thanks for this Gary. I've tagged the page for future reference. I too find learning the basics of the editing programs very easy to grasp. After watching videos and having a manual close at hand the "How To" is straight pretty straight forward. It's the "What To Do" that presents the challenges. Detailed explanations such as yours allow me to see the "Why's". After reading a huge amount and also taking a couple of classes I haven't found a good source for that level of editing instruction. I'm certain it will come with experience but non-prolific shooters will take years and still never get a level of competence they wish. As with most other skills, learning through the generosity of others and bypassing their mistakes has proven to be the optimal route.
Thanks again.
-
23rd April 2013, 09:29 PM #17
- Join Date
- Mar 2013
- Location
- Saddleworth
- Posts
- 482
- Real Name
- Wayland ( aka. Gary Waidson )
Re: The Anatomy of an Image - Morte Hoe
You're welcome Andrew.
Knowing what to do and importantly when to stop is something that comes with practice I guess.
I work non destructively with layers and masks so I can always step backwards and even alter stuff years later if I feel like it.
That helps a lot because there's no problem with being experimental.
Often if I'm feeling a bit blocked I'll drop a black and white conversion layer over the image and then edit it in mono to get the tones right before changing the conversion layer mode to luminosity to carry on with it as a colour image.
If that doesn't work, I can bin the layers and try something else.
Because a lot of my more complicated adjustments are set up as actions it only takes a moment to give something a go and get rid of it if it's not right.
-
24th April 2013, 02:06 AM #18
- Join Date
- Apr 2012
- Location
- Dunedin New Zealand
- Posts
- 2,697
- Real Name
- J stands for John
Re: The Anatomy of an Image - Morte Hoe
With your PP, way beyond and above me, I wonder if you might consider a crop across, just above the foreground rocks to bring the main rock closer and much more powerful and in keeping with your adjustments? I am intrigued too by the five echo's of the main rock formation to be found in the lower rocks when that is done.
-
24th April 2013, 09:17 PM #19
- Join Date
- Mar 2013
- Location
- Saddleworth
- Posts
- 482
- Real Name
- Wayland ( aka. Gary Waidson )
Re: The Anatomy of an Image - Morte Hoe
I'm actually looking at making a new edit for this years "Landscape Photographer of the Year" entry starting from a process 2012 raw conversion.
Looking at the file I think the new engine is capable of pulling much more out of the original so I'll look again at the crop at that stage.
I doubt if I'll cut too much though because I like the overall balance at the moment.
-
25th April 2013, 02:51 PM #20

- Join Date
- Jun 2012
- Location
- Detroit, Michigan
- Posts
- 1,009
- Real Name
- Lex
Re: The Anatomy of an Image - Morte Hoe
Agreed. At present, the image is a good example of the Suggestion of Thirds, and the leading lines in the rocks and water direct my eye rather well. The crop is about the only aspect of this image's process I feel qualified to comment on, and I wouldn't change it. Originally Posted by Wayland

So far, I've avoided getting too deep into Photoshop because I shoot people a lot and I feel very strongly that one needs to tread very softly when PPing any shot with a person in it. But it's starting to hold me back, and I really need to work on that (first, I need to find some tutorials that don't apply Barbie-doll skin smoothing). Cheers for the reminder, Wayland.


 Reply With Quote