
 Helpful Posts:
 I'm trying to learn how to selectively edit photos in Lightroom 4.1 and I watched this video and it seems easy to do. And the brush seems easier to maniuplate then the selection tool in Adobe Elements. However, when I try to edit the selected portion of the photo I end up with strange colours on the selected part of my photo, instead of the effects of shadows, curves, sharpening etc.
The link for the video I viewed was very helpful
http://tv.adobe.com/watch/learn-ligh...sh-the-basics/
but it does not cover what I am experiencing
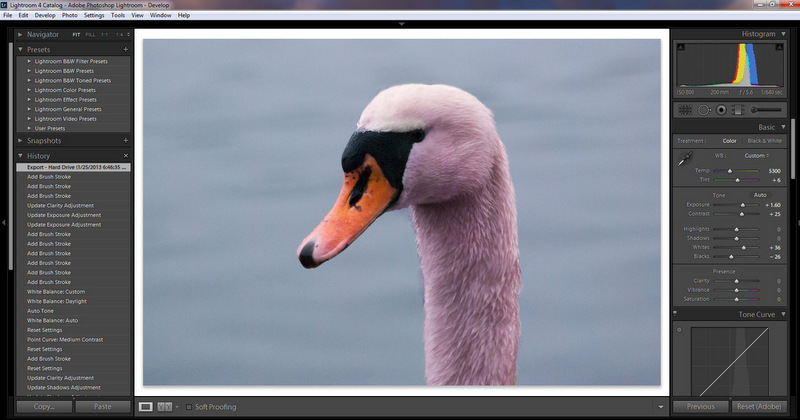
Here is a screen shot of my attempted edit
Can anyone please tell me what am I doing wrong? Something in the settings?
Results 1 to 9 of 9
-
26th January 2013, 02:17 AM #1


- Join Date
- Jul 2011
- Location
- British Columbia, Canada
- Posts
- 7,244
- Real Name
- Christina
Learning to use the adjustment brush in Lightroom 4.1
-
26th January 2013, 02:59 AM #2

- Join Date
- Sep 2012
- Location
- Nomadic but not homeless, ex N.Z. now Aust.
- Posts
- 4,167
- Real Name
- Paul

Re: Learning to use the adjustment brush in Lightroom 4.1
When using the adjustment brush you have probably turned on the colouring option. Towards the bottom of the options just above brush size you will see color and a small rectangular box. For no colour the box should have diagonal lines on it. If the box is coloured click on it and adjust the slider to 0 and the colour should disappear.
The colour on the swan looks simillar to the default mask colour and if that is the problem (I don't think it is) just move the cursor away from the dot reference point.
-
26th January 2013, 03:00 AM #3

- Join Date
- Dec 2010
- Location
- Silverdale, WA; USA
- Posts
- 415
- Real Name
- Lon Howard
Re: Learning to use the adjustment brush in Lightroom 4.1
Hi Christina,
Without seeing you go through all of the steps you took, I would be only guessing, but to start with, if there were a screen shot of your adjustment brush panel (as opposed to the basic panel shown here), it would possibly be more revealing. One thing I've found with using the adjustment brush in Adobe Camera Raw (I don't use Lightroom but the brush appears to use the same essential algorithm) is to have all the sliders on zero except for the one controlling the effect you are currently applying. For example if you want to apply exposure one way or the other, all of the sliders except exposure should be set at zero; because if they're not you'll not only apply an exposure effect, but you'll also apply the effects of the sliders that are not zeroed out. If some of those 'other' sliders are at a relatively high number you can get some rather strange side effects.
Without more information, that's my wild guess at this point, so maybe go back and try a re-do, keeping this in mind. Cheers!
Last edited by Lon Howard; 26th January 2013 at 03:50 AM.
-
26th January 2013, 07:25 AM #4

- Join Date
- Sep 2010
- Location
- Victoria BC
- Posts
- 1,510
Re: Learning to use the adjustment brush in Lightroom 4.1
Christina: Originally Posted by Christina S

I've been using the quite a bit the past six weeks and have learned a few tricks for what I need to do.
But first, could you tell us what you are trying to do? Then it would be easier to suggest some actions.
Glenn
-
26th January 2013, 11:31 AM #5

- Join Date
- Jul 2012
- Location
- Cheshire, England
- Posts
- 3,668
- Real Name
- Dave
Re: Learning to use the adjustment brush in Lightroom 4.1
Or double click on the word "Color" to get the box with the cross in it back (i.e. no colour).If the box is coloured click on it and adjust the slider to 0 and the colour should disappear.
Don't think it can be this, because the Adjustment Brush appears to be inactive.The colour on the swan looks simillar to the default mask colour and if that is the problem (I don't think it is) just move the cursor away from the dot reference pointLast edited by davidedric; 26th January 2013 at 11:44 AM.
-
26th January 2013, 11:48 AM #6

- Join Date
- Sep 2011
- Location
- Lakeland, Florida
- Posts
- 3,073
- Real Name
- Joe
Re: Learning to use the adjustment brush in Lightroom 4.1
Hello Christina, looking at your Swan it appears that Automask is checked and what your have brushed is colored red so you can see what has been brushed. At the bottom of the Adjusment Brush panel there is a box labeled Automask. See if that is checked. In the Tools menu at the top left side see if in the Adjustment Brush Overlay if the color red is checked. If so what I wrote is happening.
-
26th January 2013, 03:35 PM #7
- Join Date
- Jul 2011
- Location
- British Columbia, Canada
- Posts
- 7,244
- Real Name
- Christina
Re: Learning to use the adjustment brush in Lightroom 4.1
Thank you everyone for your replies and helpful advice.
Yes, I had the colouring option turned on and sliding the saturation to 0, eliminated the colour and this action brought up the no color box. The adjustment brush is now working just fine.
Thank you, Lon. Yes, all my sliders were set at set numbers for different effects, so I have set them all at zero. For future I will make sure I post the correct screen shot.
Glenn, I'm simply practicing and trying to learn how to edit my photos... ie; to select specific parts of a photo and apply edits to only that portion. For me that usually means applying a curves adjustment, adjusting exposure, and sharpening to bring out the detail in the selected part, fixing an overexposed sky or just making the colour of the sky or water prettier.
Thanks to this everyone on this forum and the tutorials on it, I have learned a lot about editing, but I am still having major challenges selecting things perfectly, and learning how to use masks and layers. So, I'm just practicing on photos.
-
26th January 2013, 08:02 PM #8

- Join Date
- Dec 2011
- Location
- New England
- Posts
- 9,271
- Real Name
- Dan
Re: Learning to use the adjustment brush in Lightroom 4.1
Rather than using the adjustment brush for sharpening, you might find it useful to try the masking slider in the sharpening box. This allows you to restrict sharpening to areas with a level of detail you select, while not applying it to smooth areas (like sky) that you don't want selected. I use masking most of the time but sharpening with the adjustment brush only rarely. Like the other sharpening sliders, it has will display in gray only. Hold the alt key while moving the slider. This makes it very easy to see what areas are being masked and therefore are not being sharpened.
-
26th January 2013, 08:16 PM #9
- Join Date
- Jul 2011
- Location
- British Columbia, Canada
- Posts
- 7,244
- Real Name
- Christina
Re: Learning to use the adjustment brush in Lightroom 4.1
Thank you. I was not aware of this and will try it.

 Reply With Quote