
 Helpful Posts:
 48
Less processing on this Alpha Romeo, love the gauges.
Thanks
Ryo
Results 21 to 40 of 122
Thread: Project 52 by Ryo
-
29th January 2012, 03:40 AM #21


- Join Date
- Dec 2011
- Location
- NY
- Posts
- 631
Re: Project 52 by Ryo
-
29th January 2012, 10:32 AM #22

- Join Date
- Nov 2011
- Location
- Gold Coast, Australia
- Posts
- 1,798
- Real Name
- Mal
Re: Project 52 by Ryo
Nice colours and detail on the gauges. Lots of great detail for the eye to absorb. What's at the top left of the frame just outside the car?
-
29th January 2012, 01:03 PM #23

- Join Date
- Jul 2011
- Location
- Victoria Australia
- Posts
- 600
Re: Project 52 by Ryo
Hi Ryo, I like the colour of the image, the soft blue and grey harmonise well,
Your focus looks a little soft, not sure where your focal point was, great detail
-
4th February 2012, 10:24 PM #24
- Join Date
- Dec 2011
- Location
- NY
- Posts
- 631
Re: Project 52 by Ryo
47
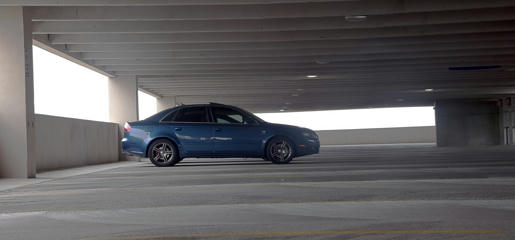
So this week I am dabbling in Medium format images, I took my camera (M4/3)4000x3000 image and captured 8 images on a tripod, overlapping 20-30% working out the calculations I figured I should come up with a 10000x5000pixel image. I used my 40-150 lens at 98mm f8 ISO 100. Thanks to Photobucket the world of CIC will only see 1,279px × 596px but the result in my computer is 10886x5032 or a 54.8MP image.(not really its still 8x12MP but hey...) The automated stitching in CS5 did not render the image faithfully,(support beams in ceiling, haze on nose of car) On the upside it is really cool to have the level of detail on such a large image, esp if you consider I could get almost the same FOV from my 25mm but at 4000x3000. I am currently working out how to minimize the movement around the entrance pupil, perhaps a pano head DIY, and I will be on the hunt for some better programs. Here is the result:

Thanks
Ryo
-
5th February 2012, 09:23 AM #25
- Join Date
- Nov 2011
- Location
- Gold Coast, Australia
- Posts
- 1,798
- Real Name
- Mal
Re: Project 52 by Ryo
Took me a while to figure out what you're doing. So in summary, we'll pretty much lose the effect you're attempting to achieve - so my only C&C is the vertical lines aren't vertical
So out of curiosity, that's an Audi, right? BMWs, Mazda rotaries, Audis - exactly what is it you do for a living and can I get a job there
-
5th February 2012, 02:05 PM #26
- Join Date
- Dec 2011
- Location
- NY
- Posts
- 631
Re: Project 52 by Ryo
Mal, That is an Audi A4(belongs to a coworker) Most of my car photos are from a Coffee and Cars that I attend every other weekend. It allows me to see everything from Fords to Ferrari's. Good catch on the verticals I was so busy looking for defects in the rendering I forgot to take a step back and check the alignment. Here is an attempt at uploading full version:
Its hosted on Mediafire and will provide a download link for you viewing.
Thanks
Ryo
-
5th February 2012, 08:03 PM #27
- Join Date
- Nov 2011
- Location
- Gold Coast, Australia
- Posts
- 1,798
- Real Name
- Mal
Re: Project 52 by Ryo
Love the resolution of the full version but the car doesn't seem as sharp as it should be - I used the wheels as a reference point. I think you probably to need to use a pan head - or perhaps a rail type arrangement would be better?
-
10th February 2012, 11:04 PM #28
- Join Date
- Dec 2011
- Location
- NY
- Posts
- 631
Re: Project 52 by Ryo
46
This weekend I will be working, so I figured that I would take today to get my picture done Early. This has changed the face of the Presidency....

Painted with light, 4" exposure ISO 100 f2. Little post processing, desaturated, and cropped.
Thanks
RyoLast edited by Ryogenetic; 10th February 2012 at 11:13 PM.
-
11th February 2012, 07:44 PM #29
- Join Date
- Nov 2011
- Location
- Gold Coast, Australia
- Posts
- 1,798
- Real Name
- Mal
Re: Project 52 by Ryo
Not sure what it is this time but I like it. My main comment is about how you've focussed it, or perhaps how you've composed the shot with the narrow DoF. The back edge of the.... cog? is in focus while the front edge of the second cog on the left is in focus. Was that the intent or should one the cogs have been in complete focus? The effect for me is to have my eyes darting back and forth between the two.
-
11th February 2012, 07:47 PM #30
- Join Date
- Jan 2009
- Location
- South Devon, UK
- Posts
- 14,882
Re: Project 52 by Ryo
Looks like the cutting heads of an electric shaver to me.
-
11th February 2012, 07:49 PM #31
- Join Date
- Nov 2011
- Location
- Gold Coast, Australia
- Posts
- 1,798
- Real Name
- Mal
Re: Project 52 by Ryo
I think you might be right... haven't seen one of those in years. Originally Posted by Geoff F

-
11th February 2012, 10:47 PM #32
- Join Date
- Dec 2011
- Location
- NY
- Posts
- 631
Re: Project 52 by Ryo
You guessed it. I was looking for something to photograph and earlier yesterday I had cleaned my electric razor so I snapped a pic. For the title I watched the top 100 gadgets. Apparently the disposable razor (interchangeable blade type) changed how much hair was on Presidents faces... Originally Posted by Geoff F
@ Mal, I had taken a series of photos changing the depth of field and focus from front to rear of the head, but I liked the one that contained the sharp points. I think that I should have gotten all three in focus at their tops.
Thanks
Ryo
Thanks Ryo
-
12th February 2012, 01:11 PM #33
- Join Date
- Jul 2011
- Location
- Victoria Australia
- Posts
- 600
Re: Project 52 by Ryo
Interesting shot Ryo, I would never have guessed what is was. I like the tone of the shot, although I think the main focus could have been on the head in front, it seems to be between the two, and perhaps a clone of the bottom right would tidy up the image,
-
18th February 2012, 08:56 PM #34
- Join Date
- Dec 2011
- Location
- NY
- Posts
- 631
Re: Project 52 by Ryo
45
Most of this week has been consumed by repairing my fleet of vehicles. So here is a shot just before I pulled the water pump off.

3 halogen light setup one from bottom of engine bay two on the hood. 25mm F1.4 ISO 100. Edited with 3 layers 1. Gradient, 2. color black, 3. Overlay in black. Had considered re-running the serpentine belt but I like seeing the ribs of the pulleys.
Thanks
Ryo
-
19th February 2012, 08:35 AM #35
- Join Date
- Nov 2011
- Location
- Gold Coast, Australia
- Posts
- 1,798
- Real Name
- Mal
Re: Project 52 by Ryo
I find that sometimes it's hard to fully appreciate the work that has gone into the photos that you create because you do it so well. If you had the time it would be great to see what you do with your photos in stages
-
19th February 2012, 12:41 PM #36
- Join Date
- Jul 2011
- Location
- Victoria Australia
- Posts
- 600
Re: Project 52 by Ryo
Hi Ryo, the image doesn't grab me as such as I don't understand what it is about , but as an image the lighting is spot on, not too bright but illuminating what I think you want the light on, great detail with very good focus, I would think the area would have been very cramped as well, I would also like to see your setup as you seem to go to alot of trouble to shoot your images under the right light,
-
19th February 2012, 09:07 PM #37
- Join Date
- Dec 2011
- Location
- NY
- Posts
- 631
Re: Project 52 by Ryo
@ Mal and Wendy, here is the setup for the camera:

Not really much trouble as I was using the lights to see what I was working on.
This is the original SOOC:

It is not terribly interesting as it sits, so I figured some vignetting to focus you on the pulley's would be nice. But there are some hotspots that needed to be dealt, and I wanted just a hint of the entire engine bay; which is why I have so many layers.
Here is a screen of my PS for this pic:

Hope that helps
Ryo
-
26th February 2012, 03:04 AM #38
- Join Date
- Dec 2011
- Location
- NY
- Posts
- 631
Re: Project 52 by Ryo
44
So tonight after work I figured I would work on some long exposures, I was going for some shots that showed the fast moving clouds as they whisped by the moon. I was shooting along the light cast from a street lamp, towards the moon and star, settings: ND filter, f10, ISO 100 on a 6sec exposure. When I pulled the photos up on the computer for editing I found this one had a really cool lens flare:

Any who, with a bit of fun editing I came up with these two edits:

and

Thanks
Ryo
-
26th February 2012, 08:48 PM #39
- Join Date
- Nov 2011
- Location
- Gold Coast, Australia
- Posts
- 1,798
- Real Name
- Mal
Re: Project 52 by Ryo
Well, I have to say - great imagination and vison. I would have likely thrown the photo in the scrap pile but you managed to produce something quite interesting and unique.
A lot of space in the overall photo though - I wonder if a tighter crop would still work.
-
3rd March 2012, 06:46 PM #40
- Join Date
- Dec 2011
- Location
- NY
- Posts
- 631
Re: Project 52 by Ryo
43
As it was raining this morning I figured I would go out and try to shoot some atmospherics, fog that is. This is one area that I have had some serious struggles. I have worked out a technique that I am exploring but I am not sure I have got it right yet.
Here is the SOOC:

Edited:

second SOOC:

Edited:

I am trying to master a way to keep the fog, unfortunately, after all the minor corrections in CS5 the fog is mostly removed in the process. So the process: Duplicate layer, set white balance, double sharpen, drop in a mask, gradient over the fog. In the second Image I added two additional layers first a soft light with a dark grey gradient, second layer at normal with a lighter grey going down 75% of the image set at 45% opacity. I have some images in mind for a cold spring morning, that will require detail and the fog.
Thanks
Ryo


 Reply With Quote