
 Helpful Posts:
 Hopefully the title got you all looking!
I'm sure that many of you have popped in to this thread hoping to read another post on portraiture, but this time, it's all about YOU!
It's been a while since we had a formal lesson - so hopefully, at least some have put some of the lessons to good use. So what I'd like to do now is encourage each and every person who has a love for portraiture to post some images of "where you're at now" with your craft, so we can focus our efforts to help YOU take it to the next level.
Who's going to be first?
Results 1 to 20 of 280
-
7th September 2011, 11:14 PM #1

- Join Date
- Dec 2008
- Location
- New Zealand
- Posts
- 17,660
- Real Name
- Have a guess :)
"School of Portraiture" - Lesson 08 - Taking it to the next level ("The Reunion")
-
8th September 2011, 12:57 AM #2

- Join Date
- Nov 2010
- Location
- Owensboro, KY
- Posts
- 1,530
- Real Name
- Brian
Re: "School of Portraiture" - Lesson 08 - Taking it to the next level ("The Reunion")
I'll bite on that one!

-
8th September 2011, 01:25 AM #3
- Join Date
- Dec 2008
- Location
- New Zealand
- Posts
- 17,660
- Real Name
- Have a guess :)
Re: "School of Portraiture" - Lesson 08 - Taking it to the next level ("The Reunion")
Thanks Brian,
Can we start by asking what YOU think of the image in terms of the good and bad stuff? What would you do to improve it? What would you do differently next time?
-
8th September 2011, 01:42 AM #4
- Join Date
- Nov 2010
- Location
- Owensboro, KY
- Posts
- 1,530
- Real Name
- Brian
Re: "School of Portraiture" - Lesson 08 - Taking it to the next level ("The Reunion")
Colin,
I really appreciate you taking the time to do these tutorials and contribute so much to this forum.
To answer your question, I like the self portrait as it is except for my sweaty appearance from work
I used a bare flash on either side of me while sitting in front of my TV with minimal PP - I think only a little USM if I recall right. For the mood it coveys it's good. I like the hard light and the separation from background is good, though the crop may be a little low on my forehead. For a more friendly mood, I might try to smile next time and choose a more colorful background
What do you think?
-
8th September 2011, 01:44 AM #5
- Join Date
- Nov 2010
- Location
- Owensboro, KY
- Posts
- 1,530
- Real Name
- Brian
Re: "School of Portraiture" - Lesson 08 - Taking it to the next level ("The Reunion")
Oh, and I would probably try a black T shirt to do it again.
-
8th September 2011, 02:17 AM #6

- Join Date
- Jul 2011
- Location
- Ontario, Canada
- Posts
- 1,300
- Real Name
- Andrew
Re: "School of Portraiture" - Lesson 08 - Taking it to the next level ("The Reunion")
Fairly new to portraiture, not entirely sure I like it either! But here's what I've got!

-
8th September 2011, 02:18 AM #7
- Join Date
- Jul 2011
- Location
- Ontario, Canada
- Posts
- 1,300
- Real Name
- Andrew
Re: "School of Portraiture" - Lesson 08 - Taking it to the next level ("The Reunion")
PS - Brian, I like your shot too, I wouldn't have changed anything.
-
8th September 2011, 02:52 AM #8
- Join Date
- Dec 2008
- Location
- New Zealand
- Posts
- 17,660
- Real Name
- Have a guess :)
Re: "School of Portraiture" - Lesson 08 - Taking it to the next level ("The Reunion")
You're very welcome Originally Posted by speedneeder

OK - not much to add, but here goes ...To answer your question, I like the self portrait as it is except for my sweaty appearance from work
I used a bare flash on either side of me while sitting in front of my TV with minimal PP - I think only a little USM if I recall right. For the mood it coveys it's good. I like the hard light and the separation from background is good, though the crop may be a little low on my forehead. For a more friendly mood, I might try to smile next time and choose a more colorful background
What do you think?
- If this was a professional shoot, I'd probably kill the specular reflections (little white dots) 1 unter the nose, and 3 in a triangle starting on your chin / jaw bone, plus the few small ones in your sunglasses.
- Obviously a very masculine shot (very terminator-esque) - nothing wrong with that
- An alternative lighting style is to put the lights behind you (and to the side) (with you as the subject, not as you the photographer) and angle them towards you so they give a very chisled look on your cheeks - and even better separation. If you try it though, keep in mind that you'll need to flag off the lights from reaching the camera directly (put something in front of the camera so that you're visible, but the lights aren't), and of course you'll need something to provide a little fill onto your face (a reflector that's "tuned" to one of the kicker lights could well be enough).
-
8th September 2011, 02:54 AM #9
- Join Date
- Dec 2008
- Location
- New Zealand
- Posts
- 17,660
- Real Name
- Have a guess :)
Re: "School of Portraiture" - Lesson 08 - Taking it to the next level ("The Reunion")
Hi Andrew, Originally Posted by Andrew76
Thanks for joining in - it's great to have you with us
Before I comment, I'd like to know what you think of this nice image -- what are it's strengths? Weaknesses? What could you do differently next time?
-
8th September 2011, 05:35 AM #10

- Join Date
- Jul 2011
- Location
- Houten, The Netherlands
- Posts
- 313
- Real Name
- Pierre
Re: "School of Portraiture" - Lesson 08 - Taking it to the next level ("The Reunion")
Hi Colin,
Since I didn't read yet all your tutorials maybe a bit to early. In fact when I took this picture I hadn't read one at all .
.
We were sitting on a terrace in bright sunlight under a thick white / cream-colored parasol.
All settings are manually: Nikon D7000; Nikkor 18-105mm @ 105mm 1/80s f/5.6; WB: (5000K) 0,0; ISO: 400; No D-lighting; No flash, VR: on; Distance 1m. 1/2 eV under-exposure. No PP, a real SOOC.
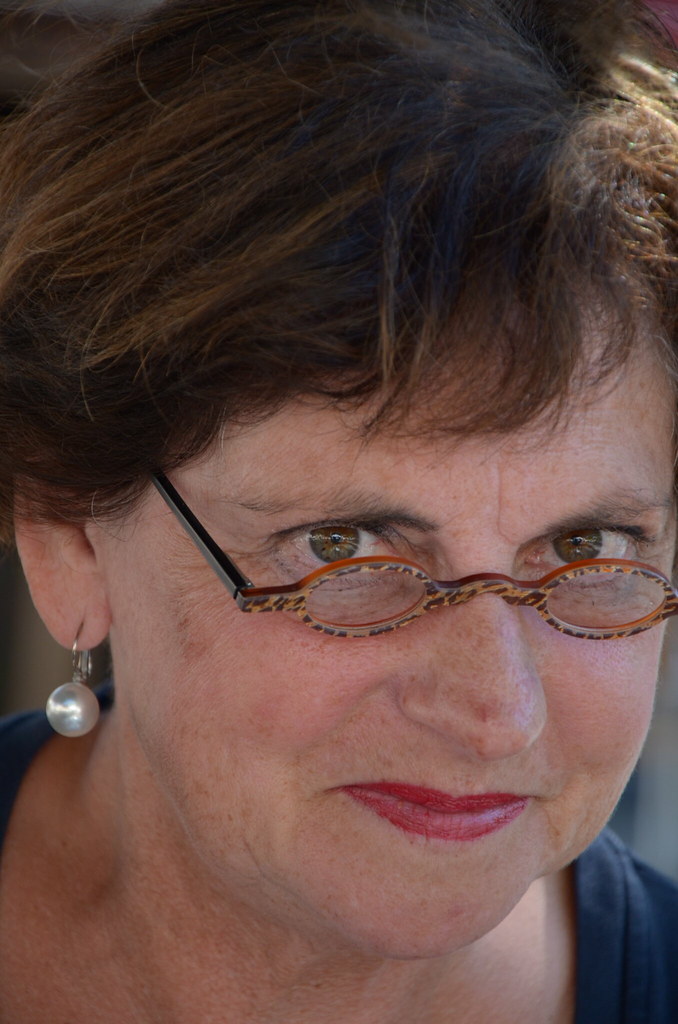
Alweer aan het fotograferen? / Photographing again? by PjerryT, on Flickr
I really love the picture.
The eyes are crispy, the lighting is right to my opinion. The colour is right (as far as I can see on a laptop and LCD of the camera). The light is ambient, so not much to do there (or am I wrong?), although "I turned" her head that way that the short side got the main light, her ear is in the "shadow", as far as one can speak of shadow with this soft light.
I'm probably a "bit" prejudiced, because not everyone likes the picture. Most I heard is that it's to much close-up. But I did that because I liked that and I just had learned it on a photo-course.....
If you want that I first complete your course, just say that and leave it that way. Otherwise any comment is appreciated.
-
8th September 2011, 06:15 AM #11
- Join Date
- Dec 2008
- Location
- New Zealand
- Posts
- 17,660
- Real Name
- Have a guess :)
Re: "School of Portraiture" - Lesson 08 - Taking it to the next level ("The Reunion")
Hi Pierre, Originally Posted by Pjerry
Thanks for joining in.
It's a nice shot - just a couple of thoughts came to mind ...
1. I wouldn't normally put the eyes in line with the centre of the image - normally you'd want them about 1/3 down from the top
2. In terms of processing - personally - I'd push the levels a little more, and apply a little output sharpening.
How does this look in comparison?

-
8th September 2011, 06:38 AM #12
- Join Date
- Jul 2011
- Location
- Houten, The Netherlands
- Posts
- 313
- Real Name
- Pierre
Re: "School of Portraiture" - Lesson 08 - Taking it to the next level ("The Reunion")
Hi Colin,
Thanks for your quick response.
It looks a bit more vivid. I like it more. probably I should learn something about CS..... The way you adjust the pictures is very nice and not - as commonly seen - over he top.
The eyes is a real thing I have to pay attention too. Your completly right, and I'm a bit of a shame that I didn't notice that. I think (a learning point for me) that it all has to do with the focus point I chose (got only 39 points where I can pick from...LOL). Focus and re-position always results in my cases (especially at such a short distance) in a lost of sharpness (my age probably ).
).
Thanks, I will pay attention to your suggestions.
Pierre
-
8th September 2011, 09:28 AM #13
- Join Date
- Dec 2008
- Location
- New Zealand
- Posts
- 17,660
- Real Name
- Have a guess :)
Re: "School of Portraiture" - Lesson 08 - Taking it to the next level ("The Reunion")
You're very welcome Pierre, Originally Posted by Pjerry
When can we see the next one?
-
8th September 2011, 11:14 AM #14
- Join Date
- Nov 2010
- Location
- Owensboro, KY
- Posts
- 1,530
- Real Name
- Brian
Re: "School of Portraiture" - Lesson 08 - Taking it to the next level ("The Reunion")
Andrew, this is a wonderful shot to me simply because the pure happiness captured on the faces - that's hard to catch like this.
Colin, thanks for your feedback on my Asta la vista portrait! All your points are good.
-
8th September 2011, 11:25 AM #15

- Join Date
- Jan 2011
- Location
- Perth, Australia
- Posts
- 254
- Real Name
- Peter
Re: "School of Portraiture" - Lesson 08 - Taking it to the next level ("The Reunion")
Colin - I would love to take you up on your offer as the "school of portraiture" is the reason I now own a reflector. I should say that I run with 1 reflector, alas no flash (except on camera), lightroom and GIMP. All photos were taken with a window on the right and the reflector set up on the left (white side I think).
So exhibit 1:

One of my favourites. If I had to criticse, the hair across the face probably isn't ideal.
Exhibit 2:

My criticisms here again are probably hair in face and maybe a bit more uneven lighting from right to left.
Exhibit 3 - same picture as 2:

Now here I am after a bit of advice please. I shoot in RAW but have never quite got the hand of downsizing in Lightroom. Through the export process I drop the largest axis to about 1500pix and select output sharpening however after observing some different photos, I think they still come out a little soft. Rather than exporting direct as a JPG, this photo was exported as a TIF, slight sharpening applied in GIMP then saved as a JPG. Be interested to hear comments on this.
Appreciate any comments or new pointers you can give me.
-
8th September 2011, 11:34 AM #16
- Join Date
- Sep 2011
- Location
- Battle East Sussex
- Posts
- 88
- Real Name
- Paul
Re: "School of Portraiture" - Lesson 08 - Taking it to the next level ("The Reunion")
Last edited by Dave Humphries; 8th September 2011 at 08:12 PM.
-
8th September 2011, 01:50 PM #17
- Join Date
- Jul 2011
- Location
- Ontario, Canada
- Posts
- 1,300
- Real Name
- Andrew
Re: "School of Portraiture" - Lesson 08 - Taking it to the next level ("The Reunion")
Hey Colin and Brian, thanks for taking a look - I kind of agree with Brian, I think it's a fairly decent shot, OK bokeh, nothing too bright/dark or distracting in the background; of course, I would prefer to shoot people NOT wearing baseball caps, but it was his choice, and his mom didn't seem to mind. A little more lighting on the young man's face, perhaps? But, the darkness in his face is partially due to the cap - reflectors could only do so much!
I personally think those are the major weaknesses, and strengths, please let me know what you think!Last edited by Colin Southern; 9th September 2011 at 10:57 AM. Reason: add image copy
-
8th September 2011, 08:53 PM #18
- Join Date
- Dec 2008
- Location
- New Zealand
- Posts
- 17,660
- Real Name
- Have a guess :)
Re: "School of Portraiture" - Lesson 08 - Taking it to the next level ("The Reunion")
You're very welcome Brian. It's kind of a slightly difficult one to critique - it's a great shot - but it's just not what I'm used to critiquing! Originally Posted by speedneeder
Do you think you'll get a chance to try the other lighting setup I suggested?
-
8th September 2011, 09:35 PM #19
- Join Date
- Dec 2008
- Location
- New Zealand
- Posts
- 17,660
- Real Name
- Have a guess :)
Re: "School of Portraiture" - Lesson 08 - Taking it to the next level ("The Reunion")
Hi Peter, Originally Posted by Ricco
Thanks for posting this - I think it's an excellent discussion piece!
I'll comment on the other two later on (bit short of time right now, so just "chipping away" at these).
- Framing. What I do is try to imagine shots printed on canvas - framed - and hung. I say to myself "if this had been shot by a professional photographer - and I came into your living room - what would I think of it?" In this case I think (and this is just my personal opinion) that I probably wouldn't put the subject right in the middle, but with large black areas either side. One option would be to simply crop away the excess and turn it into a vertical shot (and indeed I've done many shots for clients just like that), but as my personal style evolves, I'm tending towards using a landscape orientation for portraiture to give the subject some room to "look into" (especially where they're looking off in a different direction) - so my preference would be to keep it as a landscape, but to crop back some of the black (thus moving the subject off-centre in the process).
- Lighting. You've used what we call "broadside lighting", which in itself works well enough, but in this case it's also illuminated her ear to the same levels as the face tones, and unfortunately, that draws the eye to an area we don't want to draw attention to (portraiture is primarily about faces). So in a studio situation it's move the key light around a bit and also point it more towards her nose (correct positioning often has key studio light more "aimed past" the subject than "pointed at them" (helps give extra light for reflectors too) - and in a natural light situation the same rules applies, but because you can't move the sun, you have to obviously reposition the subject relative to the sun, or use a flag to block off some of the light hitting that area.
- Tones. Good job - you've pushed them about as far as you can with this image (but too far in the other two). Basically, the further you push any tone towards the highlights end of the range, the more it washes out (at level 255 it will be pure white) - and we don't normally want that with skin tones (unless it's a high-key image). Usually I'll "over-expose" an image by about a stop (based on what the light meter recommends), and then reposition the tonal range by adjusting the brightness slider (which shows most of it's effect in the medium to high midtones) (wonderful tool!). What I'm always looking for when I use it is good contrast in the skintones (ie I can see the colour and texture of the skin).
- Hair. If I had a dollar for every shot I've taken where the subjects hair has crossed the eye like this, I could probably retire! Some photographers like the look - personally - I don't mind it when there's breaks in the hair and the subject is looking through them (so I can see the pupil at a minimum), but like this, I generally clone them out if the shot is otherwise a keeper (and I might add that cloning them out is time consuming because of all the different structures one has to work through). So it's one thing to keep an eye on if you can, but I know how hard that is to do. In the studio I shoot tethered to a 40" TV screen - and if I can, I'll put a helper on "watching" duties to watch for things like this (and pendants that have moved) etc.
- Top. Generally I avoid strong patterns and colours - personally, I feel one has to either avoid them, or use them as an obvious part of the composition. In this case I'd suggest desaturating them a bit.
- Head. Little too much "chin down" for my taste, although I appreciate that "that's just the way it was" on this occasion. Often people comment on little things in my portraiture, but the "real world" reality is that there are just so many variables, and we can only control so many things at once.
- Sharpening. I don't use LR (I'm a Photoshop guy), but normally, one would apply a USM of between 50 & 100% @ 0.3 pixel for output sharpening (on the image after it has been down-sampled) (fancy word for "down-sized). Prior to that one should apply content / creative sharpening on the full resolution image (amounts vary, but 40% @ 4 pixels is the starting point I use).
- Colour balance. I thought the image had just a touch too much yellow in the skintones - so I've added about 5% blue to counter it. If one wants to shoot quality portraiture, there's just no getting away from (at a minimum) white balancing via a grey card.
Hope this helps!
So with all that in mind, I've made a few tweaks to your image -- how do you think people would react to this as a big canvas print hanging on your wall at home?

-
8th September 2011, 10:23 PM #20
- Join Date
- Nov 2010
- Location
- Owensboro, KY
- Posts
- 1,530
- Real Name
- Brian
Re: "School of Portraiture" - Lesson 08 - Taking it to the next level ("The Reunion")
Yes. Specular highlights were actually one of my goals in this photo, but I am interested to try and make one without. I'll be back.... Originally Posted by Colin Southern

 Reply With Quote
