
Hey everyone
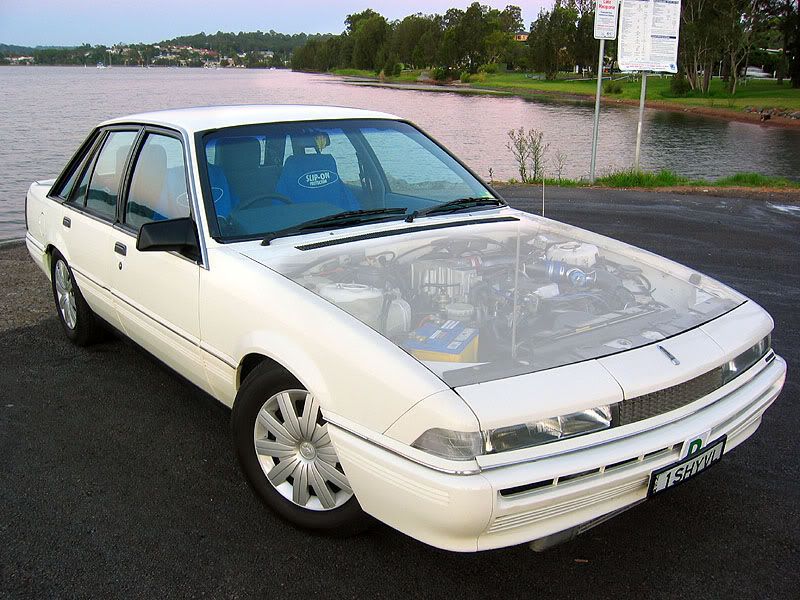
I am a newbie to photoshop and I have always been curious as to how to get this effect in the image below with the see-through hood. I am unsure what effect its called, so if anyone can point me into the right direction, that would be fantastic
Thankyou all in advance
 Helpful Posts: 0
Results 1 to 10 of 10
-
2nd April 2009, 09:13 AM #1New Member

- Join Date
- Apr 2009
- Posts
- 5
How to create semi-transparent looking objects in Photoshop
-
2nd April 2009, 09:33 AM #2
- Join Date
- Dec 2008
- Location
- New Zealand
- Posts
- 17,660
- Real Name
- Have a guess :)
Re: Newbie to photoshop
Hi Breno, Originally Posted by Breno

Welcome to the forums - great to have you with us
I'm not a whiz at special effects, but shots like this wouldn't be too hard to do. It's really just a few Photoshop tools and techniques coming together, essentially, ...
1. You'll need two images that cover the elements of what you want the composite to look like - in this case the normal looking car and either another shot of the same car without the bonnet or a photo of another engine bay taken from the same angle, with the same lighting (to keep things simple).
2. The two images will need to be stacked one on top of the other as layers
3. A layer mask will need to be created to determine which part of the image to display, and which to hide, and
4. Finally, the opacity of the layer with the normal bonnet needs to be reduced so that the engine bay appears through the normal image.
Does this help at all?
-
2nd April 2009, 09:55 AM #3New Member
- Join Date
- Apr 2009
- Posts
- 5
Re: Newbie to photoshop
Hey Colin, Thanks for the reply.
I am just having trouble with Step 3 that you wrote.
I currently have the images merged, I can see through the bonnet etc, although I can still see the 2nd image with the bonnet up in the air, so I have two images, and now I just need to erase the bonnet in the air on one of them.
-
2nd April 2009, 10:10 AM #4
- Join Date
- Dec 2008
- Location
- New Zealand
- Posts
- 17,660
- Real Name
- Have a guess :)
Re: Newbie to photoshop
Thinking about it some more, if your layers are the right way around, you should be able to just delete the portions of the image that you don't want. Originally Posted by Breno
It's getting a bit late here in the day for me (long day) - how about posting both images here and I (or someone else) will take a look at it in the morning for you? Would that help?
-
2nd April 2009, 06:58 PM #5
- Join Date
- Jan 2009
- Location
- South Devon, UK
- Posts
- 14,893
Re: Newbie to photoshop
I use a different programme but the principle is basically similar.
There are many ways of doing this sort of thing. As an alternative to Colin's first method and what I think he means with the second suggestion:
Take one photo of normal car and one of car with engine visible, bonnet up.
Arrange as 2 layers (may have to create a layer from background image to make 2 workable layers). Stack with the Engine Layer on the bottom. Use a low opacity erasure brush to partially remove the bonnet and allow the engine to show through. Enlarge the image as it will be a trifle tricky to get the edges to look natural.
You may have to erase some parts of the engine layer and fiddle a bit (up and down or rotate) to get it to fit well.
Geoff.
-
3rd April 2009, 01:04 AM #6New Member
- Join Date
- Apr 2009
- Posts
- 5
Re: Newbie to photoshop
Thanks for the replies
Colin, I have posted the links to the pictures below. I would be forever thankful if you were able to have a go and post a step-by-step instruction of how to do it rather then just telling me what to do, eg, stack image etc.
I am only new at photoshop CS and will need to be treated like a 8y.o child! haha
http://img.photobucket.com/albums/v6...L/134_3464.jpg
http://img.photobucket.com/albums/v6...L/134_3461.jpg
-
3rd April 2009, 04:11 AM #7
- Join Date
- Dec 2008
- Location
- New Zealand
- Posts
- 17,660
- Real Name
- Have a guess :)
Re: Newbie to photoshop
Hi Breno, Originally Posted by Breno
Real easy to do ...
1. Open both images in photoshop
2. Use the move tool to drag one image on top of the other so that you end up with both images in the same file, with one layer stacked on top of the other. Make sure the 2 images are properly aligned.
3. With the open bonnet image on top, use the erase tool to erase everything except what you want to show through the bonnet.
4. Change the opacity of the top layer to around 50% and ...
... Viola, job done
See how you go with that
Last edited by Colin Southern; 3rd April 2009 at 04:23 AM.
-
3rd April 2009, 10:20 PM #8New Member
- Join Date
- Apr 2009
- Posts
- 5
Re: Newbie to photoshop
Ahh too easy, Done and done, Thankyou very very much for your great assistance Colin, I really appreciate it.
-
3rd April 2009, 11:04 PM #9
- Join Date
- Dec 2008
- Location
- New Zealand
- Posts
- 17,660
- Real Name
- Have a guess :)
Re: Newbie to photoshop
You're very welcome. Originally Posted by Breno
One of my plans for a future image is to use a similar technique to produce an image of "ghosts" sitting around a table
-
4th April 2009, 07:48 AM #10

- Join Date
- May 2008
- Location
- Herefordshire UK
- Posts
- 816
- Real Name
- Chris
Re: How to create semi-transparent looking objects in Photoshop
Just a quickie for any other non-photoshop owners following this
This can all be done in Photoshop elements more or less identically except that tools come up in different order and ignore guff about layer limitations which is untrue.(maybe no 16 bit)
For mac owners it can be done by simple cut and paste from one image to another in $50 progs which have lots of other great value features (a) GraphicConverter (which is my primary image viewer, browser and sorter - exact analogue of the finder) (b) Color-it, which has the advantage over I think all other progs that most tools work on a selection only, ie you can fine tune the scale, rotation and brightness/contrast of the selection being pasted in situ over the host image. Unfortunately it only just scraped into OS10 and has fairly poor colour space control. Main use is salvage/editing of old monochrome pics. The lack of layers makes job 10x as fast and stress free.
what prog are you using Geoff?

 Reply With Quote