DIGITAL PHOTO RESTORATION
Digital photo restoration can work miracles by turning a faded old family portrait into an image of seemingly modern quality. Alternatively, this process can work in reverse to give a photograph a timeless feel. Performing either of these transformations yourself is not as difficult as it may seem — you just need to know which restoration tools to use.


example photo restoration from a scanned print, circa 1900
Although photos can degrade in a variety of ways, this usually includes some combination of fading, color casts (often yellowish), and localized physical damage (such as stains or scratches). Fortunately, photo editing has just the right tools for each aspect:
- Fading: levels, curves, contrast and black level tools
- Color Casts: white balance, color balance and other color tools
- Localized Damage: clone stamp, healing brush and other selective editing tools
Each of these will be discussed separately in the sections below, but before that we need to focus on the scanner itself . . .
IT ALL STARTS WITH THE SCANNER
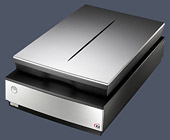
Before any digital restoration can be performed, the original photo (or film negative) needs to be scanned. This step is critical, since it ultimately determines your restoration's potential. Needless to say, try and use the best scanning equipment and software at your disposal. Everything else being equal, flatbed scanners usually provide much higher quality than similar sheetfed scanners.
Scanning Software. Often whichever software came with your scanner will work fine, especially since this caters to the capabilities of your particular device. However, sometimes this can be too limiting, in which case Vuescan and Silverfast are two notable third-party choices. Silverfast is quite powerful if you happen to have the film negative, while Vuescan is more than sufficient (and inexpensive) for printed photos.
Scanner Settings. Pay particular attention to the following:
- Resolution. In general, use a dot per inch (DPI) resolution of at least 400-600 DPI for prints, and several times this resolution with film negatives. The chosen scanning resolution will depend on the sharpness and focus of the original images, but should ideally resolve the speckles of noise/grain in the print. Try experimenting with different settings so that you can see what the image looks like on-screen.
- Precision. Scan at the highest bit depth possible: 16-bits per channel or 48-bits in total color depth, if available. This way your digital original can withstand more retouching before it begins to show signs of posterization.
- File Type. Save the scan as a TIFF file to maximize detail preservation. If your scanner and software support RAW/DNG (digital negative) files then this is even better.
- Color vs. B&W. Saving black and white photos as grayscale image files can preserve disk space, but this isn't the only consideration. A color scan can sometimes make the restoration process easier — even for a black and white image — since color makes it easier to identify and remove stains which aren't native to the photo.
- Film Negatives. These provide more flexibility — if you are fortunate enough to still have them. However, negatives are often more susceptible to physical damage, so sometimes the original photo is still a better source. Regardless, you will need to either send the negatives off for professional drum scanning, or have a film negative capable scanner.
ARCHIVE THE ORIGINAL SCANNED FILE
Before any editing, first save your original scanned TIFF or RAW/DNG file, and preferably in more than one location. All subsequent editing should be saved in a separate file. Restoration technique, personal preference, intended use and imaging technology all change — potentially requiring a new restoration at a later date (with a photo that has continued to degrade). See the tutorial on archival digital photo backup.
1. FADING: RESTORE CONTRAST & DYNAMIC RANGE
Perhaps the single most common form of degradation is fading. This causes the blacks to become less dark, and the whites to become less light. In other words: the photo begins to lose contrast.
Fortunately, this is also one of the more straightforward ageing artifacts to counteract. The most universal tool for fixing this is probably the levels tool in Photoshop (and other image editing programs). Move your mouse over the before and after labels below to see how the levels tool changes the example photograph:
Levels Adjustment Tool: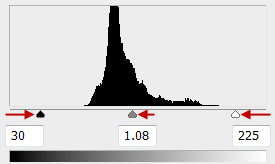 In general, you'll want to: |
 |
|
| Before | After | |
The image histogram needs to extend across as broad a range of tones as possible (from left to right above), but not so much that this detracts from the (presumed) mood of the original photograph. For example, many types of old photos never had fully black or white regions — even when brand new — giving these a softer and subtler appearance.
Other specific tips on contrast-enhancement include:


- Duplicate Layers & Opacity. Perform any contrast changes in a duplicate layer; that way the effect can be fine-tuned later using the opacity slider.
- Adjustment Layers. Alternatively, using adjustment layers is an even better solution. This has the added benefits of minimizing the risk of posterization, permitting quick and easy re-adjustment and reducing the overall file size. For contrast-enhancement in Photoshop, select "Layer > New Adjustment Layer > Levels..." from the top menu.
- Lightness Channel. You can only increase contrast of shades (and not of colors) by performing adjustments on the lightness channel; otherwise this can inadvertently exacerbate color casts, or change the overall hue. If editing in duplicate or adjustment layers, you can achieve this by setting the blending mode to "luminosity."
- Automation. These typically work by stretching the image histogram so that it spans from the far left (black) to the far right (white). The "auto contrast" and "auto levels" features are two common ways to achieve this. While this is usually desirable for modern photos, it may result in too much contrast with an old photograph.
- Curves Tool. This can provide even more specific adjustments, but is a little more difficult to use and can be overkill for many restorations. See the tutorial on the Photoshop curves tool for more on this topic.
The same tools of opacity, duplicate layers and adjustment layers are also helpful in the next two sections . . .
2. COLOR CASTS: WHITE BALANCE & COLOR TOOLS
Fading is one thing when it simply reduces contrast, however it can become harder to restore — and more unsightly — if the photograph develops an unrealistic color cast. This appears as the familiar "yellowing" of photos — even in those from a few decades ago.


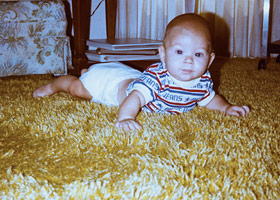
The upper portion of the white diaper was clicked on using the dropper tool for the above correction.
Using the "white balance dropper tool" is often the easiest technique since it has the potential to neutralize color casts in a single step. Use the dropper tool on a region which you believe to have been (i) light neutral gray, (ii) receiving most of its illumination from the primary light source and (iii) not tinted by light bouncing off nearby colored objects.
On the other hand, sometimes there just isn't an object which satisfies the above requirements — in which case you'll need to resort to one of the following:


- Automated Correction. This attempts to remove color casts not by using any specific region of a photo, but instead by analyzing the image as a whole. In Photoshop, two ways of achieving this are by selecting (i) "Auto Color" from the image drop-down menu, or (ii) "snap neutral midtones" after clicking the "Options..." button in the levels tool. Be careful though; many of these automated methods attempt to correct both color balance and contrast in a single step. As usual, edit in a duplicate layer so that the effect can be decreased afterwards.
- Manual Correction. This typically involves using the "color balance" (or similarly named) tool to tweak the overall warmth or coolness of a photo, or relative prevalence of magenta versus green. During adjustment, the image is manually inspected until the overall color balance is desirable.
 | |
| Cooler | Warmer |
| More Green | More Magenta |
Regardless, achieving just the right color balance can be highly subjective and there isn't always one right answer. When in doubt, it's generally a good idea to err on the side of having a photo that appears slightly warmer versus cooler, or has slightly more magenta as opposed to green coloring. Experiment with the mouseover buttons below the image to the right to see for yourself.
Complications. Perhaps the most common problem is that old photos don't always develop color casts uniformly. This might be due to how the photo was stored, or could even be a result of the chemistry of the photographic paper.
Non-uniform color casts unfortunately complicate the correction process because they require targeted adjustments. For example, if one shifted a photo's overall color balance to remove a yellow cast in the shadows, this would cause the midtones and highlights to appear bluish, or vice versa. In such cases, one needs to apply color corrections selectively, either by specifying highlights or shadows within this color balance tool, or by performing color correction with the curves tool on the individual color channels.
However, other times localized color casts are caused by stains — and not some gradual process affecting the entire image. In that case, one might be better off just blending or removing these regions entirely, as discussed in the next section. . .
3. LOCALIZED DAMAGE: CLONING & HEALING BRUSH
Old photos have likely incurred plenty of imperfections in the form of dust marks, rips or tears, stains, scratches and crinkles. These can distract from the image — particularly if located on or near someone's face:
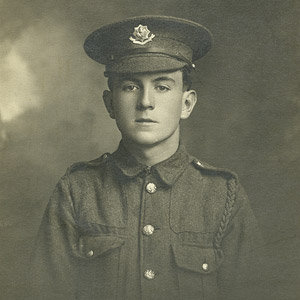
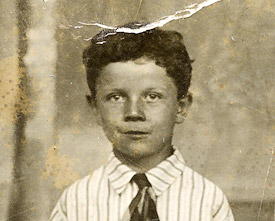 Original Scan
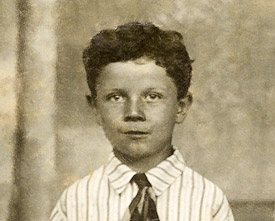 After Cloning & Healing Brush Tools
Conservative restoration using only cloning and healing brush tools; some imperfections still remain.
Move your mouse over the image on the right to directly compare before/after versions.
By far the best tools for removing these are the clone stamp and healing brush tools (in Adobe Photoshop and most other editing software). These are in fact the only two tools used to restore the above image. Each tool has the following effect:
 |
 |
||
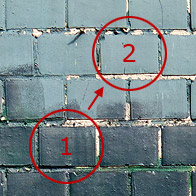
| 1 = Source Region 2 = Target Region |
Clone Stamp | Healing Brush | |
|---|---|---|---|
- Clone Stamp Tool. This works by replacing the image content in a target region with a copy from a source region. This is most useful for situations where you need to fully reconstruct all characteristics of a source region, such as when removing a large tear or duplicating a repeating object or pattern.
- Healing Brush Tool. This also works by replacing the content in a target region with that from a source region, except it only replaces texture — while preserving the original color and luminosity. Even though less is being replaced, this often actually makes the healing brush a much more effective tool. This is most useful when removing small or isolated imperfections, and when touching up uneven transitions caused by the clone stamp.
Each tool may require extensive practice until either is used to maximal effect. Both require clicking at least twice: once (while holding ALT/option key) to select the source, then again for the target. General tips and best-practices include:
- Tool Order. Optimal results are usually achieved by using each tool in succession. One can start by replacing all missing content with the clone brush tool, then by doing a final touch-up with the healing brush.
- Source Region. Perhaps the most important aspect is learning to choose the best source region for a given target; ideally the brush size should be no larger than required by the target imperfection, and the source should be as close as possible to the target's lighting and location within the image.
- Brush Hardness. A lower brush hardness setting causes the edges of the brush to blend in better with the image — especially with the clone stamp — but this also causes blurred or washed-out detail if the source and target textures are different.
- Repetition. Take extra care not to give the appearance of repeating features amongst otherwise random texture; this is a tell-tale sign that the cloning and healing brushes have been used, and is surprisingly easy to identify — even by those not familiar with photo editing. Using a diverse range of brush sizes can help make such repeating features less noticeable.
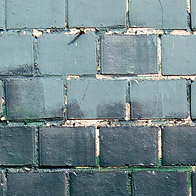
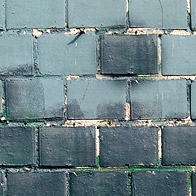
Move your mouse over the image below to see the combined effect of these tools on a large print that was digitally reassembled from torn pieces:
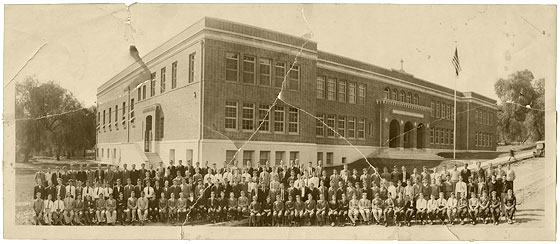
Restoration required extensive cloning since tears were across detailed brick textures. Photo circa 1929.
FINAL WORDS
Photo restorations require many interpretive decisions, so careful judgment is a critical aspect of the restoration process. Before you even touch the photo, ask yourself: what do you hope to accomplish, and which aspects are of highest priority to improve? Do your restorations maintain the original mood of the photo, or is that even important? All of these can influence your choice of several seemingly equal approaches to restoration.
Regardless, take your time! Proper removal of physical imperfections such as stains or scratches can be quite involved, so do not (always) expect miracles with just a few minutes of work.
For similar topics, also see the following tutorials:
- Levels Tool. A relatively simple and easy to use way of controlling image tones.
- Curves Tool. A more powerful but more complicated tonal adjustment tool.
- Digital Photo Editing Workflow. A comprehensive overview of all the typical steps.