
Wendy (Scout) asked about lighting setup and processing for some of the kitchen shots here Put away your cameras, and get into the kitchen...
I thought I'd do another from scratch, just to show how easy it is. This one took me about 15 mins in total.
A few points first
1. I always shoot in RAW. If you are pushing the pixels on contrast you need to shoot in RAW.
2. I use studio lights, but they are pretty cheap these days. You can buy a good starter kit for about £300 min. If you are thinking of buying some you might want to ask here first and also read buying guides. The ones I bought are only powerful enough for stuff like this table-top work, but they do the job perfectly.
3. I like the extreme contrast look. You either love it or hate it. If it's the latter I quite understand.
Here is the basic setup. The subject (knife and fork) are placed on white art paper. The camera is in my hands, but would be placed on the tripod for the shot. The light has a diffuser softbox and is placed very close. This gives a very soft light. I use a radio trigger to fire it, but you could use a synch-cord.
This is what came out of the camera. You can see it has produced a very nice even light. I took a reading first with a light meter, and this was the only shot I took - it's that easy.
In the RAW editor (CS4) the onlyt edit I did at this stage is to push the contrast. You can see the sliders how I pushed both darks and lights to give more contrast. It's better to use these controls rather than the 'contrast' slider on the main panel as it gives finer control.
Next, in Photoshop I wanted to get even more contrast, and also give a more ethereal look. I used OptikVerve plugin filters (they are free). I can't go through all the options as there are too many. You need to download them and try yourself. http://www.optikvervelabs.com/virtualPhotographer.asp
Here is what it looked like after applying a filter.
All that's left to do now is a little dodging and burning in CS4, and this is the final result. All in 15 mins.
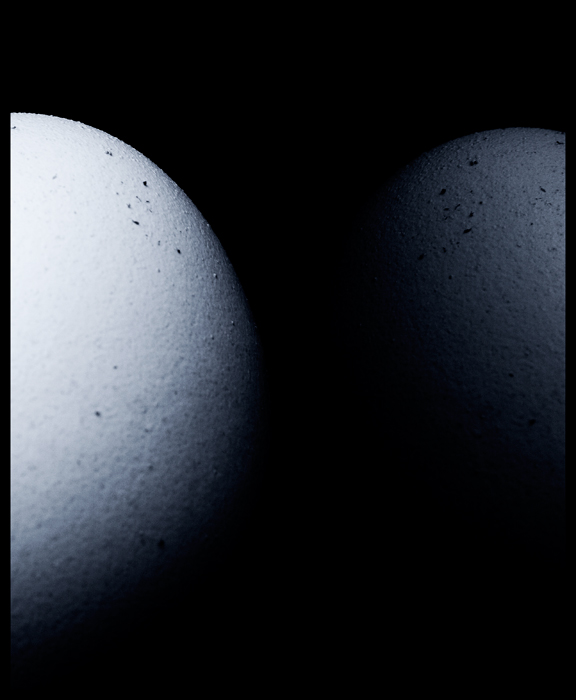
Wendy also asked about the egg shots I did. Exactly (eggactly?) the same process, except the eggs were shot on black acrylic to get a reflection. So we went from this RAW file here...
and by using a similar process to the above one, plus a shot rotation and some added grain, I got the shot below. Freaky isn't it?
 Helpful Posts: 0
Results 1 to 10 of 10
-
16th May 2010, 05:02 PM #1

- Join Date
- Aug 2009
- Posts
- 4,049
Lighting setup and processing for the high contrast look
Last edited by carregwen; 16th May 2010 at 05:43 PM. Reason: typos and a few minor changes
-
16th May 2010, 10:33 PM #2
- Join Date
- Oct 2009
- Location
- Maryland, USA
- Posts
- 1,015
- Real Name
- Rick
Re: Lighting setup and processing for the high contrast look
Hi, Rob;
Excellent write-up. I went down and executed your instructions, and it really was that easy.
I used a 580EX through a 43" (110cm) umbrella for light, and some foamboard for the base. It took me about 10 minutes to set up, since I was working from your instructions. I don't have a light meter, so I did need a couple of test shots to get the output right on the flash.
Here's the shot after ACR, with some contrast push as you describe:

I should get some flatware to use for these photos: as you can see, ours has made a few too many trips through the dishwasher to look good.
I didn't get the OptikVerve filters yet, so I just pushed the contrast some more, used the healing brush to blend the far edge into the background, and desaturated the far edge and upper-left corner.

It isn't a keeper, but as a first try at this kind of technique and processing, I'm quite pleased: definitely a testament to some good instructions. If you'd seen my first attempts in other directions, you'd see what this says about your teaching ability.
Cheers,
Rick
-
17th May 2010, 03:25 AM #3
- Join Date
- Aug 2009
- Location
- Canada
- Posts
- 3,113
- Real Name
- Wendy
Re: Lighting setup and processing for the high contrast look
Eggcellent Rob, Thanks. I have a few questions. Please bare with me, I don't know anything about photography lights except that there are many different varieties.
1. What type of lights are best. flourescent....whatever others are available
2. What power should I be looking at. I am only interested in small items, tabletop setups, and flowers
3. What do you mean by using a radio trigger or synch cord. Can't I just turn the lights on and leave them on till I'm finished?
Really stupid questions, sorry. I will do some reading, but this Kitchen thread got me started on this way before I had planned.
Also, I'm sure someone here at the forum has a lightbox setup. Can anyone comment on them. Are they worthwhile for this type of photography?
That's all the questions for now. I am going to have a look at some lights, and then come back with more specific questions before making a purchase. I'm all for DIY substitutes also, if there is something that will get good effects without too much trouble
I think when I get a feel for how light works, and can actually see it in real time with studio lights, I would probably like to get a flash setup, but right now, I need to be able to see the light before I shoot.
Thanks again for taking the time. Very helpful
Wendy
-
17th May 2010, 06:38 AM #4
- Join Date
- Dec 2008
- Location
- New Zealand
- Posts
- 17,660
- Real Name
- Have a guess :)
Re: Lighting setup and processing for the high contrast look
Yes - truely eggceptional work -- and I'm not yoking either! Originally Posted by ScoutR

-
17th May 2010, 08:32 AM #5Moderator

- Join Date
- May 2008
- Location
- Windsor, Berks, UK
- Posts
- 16,759
- Real Name
- Dave Humphries :)
Re: Lighting setup and processing for the high contrast look
Hi Wendy,
I guess the options are battery flash, studio flash (these come with modelling lamps - a continuous light that I believe dims with flash power setting, so you can see the illumination ratio between two heads), tungsten (old fashioned style), tungsten halogen, fluorescent and LED(?). Originally Posted by ScoutR
You can learn from my mistakes Originally Posted by ScoutR


I have a light box/tent set up and use small gooseneck desk lamps with 30 and 60W lamps in, great for seeing the effect beforehand (unlike flash), with thes I find that for taking pics of say cameras and lenses, etc., I work with a 55mm macro lens at f16 (for DoF), 200iso gives me shutter speeds of between 1/10s and 2 seconds depending on image content, distance of lamps etc. although this isn't a problem in itself.
However, the lamps soon make me, and the subject, very warm, even though only 120W in total (3 lamps)
Switches in the cord are a pain compared to switches on the lamp base (guess which I have?)
I also find the range of movement from the gooseneck is insufficient for ideal modelling of small items, they often end up on their sides to get low enough
The remote (IR) release is a godsend
The fold down D5000 screen with Live View is another thing that really makes the job more comfortable, I can look from above (perpendicular to the screen), whether standing or sitting (on a castored chair)
I put "LED(?)" at the end of my light source list because I know some people are selling LED arrays for videography use and I wonder whether, at close range, they might provide a less hot light source than my desk lamps Here's a video to show what I mean - anyone here tried them for stills? Originally Posted by ScoutR
I too need to 'see the light' before I shoot
Cheers,Last edited by Dave Humphries; 17th May 2010 at 08:47 AM. Reason: added more stuff
-
17th May 2010, 08:32 AM #6
- Join Date
- Aug 2009
- Posts
- 4,049
Re: Lighting setup and processing for the high contrast look
Great first attempt Rick. I did cheat a bit with mine as I used brand new cutlery that wasn't scratched or marked in any way. I notice your was a little scratched. I think people who shoot this stuff (food etc) for a living are very fastidious in getting everything right as the smallest detail shows up. Originally Posted by rick55
You can use flash-guns if you can difuse them. I have a pair of Canon 430s and a Sigma ring flash, so I can fire up to three. I didn't mention it before as it's quite an expensive option compared to a cheap studio kit.
It's worth getting the OptikVerve, They don't always work when you want them to, but for the right shot they can do the business a lot quicker than using the normal Photoshop processing (they use Photoshop features anyway).
Thanks for trying the shot setup.
-
17th May 2010, 08:52 AM #7Moderator
- Join Date
- May 2008
- Location
- Windsor, Berks, UK
- Posts
- 16,759
- Real Name
- Dave Humphries :)
Re: Lighting setup and processing for the high contrast look
Where are my manners?
I should have started with a thank you to Rob for this excellent and informative thread.
It's always interesting seeing how others work, I'll try a snap of my working space, but I'll have to clone out a lot of background rubbish before I could show it here
Thanks Rob.
There, I did it without any egg yokes
Groan,
-
17th May 2010, 09:23 AM #8
- Join Date
- Aug 2009
- Posts
- 4,049
Re: Lighting setup and processing for the high contrast look
Hi Wendy, I think Dave has answered some of this, but I'll add my bit. Originally Posted by ScoutR
1. Lights are either 'hot' or 'cold'. Hot is anything that generates heat such as tungsten or halogen that are used in the home, and for movie lights etc. They stay on all the time and therefore generate heat. They are fine to use for photography, but, and it's a big 'but', the can raise the room temperature in a small room, and if you are shooting sensitive subjects (flowers etc) it will cause problems. You might also need to alter the WB in RAW, but that isn't a problem. I saw an article last week where a guy had rigged up two kitchen flourescent tubes (they don't generate much heat) with a gap between them and used them for portrait shots. They were very good too. The problem with hot light is that you can not vary the power level unless you fit a dimmer switch. That means you have to vary the light level by changing camera settings, which is not good.
Cold lights are flash, and they only flash at the time they are triggered by you. We can include here both flash-guns that sit on your camera (but they can also be used off-camera) and studio flash units that are free-standing. There is an article/review in Digital Photo mag (UK) for the spring issue which compares studio flash kits. They highly rated the 'Elemental Genesis 2 kit' as the best, here http://cgi.ebay.co.uk/Elemental-Gene...-/300421555870 They also highly rated the Lencarta Smartflash Starter Kit http://www.photomart.co.uk/ProductDe...alogue=FLA0013. These units are typically 200-250watt power units. That is plenty for table-top work (power levels are adjustable) and you can also do head and shoulder portraits with them, no problem. Colin may have more to say on this, because if you want to light up a bigger area you need more power (it's all to do with light fall-off over distance).
2. Power levels? Mine are only 120w, and I really need 200 or 250watt. Most kits now are at 200watt minimum. For table-top, 200w should be plenty.
3. With flash units, the light is only on when they are triggered - for 1/1000s sec at the most. Shutter speed makes no difference to flash. Normally you will be in a relatively dark room, and when you press the shutter using flash you will typically be using 1/125s. The shutter will stay open for that time, but the flash will fire first for about 1/1000sec, and the rest of the 1/125s will record very little as there won't be enough light. But you still get a perfect exposure. You trigger them either with a cable connected between your camera and one of the lights (the other is triggered by the first one), or by a wireless radio or infra-red signal device. Cable is obviously a lot cheaper.
Advantages of a lighting set-up?
1. You can always use ISO100 or less, to get fine quality (the flash power will always give you enough light for a fast exposure)
2. You can capture high-speed motion at speeds up to at least 1/10,0000 sec
3. If you have a dedicated work area set up, it makes it much quicker and easier to take shots.
4. You get consistent results.
5. You get great shots!
6. It's fun.
7. It gives you more scope for doing experimental stuff with different techniques, that you just couldn't do without them.
Hope that all helps. If you want to buy a studio flash kit, bear in mind you need some space both to store it, and hopefully leave it set up permanently. It does take a good-sized area because you need space for you to work as well. You will also want a simple flash light meter (about £120) I use one of these and it's fine - you don't need anything more anorakian than that! http://www.amazon.co.uk/Sekonic-Flas...4088172&sr=8-1 You will also want a softbox which sits over the light head and diffuses the light. But they normally come with the kits. A white umbrella is also useful for softening the light, but they are cheap to buy.
Or, you could get Colin to fly over and show you how it's done!Last edited by carregwen; 17th May 2010 at 09:43 AM.
-
17th May 2010, 09:36 AM #9
- Join Date
- Aug 2009
- Posts
- 4,049
Re: Lighting setup and processing for the high contrast look
LOL! I was only thinking the other day that it would make an interesting thread subject "Meet my work-place - mess included" Originally Posted by Dave Humphries
I'll let you start it...
-
17th May 2010, 09:40 AM #10
- Join Date
- Dec 2008
- Location
- New Zealand
- Posts
- 17,660
- Real Name
- Have a guess :)
Re: Lighting setup and processing for the high contrast look
Interestingly, with the advent of multiple compact flourescent or high-intensity LED lights into a single head, I think that the terminology is slowly changing towards "continuous" lighting. I remember when I started out using 2 pairs of 500w tungsten lights - with oven paper over them as make-shift diffusers; that added 2000 watts of heat into the living room which in summer made things mightly bright and mighty hot, mighty fast! Originally Posted by carregwen
If one were keen I think that one could make up a pretty effective light by wiring about 5 compact flourencents into a small cluster to get around 500w (incandescent equivalent) for under 100w actual power dissipation.


 Reply With Quote