
 Helpful Posts:
 One of my goals for this year is to learn how to edit my photos using Elements 9 and Lightroom 4.1
While my usual subject is wildlife and birds I chose to edit some flower photos simply because I find it is easier to select a flower. (Eventually I would like to be able to do this to wildlife photos) I edited these photos using Light-room 4.1 and my goal was to blur the background and to sharpen just the flower.
In Light-room I started with the raw photo with all the presets set to zero, then I set the white balance, and the white and black points to bring out detail. I did not touch the contrast or curves because I am fond of Mike's flower photos and I think they are they are low contrast.
I used the selection brush and painted on the background, and set the clarity and sharpness to zero to blur the background.
Then I used the selection brush and selected just the flower, and sharpened by 25%. When I do this in Elements I always see a selection line and I don't see it here so I think Light-room must be easier for selective editing.
Can you see my selection line? Also is it obvious which flower I sharpened?
In this particular photo I also wanted to blur out the top portion with the funny overblown highlights behind the flowers but could not manage to do so with either the clone or the heal tool with any finesse... ie; it was very obvious (dark spots or patterns from the tools) ..
Is there a secret to cloning and healing with finesse or does it just take practice?
Is my strategy for blurring backgrounds and selectively sharpening the subject a good one? Keeping in mind that I hope to do this with wildlife photos that have a distracting background. (if it was not possible or I could not manage to photograph an attractive background.)
After I downsized the above photos to 1200 pixels to post here, I applied an unsharp mask of Radius 1, threshold 4 and 85% to the entire photo in Elements. I tried using the blur brush in Elements 9 to add to the effect of the blur I created in LR but I could not see any noticeable difference using this tool?
Should the entire photo be sharpened after downsizing or should I have just applied the unsharp mask to the flower?
Thank you.
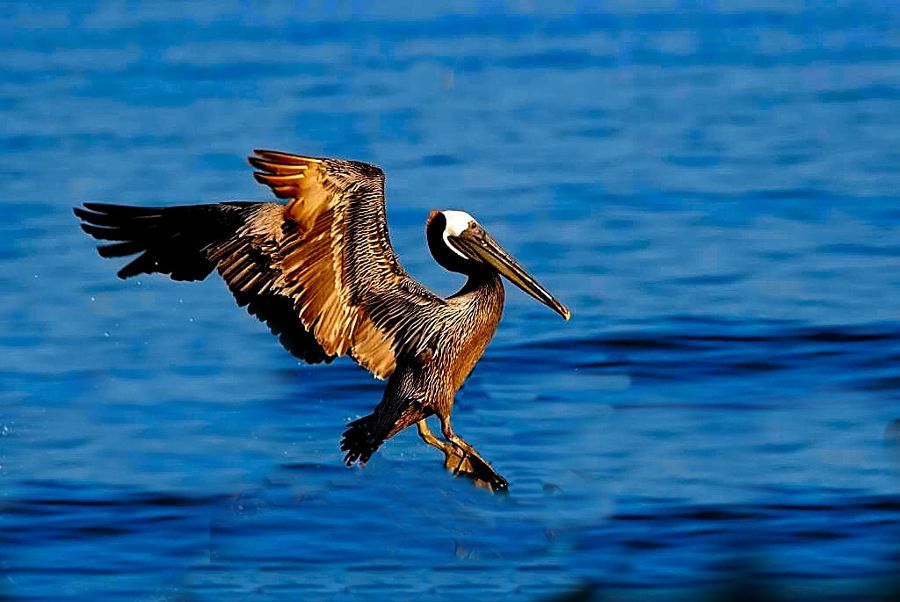
PS I wonder if someone would be up to editing the photo for me as it demonstrates what I would like to be able to do one day... I love the pelican but the background is less than attractive. I'd like to be able to make the water more attractive and clone out some of the birds, at it's feet. Perhaps it is not even possible?
Results 1 to 15 of 15
-
27th April 2013, 10:38 PM #1


- Join Date
- Jul 2011
- Location
- British Columbia, Canada
- Posts
- 7,244
- Real Name
- Christina
Feedback on Editing - Beginners Level
Last edited by Brownbear; 27th April 2013 at 11:27 PM.
-
28th April 2013, 06:02 AM #2

- Join Date
- Sep 2012
- Location
- Nomadic but not homeless, ex N.Z. now Aust.
- Posts
- 4,167
- Real Name
- Paul

Re: Feedback on Editing - Beginners Level
Hi Christina. I always tend to over do it when I rush but this maybe a step towards(past) what you were asking. You could also get rid of the second pelican if you are careful. You need to work on a bigger file preferably starting at RAW.

Last edited by pnodrog; 28th April 2013 at 06:09 AM.
-
28th April 2013, 12:39 PM #3
- Join Date
- May 2012
- Location
- northern Virginia suburb of Washington, DC
- Posts
- 19,064
Re: Feedback on Editing - Beginners Level
Considering that you seem to be struggling at least in your own mind with making a selection, you might want to consider trying U Point technology. You can see a great demonstration of it at the Nikon Capture NX2 website without having to download any software. Nik Color Efex Pro also has it, though I don't remember if it works as a stand-alone product or as a plug-in with Lightroom. The last time I checked, it didn't work with Elements. You may or may not find it easier to use U Point technology to make selections.
The light in my photos is far more diffuse (less contrasty) than in your photos. You might be surprised to learn that my photo that you and I liked best (thank you!), along with the other photo that others liked best, had a gentle S-shape in the curve that increased the contrast. Originally Posted by Christina S

Considering that your photos began with more contrast than mine in the scene, I post-processed your image to reduce the contrast on everything except the subject. I then increased the contrast on the subject and added Local Contrast Enhancement to it (just the subject). For me, the white flower in the bottom right corner was distracting, so I used the Curve to darken its mid tones and I used Gaussian blur to render it more out of focus.
Part of the reason for displaying all three curves is to perhaps open your mind to using the Curve tool for various purposes. It can be used to accomplish whatever goal you have, not just to increase contrast, and it can be used very effectively to alter only part of an image.
Curve applied to everything except the pink flower in the front and its stem

Curve applied only to the pink flower in the front and its stem

Curve applied only to the white blossom in the bottom right corner

The final result (intentionally overdone just a bit to demonstrate the effect of the various curves)

Last edited by Mike Buckley; 28th April 2013 at 12:47 PM.
-
28th April 2013, 01:00 PM #4
- Join Date
- Jul 2011
- Location
- British Columbia, Canada
- Posts
- 7,244
- Real Name
- Christina
Re: Feedback on Editing - Beginners Level
Hi L. Paul,
Amazing edit. Thank you for taking the time to do this. Give me a month or two to finish all the editing tutorials and I will re-post this photo, edited like yours.
Did you clone out the other birds or use the healing brush? Thank you.
Originally Posted by pnodrog
-
28th April 2013, 01:19 PM #5
- Join Date
- Jul 2011
- Location
- British Columbia, Canada
- Posts
- 7,244
- Real Name
- Christina
Re: Feedback on Editing - Beginners Level
Hi Mike,
Thank you for your detailed reply and recommendations. I will check out Nikon Capture NX2. I still have to finish all the tutorials for LR and Elements and I'm hopeful that by then, with some practice, my selection and editing skills will improve.
I think I selected the flower very well in each of the photos I posted (ie; I don't see any selection lines) but no one has said anything so I am thinking that perhaps I did not do it as well as I thought I did?
Yes, I'm surprised. Good to know. (One bird-less day I will try photographing flowers in more diffuse light) My understanding of curves is improving and I will continue studying. Those graphics are very helpful.
Thank you for taking the time to edit the photo. I can see the difference and I like what you did to the white flower.
Is there a reason that you used LCE instead of sharpening?
And was it incorrect of me to apply an unsharp mask to the entire photo after downsizing? ie; should I have applied this solely to the one flower?
Originally Posted by Mike Buckley
Last edited by Brownbear; 28th April 2013 at 01:20 PM. Reason: clarification of my thoughts
-
28th April 2013, 01:23 PM #6
- Join Date
- Sep 2012
- Location
- Nomadic but not homeless, ex N.Z. now Aust.
- Posts
- 4,167
- Real Name
- Paul
Re: Feedback on Editing - Beginners Level
Originally Posted by Christina S
I used Photoshop CS6 contents aware patching tool but it could easily be done just by cloning. I seldom use the healing brush but it is really just a matter of using the tools you prefer. It's the end result that counts and everyone will have a different way of getting there.
-
28th April 2013, 01:53 PM #7
- Join Date
- Jul 2011
- Location
- British Columbia, Canada
- Posts
- 7,244
- Real Name
- Christina
Re: Feedback on Editing - Beginners Level
Thank you.
Originally Posted by pnodrog
-
28th April 2013, 03:38 PM #8
- Join Date
- May 2012
- Location
- northern Virginia suburb of Washington, DC
- Posts
- 19,064
Re: Feedback on Editing - Beginners Level
Christina,
At the risk of appearing flippant, I applied LCE to the subject instead of sharpening because I wanted to increase the subject's local contrast, not to sharpen it. I appreciate that there is a very fine line between the two, but that's how I perceive the difference between them.
I always apply sharpening using a batch process to images that are downsized for display on the Internet. As a result, the sharpening is applied to the entire image. I gather that the reason this seems to work is that very little sharpening is being added at that part of my workflow.
You and a couple other people discussed awhile ago that you might progress through your learning curve more rapidly and that others might be able to help you more easily if you limit your threads pertaining to post-processing to one or two photos and to one topic. This thread seems to me to be a good example of why it's not particularly effective to ask about white balance, contrast, sharpening, use of the Curves tool and cloning all in the same thread using so many photos. Just my opinion.
Last edited by Mike Buckley; 28th April 2013 at 03:56 PM.
-
28th April 2013, 04:16 PM #9
- Join Date
- Jul 2011
- Location
- British Columbia, Canada
- Posts
- 7,244
- Real Name
- Christina
Re: Feedback on Editing - Beginners Level
Thank you for the clarification on LCE and for explaining your sharpening process after downsizing.
Yes, I recall and it seems I slipped. Great feedback, duly noted and followed from here on out.
Thank you, Mike.
Originally Posted by Mike Buckley
-
28th April 2013, 05:03 PM #10
- Join Date
- Jul 2011
- Location
- Lake Ambulalakaw, Mt. Pulag, Benguet
- Posts
- 1,026
- Real Name
- Victor Nimitz

Re: Feedback on Editing - Beginners Level
Hi Christina,
Here's my version. prelim edit via viewNX2, then, quick cloning in gimp2.8.
( some rough edges around the web feet. Still need more practice for accuracy.)
Got rid of the distractions so focus is on your pelican.
HTH
-
28th April 2013, 05:19 PM #11
- Join Date
- Jul 2011
- Location
- British Columbia, Canada
- Posts
- 7,244
- Real Name
- Christina
Re: Feedback on Editing - Beginners Level
Thank you Victor. Appreciated as I like this pelican and the other birds in the photo and the wave are a distraction. Tackling that wave is a challenge!
I am going to give editing this photo another go in a month or so after I've completed all the tutorials on editing and a little more practice. Thank you for the inspiration
-
28th April 2013, 06:03 PM #12
- Join Date
- May 2012
- Location
- northern Virginia suburb of Washington, DC
- Posts
- 19,064
Re: Feedback on Editing - Beginners Level
OFF TOPIC
Victor,
Notice that there is a rectangular shape underneath the bird. That is probably caused by a bug in CNX2 that I occasionally experience. That shape may have been added only when you saved your edited file, not while you were viewing it in CNX2. To get rid of it, try reopening the file in CNX2, allowing the photo to completely "update." Then save the file. That process usually works for me.
-
28th April 2013, 06:13 PM #13
- Join Date
- Jul 2011
- Location
- Lake Ambulalakaw, Mt. Pulag, Benguet
- Posts
- 1,026
- Real Name
- Victor Nimitz
Re: Feedback on Editing - Beginners Level
Hi Mike, Originally Posted by Mike Buckley
You're right! Talking about eagle eyes. Sure did the trick.
Thanks for the tip.
Victor
[ btw, your post seems spot on. Christina mentioned somewhere she'll check out CNX2 later. So this info will be just right for her, if ever. TY ]
-
28th April 2013, 09:57 PM #14Moderator

- Join Date
- May 2008
- Location
- Windsor, Berks, UK
- Posts
- 16,769
- Real Name
- Dave Humphries :)
Re: Feedback on Editing - Beginners Level
For what it is worth Christina, I generally also apply my output sharpening to an entire image - you know, my standard set in these ranges;
Amount 70 - 130%
Radius 0.3px
Threshold 0 - 3 (As low as noise allows)
As Mike did above, if the image is good enough, I tend to rely on LCE to give the impression of sharpness and just do that narrow radius final sharpen after downsizing. Sometimes I will only apply LCE (before downsizing) to the subject, not the background.
Only if my source image is very soft, due to camera shake, subject movement, over cropping, will I apply multi-pass sharpening and if I do this, I will still generally do it after downsizing (to avoid 'sharpened noise' issues) and then I might not apply it to the background.
-
28th April 2013, 10:32 PM #15
- Join Date
- Jul 2011
- Location
- British Columbia, Canada
- Posts
- 7,244
- Real Name
- Christina
Re: Feedback on Editing - Beginners Level
Thank you Dave. Great to hear you confirm that about output sharpening. Thank you for sharing a guideline.
I do intend to try using a lot more selective sharpening and try using just LCE. A couple of years ago I never sharpened any of my images because I'd never heard of it. Then one day I read somewhere that every image needed sharpening even if it looked sharp... So since joining Cambridge I've learned about selective sharpening and LCE, un-sharp masks, etc.. etc... I also used to never photograph anything above an ISO of 100... So even though I still ask what may seem to be the most basic of questions, I've learned so much about photography and editing since joining.
I've learned a lot today, just from this one single question. Thank you everyone for you informative and helpful replies.
PS Mike, I also learned that if I ask just one question at a time, the responses are more effective because they are loaded with information. Thank you.
Originally Posted by Dave Humphries


 Reply With Quote