
 Helpful Posts:
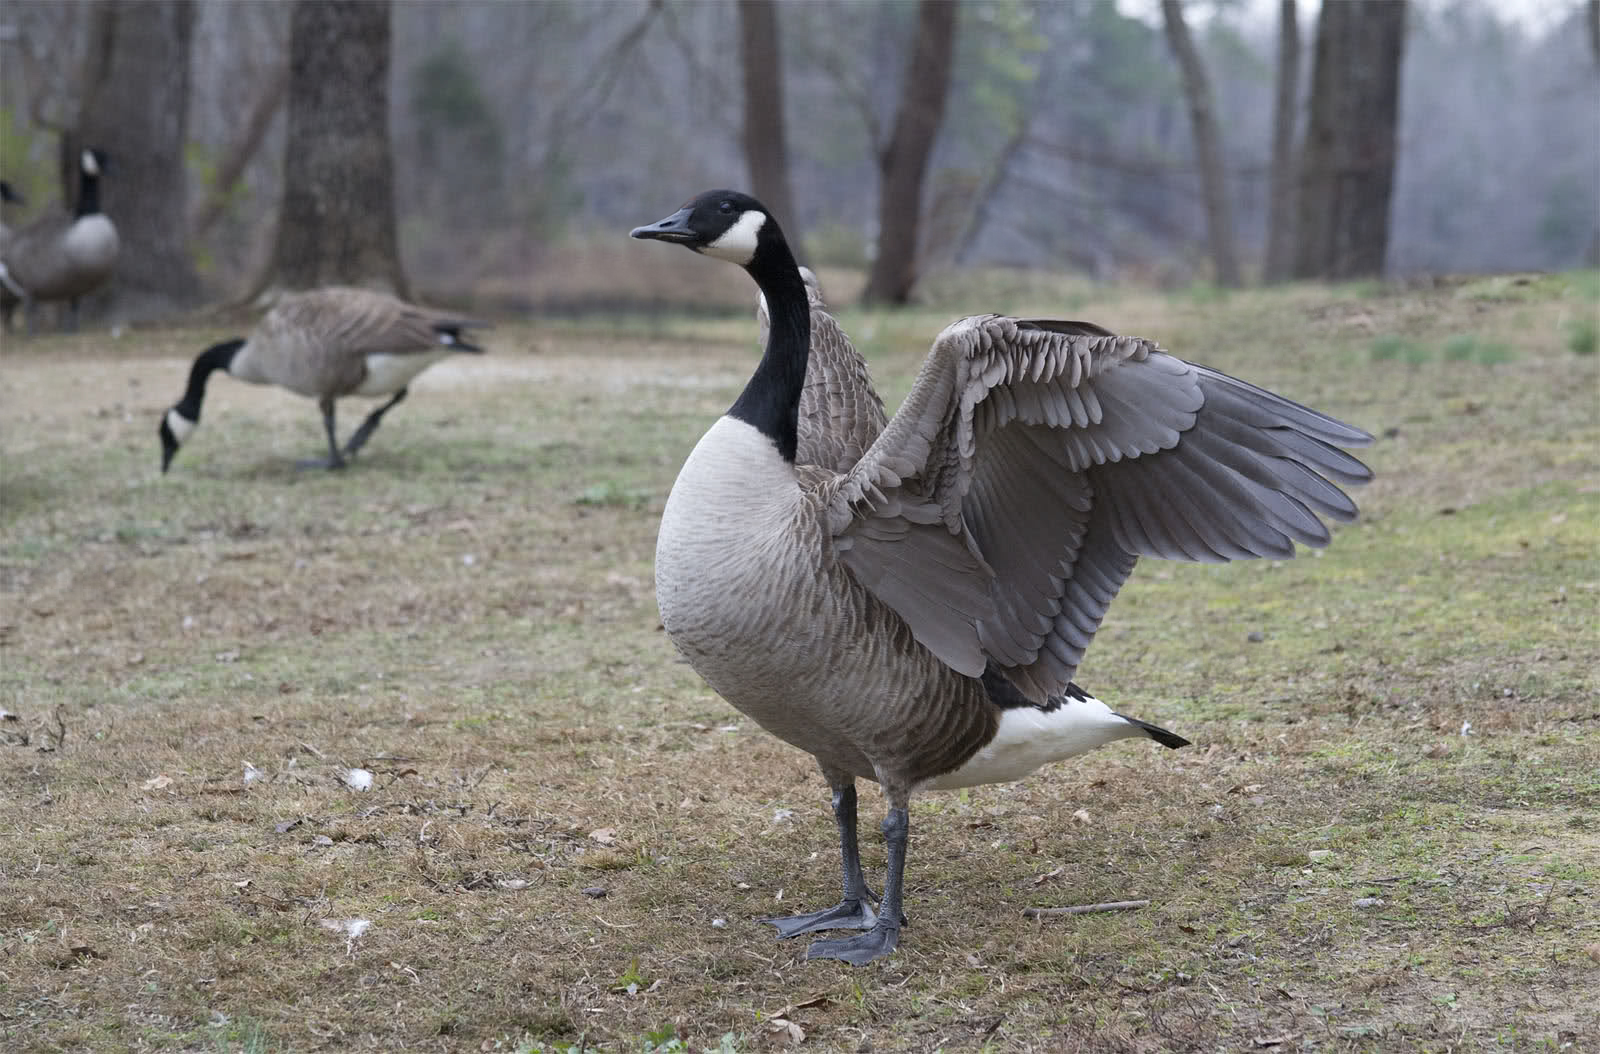
 This is a post processing experiment to develop cloning and image manipulation skills. In this case I am working with blending multiple images to merge particularly water, but also to manage selection and masking. This image was made from several shots of two geese.
I am looking for suggestions on techniques for seamlessly cloning and masking. Any feedback would be appreciated!
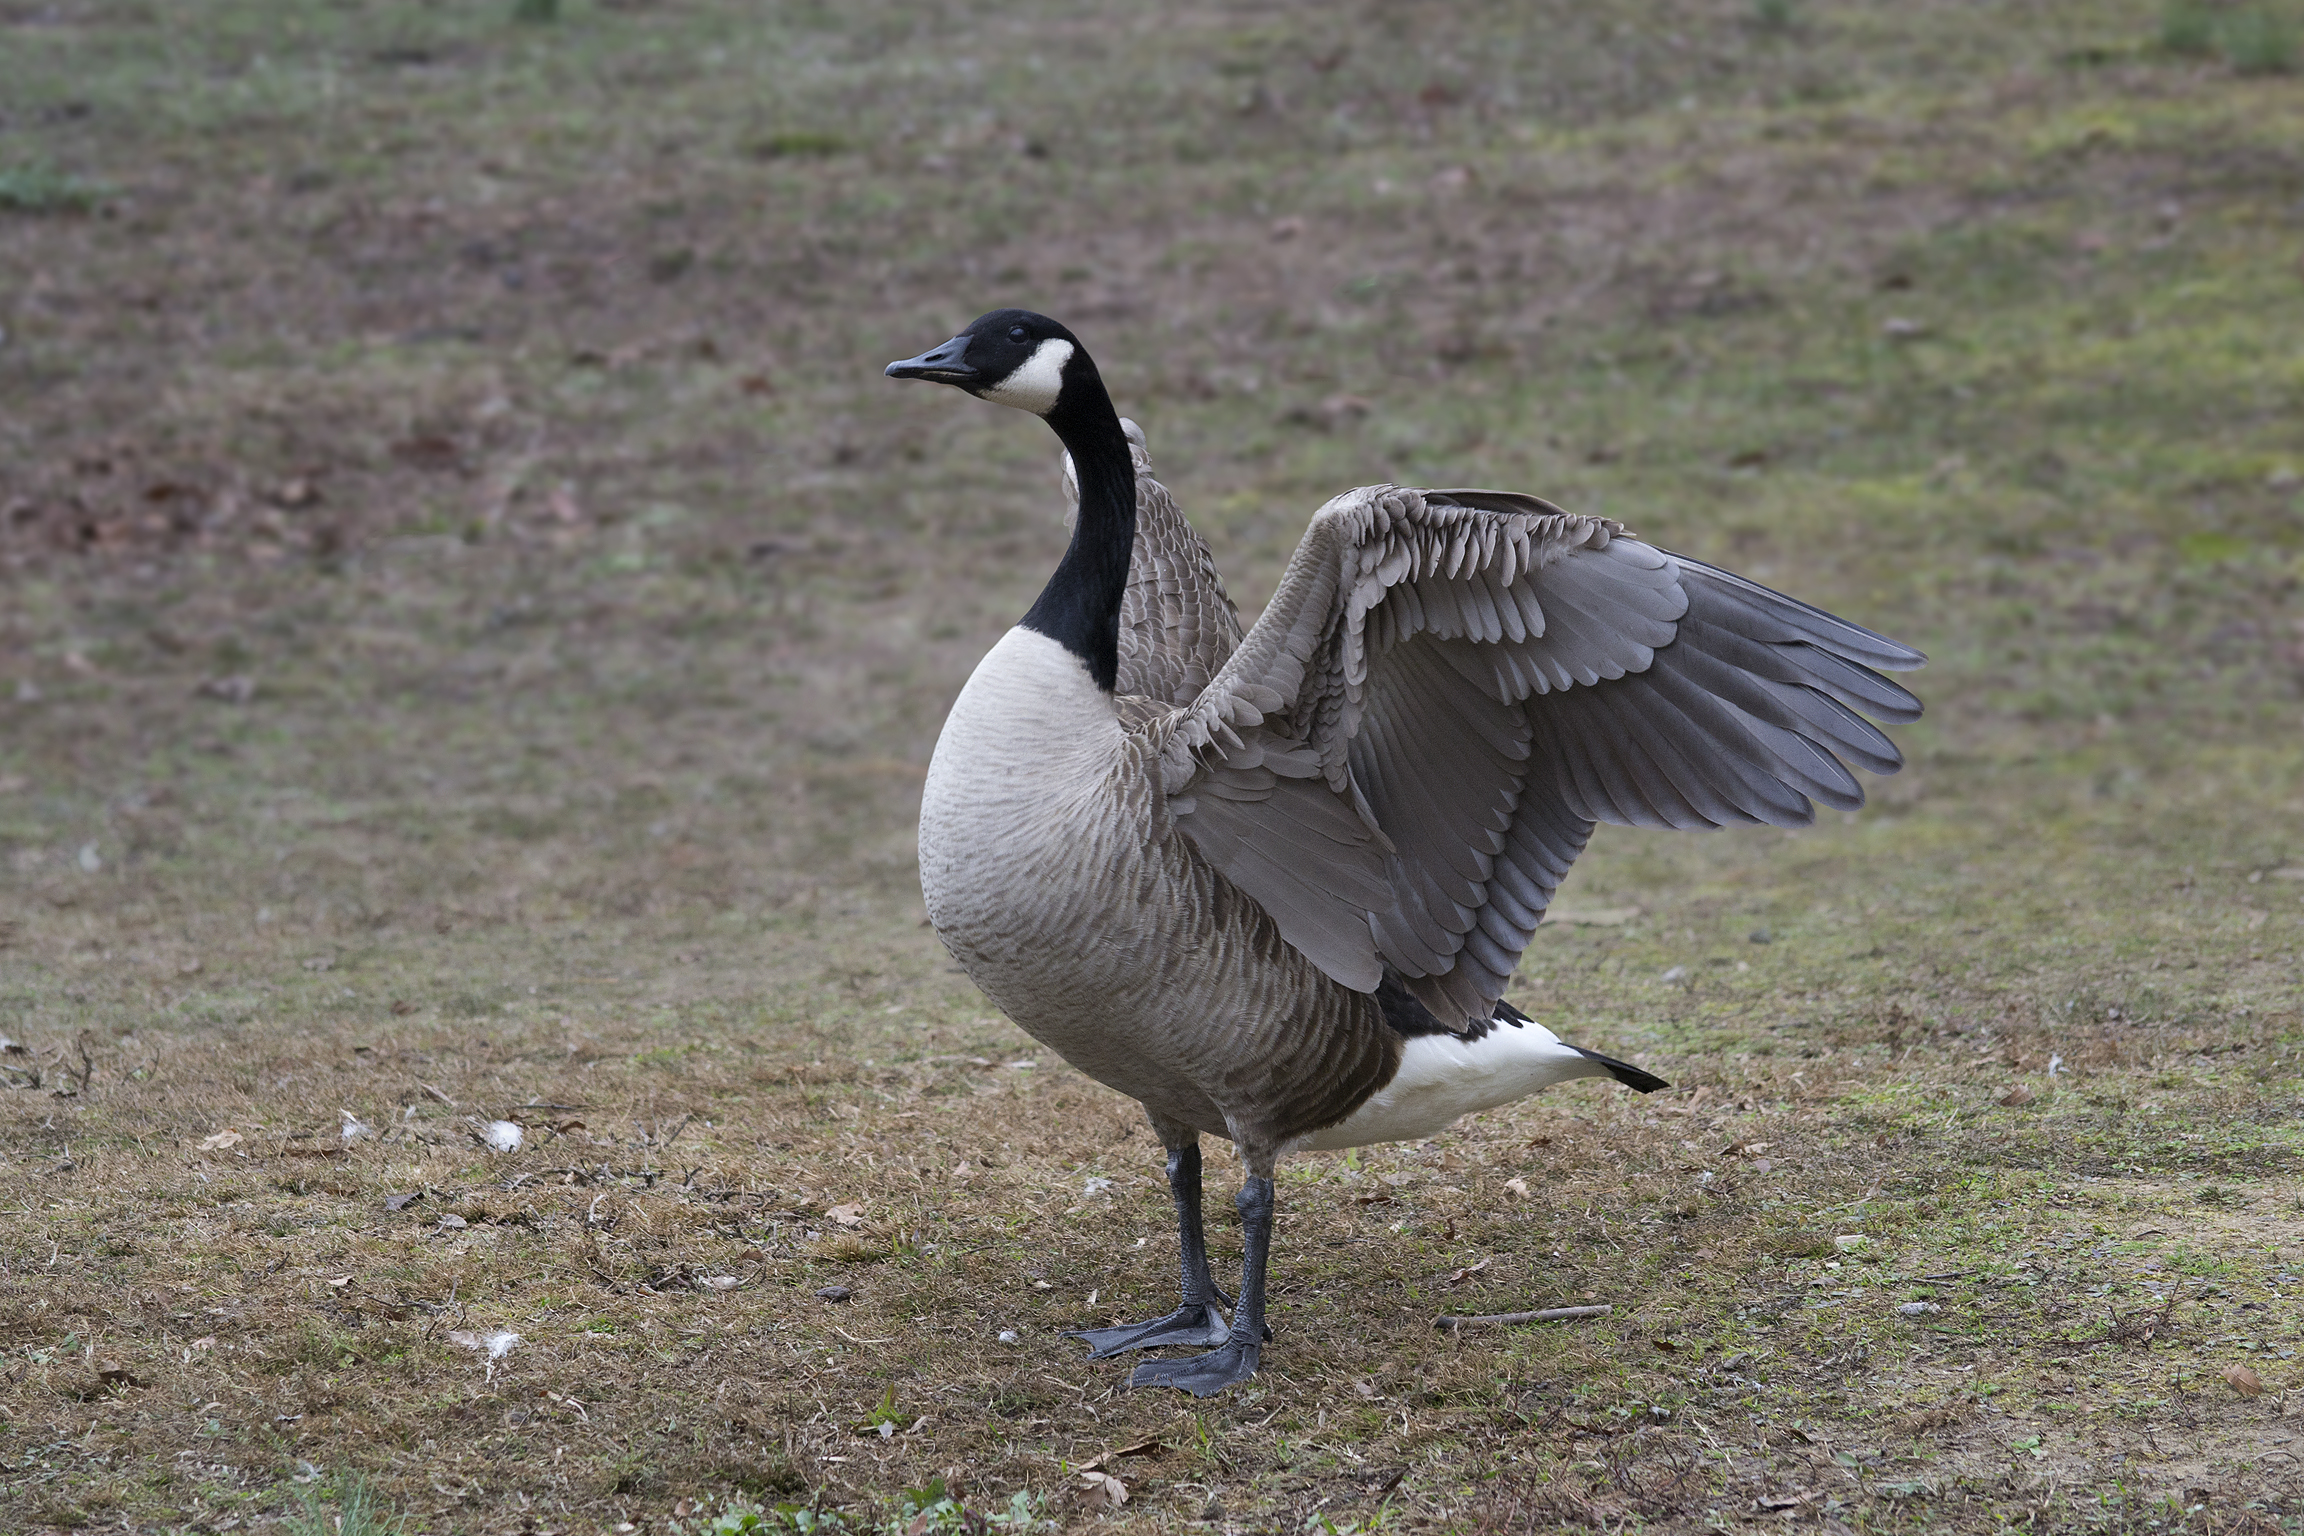
Here is a second image where I am attempting to clone out a busy background. This is the original:
And here is the attempt. I noted that particularly around the feet, it looks a bit unnatural.
Results 1 to 15 of 15
Thread: Composite Imagry
-
16th December 2011, 03:36 PM #1


- Join Date
- May 2011
- Location
- Fort Mill, South Carolina, USA
- Posts
- 6,294
- Real Name
- Frank Miller
Composite Imagry
-
16th December 2011, 06:33 PM #2
- Join Date
- Jan 2009
- Location
- South Devon, UK
- Posts
- 14,875
Re: Composite Imagry
Yes that bird is clearly a pasted job.
I suspect the problem is largely because it has very sharp edges compared with the background; particularly the feet. They should be approximately the same sharpness level as the grass on which they are standing.
-
16th December 2011, 07:16 PM #3
- Join Date
- Nov 2010
- Location
- Panama City, FL
- Posts
- 3,540
- Real Name
- Chris
Re: Composite Imagry
That and there is no shadow under the bird... You could do some localized sharpening on the bottom to midpoint on the background, drop the bird in, and lay a shadow beneath him, then do some good clone blending and it might look a little better. As you are discovering, this isn't an easy business but with practice, it can be accomplished quite deftly.
Last edited by MiniChris; 16th December 2011 at 07:25 PM.
-
16th December 2011, 08:19 PM #4
- Join Date
- May 2011
- Location
- Fort Mill, South Carolina, USA
- Posts
- 6,294
- Real Name
- Frank Miller
Re: Composite Imagry
Thank you Geoff and Chris. I need to pay more attention to the sharpness where the cloned object meets the background, such as around the feet, and although on this cloudy day, the shadow is subtle, it needs to be addressed. Got it and thanks again!
How about tips for cloning and blending in the first image?
Last edited by FrankMi; 16th December 2011 at 08:32 PM.
-
16th December 2011, 08:31 PM #5
- Join Date
- Jan 2009
- Location
- South Devon, UK
- Posts
- 14,875
Re: Composite Imagry
The first image looks fairly good to me, Frank. I find the main thing about water is to avoid any obvious straight lines.
Possibly just above the bottom left bird and underneath the bottom right bird I'm seeing a little difference. But this could be natural, there certainly isn't anything obvious.
I tend to go over the joins with a Healing Brush or Clone Tool at reduced opacity.
-
16th December 2011, 09:00 PM #6

- Join Date
- Oct 2010
- Location
- Freehold NJ
- Posts
- 602
- Real Name
- Rob Douglas
Since the 2nd one was covered I'll tackle the first. It looks to be a tad over sharpened and there is a halo around the bottom right goose which also has the appearance that is was added in compared to the others so I'm going to assume that's the one most worked on. Other than that it's a great image.
-
21st December 2011, 12:33 AM #7
- Join Date
- May 2011
- Location
- Fort Mill, South Carolina, USA
- Posts
- 6,294
- Real Name
- Frank Miller
Re: Composite Imagry
Thanks Rob! Not sure how I missed that. I try to be very careful about sharpening but my attention must have been elsewhere on this one. Thanks for the feedback! Originally Posted by Rob Douglas

-
21st December 2011, 12:34 AM #8
- Join Date
- May 2011
- Location
- Fort Mill, South Carolina, USA
- Posts
- 6,294
- Real Name
- Frank Miller
Re: Composite Imagry
Great tip! Exactly the kind of help I was looking for. Thanks Geoff! Originally Posted by Geoff F
-
21st December 2011, 01:36 AM #9

- Join Date
- Nov 2010
- Location
- Manila, Philippines
- Posts
- 3,804
- Real Name
- Willie or Jiro is fine by me.
Re: Composite Imagry
Hello, Frank. Good work on the edits. As for your cloning and blending question here is what you need to be aware of:
1. Exposure.
Check that the exposure of the subject extracted would match the exposure of the background where it should be pasted. On your example, the subject is clearly about 1 stop over exposed.
2. Contrast:
Same principle applies, both subject and background should match the contrast specially the part of the depth of field where you will paste the new subject to the background. On your example, your contrast was set too high losing those details on the feathers specially at the chest part.
3. Color or white balance.
To make the pasting believable, you need to balance the new subject to be pasted to the white balance of the background where you will paste it. Clearly, on your example, the subject became "creamy" instead of having that small greenish tint caused by the green color cast from the ground. Make a sample copy of the background image and then apply FILTER > BLUR > AVERAGE. That would give you the general "color" of the background. superimpose that on your pasted subject and then lower the opacity until it "blends in" with your subject. That would take care of the color issue in general sense. If you want a more accurate color casting you need to use the eyedropper tool and select a 5 X 5 average area and adjust your RGB levels value by numbers.
4. The edge transition.
This is where a paste up work can easily be spotted. If you are using Photoshop CS5, use the magic selection tool to select the outline of the subject you are extracting and then use the refine edge tool to refine the selection. use the smart radius function to clean up the edges well. The transition has to match the edge pixels from the original un-extracted image where the subject was originally placed so you can see the pixel transition from the original. To take care of the edge transition, play around with the blending modes and use a mask to apply the effect only on the edge pixels. your feathering could be somewhere between 1 - 5 pixels depending on how big is your working image. Usually, on 1024 pixel image sizes, a feathering of 1 - 2 pixels works just fine.
I forgot to add. usually, on professional editing work, what they do is that they darken the feet area as that area is the dead giveaway when a subject is pasted due to the unnatural shadow. However, I have seen from a professional editing DVD tutorial a work done pasting a basketball player on an empty basketball court and the transition was absolutely believable. When I checked the guy's PSD file, I could not believe that he used 17 layers just to paste one subject to a new background. No wonder he was paid handsomely on his work when it was used on a sports magazines spread.
If you can share the RAW data, I could still work around one example for you if that is OK. I can still use this computer only until the end of December. Good luck.Last edited by jiro; 21st December 2011 at 01:41 AM.
-
21st December 2011, 02:23 AM #10
- Join Date
- Nov 2010
- Location
- Manila, Philippines
- Posts
- 3,804
- Real Name
- Willie or Jiro is fine by me.
Re: Composite Imagry
Here's a quick edit, Frank if you don't mind.
Here is how I did it:

I extracted the subject VIA a mask layer instead of direct extraction. In this way, I can preserve the pixels very close to the subejct and the original background. Then, it is just a matter of cloning out the unnecessary elements using the clone stamp tool with a 100% opacity with a 2 - 3% flow to build up the areas to be cloned. Hope this helps, Frank.Last edited by jiro; 21st December 2011 at 02:32 AM.
-
21st December 2011, 03:09 AM #11
- Join Date
- May 2011
- Location
- Fort Mill, South Carolina, USA
- Posts
- 6,294
- Real Name
- Frank Miller
Re: Composite Imagry
Wow! Thank you Willie! Here are the links to the two files:
http://www.mediafire.com/?tu7q7vet3ae0cjl
http://www.mediafire.com/?4q08rq8inrnsxdg
It will take me a while to digest and play with the techniques you have provided but I can't wait to get started (after my beauty rest).
Thanks again!
By the way, if anyone else wants to have a go at the files, feel free to download them and have fun to you're heart's content!
-
21st December 2011, 04:36 AM #12
- Join Date
- Nov 2010
- Location
- Manila, Philippines
- Posts
- 3,804
- Real Name
- Willie or Jiro is fine by me.
Re: Composite Imagry
Here's a possible composite of the two image, Frank using the DNG files you uploaded:
IMO, the depth of field of the new background does not match the depth of field from where your subject is to be extracted. So, what I did is to apply a gradient layer in between the two, use the lower portion of the original shot with the subject (since it is in good focus from the front to the subject) and then use the upper portion of the new background and then blur it a little bit to make it look natural. Hope I did not offend you on the edit.
-
21st December 2011, 03:26 PM #13
- Join Date
- May 2011
- Location
- Fort Mill, South Carolina, USA
- Posts
- 6,294
- Real Name
- Frank Miller
Re: Composite Imagry
Looks Great, Willie! Now I'll have to see if I can follow your lead. How did you create the 'base layer without subject'? I am assuming that the layers were created bottom up and I'm not sure how you made the subject transparent in that layer? I'm also not sure how you created the 'clone out elements' layer. The others make sense to me.
I took the background shot with the express purpose of having a way to clone out the busy background but when I tried to combine them I realized I had a DoF issue on the background. Next time I'll know to look for that aspect.
Thanks for taking the time and effort to provide guidance! Looks like you are well equipped to start your own Photography Techniques school!
-
21st December 2011, 04:41 PM #14
- Join Date
- Nov 2010
- Location
- Manila, Philippines
- Posts
- 3,804
- Real Name
- Willie or Jiro is fine by me.
Re: Composite Imagry
Hello, Frank. I must have missed some steps when I shared my posted reply to you.
The first thing I did was to copy the background layer. I always do this. This is my "working copy" so in case I messed up, the original layer is just sitting there beneath all those layers intact. The second thing is to "extract" or outline the subject you want to cut out. You would not believe how easy it is to extract the subject here using the "Quick Selection Tool". It only took me less than 3 minutes to extract it with good result. I can go critical with the extraction but it does not merit the work. One of the few things I learned about using photoshop is that "If you are having a hard time doing something then what you're doing is not probably right." Also, the image will always dictate how far you want to go with your extraction process. If you're dealing with a very compressed image then you don't have to be very critical with the extraction process.
Once I have outlined the subject to be extracted, I can hit CTRL+J to copy it on a separate layer, right? That is normally the procedure. However, if you did not use the proper pixel value on your feathering you will lose that natural transition from your main subject to your original background data. Here is why I opted to use the masking layer option. The beauty of cloning out or extracting a subject via layer mask is that if you messed up with the selection (like it looks too fake) all you have to do is to refine your edges by painting with either black or white inside the masked layer. This will work provided that you have already determined the proper position of your extracted image when you applied the mask.
The layer with the extracted image via mask was supposed to be the 3rd layer from the layer hierarchy. However, since this is the main subject, it should always be at the top most hierarchy since it is your main subject. This is the missing explanation on my posted reply. Now, you need another extra layer with the main subject extracted and deleted. This causes the transparent outline of the subject against the background. Why do you need this? Good question. You will need this so YOU CAN CLONE OUT THE ELEMENTS ON THE PERIMETER AREA OF YOUR MAIN SUBJECT WITHOUT LOOKING FAKE. What I meant is that by cloning out some background elements, I can now exchange pixel data from neighboring areas and apply it to those elements that clutters the main subject. If you did not delete the main subject's outline and just kept it there, you are contaminating the pixel data of the main subject itself. Another big advantage of this technique (deleting the main subject to render its outlined area transparent) is that when you want to blur the background image to mimic a shallow depth of field effect, there is a feature on the LENS BLUR function in Photoshop where you can preserve image integrity on the transparent areas and it will not be affected by the lens blur algorithm. Pretty neat, huh. You can do that by setting your DEPTH MAP SOURCE inside the lens blur function to TRANSPARENCY. I found this out by accident while fiddling with the variables.
The rest was self explanatory. I might look like a very well equipped person to you, Frank but in reality I'm just a regular guy who is interested to find out why some things work and why some do not. If you, personally can also find out the answer to that question you just equipped yourself BETTER than the others. Sometimes, working on an image is more of asking practical questions like "Is there an easier way to do this?" If you can find one then you just gained a lot of precious time on your side compared to spending more than 45 minutes editing a single image! Most professional image editors do that (spending more than an hour) because they are paid to make it look perfect. I don't get paid on my work. I just love to learn stuff. If you guys would love to set up a group tutorial in your area to learn photoshop, image editing, LR workflow and adjustments, I can do that provided you let me stay at your place for free because I can't afford to pay for any hotels right now. Hahaha! Just kidding. Hope this helps, Frank. Good luck on your Photoshop studies.Last edited by jiro; 21st December 2011 at 05:36 PM.
-
21st December 2011, 10:19 PM #15
- Join Date
- May 2011
- Location
- Fort Mill, South Carolina, USA
- Posts
- 6,294
- Real Name
- Frank Miller
Re: Composite Imagry
Thanks Willie! It'll take me a while to get back to this as I'm in the middle of trying to understand JPEG Artifacts and how to deal with them but as soon as I can, I'll post back my progress on this exercise. Your room is ready!


 Reply With Quote