
 Helpful Posts:
 Well, I'm back from my Alaskan adventure. A huge thank-you to everyone who offered tips, hints, and suggestions on what to bring - it went great and I have a ton of photo's.
Which brings me to my current dilemma. As this is my first real photo-taking adventure, aside from taking the occasional round of photos with a disposable camera on family vacations in the past, I'm now sitting on a large number of photo's which require some sort of post processing. As I have no experience with this, I'm basically left with a lot of questions at this point! I should add that I do have Adobe CS5 and bridge, and I've started experimenting, but at the moment I think I'm causing more harm than good!
So a couple questions. I've read through the tutorials available on the site, as best I can, and I think I'm starting to understand what they represent. But I don't have a very good grasp on what's needed. Is there a collection of filters / changes that tend to be required on every photo, regardless of what it looks like, to make it suitable for printing?
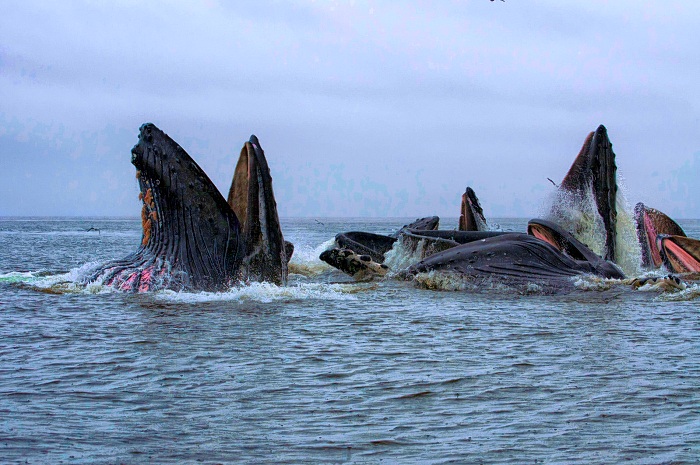
Also, since it rained 8/10 days that we were on vacation, many of my photo's are rather cloudy / grey. This is especially a problem taking pictures out on the water, where the grey of the clouds tends to blend into the grey of the ocean. Is there anything that can be done to correct this now? Example:
Any other suggestions would be greatly appreciated. I'll attach some examples of what I'm trying to do / fix shortly. Thanks very much!
Results 1 to 20 of 20
Thread: Post processing cloudy photo's
-
19th November 2011, 08:48 PM #1

- Join Date
- Mar 2011
- Location
- Cambridge, MA
- Posts
- 31
- Real Name
- Chris C
Post processing cloudy photo's
-
19th November 2011, 09:27 PM #2
- Join Date
- Jan 2009
- Location
- South Devon, UK
- Posts
- 14,737
Re: Post processing cloudy photo's
New to digital editing and working with CS5, Chris? Wow! That's a bit like deciding to go jogging and entering a Marathon Race for some training.

It is an excellent, although expensive, programme but there is so much to learn. So I would recommend starting with one of the comprehensive CS5 specialist books. I have the one by Martin Evening 'Adobe Photoshop CS5 for Photographers' but there are several others.
Did you shoot Raw? Either way, make sure you keep your originals because I guarantee that you will return to them for re editing after you have gained more experience.
Basic editing involves cropping as required, then adjusting the brightness and saturation (possibly white balance correction) plus a little sharpening.
But with CS5 there are so many different ways to achieve 'basic' editing. And once you start learning to use layers and masks . . .
-
19th November 2011, 09:34 PM #3

- Join Date
- Jun 2008
- Location
- Manchester
- Posts
- 787
- Real Name
- Mark Fleming
Re: Post processing cloudy photo's
Hi Chris,
Glad you had a good time mate,
Right, as for images such as this you're caught between a rock and a hard place to get the exposure just right and I think you've done a good job in balancing the forground with the sky. I've done a real fast and dirty edit,

If you look at the histogram you'll see it's (being read as) slightly underexposed. I've just added a slight Levels adjustment to correct this. Then I've gone into Hue and Saturations adjustment to increase the colours in the whale's features. I added the Neutral Density Gradient to tone done the sky slightly. Then I've (over) sharpened it.
We'd have to see more examples mate, and other people will have (hopefully) other ways of doing different things. But if this is an example of things to come, I think your on the right path!
-
19th November 2011, 11:02 PM #4

- Join Date
- Oct 2011
- Posts
- 305
Re: Post processing cloudy photo's
The first thing that I would suggest is to forget about Photoshop for now and test drive Adobe Lightroom for a month. It has a much more intuitive interface, a lower learning curve and does most everything for PSP with the exception of special Photoshop type things like portrait retouching.
You can of course colourize the photos in Photoshop. There are lots of tutorials on the web.

However, perhaps you want to keep the ethereal, feel of the grey days, grey water, grey whales?
How about a high key image?

-
20th November 2011, 01:00 AM #5
- Join Date
- Dec 2008
- Location
- New Zealand
- Posts
- 17,660
- Real Name
- Have a guess :)
Re: Post processing cloudy photo's
Hi Chris,
If you point Adobe Bridge at them you can then open up to 250 at once in ACR (in Bridge, just click on the first then shift-click the last, and then press enter) .
In ACR you can select them all and apply any number of adjustments to them all at once (eg levels, saturation, clarity etc), or you can adjust one image and then apply those adjustments to some or all of the other images.
If they're to your satisfaction you can then save them straight to JPEG without even having to even open them in Photoshop. This is how I cut through thousands of images from a shoot in just a few hours.
-
20th November 2011, 10:31 AM #6Moderator

- Join Date
- May 2008
- Location
- Windsor, Berks, UK
- Posts
- 16,762
- Real Name
- Dave Humphries :)
Re: Post processing cloudy photo's
Hi Chris,
Glad it went well, despite the weather
Just a word of caution, as mentioned by others, never overwrite an original file. Originally Posted by ChrisNikon

Are these RAW (.nef) originals?
- If so, you are, to an extent partially protected because CS5 (or LightRoom) will write a 'shopping list' of the changes you made to the RAW file into a new small ".xmp" file (called a sidecar file) - don't delete these unless you know what you're doing. Once the file is past the ACR (pale background) stage and into CS5 proper (dark background), it will Save as something else anyway (e.g. .psd, .tif, or .jpg)
- If you shot jpg only; just clicking Save will, if you're not careful, overwrite the original jpg

I was trying to find the best workflow thread, but failed. Originally Posted by ChrisNikon
Here's mine;
I don't say it's right for all and I will vary it if the picture content demands it, further, having just got CS5, I may well change it in future.
1) Transfer images to PC via card reader
2) Review and discard duff shots, including going to 100% to weed out the soft ones
3) Basic RAW adjustments (white balance, exposure, brightness, contrast, straighten - but not a significant crop yet)
4) Open in CS5, if necessary (you envisage a harsh crop, or it is very noisy), Noise Reduce (Neat Image) - before even capture sharpening and certainly before cropping
5) Crop, Capture sharpen
6) Cloning, selective (dodge, burn, etc.) and layer work as necessary
7) Now you've cropped and cloned out duff bits, review histogram and use Levels or Curves and then Local Contrast Enhancement
8) For best shots, Save As a psd or Tif with Layers before proceeding
9) Flatten layers, then final sharpen with USM, save as (a large) jpg
10) For web use; down size, then final sharpen with USM, save as (a small) jpg
Use quality 9/12 (or 75%) for jpgs, there's no advantage in going higher (as found in my practical tests)
Here's the Workflow Tutorial, it has handy links out to more specific tuorials on each step.
The only thing I can see you might need to do to ALL images is correct any mistake in colour space selected on camera to avoid viewing and printing problems later. At this stage, for your purposes, just use sRGB (throughout) for now. Seek advice if you shot other than sRGB, as there are two ways to apparently 'convert' and it is easy to get the wrong one and not achieve anything! Colin is our guru on this. Originally Posted by ChrisNikon
Beyond that, work only in the obvious 'shooting session' batches where the subject or lighting changes dramatically, there is no 'universal fix', so don't get carried away with bulk processing. If you do, and then find you need to tweak something, work from the RAW original whenever possible (for maximum quality), because if you open, edit, save, close, re-open, edit, save, close a jpg, each time you harm the image quality.
Cheers,
-
20th November 2011, 10:42 AM #7
- Join Date
- Oct 2011
- Posts
- 305
Re: Post processing cloudy photo's
Chris, you may find this video very helpful to adjust and transform your Alaska photos:
USING COLOR TO ADD EMOTIONAL IMPACT TO A PHOTOGRAPH
How the addition of color as well as supporting imagery can help reinforce the mood and message of a composite image that a single photograph may fail to do on it’s own.
: http://tv.adobe.com/watch/the-comple...o-a-photograph
_______________________
Below is a synopsis from photographer, author, teacher, lecturer Julieanne Kost outlining the advantages of a Lightroom+Photoshop vs. a Bridge+Photoshop workflow.
Advantages of Lightroom & Photoshop Workflow:
GENERAL
• Ease of Use
• Elegant Interface
• Photo-centric Features
ORGANIZE
• Database Driven
• Compare/Survey View
• Keyword Suggestions and Lists
• Efficient Filters/Collections
• View Offline Files
DEVELOP
• Crop/Straighten
• Virtual Copies/Snapshots
• Interactive Preset Previews
• Before/After Views
ENHANCE
• Edit in or Open Presets go to Photoshop
OUTPUT
• Third Party Plug-ins
• Template driven batch printing
• Video/PDF Slideshow output
• Publish Web Galleries
_____________________
Advantages of Bridge & Photoshop Workflow:
GENERAL
• Multi-user Workflow
• Design-centric Features
ORGANIZE
• File Browser
• String Substitution/Rename
DEVELOP
• Numeric Adjustments
ENHANCE
• Photo retouching, layers, special effects in PS
OUTPUT
• Save as PDF file with Security
___________________________
Check out the whole, in depth lecture:
Julieanne Kost helps you decide which application is right for your workflow by explaining the differences between Lightroom and Bridge for managing images and assets. http://tv.adobe.com/watch/the-comple...oom-or-bridge/
________________
Here is a large collection of some of the best Lightroom and Photoshop tutorial videos: http://jkost.com/index.html
-
20th November 2011, 11:46 AM #8

- Join Date
- Mar 2010
- Posts
- 26
Re: Post processing cloudy photo's
Saturation can be increased.
-
21st November 2011, 02:11 PM #9
- Join Date
- Mar 2011
- Location
- Cambridge, MA
- Posts
- 31
- Real Name
- Chris C
Re: Post processing cloudy photo's
Wow! Thanks everyone. This is a lot of great information, and I'll be working through the photos as I can.
Dave - yes, these are all raw originals. I didn't realize about the .xmp file, so what I've been doing is saving the images I've tried to touch-up as new .psd's and then copies as .jpg's for posting online. I still have copies of all the original nef's, so I can go back and do it properly when I've learnt what I'm doing!
I know CS5 is definitely a little [ok, a lot!] overkill at this point, but as I had it available from work, I figured I would learn how to use it to start, as opposed to buying an additional program and shifting to Photoshop later on. That may have been a mistake, we'll see
Unfortunately the vast majority of the pictures I have of this particular afternoon have this same problem of a near-universal grey sky/ocean.
I do have some other shots which I think are pretty cool, like this fellow. Thanks for all the comments, I will try reading up on this and hopefully return with some progress!

-
21st November 2011, 06:39 PM #10
- Join Date
- Dec 2008
- Location
- New Zealand
- Posts
- 17,660
- Real Name
- Have a guess :)
Re: Post processing cloudy photo's
Now tell them what happened next Chris ... Originally Posted by ChrisNikon
http://www.youtube.com/watch?v=8dspAa9NQ-c
-
21st November 2011, 06:39 PM #11
- Join Date
- Jan 2009
- Location
- South Devon, UK
- Posts
- 14,737
Re: Post processing cloudy photo's
Chris, beware of trying to over process your photos. There isn't anything inherently wrong with having grey conditions. You can allow the sky to lighten a bit, as long as you don't get over exposures.
If you look carefully at the enhanced colour examples here you will see that the sky is starting to look 'blotchy'. This can be controlled with Adjustment Layers but needs careful adjustments.
Your bear, which is a good shot, has a rather 'noisy' background. Slightly increasing the noise reduction control while converting from Raw may help. Another trick which I often use for shots like this is to lightly run over the affected areas with a Blur Tool. Adjust brush size and opacity as required.
ps. you don't have to use all the CS5 available features; you can initially just use it as a basic editor, then gradually discover all the really cleaver options.Last edited by Geoff F; 21st November 2011 at 06:43 PM. Reason: extra line
-
21st November 2011, 07:11 PM #12
- Join Date
- Dec 2008
- Location
- New Zealand
- Posts
- 17,660
- Real Name
- Have a guess :)
Re: Post processing cloudy photo's
Personally, whenever I have a photo with very little colour, I often try it as a greyscale image. Originally Posted by Geoff F
-
21st November 2011, 07:18 PM #13
- Join Date
- Jun 2008
- Location
- Manchester
- Posts
- 787
- Real Name
- Mark Fleming
Re: Post processing cloudy photo's
Looks like rain to me Geoff.Your bear, which is a good shot, has a rather 'noisy' background.
-
21st November 2011, 07:31 PM #14

- Join Date
- Oct 2011
- Location
- Cornwall
- Posts
- 1,861
- Real Name
- Mark
Re: Post processing cloudy photo's
I thought that at first glance Geoff.... then i thought naaaa just p$##*%g down must have been taken in Cornwall ....
-
21st November 2011, 10:26 PM #15
- Join Date
- Oct 2011
- Location
- Washington
- Posts
- 93
- Real Name
- Mike
Re: Post processing cloudy photo's
It is after all in the rainforest. I've never seen more rain, or been so glad for quality rain gear in the summer.
-
22nd November 2011, 02:30 AM #16
- Join Date
- Mar 2011
- Location
- Cambridge, MA
- Posts
- 31
- Real Name
- Chris C
Re: Post processing cloudy photo's
Haha, yes, it was raining like you wouldn't believe. A couple more from the same location. I'm torn between trying to clean them up a little bit, or just leave the rain in there as a reminder of how awfully wet it was out on the water that day.


-
22nd November 2011, 02:36 AM #17

- Join Date
- Jun 2010
- Location
- Missouri, USA
- Posts
- 2,454
- Real Name
- Terry
Re: Post processing cloudy photo's
Man, you really hit the jackpot on the wildlife here, Chris!
-
22nd November 2011, 03:25 AM #18
- Join Date
- Oct 2011
- Posts
- 305
Re: Post processing cloudy photo's
Wow!
I have had to Photoshop rain like that into a capture.
So, tell us what raingear you have, Chris?
-
22nd November 2011, 12:43 PM #19
- Join Date
- Mar 2011
- Location
- Cambridge, MA
- Posts
- 31
- Real Name
- Chris C
Re: Post processing cloudy photo's
For the camera, I had a rain poncho-type thing that basically bungie-tied around the lens. I left the lens hood on as well, to prevent a lot of rain from ending up on the front of the lens.
For myself, I had a jacket... and a lot of hot showers after shooting! I'm not sure my jacket actually dried off from about Tuesday - Sunday of that week.
-
22nd November 2011, 01:30 PM #20

- Join Date
- Mar 2011
- Location
- Lancaster, PA USA
- Posts
- 424
- Real Name
- Mike
Re: Post processing cloudy photo's
I did the same thing Chris with my pictures from Juneau last summer. Im waiting to upgrade my computer (need more memory) and take some serious time to learn how to use the PP software then try my hand at those photos. Originally Posted by ChrisNikon


 Reply With Quote