ANIMATED 3D STEREO PHOTOGRAPHY
Stereo photography creates a single three-dimensional image using two ordinary 2D images. Although there's several ways to achieve this effect, most require 3D glasses and/or a special display device. This article focuses on a technique which requires nothing more than an ordinary digital camera and photo editing software. It works by combining two separate photos into a single animated image (often using the standard GIF format), as shown below. While this clearly isn't recommended for all your photos, it's certainly a fun trick to experiment with when you want to create a different look.
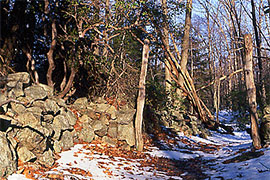
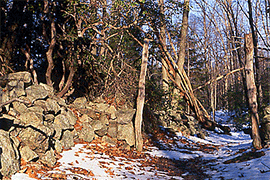
Move your mouse over each image above to see the 3D effect.
Images courtesy of StereoPhoto Maker (left) and Jim Gasperini (right).
OVERVIEW: 3D VISION & DUAL CAMERAS
Our eyes perceive depth (in part) because they see objects from slightly different perspectives. When viewed through either eye, foreground objects change position much more than objects in the background. Hold your finger out in front of you, focus on the background, and notice how this finger shifts from side to side when viewed through either eye (called "parallax"). Now, move this finger closer and notice how it appears to shift even more than before.
A standard stereo photograph simply mimics our eyes: it's comprised of two photographs which were taken at different positions. The greater the separation, the greater the 3D effect — and the greater foreground objects appear to shift relative to the background.

However, a camera lens's angle of view is often different from our own eyes, so the separation distance may have to change accordingly. Other than that though, with most 3D techniques the real difference is in how the images are combined. However, this article discusses the one exception: animated "wobble" images.
HOW ANIMATED 3D "WOBBLE" IMAGES WORK
Instead of trying to mimic what each eye sees with a separate photograph, a wobble image works by mimicking what both eyes see when you focus on an object and move your head from side to side. Our brain then interprets how objects move relative to one another — and automatically translates this into a sense of depth.
 |
|
| Image 1 | Image 2 |
 |
|
| Start Animation | Stop Animation |
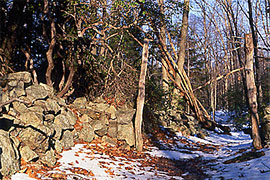
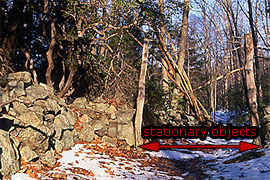
image courtesy of Jim Gasperini
The key difference with wobble images is that both the foreground and background move substantially, while the middle/subject often remains stationary. In the example above, note how the central and right-most wooden posts remain in roughly the same position. This causes the image to appear as if it is rotating slightly when it wobbles.
STAGE 1: HOW TO CAPTURE THE STEREO PHOTOS
In order to create an animated 3D image or "wobble image," the capture technique is a little different from standard 3D images. Instead of capturing two images with parallel lines of sight, with a wobble image the lines of sight actually converge. This can be captured using the following steps:
(1A) Identify a composition that spans near, middle and background objects. Avoid moving subject matter.
(1B) Choose the distance/object that will appear stationary for each camera position.
(1C) Capture the first photo, paying careful attention to the precise position of objects at the distance chosen in 1B.
(1D) Move your camera about ~4-12 inches* to the left, then rotate the line of sight slightly to the right (or vice versa), until objects from 1B are at the same place within the camera frame as they were in 1C. This is the trickiest step of the whole process and will likely take some practice.
| Required Displacement Distance | |
|---|---|
| When focal length increases . . . | Decreases |
| When subject distance increases . . . | Increases |
| When viewing size increases . . . | Decreases |
Keep in mind that wide angle photographs are typically taken much closer to the subject (see "using wide angle lenses"). Closer subjects require less displacement, so in practice the displacement may not need to change much for wide angle vs telephoto lenses.
Often the easiest way to determine the displacement distance is to just move your camera back and forth until you're happy with the movement you're seeing in the viewfinder/LCD. Luckily you don't have to get it spot on. In extreme cases though, too little displacement can eliminate the 3D effect, while too much can make the animation appear as two different 2D images. Regardless, it's also a good idea to take more than two photographs so you can experiment with how larger/smaller displacements appear on your home computer screen.
STAGE 2: HOW TO CREATE THE 3D ANIMATED GIF IMAGE
The steps below are shown for Photoshop, but many other image-editing programs will also work. In general, your software just needs to support (i) layers and (ii) saving animated GIF files. There's also a free automated program called StereoPhoto Maker. Regardless, the general steps are as follows:
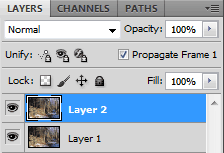
(2A) Paste one of the images as a second layer on top of the other image:
(2B) Change the top layer's opacity to 50% and nudge it so that the objects chosen in 1B are at the same position as the lower layer. Then change the top opacity back to 100%. This step isn't always necessary, but it helps minimize errors from 1D above.
 Top layer is set to 50% opacity.
 The two vertical posts appear sharp (same position),
whereas objects in front/behind these appear blurred
(different positions).
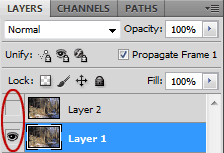
(2C) Open the animations window in Photoshop (Window > Animations). Then create a second frame for your animation by clicking on the button circled in red below.
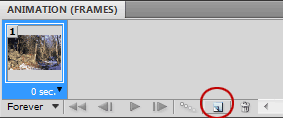
(2D) Select frame 1 and make sure that only the bottom layer is visible (by setting the eye icons as shown circled in red below), then select frame 2 and this time make sure that only the top layer is visible (or vice versa).
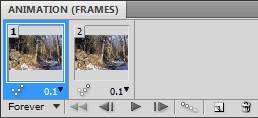
(2E) Set the delay time between frames. Animated stereo images usually appear best with a value of 0.1 seconds (as shown in the upper right image). You can now test your animation by clicking on the play button above.
(2F) Once you're happy with the effect, save the image as an animated GIF file by clicking on "File > Save for Web & Devices ..." and selecting GIF from the top right drop-down menu. You should now be able to see the 3D effect within any image viewer, email client or web browser.
ALTERNATIVE WAYS TO CREATE & VIEW 3D PHOTOS
There's several more sophisticated ways to combine and view 3D photos, although they don't have the universal viewing capabilities of the above "wobble image" example. The most popular methods include:
 Stereo
Image Pair
Viewable using
cross focus
Viewable using
cross focus
Composite Image
Viewable using
red/blue 3D glasses
Composite Image
Viewable using
polarized 3D glasses
The above images are just to illustrate what each method looks like in 2D;
do not try to view these in 3D, since it won't work at this size and/or on your display.
- Stereo image pair with cross focus viewing. This just requires placing each image side by side, and viewing these out of focus. When done correctly, each image appears as a double, but one image double from each original photo overlaps to form a central 3D image. However, this is also the most difficult and unnatural viewing technique to master.
- Stereograms. These are slightly easier to view than a cross focus image pair, but they don't reproduce any colors in the 3D image.
- Red/blue composite image viewable with red/blue 3D glasses ("anaglyph"). This is easy to view and is how older 3D movies were displayed, but colors don't always appear as natural as with the newer polarized 3D movies (below).
- Overlaid polarized images viewable with polarized 3D glasses. This is now the standard for 3D movies and definitely produces the best results, but requires special glasses in addition to a sophisticated display device.
Fortunately, the primary difference with the above techniques is in how they're displayed/viewed — not necessarily in how they're captured. As long as you keep your two stereo images, you can often change how they're combined as technology improves.