CAMERA FLASH: APPEARANCE
Using a camera flash can both broaden the scope and enhance the appearance of your photographic subjects. However, flash is also one of the most confusing and misused of all photographic tools. In fact, the best flash photo is often the one where you cannot even tell a flash was used. This tutorial aims to overcome all the technical terminology in order to focus on the real essence of flash photography: how to control your light and subsequently achieve the desired exposure.
Before proceeding, it's advisable to first read the tutorials on camera metering & camera exposure on how aperture, ISO and shutter speed control exposure.
FLASH LIGHTING INTRO
Using a flash is fundamentally different from taking a normal camera exposure because your subject is being lit by two light sources: your flash, which you have some control over, and the ambient light, which is likely beyond your control. While this fact may seem simple and obvious, its consequences are probably not:
- A flash photograph can vary the appearance of a subject by controlling the intensity, position and distribution of light coming from a flash. With ordinary ambient light photos, one can only affect the appearance of a subject by changing exposure and depth of field.
- Unlike with ambient light photography, one cannot see how their camera flash will affect the scene prior to taking the photograph, since a flash emits within milliseconds or less. Furthermore, a flash is so quick that even after the shot it's nearly impossible to tell what it looked like without checking your camera.
It's therefore critical to develop a good intuition for how the position and distribution of your camera's flash influences the appearance of your subject. These qualitative aspects will be the focus of the first part of this tutorial; the second part will concentrate on camera settings for achieving the desired flash exposure.
LIGHT DISTRIBUTION: BOUNCED FLASH & DIFFUSERS
An important concept in flash photography is the following: for a given subject, the distribution of the light source determines how much contrast this subject will have.


Contrast describes the brightness difference between the lightest and darkest portions of a subject. When light is more localized (left), one face of the sphere receives intense direct light, while the opposing side is nearly black because it only receives what little light had bounced off the walls, ceiling and floor. When light is more distributed (right), shadows and highlights appear softer and less intense because this light is hitting the sphere from a wider angle. Photographers often describe light which scatters substantially or originates from a large area as being "soft light," and more concentrated and directional light as being "hard light."
What does this all mean in practice? Generally, photographs of people will appear more appealing if they are captured using less contrast. Contrast tends to over-exaggerate facial features due to deep shadows being cast across the face. Furthermore, if the sphere in the above example had texture, then its texture would have been greatly emphasized in high contrast lighting. For a photo of a person, this would be analogous to giving skin a rougher and often less desirable texture.
The big problem is that a camera flash is by its very nature a localized light source. A good flash photographer therefore knows how to make their flash appear as if it had originated from a much larger and more evenly distributed light source. Two ways to achieve this are by using either a flash diffuser or a bounced flash.
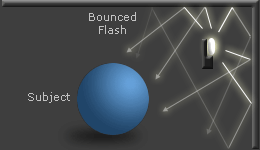
bounced flash is diffuse but loses intensity
While it may at first sound counterintuitive, aiming your flash *away* from your subject can actually enhance their appearance. This causes the incident light from your flash to originate from a greater area, and is why portraits are usually taken with a flash that first bounces off a large umbrella.
However, bouncing a flash greatly reduces its intensity, so you will need to have a much stronger flash in order to achieve the same exposure. Additionally, bouncing a flash is often unrealistic for outdoor photographs of people since they are no longer in a contained environment.
Similarly, a flash diffuser is usually just a simple piece of translucent plastic which fastens over your flash, acting to scatter outgoing light. For outdoor photos this will make very little difference, but for photographs taken indoors this will soften the lighting on your subject, since some of the scattered light from your flash will first bounce off of other objects before hitting your subject. However, just as with a bounced flash, be aware that using a flash diffuser can greatly increase the necessary flash intensity.
As with anything though, too much can be a bad thing. Light which is overly diffuse can cause the subject to look flat and two-dimensional. Landscape photographers understand this well, as it's the flat look created by light which is emitted evenly across the sky on an overcast day. However, overly diffuse light is rarely a problem with flash photography.
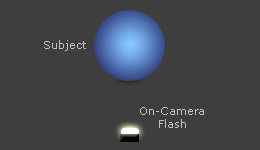
LIGHT POSITION: ON-CAMERA & OFF-CAMERA FLASH
The position of the light source relative to the viewer also affects the appearance of your subject. Whereas the localization of light affects contrast, light source position affects the visibility of a subject's shadows and highlights:
 Head-On Lighting
 Subject Appears Flat
 Off-Angle Lighting
Subject is More Three-Dimensional
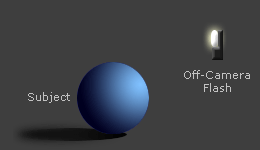
The subject with head-on lighting (left) looks less three-dimensional than the subject shown using off-angle flash (right), which is is exactly the difference one sees when using an on-camera versus off-camera flash, respectively. With on-camera flash, the side of the subject which receives all the light is also the side of the subject the camera sees, resulting in shadows that are barely visible, and a bright and harshly-lit subject.

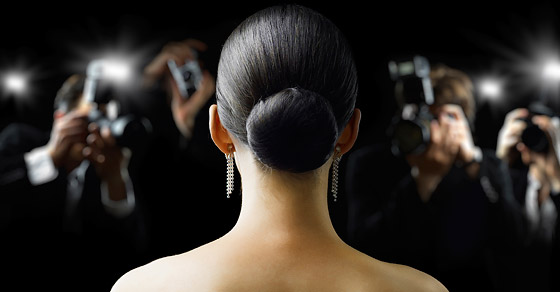
example of non-ideal on-camera flash
Overall, subjects generally look best when the light source is neither head-on, as with on-camera flash, nor directly overhead, as is often the case with indoor lighting. In real-world photographs, using an on-camera flash can often give a "deer in the headlights" appearance to subjects, such as in the example of the well-known subject to the left.
However, it's usually unrealistic to expect that one can have a flash located off of the camera, unless one is in a studio or has a sophisticated setup, as may be the case for a big event like a wedding.
The best and easiest way to achieve the look of an off-camera flash using an on-camera flash is to bounce the flash off of an object, such as a wall or ceiling, as discussed previously.
Another option is to use a flash bracket, which increases the distance between the flash unit and the front of your camera. Flash brackets create substantial off-angle lighting for close range photos, but appear increasingly similar to an on-camera flash the farther they are from your subject. A noticeable improvement is reducing red-eye, because light from the flash no longer bounces straight back to the camera (see red-eye section later). A flash bracket's biggest disadvantage is that they can be quite large, since they need to extend far above or to the side of your camera body in order to achieve their effect.
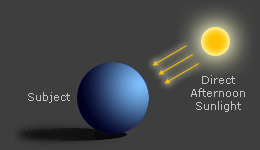
MULTIPLE LIGHT SOURCES: FILL FLASH
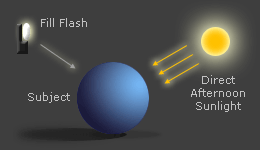
reduces harsh shadows from strong sunlight
The term "fill flash" is used to describe a flash that contributes less to the exposure than does ambient light. Fill flash gets its name because it is effectively "filling in" the shadows of your subject, while not appreciably changing the overall exposure. A fill flash effectively plays the role of a secondary light source.
A common misconception is that a flash is only used for situations where it's dark. Contrary to this belief, fill flash is most useful under bright ambient lighting, such as when your subject is back-lit, or when the lighting has too much contrast. It can dramatically improve the appearance of people being photographed in otherwise harsh outdoor lighting, such as in afternoon sunlight on a clear day (example to the right). Move your mouse over the image to see it without fill flash.
However, in order to use a fill flash you will need to force your flash to fire; most cameras do not fire a flash in automatic mode unless the scene is rather dimly lit. When there is plenty of ambient light, compact and SLR cameras will default to using their flash as a fill flash when it's activated. Just pay close attention to the charge on your camera's battery since flash can deplete it much more rapidly than normal. The second half of this tutorial will go into more detail about how to achieve the right amount of fill flash.
FLASH & RED-EYE REDUCTION
A big problem with camera flashes is unnatural red eyes in subjects, caused by a flash which glares back from the subject's pupil. The red color is due to the high density of blood vessels directly behind the pupil at the back of the eye. Red-eye can be most distracting when the subject is looking directly into the camera lens, or when their pupils are fully dilated due to dim ambient light. It is also much more prominent when the flash is very localized and directional ("hard light").

example of red-eye caused by flash
Some camera flashes have a red-eye reduction mode, which sends a series of smaller flashes before the exposure so that the subject's pupils are contracted during the actual flash. This does not eliminate red-eye entirely (since the smaller pupils still reflect some light), but it makes red-eye much less prominent since the pupil area is greatly reduced. An alternative method for red-eye reduction would be to just take the photo where it is brighter, or to increase the amount of ambient light — both will naturally contract the pupil.
Another technique is to use digital red-eye removal, which works by using image editing software to select the red pupils and change their hue to match the person's natural eye color. However, this technique should only be used as a last resort since it does not address the underlying cause of red-eye, and is difficult to perform so that the eye looks natural in a detailed print. For example, subjects can easily end up not having any pupils at all, or can have portions of their eye that are colored like a blue iris but still have the texture of a pupil.
The only ways to eliminate red-eye entirely are (i) to have the subject look away from the camera, (ii) to use a flash bracket, an off-camera flash or a bounced flash, or (iii) to avoid using a flash in the first place.
FLASH WHITE BALANCE
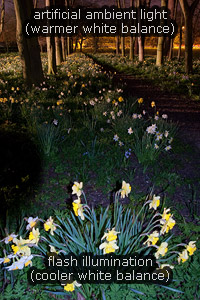
flash vs ambient white balance
Most flash units emit light which has a color temperature of about 5000K, which is comparable to daylight (see tutorial on white balance). Ambient light will therefore have a color tint if it differs substantially from 5000K, since most cameras automatically set their white balance to match the flash (if it's used). The tint is most apparent with artificial lighting, and when balanced flash ratios (1:4 to 4:1) make light from both flash and ambient sources clearly distinguishable.
Flash white balance issues can also result from a flash which bounces off a colored surface, such as a wall which is painted orange or green. However, bouncing off a colored surface will not necessarily change the white balance of your flash if ambient light bounces off that surface as well.
Alternatively, the flash's white balance can be intentionally modified to achieve a given effect. Some flash diffusers have a subtle warming effect, for example, in order to better match indoor incandescent lighting, or to give the appearance of light from a sunset.
EXTERNAL FLASH UNITS
External flash units are usually much more powerful than flash units which are built into your camera. Even though an in-camera flash has enough intensity for direct light on nearby people, this type of light can be quite harsh. Often only an external flash unit has enough power to bounce off a distant wall or ceiling and still adequately illuminate the subject. An added benefit is that external flash units are usually easier to modify with diffusers, brackets, reflectors, color filters and other add-ons. Furthermore, external flashes are also a little farther from your lens's line of sight, which can reduce red-eye and slightly improve light quality.
Please continue onto the second half of this tutorial:
Camera Flash, Part 2: Flash Ratios & Exposure