
 Helpful Posts:
 First things first, I feel so fortunate to have come across this forum as a result of my online photography course - proudphotography.com. This forum is the best thing that has happened to me thus far in my learning curve as a new photographer. Thanks so much to the administrators and all the participants for all the hard work you do!
Now, to my question....
I'm just now starting to understand the nature of light. That it is mainly composed of red, green and blue. That light is frequency expressed in combinations of color and that different kinds of light contain different frequency and color combinations. I realize even that is just the basics. What I'm not sure about is how to control the light using white balance and kelvin adjustments on my Sony A-580. I have gotten so far as to find the "function" button in any given mode which gives me a menu of different lighting options like AWB (auto white balance), fluorescent, incandescent, etc; but sometimes as I try working through the different modes the lighting still doesn't seem right. Is there a way to test the light in the room and get a better exposure. If equipment is suggested could you include product name and a link?
Many thanks again to all the helpful folks on this forum!
"T"
Results 1 to 20 of 31
-
19th February 2011, 02:26 AM #1


- Join Date
- Jan 2011
- Location
- San Francisco, California
- Posts
- 17
- Real Name
- Tony
AWB, Kelvins - How do I properly use them in manual mode to get a good light setting
-
19th February 2011, 03:17 AM #2
- Join Date
- Dec 2008
- Location
- New Zealand
- Posts
- 17,660
- Real Name
- Have a guess :)
Re: AWB, Kelvins - How do I properly use them in manual mode to get a good light sett
Hi Tony,
I like this man already Originally Posted by insidescoop


You're sorta on the right "wave length" (excuse the pun!), but I think you're perhaps making it a little harder for yourself than it really needs to be. Think of it this way ...I'm just now starting to understand the nature of light. That it is mainly composed of red, green and blue. That light is frequency expressed in combinations of color and that different kinds of light contain different frequency and color combinations. I realize even that is just the basics. What I'm not sure about is how to control the light using white balance and kelvin adjustments on my Sony A-580. I have gotten so far as to find the "function" button in any given mode which gives me a menu of different lighting options like AWB (auto white balance), fluorescent, incandescent, etc; but sometimes as I try working through the different modes the lighting still doesn't seem right. Is there a way to test the light in the room and get a better exposure. If equipment is suggested could you include product name and a link?
- If you shine a red light at a white piece of paper, the "white" piece of paper becomes red. Shine a blue light on it, it becomes blue. In short, the colour of the light we see reflected from everyday objects is influenced by the colour of the light that illuminates them; no surprises there.
- The colour of various light souces (tungsten bulbs, flourescent tubes, the sun, all give off different coloured "white" light; tungsten lights are actually quite a yellow "white" light; flourescent lights are actually quite blue, and the sun varies a lot depending on the time of day.
- Cameras don't know any of this ... so they can't tell the difference between a pale yellow piece of paper illuminated by a true white light or a white piece of paper illuminated by a pale yellow light (the result is the same) - but - when we look at say a portrait of a person, we want to see natural skin tones; we don't (normally) want them influenced by the colour of the light illuminating them - but - often we can't do a heck of a lot about the colour of the light that's illuminating them, so all we can do is compensate for it afterwards.
- So camera settings like tungsten, cloudy, flourescent etc are simply instructions to the camera to say "apply this compensation for this light, and that compensation for that type of light".
- Auto WB simply says "heck, I don't know - so do your best to figure it out yourself".
So much for the theory ...
In practice, all of the above works, but it's seldom "perfect" because it's based on assumptions of what the colour temperature of the likes of tungsten is, and that will vary with changes in voltage (and other things). So in practice - for greater precision - we have to give the camera a helping hand ...
- One of the easiest ways is to simply use a grey card. One simply gets the subject to hold it in the shot whilst you take a reference photo - and you subsequently use this shot to correct the white balance of all subsequent shots taken under the same lighting conditions. In reality, it's simple and VERY effective (takes just a couple of clicks to adjust hundreds of images at once, and is very effective in mixed lighting situations (eg when you're also used a degree of fill flash)).
- Other techniques involve using things like Expodiscs and setting a custom white balance (can't be used effectively when fill flash is being used)
- And the "top of the line" solution is to use something like a Colour Passport that not only corrects for the colour temperature of the light, but also for the variences in camera calibration as well.
Probably a lot for you to take in, so I'll shut up for now ... just come back with more questions when you're ready
-
19th February 2011, 03:26 AM #3

- Join Date
- Nov 2010
- Location
- Manila, Philippines
- Posts
- 3,804
- Real Name
- Willie or Jiro is fine by me.
Re: AWB, Kelvins - How do I properly use them in manual mode to get a good light sett
You could probably use an 18% gray card to help you nail the white balance right on your shots whether you are indoor or outdoor. Place the gray card where you aim your camera (parallel to the camera plane if possible) and take a sample shot. Now, when you want to post-process your image, click on the gray card as you adjust the white balance command on your software and it will automatically compute the degree kelvin to correct the white balance of your shot. Here is an example: Originally Posted by insidescoop
This is the original image straight from the camera (converted to jpeg). As you can see, the gray card changes in color and shade depending on the type of light it was subjected to. By the way, the light I used on this one was an LED flashlight.

Now, this is the same image after clicking the central area of the gray card to correct the white balance on the image.

I'm using ACDSEE Pro software, and from the white balance adjustment, the software tells me that the light has a value in between 4330K to 4398K depending on where I click on the gray card. Wait for the other members to see your posts so you can get a more credible answer to your query. Another way to measure the color temperature of your light source in degree kelvin would be the use of a light meter like the Sekonic brand. Hope this helps.
Colin was fast to answer when I was just posting my reply. Hehehe. His explanation is very nice.Last edited by jiro; 19th February 2011 at 03:39 AM.
-
19th February 2011, 03:26 AM #4

- Join Date
- Jan 2011
- Location
- Seattle Washington
- Posts
- 3,550
- Real Name
- Paul
Re: AWB, Kelvins - How do I properly use them in manual mode to get a good light sett
Hey Tony, the site has a great bunch of tutorials if you have not checked them out I would have a go. Here is the one that should answer your questions.
https://www.cambridgeincolour.com/tu...te-balance.htm
Guess I was a bit slow or somehow I missed the guys posts above me.
-
19th February 2011, 03:33 AM #5

- Join Date
- Oct 2010
- Location
- Canada
- Posts
- 1,998
- Real Name
- Janis
Re: AWB, Kelvins - How do I properly use them in manual mode to get a good light sett
I have a related question, Colin, which I hope Tony won't mind me asking here. I was just re-reading the white balance tutorial and I noticed that it says that using the eyedropper tool to correct white balance risks greatly reducing bit depth. Would you or anyone else be able to explain to me why that is? I am not too afraid of technical stuff; in fact I rather like to know how things work, up to a point. Originally Posted by Colin Southern

-
19th February 2011, 03:46 AM #6
- Join Date
- Dec 2008
- Location
- New Zealand
- Posts
- 17,660
- Real Name
- Have a guess :)
Re: AWB, Kelvins - How do I properly use them in manual mode to get a good light sett
Hi Janis, Originally Posted by purplehaze
No worries.
In short, it all depends when you do the white balancing.
If you're shooting RAW, then adjusting the white balance in ACR (Adobe Camer RAW) is the closest thing to a free lunch that you'll ever find because it does it by redefining the colorimetric interpretation data (ie the "shade of red, green, and blue filters that the camera uses on the sensor) - techy stuff, but in English "it's almost lossless".
Once the image is already converted then adjustments to things like clipping points, gamma etc become a lot more destructive; small changes on a 16 bit image are OK - even moderate changes, but the big problems start to occur when people try to make bigger changes on 8 bit files, or on JPEG images (which have already discarded a LOT of information).
If you're wondering why I'm talking about "levels" and you're talking about "white balance" it's because they're essentially the same thing ... it's just that in the case of a white balance adjustment the changes to the levels are not by the same amount accross all three channels.
Does that help?
-
19th February 2011, 03:47 AM #7
- Join Date
- Jan 2011
- Location
- San Francisco, California
- Posts
- 17
- Real Name
- Tony
Re: AWB, Kelvins - How do I properly use them in manual mode to get a good light sett
Once again this forum has not let me down1 My sincere thanks to each and every reply. I will begin work right away at playing around with the suggestions. By way of the grey card and having the subject hold it...once I take the photo what am I looking for in the correction? Do I change the white balance so the card no longer looks grey. Sorry, I know I sound a little dull here but I'm new to all of this. Thanks again! Jiro, thanks for taking time to post the pics. I can see the difference. I plan to purchase Adobe CS5 as well as Lightroom. I'm sure they both have a similar feature to the software you use?
-
19th February 2011, 03:48 AM #8
- Join Date
- Jan 2011
- Location
- San Francisco, California
- Posts
- 17
- Real Name
- Tony
Re: AWB, Kelvins - How do I properly use them in manual mode to get a good light sett
No worries Colin - hop aboard anytime. Your post was interesting as well.
-
19th February 2011, 03:53 AM #9
- Join Date
- Dec 2008
- Location
- New Zealand
- Posts
- 17,660
- Real Name
- Have a guess :)
Re: AWB, Kelvins - How do I properly use them in manual mode to get a good light sett
Yes - there is a white balance eye dropper in Photoshop's Adobe Camera RAW converter ... you just click on the grey card with it and it instantly corrects the image ... then you can synchronise that white balance to all other images in the set. Originally Posted by insidescoop
-
19th February 2011, 03:56 AM #10
- Join Date
- Nov 2010
- Location
- Manila, Philippines
- Posts
- 3,804
- Real Name
- Willie or Jiro is fine by me.
Re: AWB, Kelvins - How do I properly use them in manual mode to get a good light sett
Maybe, ACDSEE Pro is more like Lightroom because they can't use layers. Photoshop is more versatile. If you're going to work in mulitple images at once and you want to adjust them all with the same adjustments, I'd probably say Lightroom is the way to go for you. But, if you basically work on a per image basis and you want to have a creative hand on what you do, Photoshop would be your toy. As they say... "the limit is only your imagination." Good luck, Tony. Originally Posted by insidescoop
-
19th February 2011, 04:49 AM #11
- Join Date
- Oct 2010
- Location
- Canada
- Posts
- 1,998
- Real Name
- Janis
Re: AWB, Kelvins - How do I properly use them in manual mode to get a good light sett
Okay, this is interesting. So the ACR conversion is essentially lossless, but the editing of the RAW file in PS is not? Or is it no longer RAW in PS? Originally Posted by Colin Southern
I think maybe I'm okay (?) so long as I am using Aperture, which I understand as a lossless editing program (until you save the RAW file to another format). It actually has the ACR conversion built in, although I have been letting Nikon Transfer do the conversion since I read somewhere that the Adobe algorithms might not interpret everything perfectly (like I'd notice, heh, heh). I have been doing the white balance correction in Aperture, but it's been hit and miss, so I really should discipline myself to use a grey card. (Tip for Tony: don't buy the big awkward ones like I did, get the little ones on a sling that are easy to carry around.)
-
19th February 2011, 05:06 AM #12

- Join Date
- Sep 2009
- Location
- Washington (state) USA
- Posts
- 976
- Real Name
- Pops

Re: AWB, Kelvins - How do I properly use them in manual mode to get a good light sett
Just a tip which I use: I carry the gray cap of a 35mm film canister with me. It works fine in most cases as a gray card.
Pops
-
19th February 2011, 05:12 AM #13
- Join Date
- Oct 2010
- Location
- Canada
- Posts
- 1,998
- Real Name
- Janis
Re: AWB, Kelvins - How do I properly use them in manual mode to get a good light sett
I have at least half a dozen of those! Thanks, Pops! Originally Posted by PopsPhotos
-
19th February 2011, 06:14 AM #14
- Join Date
- Oct 2010
- Location
- Canada
- Posts
- 1,998
- Real Name
- Janis
Re: AWB, Kelvins - How do I properly use them in manual mode to get a good light sett
Okay, I think I figured it out. I have the eyedropper for correcting white balance in Aperture which is the equivalent of what you use in ACR. And then I have the eyedropper on the Curves tool, for setting the gray point on the red, green and blue curves, which is the equivalent of what you have in PS that is potentially destructive. Got it now, I think. I'm a little slow--well, a lot slow--but I usually get there in the end. What's frustrating is that by the time I get there, I've forgotten what I'm there for. Originally Posted by purplehaze

-
19th February 2011, 08:09 AM #15
- Join Date
- Dec 2008
- Location
- New Zealand
- Posts
- 17,660
- Real Name
- Have a guess :)
Re: AWB, Kelvins - How do I properly use them in manual mode to get a good light sett
In ACR, when you adjust everything and then hit "Open", it surprises many people to learn that in essence, you're only making a single adjustment. So adjustments to white balance - and curves - and exposure etc are all applied in a single operation ... so in essence, all you're doing when you adjust the controls is "tailor the conversion". Not quite what you were asking, but something I thought you might like to know. Once the image is in Photoshop then it's already passed through gamma conversion, and already a lot of information has been pushed and pulled; you can still manipulate it more, but you'll degrade the image (although not necessarily visually initially). Best practice is to do as much manipulation as possible in ACR - then open the image as a 16 bit file in Photoshop and do the rest of what needs doing. Originally Posted by purplehaze
Are you meaning Aperture, or Lightroom? Aperture is made by Apple, not Adobe ... and doesn't have ACR built in that I'm aware of (but Lightroom - made by Adobe - does). It seems that everyone has their own favourite RAW conversion program; in my opinion, Adobe usually manage to keep ahead of the pack; in the case of white balancing, what they do is profile each supported model of camera using targets illuminated using two different light standards (Illuminant "A" and "D50" off memory), and then interpolate and extrapolate these profiles to simulate camera performance at any other colour temperature and tint. Pretty clever stuff, and I've found it to work very well. Additionally, you can also use custom camera / lens / illuminant profiles if you're really that keen.I think maybe I'm okay (?) so long as I am using Aperture, which I understand as a lossless editing program (until you save the RAW file to another format). It actually has the ACR conversion built in, although I have been letting Nikon Transfer do the conversion since I read somewhere that the Adobe algorithms might not interpret everything perfectly (like I'd notice, heh, heh). I have been doing the white balance correction in Aperture, but it's been hit and miss, so I really should discipline myself to use a grey card. (Tip for Tony: don't buy the big awkward ones like I did, get the little ones on a sling that are easy to carry around.)
-
19th February 2011, 08:12 AM #16
- Join Date
- Dec 2008
- Location
- New Zealand
- Posts
- 17,660
- Real Name
- Have a guess :)
Re: AWB, Kelvins - How do I properly use them in manual mode to get a good light sett
If the adjustment can be done in ACR (and there's not much that can't be) then it's simple to synchronise those adjustments across up to 500 RAW files at a time (it's great for dust spots!). Originally Posted by jiro
-
19th February 2011, 04:17 PM #17
- Join Date
- Jan 2011
- Location
- San Francisco, California
- Posts
- 17
- Real Name
- Tony
Re: AWB, Kelvins - How do I properly use them in manual mode to get a good light sett
Thanks for the tip Colin!
-
19th February 2011, 04:22 PM #18
- Join Date
- Oct 2010
- Location
- Canada
- Posts
- 1,998
- Real Name
- Janis
Re: AWB, Kelvins - How do I properly use them in manual mode to get a good light sett
You're right. Aperture has its own built-in RAW processor. I thought I had read somewhere that Apple uses the Adobe algorithms, but I can't find the reference, so I may have misread something. Originally Posted by Colin Southern
Anyhow, this has all been illuminating and I will have to dig into the Aperture forums to find out how these principles might apply to my workflow. Aperture has a RAW Fine Tuning brick that appears on the face of it to be an all-in-one kind of adjustment like you were talking about in ACR. The White Balance brick, on the other hand, is separate and adjustable for all file types.
Thanks! I learn a little more each day.
-
19th February 2011, 04:23 PM #19
- Join Date
- Jan 2011
- Location
- San Francisco, California
- Posts
- 17
- Real Name
- Tony
Re: AWB, Kelvins - How do I properly use them in manual mode to get a good light sett
Good tips Pops and Jeeperman thanks for the lead on the tutorial. I have read it and will read it again and again. Love the dog with the pacifier pic!
-
19th February 2011, 05:36 PM #20

- Join Date
- Jul 2008
- Location
- Southern California, USA
- Posts
- 17,409
- Real Name
- Richard
Re: AWB, Kelvins - How do I properly use them in manual mode to get a good light sett
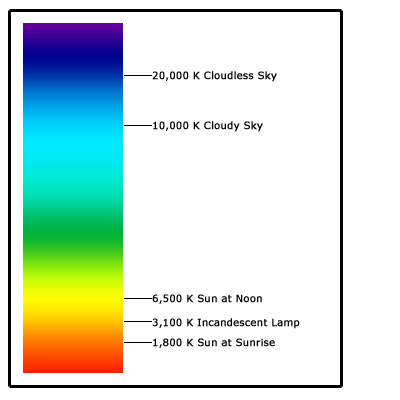
Color temperature is a characteristic of visible light that has important applications in lighting, photography, videography, publishing, manufacturing, astrophysics, and other fields. The color temperature of a light source is the temperature of an ideal black-body radiator that radiates light of comparable hue to that of the light source. Color temperature is conventionally stated in the unit of absolute temperature, the kelvin, having the unit symbol K.
Have you ever heated a piece of metal in a flame? As gets hotter it begins to glow; at first a red, then yellow and finally a blue color which almost turns to white as the piece of metal gets hotter.
Color temperature is measured by the actual heat temperature (in degrees Kelvin) of a mass, called a "perfect radiator" as it changes color when heated.
In color film photography, color temperature was extremely important in deciding just what film to use. This was especially true when shooting slide or reversal film, since the color balance of a color print could be adjusted in the printing process. We had films that were balanced to be shot under tungsten light (3200 or 3400 degrees kelvin - actually for a while there were two different films, one for 3200K and the other for 3400K)) and films balanced to be shoot in daylight or with electronic flash (5500 - 6000 degrees Kelvin). If you shot these films under a light different from which the were balanced, the color would be askew.
If you shot daylight films under tungsten lighting you would get an overall yellow-red cast to the image. If you shot tungsten balanced films under daylight conditions or electronic flash, the overall cast of your image would be blue.
We had filters which would compensate for the color differences. Using daylight films under tungsten conditions required a blue hued filter while shooting tungsten balanced films under daylight conditions would require a salmon colored filter.
Shooting daylight films under tungsten conditions was not very practical since the blue filter cost you several stops of exposure. Using tungsten balanced films in both daylight and tungsten light was quite practical. In fact, for many years, the reversal film I used for 16mm photography was balanced for 3200 degrees Kelvin. Most of my lights were also balanced for 3200 degrees. When I used this film outdoors, I compensated with a salmon colored Wratten 82 filter. This did not reduce my exposure to any great degree and my standard daylight exposure with a camera that did not have an adjustable shutter was between f/8 and f/11.
The problem with lighting in those days is that all tungsten or all daylight is not the same color. Using the Wratten 82 filter would just get me in the ball park color wise. If I wanted to get a more accurate color rendering, I would have to use a color meter and a set of color compensating filters. This was a slow involved process and costly since a color meter and set of CC filters was exceptionally expensive.
DSLR photography has conveniently solved the color balance issue. Setting the camera on Auto White Balance will get you in the ball park even if you are shooting JPEG. However, if you are shooting RAW, you have total of your color balance in post processing and can tweak the color to the point that you like it.
Color balance selection is more of an art than a science. The color under which a subject looks best is not always the most accurate color. As an example, IMO people tend to look better in warmer color balance than cooler; even when they were shot under cooler lighting conditions
Here is one confusing factor when speaking in color balance jargon. A color balance of 5500 degrees kelvin (which is obtained by heating the perfect radiator to a very hot temperature ) is called cooler light; while a color temperature of, say 3200 degrees Kelvin is called warmer temperature. This is just one of the many confusing factors in photography speak lingo.
There is at least one occasion that using a filter when shooting with a DSLR comes into consideration; mixed lighting sources. Say you are in a room with primarily tungsten light and are lighting your subject with a flash that is very close to daylight. You have two different color temperatures to work with. If you adjust your image so that the color temperature of the subject is correct (about 5500-6000K) the background which is primarily lit by tungsten (2800-3600K) will have an orange-yellow cast. Using a salmon colored filter over your flash tube will result in both the subject and the background being lit by a similar color light and you can correct the entire image very easily. This is also true, but more important when shooting under fluorescent lighting. The subject will look O.K. but the background might look a murky green. You can solve this by placing a greenish filter over the flash tube resulting in a subject which is lit by a light of very close color to the background. Shooting in RAW, you can then adjust the entire image quite easily in post processing.
Except for shooting under extremely mixed lighting conditions, I always shoot RAW and use AWB to get me close to the color I want and then tweak that color in Camera Raw.Last edited by rpcrowe; 20th February 2011 at 01:21 AM.

 Reply With Quote