Helpful Posts:
 Here begins a journey
OK - lets set a little "frame of reference" ... by "portraiture" I'm meaning head & shoulders and/or 3/4 length shots of "models" who are willing participants; are prepared to pose - and are willing to follow instructions. And in this first series of lessons we'll work on outdoor portraiture and natural lighting, so you can put away your 1200 watt-second strobes & portable generators (ahh - hang on, that's me!).
I'm not trying to make this sound like a dictionary definition (it's not) -- but I did want to set the above scene for what I'd like to cover in this series, and just as importantly, what I'm not covering at this time, eg ...
Not covering ...
- Family snaps (where one or family members pauses for a second, says "cheese" whilst the photographer goes "click"), and
- Environmental portraits where for example shots are captured of a worker in their surroundings (although many of the techniques may well be useful for these types of shooting).
OK - with that out the way, the first thing I'd like to work on is backgrounds and locations ...
In reality getting this right is about 1/3 of the battle, and the good news is getting a suitable background & location is actually pretty easy when you know what to look for; we're really only looking for 3 things:
1. Some place that's out of direct sunlight. Direct sunlight is horrible for portraiture (in fact it's horrible for most types of photography) - direct sunlight gives harsh shadows - washes out skin tones - and it makes models squint; generally it's just plain unflattering. So first up, we need a shady place, free of direct light (including dappled light shining through tree branches). Sounds simple enough, but I could show you wedding party shots taken by full-time professionals where dappled light shining through tree branches onto faces of the wedding party has produced far from ideal results - so be sure it's one of the things you look for when gazing through the viewfinder.
2. OK - we've found some places in the shade - but - it's not quite that simple; what I didn't tell you is that we also need a place in the shade WITH SUNLIGHT CLOSE BY. If we pop our model into the shade then already we're streets ahead - but - a shot taken under these types of condition often has no direction to it and the subject will be reflecting levels of light similar to their surrounding and won't "pop" (or "stand out") - recessed areas like eye sockets will be dark, and the images just won't sing. If however you can get your model in the shade - but have sunlight close by (or a fill flash, but that's a different lesson) then some of that light can be reflected back towards the model, making them brighter than their surroundings AND illuminating recessed areas like eyes. Get this right and you'll suddenly be able to reveal pleasing eye detail (like eye colour and patterns) rather than just 2 black holes where eyes used to be.
3. Lastly, we want the location to be appropriate - all too often people aim for a "portrait" but none-the-less end up with 1/2 chewed dog's bones / shopping bags / lawn mowers etc etc etc in the background. Now I'm not saying that some of these things CAN'T be used - but - until you know HOW to use them, they're best avoided. What I find works best is a simple repeating pattern - the likes of trees & shrubbery CAN be used, but again, it has to be handled properly; unless you have the lenses and techniques to throw it significantly out of focus then more often than not it ends up being sharp enough to be a distraction, but not sharp enough to be pleasing; whereas with more regular patterns it doesn't seem to matter quite so much.
So there you have it - Backgrounds and locations. In summary ...
1. In the shade
2. Sun close by
3. Simple background with no distractions
So here's your first portraiture shooting assignment -- have a look around your home / street / community, and select 2 or 3 locations that meet these criteria - take shots of them - and post them here for us to take a look at (ie no models required for this assignment). Too easy eh?
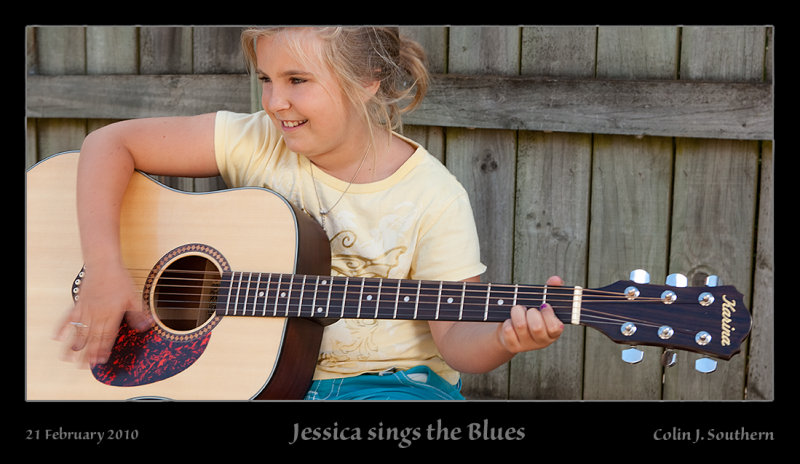
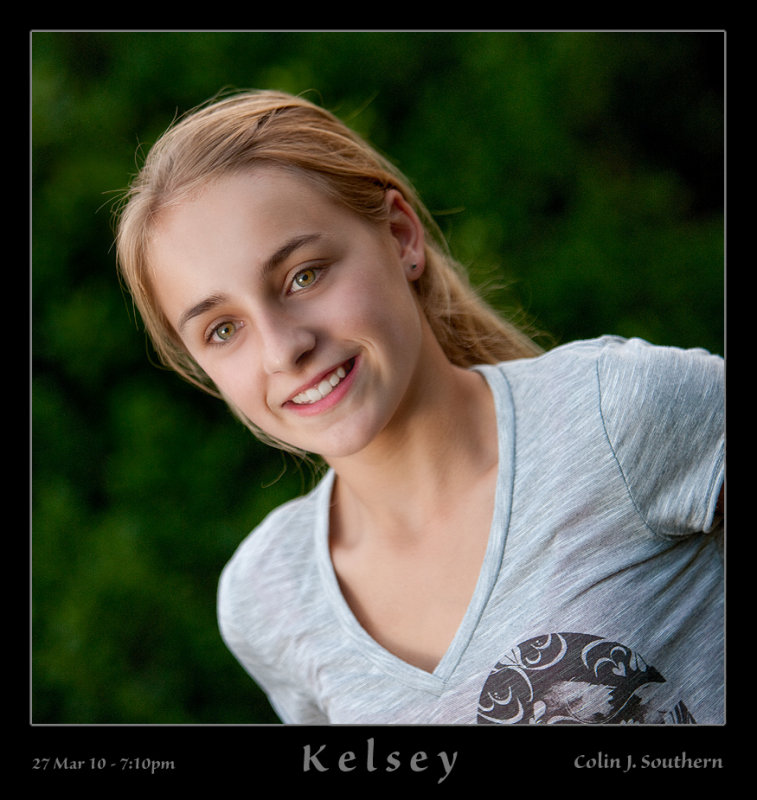
To finish up for today, take a look at the backgrounds I've chosen for these three shots to get an idea of how I've applied the above lesson to my own work.
PS: Hope you ALL feel free to jump in with questions or comments (so long as we don't let the lesson drift too far off track).
Results 1 to 20 of 47
-
2nd August 2010, 11:10 AM #1

- Join Date
- Dec 2008
- Location
- New Zealand
- Posts
- 17,660
- Real Name
- Have a guess :)
"School of Portraiture" - Lesson 01 - Backgrounds / Locations
-
2nd August 2010, 05:51 PM #2

- Join Date
- Jul 2010
- Location
- Phx Arizona
- Posts
- 31
- Real Name
- Shauna Seymore
Re: "School of Portraiture" - Lesson 01 - Backgrounds / Locations
Colin, Thank you so much for taking the time to share your knowledge, I am very excited to be apart of this..my only question is..will it matter much further into the course that I am shooting with a p&s camera? I am going to do my best with what I have..I just hope I can keep up

Shauna
-
2nd August 2010, 07:24 PM #3
- Join Date
- Dec 2008
- Location
- New Zealand
- Posts
- 17,660
- Real Name
- Have a guess :)
Re: "School of Portraiture" - Lesson 01 - Backgrounds / Locations
Hi Shauna, Originally Posted by Shauna

Good techniques will improve the captures with any type of camera ... eg a shot taken with a point and shoot where there's a chewed dog's bone in the background is always going to lose out to a shot taken with a point and shoot where there is a much better background, but the same shot taken with an SLR might be better again due to a tighter depth of field.
You can learn the techniques with any type of camera though.
-
2nd August 2010, 07:38 PM #4

- Join Date
- May 2008
- Posts
- 1,543
- Real Name
- Ali
Re: "School of Portraiture" - Lesson 01 - Backgrounds / Locations
Thanks, Colin! Looks like this is going to be a very useful series. Please include the things that you know we will not get from reading books or watching videos on these topics. My experience is that, they usually leave out important stuff, so that we can never get to their level
But I have one comment: The background in your second picture, seems too distracting to me, as a portrait background. It has a repeating pattern, it is uniform to some extent, but is too close to the subject, and therefore not blurred enough. I would like to know your thoughts on this issue: "The distance between the subject and the background", to through it out of focus. How important is it? Usual portrait backgrounds are either too dark or just blurred out of focus.
Thanks again!
Ali
-
2nd August 2010, 08:13 PM #5
- Join Date
- Dec 2008
- Location
- New Zealand
- Posts
- 17,660
- Real Name
- Have a guess :)
Re: "School of Portraiture" - Lesson 01 - Backgrounds / Locations
Hi Ali,
Thanks for the kind words.
I know what you mean about including the extra bits that others miss ... I'll do my best
With regards to #2 ... yes ... further seperation would have been desireable (although I can't say that this background really bothers me in the slightest) - but - having it as you see it degraded the image a LOT less than moving the subject forward into full "high noon" sun. I had the same problem with image #1 in that there was dappled light on the model if I brought her any further forward.
It's a bit like folks who say "just zoom with your feet" when in the real world, taking 2 steps back sometimes puts you over the edge of a cliff; it's always a case of doing the best we can with what we have. I could have blurred it a little in Photoshop, but I usually find that ruins the image because it looks fake.
-
2nd August 2010, 08:55 PM #6
- Join Date
- Aug 2009
- Location
- Canada
- Posts
- 3,113
- Real Name
- Wendy
Re: "School of Portraiture" - Lesson 01 - Backgrounds / Locations
Great Lesson Colin. I even think I can stay with you for this one. If I can find a place around home (an apartment) I might even be able to stay the course. I'll just drag some of the tennants over for a shot as they are coming in from work or from getting groceries or something.
I really like the format you have used for this first lesson, and I'd love to be able to follow through on this and be able to get some decent family portraits in the future.
Do you have a time line in which you would like us to complete each lesson.
Wendy
-
3rd August 2010, 12:49 AM #7
- Join Date
- Dec 2008
- Location
- New Zealand
- Posts
- 17,660
- Real Name
- Have a guess :)
Re: "School of Portraiture" - Lesson 01 - Backgrounds / Locations
Hi Wendy, Originally Posted by ScoutR
It probably won't take too many lessons anyway, but I don't want to move on and leave anyone behind ... so probably a day or two or 3 per lesson.
-
3rd August 2010, 02:02 AM #8New Member
- Join Date
- Jul 2010
- Posts
- 6
Re: "School of Portraiture" - Lesson 01 - Backgrounds / Locations
Thank you so much for your time & effort to post this Colin! Portraiture is one of my favorite things in photography. That kind of info is so important to me, a newbie on the subject.
-
3rd August 2010, 02:49 AM #9
- Join Date
- Dec 2008
- Location
- New Zealand
- Posts
- 17,660
- Real Name
- Have a guess :)
Re: "School of Portraiture" - Lesson 01 - Backgrounds / Locations
Hmmm ... I'm getting lots of thanks, but aren't seeing any suitable backgrounds posted yet! Originally Posted by Rafael
-
3rd August 2010, 08:18 AM #10

- Join Date
- Jun 2010
- Location
- Haarlem, Netherlands
- Posts
- 1,682
- Real Name
- Peter

Re: "School of Portraiture" - Lesson 01 - Backgrounds / Locations
Colin, good suggestions, thanks (another one and still no background!) for that. Just a question though on suitable backgrounds: I really like the portraits of Henri Cartier Bresson. What he seems to do in some of these is find a background that is/seems connected to the subject in the portrait. In the better examples of this the person itself would be sharply defined and the background would be slightly blurred. Recognizable but unobtrusive. He does use the repetitive background now and then (e.g. there is a portrait where Camus is in front of a rather dull bookcase), but the other portraits seem more lifelike somehow.
I know this is a bit off the track that you are following here, but I am interested on your opinion and whether you use it.
-
3rd August 2010, 12:17 PM #11
- Join Date
- Aug 2009
- Location
- Canada
- Posts
- 3,113
- Real Name
- Wendy
Backdrops
These are pretty ugly, I hope they look better with a person in front of them. I am compromising in order to be able to shoot at my building and try to grab a tennent as a model. I don't like any of these backdrops, I'm sure I will end up with mug shots.
I tried to blur these by focusing on a spot approx where I thought the model would be. I think I should be able to blur the backgrounds more for the actual shots.
Questions:
What is the best aperature for portraits. I used f8 for these
How far should the model be from the backdrop
How far should I be from the model
What is the best focal length
Are some colours better than others (I hate these, they are going to look like mug shots)
#1 & 2 will be in the shade until about noon and the sun will be slightly behind and to the right.
#3 will be in the shade later in the afternoon. I don't think I will get dappled light from the trees, but I'll have to check. The sun will be slightly behind and to the right. I thought if I could get the cedars blurred a bit more they would not be too distracting.
I'm not happy with any of these, but it's the best I can do close to home. If they are totally outrageous, let me know and I will find something farther away. I don't know if I will be able to drag a model along though
#1

#2

#3

-
3rd August 2010, 12:22 PM #12Moderator

- Join Date
- May 2008
- Location
- Windsor, Berks, UK
- Posts
- 16,769
- Real Name
- Dave Humphries :)
Re: Backdrops
Hi Wendy,
Shooting at an oblique angle to the wall should help avoid the 'mug shot' look I'd think, rather than take the model shot 'square on' like this. Let's see what the headteacher says
Cheers,
-
3rd August 2010, 08:04 PM #13
- Join Date
- Dec 2008
- Location
- New Zealand
- Posts
- 17,660
- Real Name
- Have a guess :)
Re: Backdrops
Hi Wendy,
You're a winner!
Firstly because you're the only one who's actually DONE it! ...
... and that's important for a couple of reasons;
1. Because next time you pick up a camera to shoot a portrait, "backgrounds" is something that you'll be thinking about, and
2. Now you have 3 locations in your "toolbox" that you know a little about -- so you've added to your experience. So even after just one lesson, if a neighbour knocked on your door and said "my son has just popped in for 1/2 from another state, could you take a photo" you'll be able to glance at your watch and think - Hmmm - it's 9:50 - should be good to go with location 1 or 2" (which will impress the client too)
With regards to the actual shots ...
#1 - yep, I could make this fly no problems at all. The colour is light enough - there's enough pattern - and with a bit of camera rotation I think this would work really well.
#2 - yep, I think this would work too - if you weren't zoomed in too far (I'd prefer more bricks like in the first shot if possible) - all you'd need to do is bring the model forward towards you, and backup more.
#3 - Not sure. If you backed the model up so that they were close to the hedge then if might be distracting, but if you brought them forward then it might turn into more of a complex scene (I can't tell because I can't see what I can't see).
But great start. It looks like we're going to have a bit of time on our hands before the next lesson (that's a hint to the rest of you lot by the way!) - so if you want, have another look around and see if you can find another 3 (making 6 for your toolbox!).
With regards to your other questions - that's easy - don't worry about them for now - all will be revealed in future lessons
-
3rd August 2010, 09:07 PM #14

- Join Date
- May 2010
- Location
- Germany
- Posts
- 361
- Real Name
- Robert S.
Re: Backdrops
Hello Colin,
thank you for your good explanations and samples.
Rather than Ali, I do not feel that the background on #2 is disturbing. Your model wears bright and vivid colors while the wooden fence in background is very worn out, that makes it look monochrome with less contrast. The eye is attracted towards the girl with the guitar.
bye
Robert
-
4th August 2010, 03:50 AM #15
- Join Date
- May 2008
- Posts
- 1,543
- Real Name
- Ali
Re: "School of Portraiture" - Lesson 01 - Backgrounds / Locations
Here is another example. The diagonal one is real! I actually took another picture, not rotated in PS
A

B

-
4th August 2010, 04:20 AM #16
- Join Date
- Feb 2010
- Location
- Victoria Australia
- Posts
- 2,634
- Real Name
- Kay
Re: "School of Portraiture" - Lesson 01 - Backgrounds / Locations
The scotch mist has been drizzling down all day - but I dashed out in a break in the clouds and found 2 spots here at school. I could see where the sun would be if it was allowed out today.
With the creeper it is over my Rt shoulder & with the brick wall it is over my left.
I like 'green' backgrounds & thought maybe the different shades of the leaves in the creeper would blur nicely if the 'model/choir!' are standing far enough in front of it?
I chose spots here during the work day because even though I work in the sports dept...there is often a call of 'hey you with the camera can you?'
e.g below! just received
Gidday Pix
Wondering if you could pop in and take some pics of the senior choir for me on Thursday. We rehearse 4-5.20 senior music house. Id like to set up something nice with our beautiful new trophy.
Ta - carl


-
4th August 2010, 09:03 AM #17
- Join Date
- Dec 2008
- Location
- New Zealand
- Posts
- 17,660
- Real Name
- Have a guess :)
Re: "School of Portraiture" - Lesson 01 - Backgrounds / Locations
Hi Kay,
Tell Carl you're busy ... I'll write you a note if you like!
I think the 2nd shot will work well ... at the moment it's pretty over-exposed - but - with a model in front of it - lit brighter by virture of a reflector - the background naturally receives relatively less light (since the exposure is based on the model) ... and it should fall into place quite naturally (and if it doesn co-operate we'll beat it into submission with Photoshop)!
The first one though - personally - I'd pass on for now; it's relatively high-frequency stuff (meaning it has lots of small elements) that often tend to end up being wht I call a "Clayton's background" (something other oldies might remember as being a non-alcoholic substitute drink ... they marketed it as "the one you have when you're not having one"); I find backgrounds like that are kinda like "well, we had to put SOMETHING there", but it's really is just a "something", rather than a sympathetic part of the composition.
I'm not saying that greenery can't be used - but - personally I think it either has to be big enough to be pleasing, or you have to totally nuke it with a shallow DoF - all things we can look at, but I'd like to get one set of techniques out the way first.
-
4th August 2010, 09:08 AM #18
- Join Date
- Dec 2008
- Location
- New Zealand
- Posts
- 17,660
- Real Name
- Have a guess :)
Re: "School of Portraiture" - Lesson 01 - Backgrounds / Locations
Yep - good stuff Ali - same comments as for Kay really. In reality I find that if I rotate the camera at the time of shooting then it helps me visualise the potential of the shot - but on the other hand, if one particular frame stands out for other reasons, but isn't rotated, then I'll do it in Photoshop in the blink of an eye (Ctrl + A; Ctrl + T -> "job done"). Originally Posted by Alis
-
4th August 2010, 10:57 AM #19

- Join Date
- May 2010
- Location
- In a bus somewhere in New Zealand
- Posts
- 795
- Real Name
- Kit, aka Slimtla
Re: "School of Portraiture" - Lesson 01 - Backgrounds / Locations
Sorry, teacher, but I didn't do my homework. I found a possible background or two but thought "Do it later..." And then it rained...and rained...and rained.
One challenge in this for me is that the backgrounds are going to have to be a moveable feast, as we are travelling in a few days. The only stable outdoors background I can see being available will be the side of a big, green bus. Would that be a suitable option, or do I need to hunt something else down?
-
4th August 2010, 11:05 AM #20
- Join Date
- Dec 2008
- Location
- New Zealand
- Posts
- 17,660
- Real Name
- Have a guess :)
Re: "School of Portraiture" - Lesson 01 - Backgrounds / Locations
Hi Kit, Originally Posted by Klickit
Don't know (try it and find out)
To be honest, this part is more about reaching people to quickly recognise what will work and what won't work quite as well ... in reality there are zillions of suitable spots - usually without having to look too hard.