
 Helpful Posts:
 As per Phil's suggestion; here are the screen shots and workflow of this image. I'll start with the cropped RAW file. I tend to use non-destructive editing techniques so pretty well all my work uses layer masks and adjustment layers:
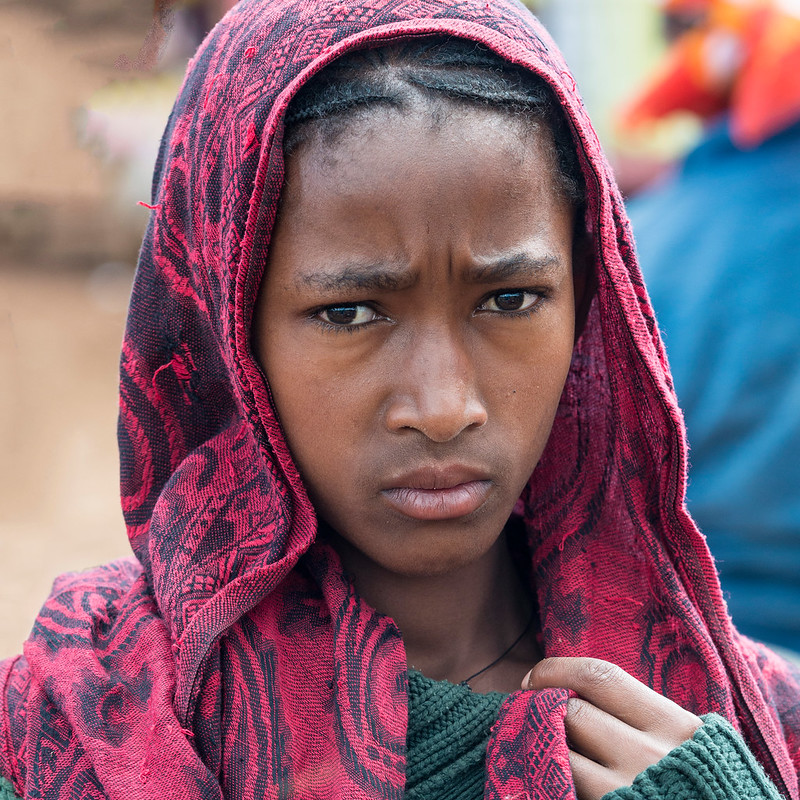
This is the original image with the offending blue and orange colours, camera right:
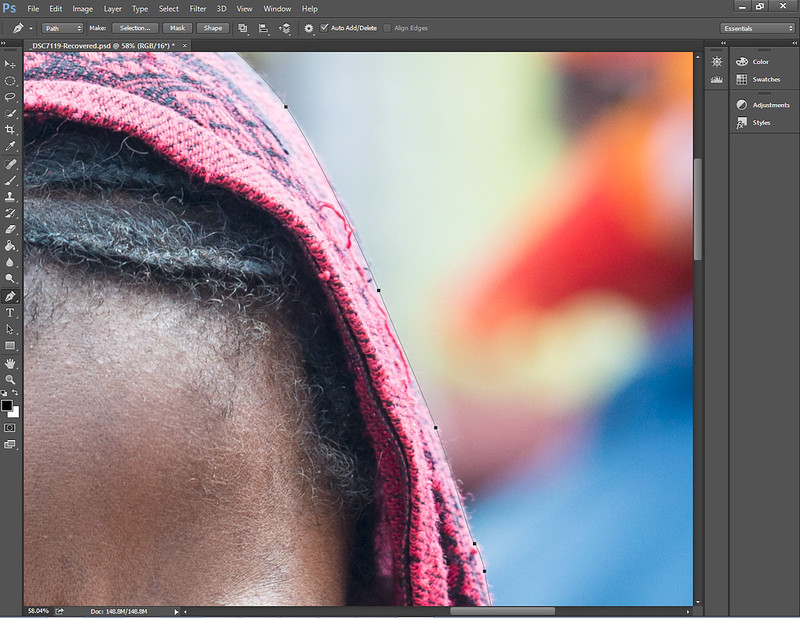
Step 1 - I used the pen tool to make a rough selection of the offending area. I stayed inside the woman's head covering by a few pixels. This does not have to be super accurate as the details won't get lost in further processing, they will just get desaturated and tinted. Here is a closeup of part of the selection.
[url=https://flic.kr/p/oasX21]
Step 2 - I made the selection and feathered it slightly ( 5 pixels) and used and a B&W adjustment layer. In this screen shot, you can see, the mask confines the effects to the offending part of the image, and the details of the shawl are still there.
[url=https://flic.kr/p/oataYT]
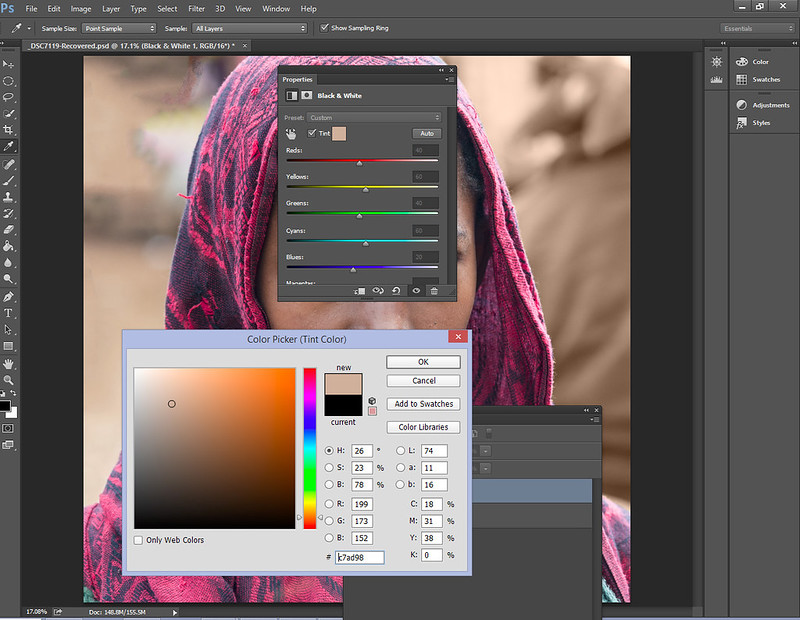
Step 3 - As I don't want the area to be B&W, I check the tint button on the B&W adjustment layer pop-up. I used the eyedropper tool to take a sample of the colours on the left hand side background of the image. This gets the right hand side into the right colour range.
[url=https://flic.kr/p/oasWWS]
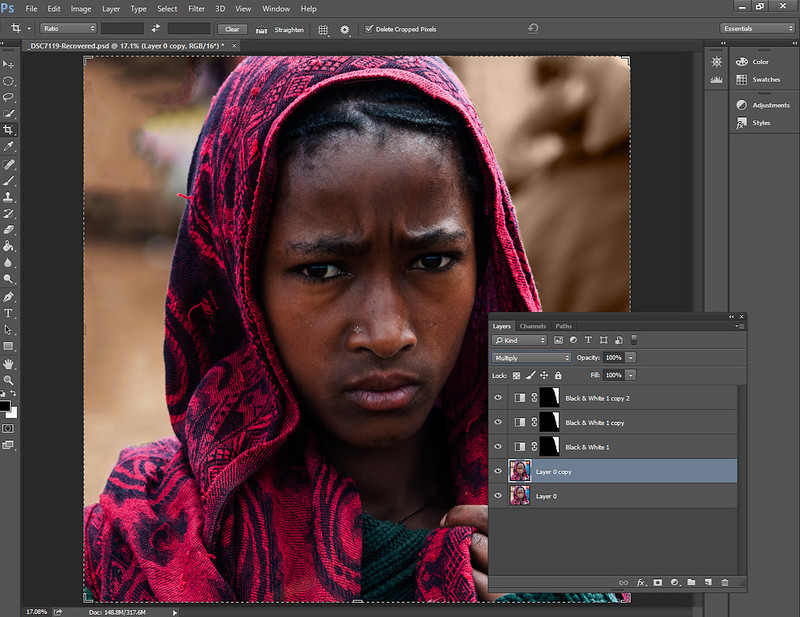
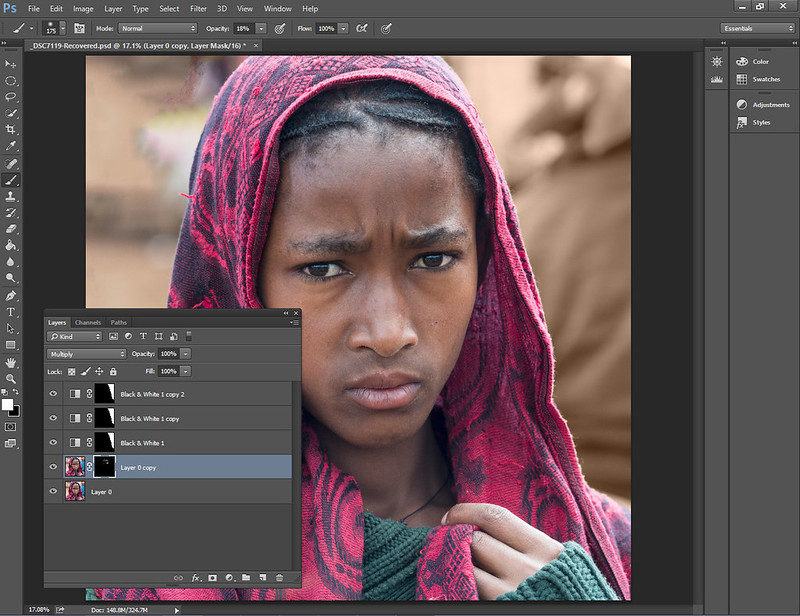
Step 4 - The intensity of the tint is not quite working, so I duplicate this layer two more times to increase the intensity of the layer mask to the point where I am happy with it. I find that her eyebrows are a bit to bright for my liking so I duplicate the base image and set the blending mode to Multiply to darken the image. This is shown here.
[url=https://flic.kr/p/orFrup]
Step 5 - I now apply a black layer mask to hide the the layer and paint on the layer mask with a soft, white brush at around 20% opacity to revel the darker layer in the areas where I have painted. This darkens some of the shiny spots on her face, and unlike the Dodge tool, the layer mask approach is completely reversable and editable.
[url=https://flic.kr/p/orKARL]
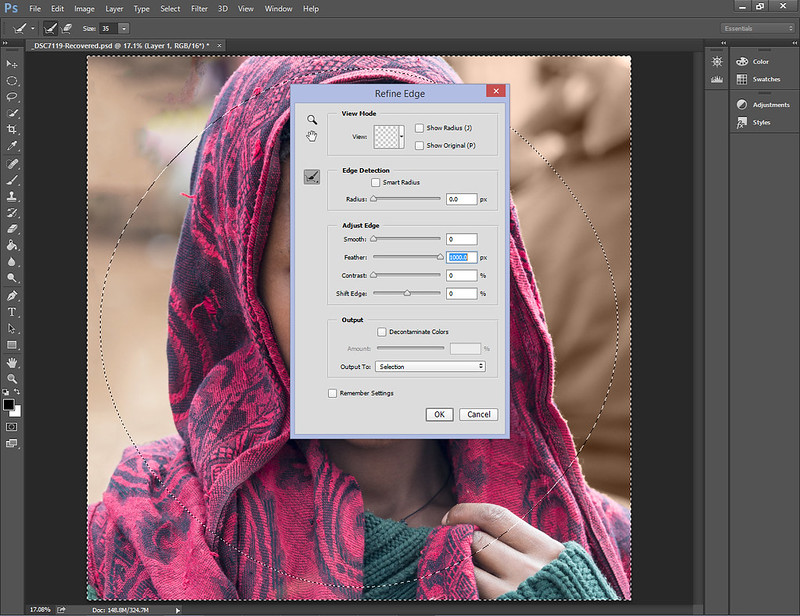
Step 6 - I want to draw the viewer's eyes into the image, so I add a vignette. I added an new empty layer to the top of the stack, and with the Elliptical Marquee tool, draw a centred selection that I then invert <Ctrl> <Shft> <I>.
[url=https://flic.kr/p/orFreK]
Step 7 - I click the Refine Edge button on the Elliptical Marquee tool to bring up the pop-up and apply a large feather; in this case, the maximum allowed of 1000 pixels. You need Photoshop PS6 or newer to be able to do this. Older versions of Photoshop limit the amount of feather to a much lower value.
[url=https://flic.kr/p/orFrbD]
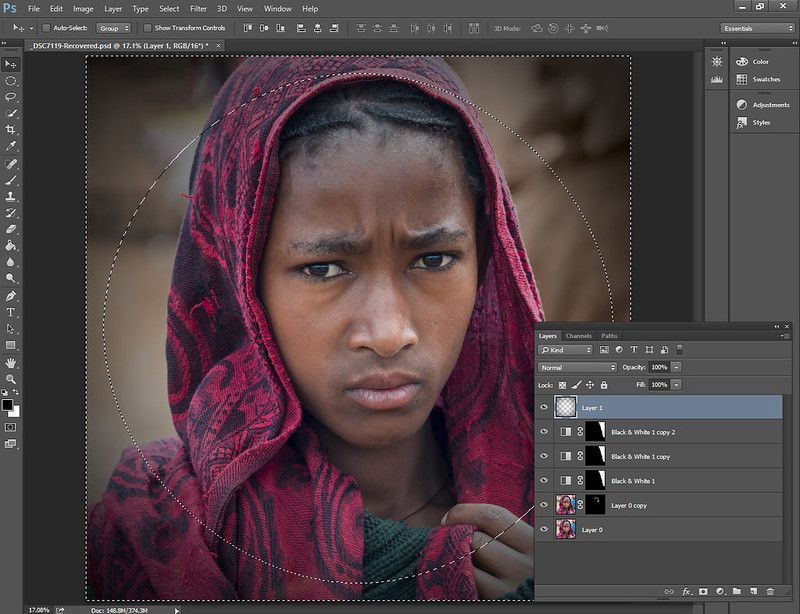
Step 8 - I select the Paint Bucket tool, using black, I darken the outside of the frame.
[url=https://flic.kr/p/orKAvW]
Step 9 - This vignette, by itself bleeds into the image, so while still keeping the selection, on the Layers Pallet, I click "Add a Mask" with black as the foreground colour. This significantly reduces the impact of the vignette. I might touch up the mask with a black paint brush to tweak it a bit. I will dial back the intensity of the vignette a bit by reducing the opacity to around 40% or so.
[url=https://flic.kr/p/oau8pa]
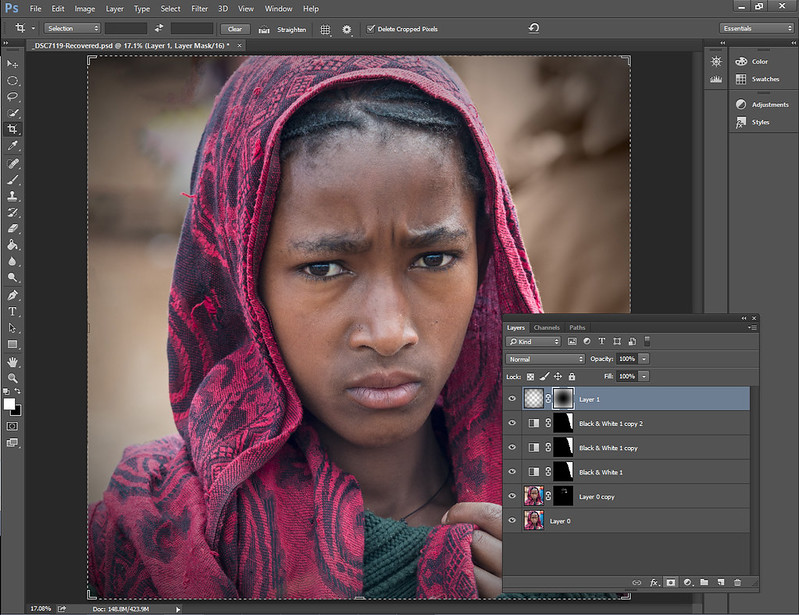
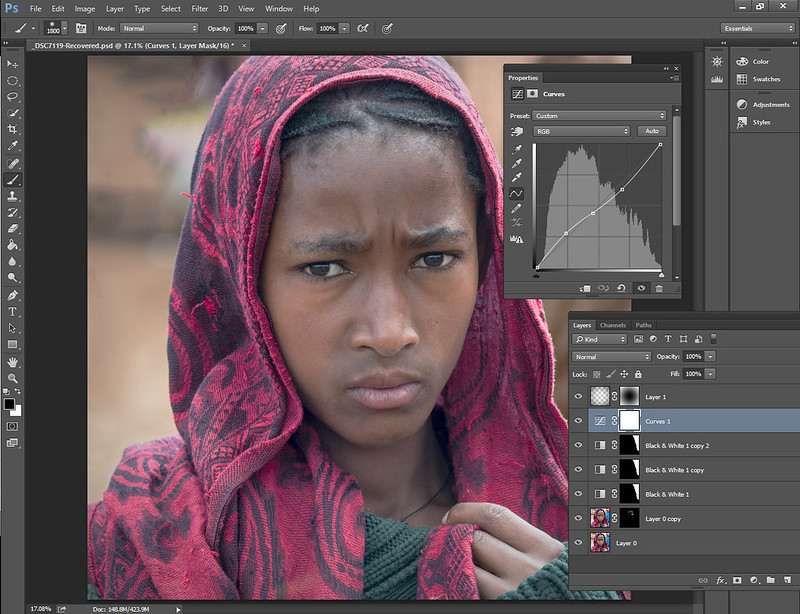
Step 10 - I find that the image is a bit too contrastly for my liking (it was taken at a fairly unflattering time of day), so I add one more adjustment layer, just below the vignette in the stack. I use a reversed "S" shape to drop the contrast ever so slightly.
[url=https://flic.kr/p/orXH92]
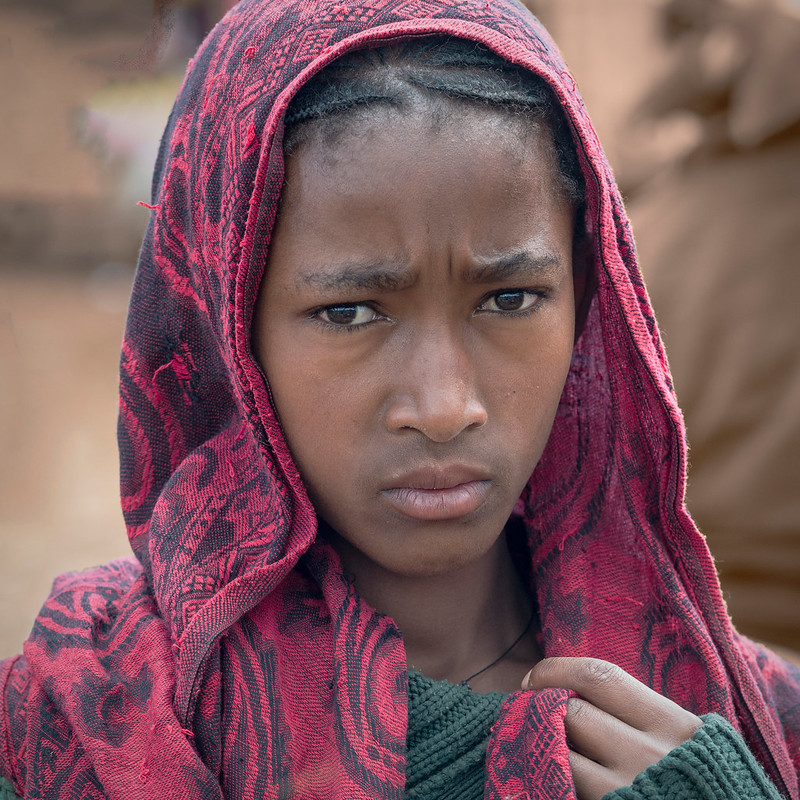
At this point the image is the way I like it.
[url=https://flic.kr/p/orXH6X]
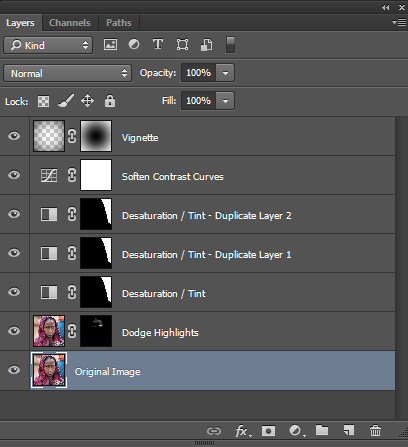
And finally; a closeup of the layers with descriptions.
[url=https://flic.kr/p/orFqva]
This may seem like a lot of work, but as I stated in a previous posting; the whole thing took me about 2 or 3 minutes....
Results 1 to 20 of 21
-
24th July 2014, 03:16 PM #1Moderator


- Join Date
- Mar 2012
- Location
- Ottawa, Canada
- Posts
- 21,956
- Real Name
- Manfred Mueller
Young Woman at the market - Southern Ethiopia - PP Workflow
Last edited by Manfred M; 24th July 2014 at 07:47 PM. Reason: typo correction
-
24th July 2014, 07:13 PM #2

- Join Date
- Oct 2013
- Location
- Co Wicklow Ireland
- Posts
- 208
- Real Name
- Marie
Re: Young Woman at the market - Southern Ethiopia - PP Workflow
Many thanks for sharing Manfred....this is so helpful.
-
24th July 2014, 07:29 PM #3

- Join Date
- Dec 2009
- Location
- WNY
- Posts
- 36,717
- Real Name
- John
Re: Young Woman at the market - Southern Ethiopia - PP Workflow
Nicely presented.
-
24th July 2014, 09:17 PM #4

- Join Date
- Dec 2011
- Location
- New England
- Posts
- 8,636
- Real Name
- Dan
Re: Young Woman at the market - Southern Ethiopia - PP Workflow
Manfred,
Thanks very much for presenting this and documenting it so carefully. Because a lot of the photography I do is largely or entirely editable in Lightroom, my Photoshop skills are still rudimentary, and I found this really informative.
Dan
-
24th July 2014, 09:29 PM #5
- Join Date
- Dec 2008
- Location
- New Zealand
- Posts
- 17,660
- Real Name
- Have a guess :)
Re: Young Woman at the market - Southern Ethiopia - PP Workflow
Manfred,
I'll show you an alternate technique that's faster and more accurate, and doesn't involve accurate selections:
1. Draw a small selection somewhere inside the problem area - doesn't need to be more than even 10% of the area - any rough-as-guts loop will do.
2. Add a hue-saturation - brightness layer
3. Change only the channel of the HSB layer that controls the problem colour to some other colour (again, doesn't have to be accurate)(just so you can see what you're painting in the next step)
4. Click on the layer mask - and paint over the entire problem area with a white brush. (here's the clever bit) - it'll only change the selected colour. If there's good colour contrast then you can be as rough as you like with the painting.
5. Go back into the layer properties and change the colour to whatever it's supposed to be.
You can use this for changing the colour of all kinds of things quickly and accurately, without time-consuming paths/selections.
-
24th July 2014, 09:46 PM #6

- Join Date
- Jun 2008
- Location
- Manchester
- Posts
- 787
- Real Name
- Mark Fleming
Re: Young Woman at the market - Southern Ethiopia - PP Workflow
Manfred,
This has a couple of excellent points, especially for people who are starting out in PP.
The first is the use of the Pen tool to make an accurate selection within the image. This can be a difficult tool to master at first, but it's a vital tool for the photographer, and your example shows this. I think if I were to teach someone PS, I would start with the tools palette, and then the Pen tool would be the first thing for them to learn.
The second is obviously layers and your excellent use of masks within this image. People are often baffled by these, so I always use the analogy of the old overhead projectors, adding and adding different slides to build a presentation. I hope that makes sense to people looking in,
I also really like the way you've altered the background. The tint feature in the B & W adjustment was something I'd forgotten about. Until now I'd would have pottered about in a Saturation layer and struggled.
So, all in all, I doff me cap mate,
A top post.
More of these, I'm certain would be appreciated by many.
Edit; Colin is a clever git.Last edited by The Blue Boy; 24th July 2014 at 09:57 PM.
-
24th July 2014, 10:04 PM #7
- Join Date
- Jun 2013
- Location
- North West of England
- Posts
- 7,178
- Real Name
- John
Re: Young Woman at the market - Southern Ethiopia - PP Workflow
Excellent tutorial Manfred and not just for beginners.
Colin, your methodology sounds interesting too but I got a bit lost around step 3. Not sure what you are referring to there. Any chance of more detail please?
-
24th July 2014, 10:05 PM #8
- Join Date
- Jun 2008
- Location
- Manchester
- Posts
- 787
- Real Name
- Mark Fleming
Re: Young Woman at the market - Southern Ethiopia - PP Workflow
Having said all that, I'd then apply the same technique to the left-hand side as there's also a distracting bit near the top left-hand side of her bonce mate.
But everyone's a critic,
-
24th July 2014, 10:20 PM #9

- Join Date
- Jul 2011
- Location
- British Columbia, Canada
- Posts
- 7,244
- Real Name
- Christina
Re: Young Woman at the market - Southern Ethiopia - PP Workflow
Thank you Manfred. Immensely helpful and informative, and a special thanks for keeping it simple.
-
25th July 2014, 12:00 AM #10
- Join Date
- Dec 2008
- Location
- New Zealand
- Posts
- 17,660
- Real Name
- Have a guess :)
Re: Young Woman at the market - Southern Ethiopia - PP Workflow
Hi John, Originally Posted by John 2

If you look at the property sheet for the HSB layer, all actions by default will apply to all channels (the "master" channel), but you can choose to restrict the action to only one colour. In the following I've changed the selection to green and left the property sheet open so you can see - then in the 2nd image, show what it's like when the mask is quickly and roughly painted over - changing the blue hat to a green one.
No selections - "rough as guts" painting - perfect result - and can be done in about 20 seconds with a bit of practice.


Or if one prefers ...

Last edited by Colin Southern; 25th July 2014 at 02:31 AM.
-
25th July 2014, 01:47 AM #11

- Join Date
- Sep 2012
- Location
- Nomadic but not homeless, ex N.Z. now Aust.
- Posts
- 4,142
- Real Name
- Paul

Re: Young Woman at the market - Southern Ethiopia - PP Workflow
In Photoshop there are more ways to skin a cat than is healthy for it...
It is always interesting to see different approaches to a typical problem.
-
25th July 2014, 08:04 AM #12
- Join Date
- Jun 2013
- Location
- North West of England
- Posts
- 7,178
- Real Name
- John
Re: Young Woman at the market - Southern Ethiopia - PP Workflow
Many thanks Colin. I must have been asleep at 11.30 last evening when I viewed your post. It was the HSB bit that I didn't understand but making the link to para 2 would have helped. I use the selective colour option in the HSB panel quite a lot but never in this way. Thanks both of you. That's two useful bits of education taken on board. Originally Posted by Colin Southern
-
25th July 2014, 11:57 AM #13
- Join Date
- Dec 2011
- Location
- New England
- Posts
- 8,636
- Real Name
- Dan
Re: Young Woman at the market - Southern Ethiopia - PP Workflow
Colin,
many thanks. I'm going to grab some images and practice this one
Dan
-
25th July 2014, 12:16 PM #14Moderator
- Join Date
- Mar 2012
- Location
- Ottawa, Canada
- Posts
- 21,956
- Real Name
- Manfred Mueller
Re: Young Woman at the market - Southern Ethiopia - PP Workflow
Another technique for the toolkit; thanks Colin. Originally Posted by Colin Southern
A bit of a warning; this technique only works if the surrounding areas are free of the colour you are trying to isolate, otherwise the mask grabs more than you want. Colin's examples are clearly good examples of where that works, but if you have a red flower against an orange background, it will fail.
For the simple selection I did, I suspect that the pen tool technique in my hands isn't a lot slower in this particular instance than your technique Colin. I'm quite fast with it; one has to be good with the Pen Tool when one uses Adobe Illustrator.
There really are many different ways to make selections and I probably use half a dozen different ones regularly, as each situation where one makes a selection can be quite different from another. The technique I've tended to use in situations like Colin's example is to select the colour range and then refine it with the Quick Mask functionality.Last edited by Manfred M; 25th July 2014 at 12:22 PM.
-
25th July 2014, 12:24 PM #15
- Join Date
- Dec 2008
- Location
- New Zealand
- Posts
- 17,660
- Real Name
- Have a guess :)
Re: Young Woman at the market - Southern Ethiopia - PP Workflow
No worries. Originally Posted by GrumpyDiver
It still works - you just have to be a bit more careful about painting the mask - AND - which colour you select. One needs to keep in mind that below the base colour selector in the HSB dialog box you can fine-tune the range that it works with, both in terms of the starting point, and how much the colour is allowed to vary either side of it (in essence it allows you to create your own custom colour presets). Keep in mind also that it's just a painted mask; if you have an area where it's affecting colour that it shouldn't, just hit the "X" key and paint over the white with black to hide it (on the mask).A bit of a warning; this technique only works if the surrounding areas are free of the colour you are trying to isolate, otherwise the mask grabs more than you want. Colin's examples are clearly good examples of where that works, but if you have a red flower against an orange background, it will fail.
Yep - I use the pen tool all the time too; it's great when there's straight lines and clean curves - it sucks for fuzzy edges though.For the simple selection I did, I suspect that the pen tool technique in my hands isn't a lot slower in this particular instance than your technique Colin. I'm quite fast with it; one has to be good with the Pen Tool when one uses Adobe Illustrator.
-
25th July 2014, 12:38 PM #16
- Join Date
- May 2011
- Location
- SE Michigan
- Posts
- 4,511
- Real Name
- wm c boyer
Re: Young Woman at the market - Southern Ethiopia - PP Workflow
Geez...it would appear that this here wannabe is not nearly as good as he thought he was.

Thanks for the tutorials guys.
-
25th July 2014, 04:15 PM #17

- Join Date
- Sep 2010
- Location
- Victoria BC
- Posts
- 1,510
Re: Young Woman at the market - Southern Ethiopia - PP Workflow
Yes, it's in my bookmarks now. Thanks for excellent tutorial. Originally Posted by Shadowman
Glenn
-
25th July 2014, 04:23 PM #18
- Join Date
- Sep 2012
- Location
- BC Canada
- Posts
- 566
- Real Name
- Irene Eva
Re: Young Woman at the market - Southern Ethiopia - PP Workflow
Thank you for the detailed tutorial.
Irene
-
25th July 2014, 05:54 PM #19

- Join Date
- Aug 2012
- Location
- S, B'ham UK
- Posts
- 3,337
- Real Name
- John
Re: Young Woman at the market - Southern Ethiopia - PP Workflow
I was curious to see if this could be done with the GIMP. - not so far but I may have found an easy way to generate the layer mask that will probably work on both.
GIMP's colour select tool is pretty crude. I upped the threshold and selected the blue and extended it with additive selection till all of it was selected. As this is crude it also selected other parts of the image so reduced the threshold and used subtractive selection to remove most of it. Only a few clicks and the magic wand would probably be easier to use anyway as it looks for boundaries.
Then added a layer mask using the selection as a basis for it. Viewed it and quickly brushed out the problem areas with a black brush. I'd made sure that there were no problems on the boundaries. Then inverted the mask.
Once this has been done anything could be done with an underlying image and that will only show where the mask allows.. I just desaturated it. I also painted the left hand side rather than selecting it which would probably be a better option.

I didn't notice the blue top and right was there so it should have been in the selection.
John
-
-
26th July 2014, 06:20 PM #20
- Join Date
- Dec 2013
- Location
- Turkey
- Posts
- 12,779
- Real Name
- Binnur
Re: Young Woman at the market - Southern Ethiopia - PP Workflow
Very detailed explanation Manfred, thank you very much
May I ask how you feathered the image with 5 px ? With Refine Edge funtion?


 Reply With Quote