
 Helpful Posts:
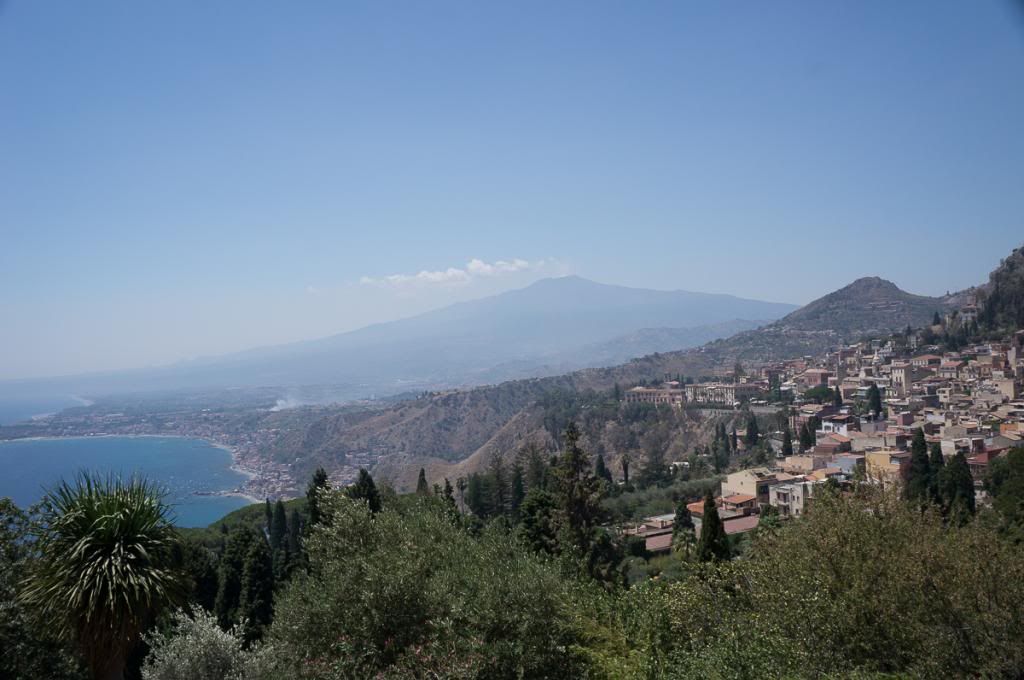
 The picture below is of Mt. Etna as seen from the village of Taormina. It is straight out of the camera with no processing. One of the things I'm struggling with now is trying to reduce the haze and have a clearer view of the mountain. The preferred option would be to take the picture on a clear day with low humidity in the early morning hours. But that option was not available to me - as in most situations when traveling this was the four hour window I was going to be there, I could take the picture or not. Having chosen to take the picture I would like to make it as good as possible.
There's nothing special about this particular picture. I'm just using it as an example for something that I run into a lot. As I said, you take the picture when you can.
I'm using Lightroom 4 for processing. PSE 10 came with my computer but I have not taken the time to begin to learn how to use it - I can start the program but nothing more.
Does anyone have any tips on how to do this? Any help at all would be much appreciated.
Results 1 to 15 of 15
-
18th August 2013, 01:48 PM #1


- Join Date
- Feb 2012
- Location
- Arizona
- Posts
- 144
- Real Name
- Didace
Landscapes - Cutting Through the Haze?
-
18th August 2013, 02:16 PM #2

- Join Date
- Sep 2009
- Location
- Burton on Trent, UK
- Posts
- 4,788
- Real Name
- Steve
Re: Landscapes - Cutting Through the Haze?

Best I can do.
Duplicate the base several times
Color 100%
Adjustment layer created from the one below. Pin Light levels auto
Overlay 85% Inverted with Gaussian blur to taste
Multiplicity layer say 90%
Base
It looks a bit posturized but if you work with a bigger file may be alright.
-
18th August 2013, 02:38 PM #3
- Join Date
- Jun 2013
- Location
- North West of England
- Posts
- 7,178
- Real Name
- John
Re: Landscapes - Cutting Through the Haze?
Not sure whether Elements 10 comes with Layers but if it does then to produce the version below, you can:
1. Duplicate the image which will become a copy as a layer.
2. Select the copy layer and increase the contrast. Best way to do this is to use the Levels adjustment to darken the mid tones an lighten the highlights.
3. Use the Eraser tool with a soft edge brush to wipe away the lower half (i.e. the foreground) of the copy layer to expose the original. Then "flatten" the image.
That way you will end up with the original FG but the distance and sky area will have been increased in contrast but don't go too far. Some recession in a landscape looks right.
You could achieve the same thing by selecting the area over which you want to increase the contrast but it's harder to get the same smooth transition that using a soft brush will give you in the above method.

-
18th August 2013, 02:51 PM #4
- Join Date
- Nov 2011
- Location
- Tulsa, OK
- Posts
- 468
- Real Name
- Larry Saideman
Re: Landscapes - Cutting Through the Haze?
Since I bought the Nik bundle, I cannot keep myself from using the Tonal Contrast feature in Color Efex. Moving the highlight slider along might give you just the result you want. The precision is nice as you can go from very subtle to way too much and everywhere in between. I use it for these situations but, remember, the pic is pretty nice as it is and the contrast between the vivid foreground and hazy background is pleasant in my eyes. It is probably very close to the way you saw it. Cropping some of the sky and warming the white balance a bit might also enhance the shot a bit and get rid of the vignetting, too.
-
18th August 2013, 08:09 PM #5
- Join Date
- Mar 2012
- Location
- Oregon, USA
- Posts
- 212
- Real Name
- Arlen
Re: Landscapes - Cutting Through the Haze?
Didace, short of being there at a different time, the next best thing in a situation like that is to use a polarizing filter. It would cut down a lot of that haze. But still maybe not as much as you would want.
In post processing this image to get where you want to be, the problems you're trying to solve are loss of contrast and saturation. So the first stage would be to optimize those parameters in the whole image as best you can. You'll then still have the problem areas in the distance that need special attention. For best results in working with those you need to do some masking, and LR's masking tools are very rudimentary, so as others have mentioned going into a program like Photoshop would be ideal. Even there you wouldn't want to push it too far, because you just can't recover detail that's not there to start with. John's example above looks pretty good.
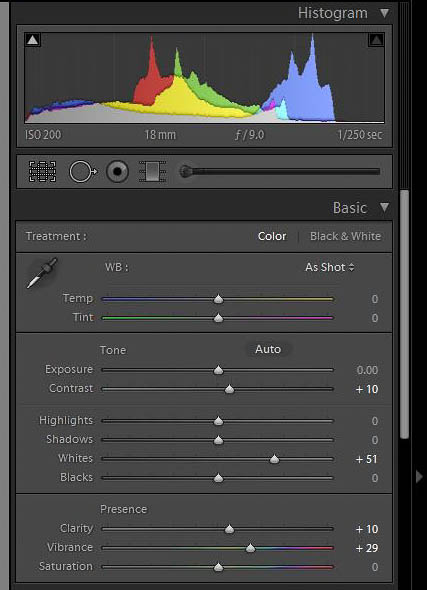
It sounds like you want to stick to LR though, at least for now. And there are some things you can do solely within that program that will help. Here's a run-through of a rough example that I only spent a few minutes working on. You can do better if you put in some time.
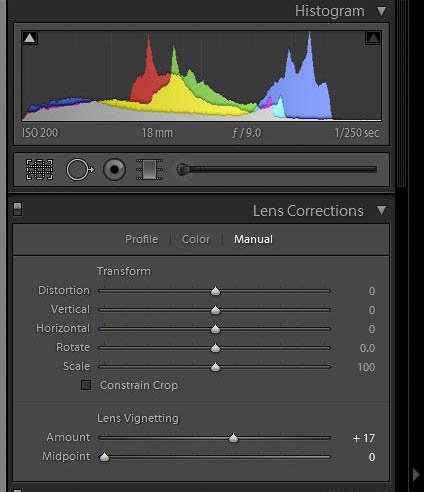
In this exercise I first made some global adjustments to bring some "snap" back into the whole scene and increase the missing contrast in a variety of ways. We need to use the entire dynamic range available to us, meaning at one end we have a bit of true blacks and at the other end a bit of true whites. Your "Blacks' setting is already OK, but we need to get to the whites end by running up the Whites slider. Also add more Contrast via its slider, and some saturation via the Vibrance slider. I ameliorated the severe vignetting by using LR's Vignette controls, and I removed the remaining dark spots at the upper left and right corners using the Spot Removal tool. (You have more spots from sensor dust that you could remove with that tool, but I didn't do it here.)
Here's the resulting image at this stage, having made only global adjustments (except for the spot removal):

And here are the LR settings that I used to get here:
Now let's turn to that haze in the distance that you're unhappy with. We need to select it for special work. In LR the primary selection tools are the Gradient and the Adjustment Brush. Normally I would use a gradient here, to avoid contrasty lines along the boundaries where the selection ends. You can play around with that and possibly end up with an acceptable result. When I tried it quickly, it was too hard to get a selection of the distant mountains that did not also include the peak on the right side of the near ridge, where we don't want much of a contrast change.
So I used the Adjustment Brush instead. In many cases you can do a quite precise selection with the AB if you click the Auto Mask box. But if you use it in that mode to select skies and then make big adjustments, it leaves ugly light or dark halos all along the boundaries with land objects, due to poor feathering of the selection. So here I did not check that box, but instead used a brush with Feather set very high, to about 70%, and very large, so it covered the whole sky. I made one pass over the sky, letting the feathered part overlap the near ridge. The near ridge is the problem, because it should not receive much adjustment. I then adjusted the parameters of the brush to increase Contrast and Clarity (local contrast) to reduce haze, and decrease Highlights and Exposure to get some color back into the sky.
Here is the final result after adding the Adjustment Brush (plus one more offsetting adjustment I'll describe in a moment):

And here are the settings for the Adjustment Brush:

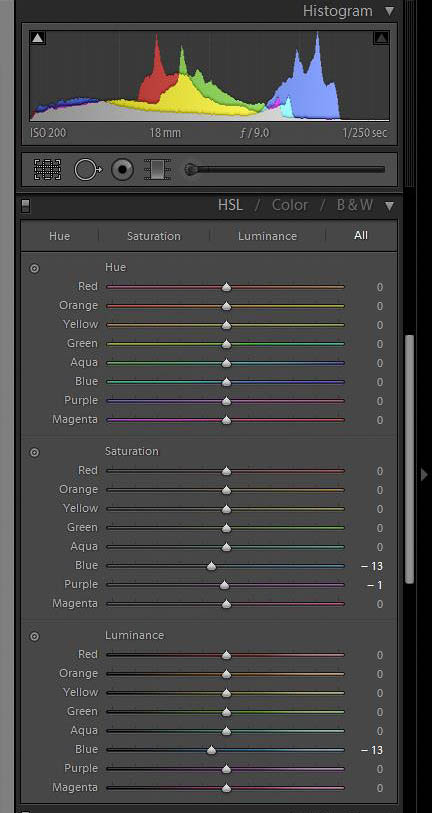
The AB changes in Contrast and Clarity also increased the saturation of the blue sky, too much in my opinion. So I went into the HSL tab and, using the Targeted Adjustment Tool to select the colors in the sky, I reduced its Saturation and its Luminosity somewhat, using the settings below:
Upon close examination you will notice that the sky Adjustment Brush also slightly affects the top of the near ridge. There's no easy way to avoid this, you can only minimize its impact. If you spend some time and play with the feathering and where it ends, you may be able to achieve an effect that better suits your taste.
There are many ways to do a much better job of it in Photoshop, if you are inclined to learn the techniques. But maybe the approach I've demonstrated here will get you closer to where you want to be while using the tools you are familiar with.
-
18th August 2013, 10:13 PM #6

- Join Date
- Jul 2008
- Location
- Southern California, USA
- Posts
- 17,409
- Real Name
- Richard
Re: Landscapes - Cutting Through the Haze?

This was done in less than one minute using the color contrast filter of NIK Color Efex. It could easily be optimized with a few more minutes work using some other NIK plug-ins like Viveza. I prefer this cropping to avoid the large expanse of sky...
This was done simply with global corrections but, the U-point technology would allow local corrections...Last edited by rpcrowe; 18th August 2013 at 10:25 PM.
-
18th August 2013, 10:18 PM #7
- Join Date
- Feb 2012
- Location
- Arizona
- Posts
- 144
- Real Name
- Didace
Re: Landscapes - Cutting Through the Haze?
Thank you, this was very helpful. One thing I should have pointed out in my post was that I did use a polarizing filter on this day. I was going down mostly the same path as you described except for over-doing some of the adjustments (I need to get "less is more" into my head but those sliders are so easy to shove one way or the other). The big takeaway for me is using the adjustment brush without the masking and with the larger feather. I'd get the mountain to look "better" if I only looked at it, but then it didn't seem to match the rest of the picture. I need to expand my range of tools and their use and this will go in the toolbox. Originally Posted by Arlen

-
18th August 2013, 10:24 PM #8
- Join Date
- Mar 2012
- Location
- Oregon, USA
- Posts
- 212
- Real Name
- Arlen
Re: Landscapes - Cutting Through the Haze?
Yes it would, and very nicely indeed. And the NIK software is available as a plug-in for Lightroom--if the OP is willing to spring for the cost and learn to use it. Originally Posted by rpcrowe
-
18th August 2013, 10:25 PM #9
- Join Date
- Mar 2012
- Location
- Oregon, USA
- Posts
- 212
- Real Name
- Arlen
Re: Landscapes - Cutting Through the Haze?
Didace, I'm glad you found it helpful. We're all still learning, and if the time comes when we're not, it will stop being any fun.
-
18th August 2013, 10:32 PM #10
- Join Date
- Feb 2012
- Location
- Arizona
- Posts
- 144
- Real Name
- Didace
Re: Landscapes - Cutting Through the Haze?
Originally Posted by rpcrowe
This intrigues me. How do these plug-in work with LR? Is it just like adding more options to the menus and tools? I could do some googling but you guys are so much smarter than the rest of the internet. Originally Posted by Arlen

I very much agree. I think these types of shots need the wide cropping. Originally Posted by rpcrowe
-
18th August 2013, 10:59 PM #11
- Join Date
- Jul 2008
- Location
- Southern California, USA
- Posts
- 17,409
- Real Name
- Richard
Re: Landscapes - Cutting Through the Haze?
Using Photoshop, I go into my filters menu and select NIK Software which produces a drop down menu with the following choices:
Color Efex - this has many presets which you can use globally or you can select individual portions of the image with U-Point technology. I won't get in to the U-point system but I consider it very easy to use in the selection of different parts of the image all the NIK Software components have the U-Point technology included..
Dfine: noise removel
HDR Eex: any type of HDR from grungy to realistic
Sharpener: self explanatory
Silver Efex: great B&W conversions
Viveza: a pretty comprehensive editing program
Do a Google search for NIL Software and you will find a plethora of tutorial and advertisement videos. I am just starting with NIK and every day I learn something new about it that I like. I just watched a video last night about the Color Contast filter and thought it might be a good one to try with your Mount Etna image...
There is even a way to combine a black and white image with a color image to improve contrast. I still need to view that video a few more times to understand it.
NOTE: There is probably nothing you can do with NIK that you cannot with Photoshop alone but, you need more skills and time working with Photoshop. Apparently NIK can be plugged into Photoshop, Photoshop Elements, and Lightroom. Very likely, it can be used with other programs and I think some NIK plug-ins can be used as a stand alone. Since I use NIK as a Photoshop Plug-in I haven't paid much attention to its interface with other editing systems or its use as a stand alone program....
I recently saw Lightroom for $99 U.S. Dollars. Combine that with NIK for $150 and you would have a very nice system. The same goes for Photoshop Elements. I would never have purchased the NIK at its original high price but, I am quite happy it was reduced...
-
19th August 2013, 12:31 AM #12
- Join Date
- Mar 2012
- Location
- Oregon, USA
- Posts
- 212
- Real Name
- Arlen
Re: Landscapes - Cutting Through the Haze?
The NIK plugins for LR work similarly to the way they do in PS. As you are working on an image file in LR, you select the particular NIK plugin from a menu at the top, or from a right-click context menu. A new window opens where you make your NIK application adjustments. When you click OK, the window closes and the Tiff file it generates is imported into LR for further work or cataloging. It's best to do all or at least most of your parametric adjustments of the RAW file in LR first, because after the NIK step you'll be working on less-forgiving actual pixels in the Tiff file (though they won't be applied in LR until you save them to the file itself). That's true in either LR or PS.
Edit: I should add that a difference between using the plugins in PS and LR is that in the latter, you lose the ability to apply the effect on a layer. For that reason I always use them in PS, but if all you have is LR, they are still very useful.Last edited by Arlen; 19th August 2013 at 12:56 AM.
-
20th August 2013, 08:34 AM #13

- Join Date
- Mar 2012
- Location
- Madrid
- Posts
- 155
- Real Name
- Patrick
Re: Landscapes - Cutting Through the Haze?
This thread reminded me of a tutorial I bookmarked some years ago to deal with this very problem. The example pics are small but I think the result is good with the adjustments made with the Curves Tool in Camera Raw (which I think should be included in PSE 10). I wish the Curves Tool could be adjusted the same way in Lightroom but unfortunately it can't. That being said, for your picture I'd probably just use the Graduated Filter Tool in Lightroom since you could put it at a slant and make adjustments above the slant- boost in contrast, clarity and sharpness and probably a little less highlights. Quick and easy
http://www.aguntherphotography.com/t.../workflow3.htm
-
20th August 2013, 02:09 PM #14
- Join Date
- Jul 2008
- Location
- Southern California, USA
- Posts
- 17,409
- Real Name
- Richard
Re: Landscapes - Cutting Through the Haze?
Patrick wrote: "I wish the Curves Tool could be adjusted the same way in Lightroom but unfortunately it can't. "
I don't know if NIK software allows levels and curves to work how you would like it when it is Lightroom hosted but, I tend to think that it would. However at the risk of sounding like a fan-boy (which I am rapidly becoming); NIK Viveza hosted in Photoshop CS6 has levels and curves capability. Generally, I do a lot of my corrections using Camera RAW and then go into NIK for finishing touches.

I have absolutely no connection with Google NIK Software except that I am like a kid on Christmas morning, unwrapping one present after another as I am learning the capabilities of the NIK plug-ins. For a guy with only medium Photoshop Skills, NIK is certainly enjoyable to work with...
I have recently viewed a YouTube video on "multi pass sharpening" using NIK that is quite interesting. I have not completed watching the YouTube video, nor have I experimented with this type of sharpening. It seems way out of the box, but just might be an effective tool for working with some selected images...
https://www.youtube.com/watch?v=GE_JeP06IG4
-
20th August 2013, 03:36 PM #15
- Join Date
- Mar 2012
- Location
- Madrid
- Posts
- 155
- Real Name
- Patrick
Re: Landscapes - Cutting Through the Haze?
Ha! I can relate Richard! I have the Nik Suite and they really are a joy to use and the results can be really impressive. I also have Photoshop so I have the tools but I tend to stick to Lightroom for the majority of my pics, only moving into Photoshop and the Nik plug-ins for my more demanding photos (though I'm still very much a novice with these programs). I'll have a look at the sharpening video, I'm always going back and forth with my sharpening methods. Originally Posted by rpcrowe
Cute dog by the way. Here's one of my brother's dog Napoleon that I processed with Silver Efex Pro:


 Reply With Quote