
 Helpful Posts:
 Bruce - you're most welcome.
Results 21 to 40 of 40
-
6th May 2013, 01:47 AM #21


- Join Date
- Jan 2009
- Location
- Sraylya
- Posts
- 4,936
- Real Name
- William (call me Bill)
Re: Macro - How to use Focus Limiter on lens
-
6th May 2013, 02:21 AM #22
- Join Date
- Feb 2013
- Location
- Vermont, USA, Southwestern corner
- Posts
- 105
- Real Name
- Susan
Re: Macro - How to use Focus Limiter on lens
Thanks Bill! I am glad I got it right in terms of what the different metering modes will do. That is the first, very important, step in being able to apply them. When Ted Cousins says to meter the "middling brightness" of a scene, I do understand that by doing that you are by-passing the matrix averaging of the brightnesses in the scene. But my question is: how do you know when that will do a better job than using matrix mode? Originally Posted by William W

This makes sense to me. In fact, I posed this concept in a response to Ted before I saw your posting. Sometimes the main feature is what needs to be emphasized, and the rest hardly matters! So in this case, "middling brightness" is actually the part that needs to be best exposed. Originally Posted by William W
In principle, I understand this, but do not know how you would calculate the final exposure. Originally Posted by William W
For this example, you give no hint about what you did differently for the second image to make it better. At this point, I start having trouble understanding what you are saying. Won't ETTR often result in over-exposed images? I do try to use the camera's light meter to make adjustments before taking the picture, but am still not sure I know what I am doing! Originally Posted by William W
Let's see if I understand what you are saying - green grass will meter like a gray card, the palm of your hand is 1 1/2 stops darker than green grass, meaning you have to increase exposure by 1 1/2 stops for a particular picture where you have checked exposure on your hand? And if I meter something, for instance a horse or a piece of fabric, in a certain light, and compare it to a gray card, then I can determine how to change the exposure. Originally Posted by William W
Let me know if I've got this right, or if I've got it backwards!
Thanks for the very detailed explanation of this. Sorry if I don't understand it completely.
Susan
-
6th May 2013, 04:40 AM #23
- Join Date
- Jan 2009
- Location
- Sraylya
- Posts
- 4,936
- Real Name
- William (call me Bill)
Re: Macro - How to use Focus Limiter on lens
Experience. And making errors. And understanding why the errors. It’s not that difficult or worrisome really. Matrix will work very good for most scenes. Originally Posted by Green Mountain Girl
In the shot of the Indoor Swimming Pool, I metered the water; the wall in shadow; the wall in light and the screen. Originally Posted by Green Mountain Girl
The screen was important, (actually the image on the screen was important). And the screen was relatively very bright and I was afraid of losing detail. But I didn’t want the shadows to lose detail either.
I chose an exposure such that the lighter shadows on the walls and the highlights on the screen were around 6 Stops apart - but with a bias to the shadow area. We are now discussing Dynamic Range. Although the 5D has a greater Dynamic Range than 6 stops (about 9 realistically, I think) I was (mentally) squishing the scene into a 6 Stop Range with a bias to blowing a bit of the screen if necessary.
I would normally only take TWO Spot Meter Readings: one shadow that I want to keep and one highlight I want to keep. But in this scene the water was important too so I metered it to understand where in the exposure range it would fall. Then just for fun I metered the wall in light (because that wall is very close to a Photographic grey reference – and I metered it for more a test and learning than any real need to do so for shooting this particular scene.
I am conservative with this approach: by choosing a 6 or 7 stops as my working dynamic range when I take two spot meter readings.
What I found (after mentally computing) was that if I had just used the ‘wall in light’ the exposure would have been pretty safe – so I learned something.
But if I had used “evaluative” I know that would have blown way too much of the screen – and that’s why I chose to use the Spot Metering technique.
I did practically nothing – Evaluative Metering worked perfectly! That was the point of the example. Originally Posted by Green Mountain Girl
I referred to how the TENT shot is a good example of why one should often use ETTR. Originally Posted by Green Mountain Girl
If one were to have used “Matrix or Evaluative metering for that scene. The Evaluative Mode Light Meter in the camera I was using wanted me to shoot that scene about 1 stop UNDER how I chose to shoot it
i.e. my light meter was telling me take this at F/8 @ 1/160s @ ISO200 – but I didn’t want to do that, because I knew that silly light meter was “seeing” all that sky and all that white tent and wanted to make all that are look like a nice grey.
If I trusted the meter and used ETTR – I would have attained reasonable results and I could have developed the background nicely and not blown the whites of the tent.
ETTR does NOT mean ‘blowing-out’ it means getting as close to the right hand side of the histogram as possible
Yes Originally Posted by Green Mountain Girl
Almost. Originally Posted by Green Mountain Girl
The palm of my hand is a very light skin-tone. Lighter than a grey card and lighter than green grass. My Light meter will want to make that appear as GREY (not whitish) in the image – so the light meter will tell me an exposure which is UNDEREXPOSED – so I have to correct that by OPENING UP (the aperture) about 1½ Stops.
Yes! Originally Posted by Green Mountain Girl
WWLast edited by William W; 6th May 2013 at 04:58 AM. Reason: speed typing corrected typos - there are probaly still somethere - sorry in a big rush
-
6th May 2013, 02:16 PM #24
- Join Date
- Feb 2012
- Location
- Texas
- Posts
- 6,956
- Real Name
- Ted
Re: Macro - How to use Focus Limiter on lens
looks like you're making progress in understanding metering, judging by the comment in bold above. Definitely not a solution for all "photographic objectives" (scenes) because all scenes are different and require adjustment of the modus operandum. In other words, if your prior evaluation leads you to expose one element "properly" then you would meter it but then adjust the exposure of that metered area upward or downward as needed for your composition. Originally Posted by Green Mountain Girl
Does your live view adjust it's appearance as, in spot metering mode, you wave the camera around in the scene? That may be a good indication of how the shot will turn out but a white house would still need a stop or so more and a black sheep a stop or two less.
As to spot versus center-weighted, the scene dictates. Perhaps, for landscapes or seascapes, center-weighted would do the job (still in manual) but bugs, flowers, wristwatches, I prefer spot metering.
-
6th May 2013, 09:28 PM #25
- Join Date
- Jan 2009
- Location
- Sraylya
- Posts
- 4,936
- Real Name
- William (call me Bill)
Re: Macro - How to use Focus Limiter on lens
Susan, I might have missed it . . .
What camera(s) are you using?
WW
-
7th May 2013, 02:39 AM #26
- Join Date
- Feb 2013
- Location
- Vermont, USA, Southwestern corner
- Posts
- 105
- Real Name
- Susan
Re: Macro - How to use Focus Limiter on lens
Hi Bill! Originally Posted by William W
I think I understand this - you have a subject with an area that is very bright and an area that is in shadow/dark. You don't want evaluative metering because it is likely, by averaging, to lose detail by blowing out whites. So you take readings of each extreme, and use a setting in between them - either in the middle, or weighted to one direction or the other a bit depending on the effect you are looking for. If the subject has more complexity (as in the one with the pool) then more readings might be needed to make sure you are able to stay within the dynamic range of 6 stops.
I'm not really understanding why you want to get as close to the right hand side of the histogram as possible. Wouldn't that put an emphasis on the brighter parts of the picture, making it appear overexposed? This won't give blown out highlights/whites. I have some photos I took where the histogram is almost a perfect bell curve, thought they would be fine, but when I got them home and looked in the computer, they were around a full stop overexposed. Originally Posted by William W
Guess I got this one backwards! But I think I understand it - the palm is light, so the meter wants to tone it down (make it gray), which makes it necessary to increase exposure. But this is only one reading, so this would only work if the whole image was the same luminance as the palm. You would need more readings to get your own "middle" exposure. Originally Posted by William W
Hope I've got it!
You asked what camera I am using - Nikon D7000. My first DSLR, chosen because I wanted to grow into it, not out of it, as I did with my first digital - a point and shoot. Still have a lot to learn!
Thanks so much!
Susan
-
7th May 2013, 03:16 AM #27
- Join Date
- Feb 2013
- Location
- Vermont, USA, Southwestern corner
- Posts
- 105
- Real Name
- Susan
Re: Macro - How to use Focus Limiter on lens
Hi Ted, Originally Posted by xpatUSA
Yes, I am making progress. Of course, understanding is just the beginning - now I have to put it into practice, practice, practice!
I tried this in my living room just now (11pm, one lamp on and the television) - not an ideal situation. But I could see how it adjusted! This is something I would not have thought of doing. It is amazing how well this illustrates what you and Bill have been helping me to understand about how the meter works. I focused on a lamp and it immediately went from very bright to darker. Focused on my rug which has a mixture of colors, including white, but is in shadow, and it got brighter. Originally Posted by xpatUSA
I just want to check that I understand this. I am photographing a scene with the lamp in it, but if I spot meter on the lamp the lamp might come out OK, but the rest of the scene will be too dark so I have to increase exposure. And the black sheep in a scene, everything would come out too light which is why exposure has to be decreased.
Now a question: I have two kitties who are a dark chocolate color. I have photographed them and found it difficult to get the color right. It occurred to me that part of the problem was the lighting (indoors, combination of incandescent and compact fluorescent bulbs). In PP, I managed to get rid of the blue (highlights I think) by raising temperature. So, if I had spot metered them and then the background (gold brocade fabric), and then chosen a "middle" metering, would that have eliminated some of the difficulties I experienced getting it right?
Metering is important, and I have learned that I didn't understand it much at all!!! But at least I know more now than before...
Thanks so much for the help and encouragement.
Susan
-
7th May 2013, 05:30 AM #28
- Join Date
- Jan 2009
- Location
- Sraylya
- Posts
- 4,936
- Real Name
- William (call me Bill)
Re: Macro - How to use Focus Limiter on lens
In a nutshell yes thats the general idea. Originally Posted by Green Mountain Girl
As I mentioned my cameras (and yours) have MORE than 6 stops range I am just conservative when I am computing my metering, because I usually will NOT meter the BRIGHTEST portion of the scene but rather the BRIGHTEST PORTION that I WANT in the final image.
The salient point to understand is when I use Spot Metering and I take two readings: I bias my computed exposure either towards the brighter areas or the darker areas depending what I wish to emphasise.
The range of the EVs in the Scene [1] is usually NOT beyond the dynamic range of the camera so therefore I usually get all of the scene, in reasonable detail.
But if the range of the scene is beyond the dynamic range of the camera, then I will blow some of it or some will go to Black-Black and I usually dont care.
If I want all of the scene and the scene is a very large EV Range then I might use HRDI [2] Technique
1 [Range of EV's the scene - (Exposure Value) the term for the Dynamic Range of the Scene]
2 [HDRI High Dynamic Range Imaging: take several images at different exposures and blend them in PP]
***
OK - I understand your issue. Originally Posted by Green Mountain Girl
ETTR (usually)assumes that one is shooting raw.
The concept, in simple terms, is that as much info is squished into the file as possible and later you can PP it to make (the exposure and the nuance of tonal range) what you want.
Again I reiterate that ETTR does NOT mean you blow the highlights.
You just squish the highlights up to the right hand side, as much as possible so the data (all the data especially the stuff down the left hand side) is as clean as possible and as much as possible its like the bus conductor pushing the people to the back of the bus.
There is probably a really good and simple technical explanation here in the tutorials if you have a look or search the old thread files, no doubt youll find a lot written by Colin Southern and others who are digitally inclined and like writing about all the ones and zeros . . . I do undersatnd it, but it does my head-in to have to write about it in detail. Worse than shooting Birds in Flight, for me.
Also, as I said I very rarely use an histogram so I dont even look there much, anyway.
I mentioned ETTR in this thread, because many Photographers DO use the Histogram and also many CHIMP.
[CHIMP - take image look at histogram adjust exposure to suit what they want take another image if necessary]
I DO NOT want to engage in whether CHIMPING or ETTR is good, bad or ugly or the best way of doing things thats up to you to choose I was just providing examples of how to use the Metering Modes and other associated activities.
A "perfect bell curve" is not what you want for all your photos.
*
What we are generally discussing in this thread - is subtly different and more pure for want of a better way of describing it.
What we are describing is making ONE image based solely upon ONE exposure premeditated by the use of a light meter and perhaps some computations.
This is akin to shooting with Transparency Film you either get it right or you get it wrong.
This is approaching Photography with a One Shot mentality.
I see a value in this approach.
That does NOT imply that there is no value in other approaches, such as CHIMPING so dont let any anyone cheery pick bits of quotes here and there from this post and want to debate this is better than that with me - I am not interested.
This "One Shot" approach to shooting and also what we are discussing in detail in this thread about the many ways to to use SPOT METERING is only a SMALL PORTION of the ways you might use your camera . . . so for heavens sake, even though we are going into a lot of detail about Metering Modes and the worth of understanding them all and how we might manual computations: dont forget that using Matrix Mode for most scenes, will result very good images.
*
The main values/advantages I see in a One Shot approach are:
The Moment I shoot a lot of Portraiture, if you will candid, that is to say not with contrived lighting but mostly in available light and often before the Subject is aware of the camera. Once the moment is gone - it is gone. I have no time for regrouping or re evaluating after the first shot. I also did shoot a lot of Weddings same rationale applies.
The Action I shoot a lot of sport. And most of the sport I shoot is anticipatory, in other words I understand the sports which I shoot, so therefore I can anticipate from where the next useful shot might come: but for most of the Sports I shoot, there are often radical lighting changes across the field of play (Field Hockey early in the morning or late in the afternoon for example) so I want to be able to adjust the exposure quickly, to suit.
The Pleasure I just want to capture each shot - once.
I always shoot raw + JPEG(L) I often use the JPEG file SOOC (Straight Out Of Camera)
*
The main disadvantage that I see in One Shot is:
Mistakes - are permanent.
So who wants to be an Idiot for the sake of a principle, which is not a real Principle anyway? not me.
So (for a practical example) - I am in a real hurry talking eating laughing etc but I know that I will want several scenes - this is pleasure photography - and many scenes will be complex thats easy I just shoot a bracket. I usually shoot ±1 Stop or ±⅔Stop and I leave the Light Meter in Matrix Mode and the Camera in Manual Mode.
Now usually I do nail the exposure with the first shot maybe say 70%~80% of the time.
But for the 20%~30% of errors errors I make with my first exposure, then almost 100% of time I am within ±⅔ Stop of what I wanted anyway and the scenery stays still for the other two quick shots that is so simple to do to set Auto Bracketting.
***
Thats all about the detailed bit we are getting at, in this thread . . . Originally Posted by Green Mountain Girl
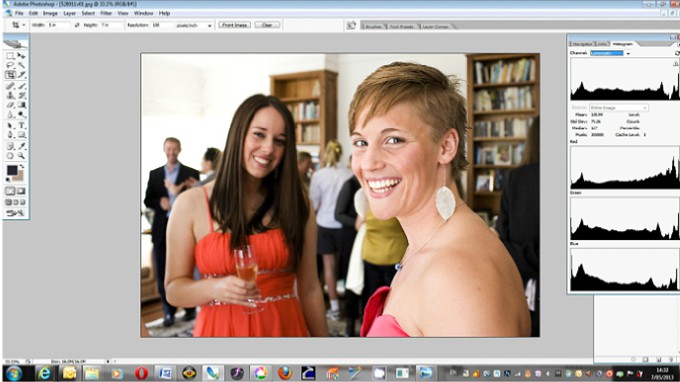
If we are using the images straight out of the camera OR we want to have detailed and minute control over the exposure for every different type of scene we Photograph AND we want to consult the Histogram for advice: then we must understand what the histogram means.
And most importantly, we must acknowledge that we do NOT always want the almost a perfect bell shaped curve . . .
The (almost) Perfect Bell Shaped Curve:

*
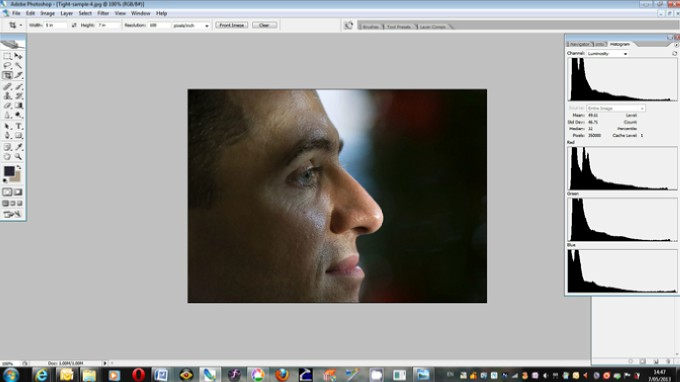
The Flat line
*
The Spiky One

*
The Little Dipper

*
The Big Dipper
***
Yes to the first bit. Originally Posted by Green Mountain Girl
But no to the second.
The idea of using the palm of my hand is because it is a known standard to me. If I had to make a photograph of a naked person who was Albino or who had Black skin my light meter would be chaotic. But as I know that if I meter my palm (in the same light as either Subject) the correct exposure for their skin also will be attained by opening up 1½ Stops from the meter reading off the palm of my hand.
***
Thanks , just wanted to know so I could use the correct terms that Nikon uses and not use Canon terminology. Originally Posted by Green Mountain Girl
WW
-
7th May 2013, 12:50 PM #29
- Join Date
- Feb 2013
- Location
- Vermont, USA, Southwestern corner
- Posts
- 105
- Real Name
- Susan
Re: Macro - How to use Focus Limiter on lens
This I will remember! Originally Posted by William W
Isn't this the same thing as bracketing? - it is great for a subject with deep shadows and bright areas. Helps to keep the details of both areas! Originally Posted by William W
I think I understand what you are getting at. It is done so that the data is IN there with all the colors and details. Then in PP you can adjust different aspects of the image to convey what you decide represents your artistic interpretation. Originally Posted by William W
I do use RAW all the time, only convert to JPEG when I want to export the photo.
Thanks for explaining what CHIMP means - have seen the term, had no idea what it referred to. And you are right, there are many who do this. It made sense to me at first, but now it makes less because what is seen in the camera review is only an indication of what will be seen in the computer. I guess it is still useful if you want to be sure you aren't blowing out too much of the image - when most of the curve is jammed up against the right side and up to the top!
I did not mean to imply that I wanted a perfect bell curve for everything, it is just that it seemed like if none of my values were riding up the left or right, then it would be OK. But I suspect that the "perfect bell curve" is a result of the "averaging" done by the metering system. As your photo examples demonstrate, the curve of each image represents what is emphasized, the use of the dynamic range, etc. If all images had the same curve, they would be less interesting! Originally Posted by William W
The "One Shot" concept is something I understand in principle. Application is another thing altogether... To be able to catch that one instant that "says it all" isn't easy, but something to keep working towards.
Agreed. Matrix has done pretty well for me so far, but you have made me aware of why it does not always work the best. And now I can make an informed decision about the metering mode to use and how to use it! Originally Posted by William W
Is there a difference between HDR and bracketing? Originally Posted by William W
Like having a gray card (+ 1 1/2) you carry around "in the palm of your hand"! Originally Posted by William W
Bill, I'm grateful for your help. Understanding metering better is adding a new dimension to my photography skills. Is there anything we haven't covered?!!!
Susan
-
7th May 2013, 03:29 PM #30
- Join Date
- Feb 2012
- Location
- Texas
- Posts
- 6,956
- Real Name
- Ted
Re: Macro - How to use Focus Limiter on lens
Agreed. William has already covered this in better detail. Originally Posted by Green Mountain Girl
Yes, I recall the cats from a previous thread, I think. The question, taken literally, opens a different can of worms (that of color rendition), perhaps not relevant to this thread.Now a question: I have two kitties who are a dark chocolate color. I have photographed them and found it difficult to get the color right. It occurred to me that part of the problem was the lighting (indoors, combination of incandescent and compact fluorescent bulbs). In PP, I managed to get rid of the blue (highlights I think) by raising temperature. So, if I had spot metered them and then the background (gold brocade fabric), and then chosen a "middle" metering, would that have eliminated some of the difficulties I experienced getting it right?
I immediately wondered about the reflectivity of cat fur. "Say whut?", you go. Well, how an object reflects light is highly relevant to a shot, especially under artificial light - with the possible exception of flash or halogen. An extreme example: if your cat is in a red light district but its fur only reflects blue - there will be no cat in your shot. If your cats fur (i.e. surface of an individual hair) is irridescent to an extent then, like oil on water, it will change color depending on the angle of lighting or your camera position.
So maybe the cats fur color can change dependent on lighting. In watch photography, especially certain kinds of dial, the angle of lighting can be important. Often, not always, diffused lighting gives a truer shot. An experiment: get a bright light but put a sheet of tracing paper between it and the cat and take the shot. Check for correct color, not focus or exposure. Or, take a cat outside, tie it to a tree stump on a part-cloudy day, and see if it's color changes as clouds pass over the sun and as you walk around the cat (ignoring its piteous cries). "Shuddup, cat, this is an experiment!" . . .
I Googled "cat fur" reflectivity -reflection which, if you do exactly as shown in bold especially the minus sign (meaning not), gives some links to good info on how fur reflects light. The following link will be of interest but only mentions cat fur vis-a-vis detail, not color:
http://www.rogerandfrances.com/subsc...0metering.html
I am not sure that exposure per se would affect the fur color although playing with white balance, or hue and saturation certainly would. Do remember though that apparent color can seem to be different depending on the image lightness which is affected by exposure but, theoretically, the color (as in hue) does not change.
buena suerte,Last edited by xpatUSA; 7th May 2013 at 04:02 PM.
-
7th May 2013, 03:46 PM #31
- Join Date
- Aug 2010
- Location
- Stockholm, Sweden (and sometimes Santiago de Cuba)
- Posts
- 1,088
- Real Name
- Urban Domeij
Re: Macro - How to use Focus Limiter on lens
Indeed it is bracketing, but HDR implies that bracketed shots are later merged with software to get tonality and detail in bright as well as dark parts of the image. To avoid a too flat, contrast-less image, the HDR is tone-mapped by flattening global contrast while maintaining local contrast. Originally Posted by Green Mountain Girl
Histograms are not easily evaluiated. The "perfect bell curve" mostly implies a rather flat and dull image, while a more contrasty has a flatter histogram, and the highest contrast images have two tops widely apart. However, the histogram is only a statistical image of which tone values are represented by pixels in the image, but it says nothing of where those pixels reside. In fact it says almost nothing about the image. The only parts of the histogram that are of any interest are the very extreme ends, particularly the one to the right. Ideally, to shoot with "exposure to the right", ETTR, the histogram should end in the bottom corner to the right and not reach any height there. But - you might accept blown highlights somewhere, and in that case, the histogram would climb the right wall somewhat. So the histogram is only an aid, and there are no imperatives. But forget the bell curve, histograms are not about bell curves. The histogram, combined with highlight blinkies is a tool, a very useful tool, but don't bother about the shape of the curve, because it says nothing about the image. Originally Posted by Green Mountain Girl
-
7th May 2013, 04:15 PM #32
- Join Date
- Jan 2009
- Location
- Sraylya
- Posts
- 4,936
- Real Name
- William (call me Bill)
Re: Macro - How to use Focus Limiter on lens
About these two aspects Bracketing and HDRI
Bracketing is the technique of taking several different images of the same scene.
In this thread, I was referring to Exposure Bracketing.
Exposure Bracketing is the techniques of making several different exposures of the same scene. Usually, an odd number: three, five or seven, etc. exposures are made, such that the brackets are plus and minus and evenly and incrementally from a central exposure.
Most (all?) modern DSLRs allow for a function Auto Exposure Bracketing
You can also make an Exposure Bracket, by manually selecting exposure for each shot. The reasons for making an exposure bracket manually might be if the bracket goes beyond the automatic capacity of the camera: for example a camera might only be capable of a bracket of three exposures and you want five; or the bracket you want might not be evenly spaced, for example you might want +1Stop and ½Stop.
In an Exposure Bracket, the central exposure is referred to as 0 (zero) and the other exposures are referred to as + (plus) or (minus) Stops from that.
The idea of an Exposure Bracket is to have a safety net, should the initial exposure be incorrect.
The usual, original reason for exposure bracketing is to use only ONE on the exposures, for the final image.
***
HDRI (High Dynamic Range Imaging)
This technique INCLUDES, initially making an Exposure Bracket of some sort, but it might be only TWO exposures.
Then the different exposures are blended in Post Production to make one final image.
HDRI, is a specific use of making an Exposure Bracket in the first place, however, some people might argue that two exposures don't make 'A Bracket', anyway.
***
Whilst I wrote that the original use of an Exposure Bracket was to use only one of the images from the bracket for the final image, there is a technique of Negative Sandwiching, where (usually two) negatives are sandwiched in the enlarger to make a print.
This technique usually involved carefully trimming the negatives with a scalpel before sandwiching. If you like this was like old school HDRI.
***
Bracketing (as a general term) might not necessarily be and we should not assume that it always is EXPOSURE Bracketing.
For example, we might shoot a scene of a running brook using Shutter Speed Bracketing. That is to say using the same exposure for each shot, but changing the shutter speed so we can later choose the image which makes the water appear the nicest to our taste.
Many DSLRs allow for White Balance Bracketing.
Focus Stacking is a type of Bracketing, also.
I suppose we could argue that shooting individual shots across a pan of a scene and then stitching them into one, is a type of Bracketing also:

WWLast edited by William W; 7th May 2013 at 09:10 PM. Reason: corrected typo
-
7th May 2013, 05:48 PM #33
- Join Date
- Feb 2013
- Location
- Vermont, USA, Southwestern corner
- Posts
- 105
- Real Name
- Susan
Re: Macro - How to use Focus Limiter on lens
Now that you mention it, I believe that cat's fur has to have its own kind of reflectivity. It is a curved surface, so the light is reflected at multiple angles. Originally Posted by xpatUSA
I prefer the diffuser method, rather than the tying to a stump method! Not only being tethered, but also falling prey to whatever parasites or critters that want to come feast on it... Poor kitty!!!
I took a picture in the woods a while back, and was surprised that the shadows on the birch trees were blue. Read somewhere that this IS the color of shadows! I still haven't figured out how to eliminate the blue entirely from that picture, but I did manage to improve it somewhat. When doing PP on the cat picture, I was able to use multiple adjustments to get rid of the blue without turning the cat orange, but the most important one was the white balance/temperature. Originally Posted by xpatUSA
Very interesting to think about all the combinations of factors that affect our photographs!
Susan
-
7th May 2013, 06:09 PM #34
- Join Date
- Feb 2013
- Location
- Vermont, USA, Southwestern corner
- Posts
- 105
- Real Name
- Susan
Re: Macro - How to use Focus Limiter on lens
It appears that there is a semantics issue here! Bracketing is a technique to get multiple shots with variation in one parameter. HDRI is one of the processes that can make use of the bracketed shots. Originally Posted by Inkanyezi
Question: What is tone mapping? I know that global contrast has to do with the overall image, but what is flattening? And how do you change the overall while maintaining something local? FYI, I use LR4, and use Scott Kelby's book on it to help. Some of the terms you use are in there, but don't seem to correlate to what you are describing. Some explanation would be appreciated.
Bill also gave a good pictorial representation of types of histogram curves in one of his posts! It is quite clear that the curve will change according to what makes up the characteristics of the image. Originally Posted by Inkanyezi
I agree - the histogram is a tool within a tool (the camera), and it is important to be conscious of what it says (or does not say) about the image. Although still learning these things, I HAVE come to recognize that the photographer has a responsibility to make use of these tools in a way that dictates how the picture will come out. Not let the tools dictate. Originally Posted by Inkanyezi
Thanks for your input. It has been helpful.
Susan
-
7th May 2013, 06:24 PM #35
- Join Date
- Feb 2013
- Location
- Vermont, USA, Southwestern corner
- Posts
- 105
- Real Name
- Susan
Re: Macro - How to use Focus Limiter on lens
Thus far, I have only bracketed using the settings in the camera, although I was aware of the option of doing it manually. However, you have described more variations than I had considered or heard of! Originally Posted by William W
These are things I have not tried yet, but I can see how they could be useful under different types of circumstances! Originally Posted by William W
Thanks for going over so much information with me. I am enjoying our "conversation" and learning a lot!
Susan
-
7th May 2013, 07:25 PM #36
- Join Date
- Aug 2010
- Location
- Stockholm, Sweden (and sometimes Santiago de Cuba)
- Posts
- 1,088
- Real Name
- Urban Domeij
Re: Macro - How to use Focus Limiter on lens
Quite correct. When bracketing exposure, and then merging various images, transposing them into a digital system with more bits, a larger dynamic range can be covered. However that image cannot be displayed, as our display media will not cover that larger dynamic range. Originally Posted by Green Mountain Girl
Maybe I shouldn't have used the term flattening, as it is one of those that software engineers also has used for something entirely different... In image processing software it means to eliminate all layers and remove transparency from an image, but my intent was another, dealing with the dynamic range of the HDR image. The HDR image has 32 bits, while our regular jpeg has 8. We can display eight bits on our screen or print it on paper. If the image is a 32 bit HDR image, only the brightest 8 bits will be displayed, the remaining 24 bits, most of the image, will be pitch black. Originally Posted by Green Mountain Girl
Globally reducing this huge dynamic range will 'flatten' contrast, producing a dull soft greyish image with very little discernable detail, because of the low contrast. The solution is tone mapping, to reduce the overall contrast, while accentuating local contrast in different parts of the image, fooling our eye to believe that the image has a huge dynamic range, although it is an LDR image, tone mapped to depict a HDR scene. There are various ways of doing this, and it was done also when we used film, although the process was different.
There are a few things in the histogram that can confirm what we already see when looking at the image. The histogram can tell us that highlights are blown, but not where. A histogram that climbs the left wall with many pixels at the far left side will tell us that there is much of the image that is dark, as we already see when we look at it. The typical bell curve will tell us that there are a lot of pixels around a certain shade, hence a low contrast image with most pixels in the middle tone area. The lowest contrast possible is one single spike. The inverted bell curve, two peaks widely apart with the inverted bell between, says that it is possible that the contrast is high, but it does in no way confirm this, as those high contrast pixels could be randomly distributed over the whole area. And a good contrast image often has a rather flat histogram, indicating distribution of different shades over the image. A histogram that comes down to baseline in both ends tells us that our sensor has enough dynamic range for the scene. If it climbs the wall at the right side, the image is over-exposed, and if it goes down to the baseline somewhere in the middle and never reaches the bottom right corner, leaving the base-line to the right empty for a long stretch, the image can be suspected to be under-exposed. Originally Posted by Green Mountain Girl
So generally, the histogram says few things, which if we can confirm them by looking at the image, could be helpful in understanding how histograms usually look. Beyond that, it's of little use. Histograms don't show anything of how the pixels are distributed in the image area, only the number of pixels of certain shades. Combined with the highlight warning, the histogram can be a help to find correct exposure for a scene. Particularly in lighting situations when it is difficult to evaluate the chimped image from the screen, those two tools, histogram and highlight warning, are useful. We can also often use the histogram in PP to set our white and black points, the endpoints of the histogram, to make sure that we use the entire range of our display.
In PP, the histogram is useful to see whether we moved our white or black point too much. When making a high key image, often we can see the histogram drop sharply before the right end, so that it still goes down to the bottom right corner, with a top, narrow bell curve, to the right, while leaving much empty to the left. On the other hand, when we make a low key image, the few small highlights might not even be noticeable in the histogram, while it climbs the wall to the left and most of the image pixels are at the far left of the histogram that seems to have nothing at all at the right side, just the baseline. If, in high key, the histogram climbs the right wall, having a spike at the very right end, we have moved the white point too far left.
The shape of the histogram curve is usually not of any importance, it just "is".
-
7th May 2013, 08:30 PM #37
- Join Date
- Feb 2013
- Location
- Vermont, USA, Southwestern corner
- Posts
- 105
- Real Name
- Susan
Re: Macro - How to use Focus Limiter on lens
Glad you weren't talking about layers - LR4 doesn't do layers, and I haven't figured out PSE 11 yet. Those bits that will be black - we don't really see them, since they are so small, do we? Originally Posted by Inkanyezi
Is reducing the dynamic range something we do, or is it something the PP software does? Originally Posted by Inkanyezi
What is tone mapping and how to do it? How do you reduce overall contrast and accentuate local contrast in different parts of the image?
Your explanation of the histogram is excellent! It does make it clearer to me. I really appreciate this.
Susan
-
7th May 2013, 09:00 PM #38
- Join Date
- Aug 2010
- Location
- Stockholm, Sweden (and sometimes Santiago de Cuba)
- Posts
- 1,088
- Real Name
- Urban Domeij
Re: Macro - How to use Focus Limiter on lens
The dynamic range is the difference in brightness between the deepest shadow and the brightest highlight in a scene. The dynamic range of our medium, the sensor in the camera, may be sufficient, but often it is smaller. I.e. if a scene has a dynamic range of 16 stops and our sensor can register a dynamic range of 12 stops, it cannot cover the entire dynamic range of the scene. Originally Posted by Green Mountain Girl
In some cases, a graduated ND filter can alleviate the problem, by decreasing the brightness of the sky and clouds, so that the entire scene dynamic range will fall within the range of the sensor. In other cases, we can apply HDRI technique, bracketing exposures, to combine images in software.
Tone mapping and how to do it is worth a whole book, so I'll only deal with it briefly. In essence, the dark parts of the image are made brighter, but the contrast within those dark parts is maintained. Inevitably, there will be areas where different tones meet in the image, and the tone mapping technique is applied to cope with those inconsistencies. borders between dark and bright areas are accentuated, while the brightness in bright parts is reduced farther away from the bordering area, and the dark area is made brighter farther away from the border to a bright area. It is a very tricky operation, and only sometimes it's done manually, using layers. Mostly special software is used, that can automate the mapping process. Originally Posted by Green Mountain Girl
But it helps to think of it as when it's done manually. Imagine you have one exposure for the shadows and one for the highlights, each one put in a separate layer. Everything in the highliight image that is dark is removed, and everything in the shadow image that is bright is deleted. The tricky part evidently is where these two meet, how to make the transition from one to the other seamless. If it is well done, you might not see the transition from one to the other, and the image, although its dynamic range is small, can depict a much larger dynamic range from the scene.
-
7th May 2013, 09:27 PM #39
- Join Date
- Jan 2009
- Location
- Sraylya
- Posts
- 4,936
- Real Name
- William (call me Bill)
Re: Macro - How to use Focus Limiter on lens
On the use of Histograms and the like:
Don’t skip over the mention of the ‘Blinkies’ - “Highlight Display”. They are a good tool also.
IMO the ‘Blinkies’ are better ‘first line confirmation tool’ than the histogram, because they give an indication of “where” in the scene.
For a D7000, I think that you’ll have to activate the Highlight Display Function for the Image Display Mode to see the highlights blink at you.
***
I am glad Urban provided more details, in reasonably non technical jargon, describing the histogram and the uses thereof: the script goes well with the illustrations.
WW
-
8th May 2013, 03:11 AM #40
- Join Date
- Jan 2009
- Location
- Sraylya
- Posts
- 4,936
- Real Name
- William (call me Bill)
Re: Macro - How to use Focus Limiter on lens
Susan - read this - what Manfred wrote in Post #5 and understand what it means when it applies to metering.
Read the whole thread . . .
WW

 Reply With Quote

