
 Helpful Posts:
 I have just finished reading the new book by Jeff Schewe "The Digital Negative" on processing raw images. A fantastic technique I learn is the 32-bit HDR image combination that produces non-HDR look. The technique makes one TIFF image with the whole dynamic range of all initial images as if it was shot with a non-existing super dynamic range camera. For example if my humble camera has a DR of 11EV and I shoot two images of 0EV compensation and +3EV compensation I get a 14EV file with noise reduction in the shadows (probably it does some averaging). I just beat you 1Dx/5DmIII owners!
The key concept is that this super image is then processed in Lightroom just like any other RAW file without any HDR look at all.
Here is how it goes:
1) You select two or three but no more raw files in Lightroom of the same scene with different exposures and select Merge to HDR Pro
2) In the Merge to HDR Pro dialog box you select Mode: 32 bit. There is only one slider there that affects the preview but not the file produced so just click OK.
3) In Photoshop save as a 32 bit (Float) TIFF file at the save menu. Keep in mind it's a large file! (it's actually a 32-bit floating point image)
4) Back in Lightroom you have to manually import the newly created file into your library.
5) Here the magic begins. At first the image looks really dark but the Exposure slider in Lightroom now allows you for a +-10EV exposure alteration instead of the standard +-5EV. Work as usual as if you had a huge-DR super camera. No nasty HDR look.
32-bit TIFFs are only supported by Lightroom 4.1 or newer (ACR 6.1 or newer).
Here are my first tests:
While the second one is nothing special (you can even see the movement of the sun), the first one has a DR of almost 15EV (!) and no noise reduction at all for demonstration.
I don't know what you think but for me it's new photographic world for HDR images.
Results 1 to 20 of 21
-
11th February 2013, 04:42 PM #1


- Join Date
- Sep 2011
- Location
- Athens, Greece
- Posts
- 719
- Real Name
- Miltos
Experimenting with 32-bit HDR - must try
Last edited by MilT0s; 11th February 2013 at 05:16 PM.
-
11th February 2013, 09:30 PM #2
- Join Date
- Dec 2012
- Location
- Honolulu, Hawaii
- Posts
- 1,651
- Real Name
- Shane
Re: Experimenting with 32-bit HDR - must try
Miltos;
I just read this book as well and it was definitely worth the investment for basic to advanced users. There is a lot of information to absorb so thanks for sharing your examples of this techinque from a real world perspective. Could you post an example of the best exposed image of each before your applied this process so we have a point of reference?
Thanks,
-
11th February 2013, 09:50 PM #3
- Join Date
- Sep 2011
- Location
- Athens, Greece
- Posts
- 719
- Real Name
- Miltos
Re: Experimenting with 32-bit HDR - must try
Hi Shane,
Unfortunately I won't be able to post the images until next weekend.
For the first image you can imagine that there was a bright sunny day outside so the exposure for the inside of the church gave a totally blown window. I used two images with 3.3 EV difference for the interior and the windows and then used the Highlights slider in Lightroom to -100 after correcting the total exposure.There are still parts of the window burned so I could have used another exposure.
I know these images are awful, they are just some proof of concept experiments.
-
11th February 2013, 09:54 PM #4
- Join Date
- Feb 2013
- Location
- Turkey
- Posts
- 27
- Real Name
- Altay
Re: Experimenting with 32-bit HDR - must try
Exactly HDR ... you're creating 32-bit HDR file with 3 exposures (this is the reason why they don't look like a HDR so much) and then using the exposure slider for global tonemapping. If you use "HDR toning" adjustment in the Photoshop, you may get the same results, even more with the gamma slider.
-
11th February 2013, 10:15 PM #5
- Join Date
- Dec 2011
- Location
- Cobourg, Ontario, Canada
- Posts
- 2,509
- Real Name
- Allan Short
Re: Experimenting with 32-bit HDR - must try
Miltos: I find for the inside of a church with windows, you will need at least 5 stops to get the difference between the glass and the walls.
Cheers:
Allan
-
11th February 2013, 10:16 PM #6

- Join Date
- Dec 2011
- Location
- New England
- Posts
- 9,210
- Real Name
- Dan
Re: Experimenting with 32-bit HDR - must try
If what you want is extended DR without the "HDR look" (which is what I usually want), why not do exposure fusion? It's simple. Lightroom Enfuse does it effortlessly: pick the images, tell LR to use enfuse, and go get a cup of coffee. The default settings work well.
I have a hunch that the technique you are describing can do much more, but for this purpose, I wonder how different it is.
-
11th February 2013, 10:41 PM #7
- Join Date
- Sep 2011
- Location
- Athens, Greece
- Posts
- 719
- Real Name
- Miltos
Re: Experimenting with 32-bit HDR - must try
Thanks for the tips.
I think the new technique is both powerful and straight-forward to use. And by saying new I mean the capability to process 32bit HDR images in LR just like every other image.
AltayHan: I often have difficulties to get the results I want with HDR toning in photoshop. I think with 32bit and LR things get easier.
Allan: thanks for the advice, now I know it I'll get better results next time. In my example the 3.3EV difference was indeed not enough.
Dan Koretz: Never heard of Enfuse before. Probably the Adobe way is more powerful and I am also curious about how different it is.
-
12th February 2013, 11:49 AM #8
- Join Date
- Feb 2013
- Location
- Turkey
- Posts
- 27
- Real Name
- Altay
Re: Experimenting with 32-bit HDR - must try
Hi Miltos,
Of course, it is a personal preference at the end ... but, you should get the same result with the same sliders in both of them.
I don't know which develop module sliders can be used for a HDR file in Lightroom. I have not used it for this purpose before. But, I think that the algorithms used in Lightroom and Photoshop are same for common controls for HDR files. For example, "exposure" adjustment can do the same job for it is devised for linear 32-bit files ... as well the 32-bit exposure view option at the bottom of the Photoshop window. If you like more control, please look at the "local adaptation" option in HDR toning adjustment.
-
12th February 2013, 07:03 PM #9Moderator

- Join Date
- Mar 2012
- Location
- Ottawa, Canada
- Posts
- 22,425
- Real Name
- Manfred Mueller
Re: Experimenting with 32-bit HDR - must try
Miltos - I did some playing around with this pseudo-HDRI technique some time ago and compared the results to just tone mapping an image, a standard HDRI. I also have the three images that I used to generate the pseudo-HDRi mage. I used RAW files in all cases and generated TIFF files from the RAW data by playing with the exposure settings in Photoshop. The images here have been converted to jpegs. All HDRI / tone mapping work was done with the Oloneo Photoengine software.
I shot these images two summers ago in the Mer Bleue area; a protected area that is listed as a wetlands of international significance under the Ramsar Convention. The name "Mer Bleue" comes from the bluish colour that is often seen there in the mornings as the mist rises from the bog. This was a good candiate for HDRI treatment because of the huge dynamic range of the scene.
Original jpeg image:

This is a tone mapping of a single image:

This is a "true" HDRI image built out of around 5 different bracketed exposures:

This is the HDRI generated from a single RAW file:

These are jpegs of the original TIFF files created from the single RAW file:
This file is where the highlight detail comes from:

This is the generate file for the mid-tone values:

And finally, this is the file generated to handle the shadow detail:

The bottom line is that it is an interesting technique, but is not necessarily capable of showing the full dynamic range of a scene.
-
7th March 2013, 01:31 AM #10

- Join Date
- Jul 2012
- Location
- NY
- Posts
- 277
- Real Name
- Orlando
Re: Experimenting with 32-bit HDR - must try
I just found out about enfuse for Lightroom. I haven't tried it yet but it's gotten good reviews. I'm curious how it would like to see how it'll show those images Manfred created. And wondering if Manfred would bite at my hint.

site is:
http://www.photographers-toolbox.com...s/lrenfuse.php
If not, np. I'll set some time to take some photo's.
-
7th March 2013, 01:09 PM #11
- Join Date
- Dec 2011
- Location
- New England
- Posts
- 9,210
- Real Name
- Dan
Re: Experimenting with 32-bit HDR - must try
Re Enfuse: I have only one A/B comparison, but with a simpler HDR technique. The first shot uses HDR Pro in CS5 to merge two different exposures. The second uses LR Enfuse. Both are at default settings. The HDR does not have the painted-on-velvet exaggeration that is very common with HDR photos, but it has bad distortions of color--e.g., the somewhat turoquise sky in the top right, the reddish rocks in the lower left, and the brownish water lilies. The colors in the Enfuse image are spot on, although I have had a few that have been a bit off. I have never turned back since I made this comparison.


-
7th March 2013, 07:24 PM #12

- Join Date
- Nov 2009
- Location
- California
- Posts
- 1,503
- Real Name
- Kathy
Re: Experimenting with 32-bit HDR - must try
Until Manfred coughs up Originally Posted by orlcam88


50D. EF-S 18-55 f/3.5-5.6 II (non-IS kit lens), three handheld shots bracketed at +/-2EV intervals.
Combined in LR with LR/enfuse (which uses enfuse and align_image_stack). +a slight s-curve adjustment. Default settings for enfuse used.
The main confusion with using enfuse is that folks assume that the contrast, saturation, and exposure settings are like tonemapping controls to boost the contrast, saturation, and exposure of the final image. They're not.
The way that exposure fusing works is that individual pixels are selected from the member images, based on those three selection criteria, and the numbers you put in weight how heavily that specific factor plays in the final decision. All numbers are relative. So setting 0 0 0 is the same as setting 0.5 0.5 0.5 or 1 1 1.
Generally, for exposure fusing, you put exposure high, and maybe tweak the saturation or contrast numbers a little.
For focus stacking, you'd put contrast high (i.e., what's sharpest in focus has the most contrast) and lower the other two numbers.
Think of it like using masks and layers, but on a per-pixel basis. This is why you're very unlikely to get the super-saturated/haloed HDRlol look The only color values you're going to get in the final image are only ones that were captured in-camera.
If you use enfuse (which is an open source command line utility) from a GUI other than the LR/enfuse plugin (E.g., Hugin, or EnfuseGui), be aware that enfuse only does the fusing. It does not align the images. Hugin and the LR/Enfuse plugin rely on align_image_stack to do the aligning. This is also why LR/Enfuse requires you to download and install enfuse and align_image_stack separately, or to define where you have them installed on your box if you don't want to use the versions the developer's linked to (e.g., you're a Hugin fiend who likes to play with bleeding-edge RC builds, and you get them directly from sourceforge yourself, or you already have Hugin installed and see no need for a second set of these tools).Last edited by inkista; 11th March 2013 at 06:44 PM. Reason: typo.
-
8th March 2013, 12:26 AM #13
- Join Date
- Jul 2012
- Location
- NY
- Posts
- 277
- Real Name
- Orlando
Re: Experimenting with 32-bit HDR - must try
Thanks Dan & Kathy! I was at work all day remembering my first HDR photo and couldn't wait to try out enfuse to compare. Unfortunately I deleted the 2 over/under exposed photos so I couldn't try it. Thanks for showing me the examples! I do like the enfuse version better. The latest version for LR has a button to download the additional software so it makes that piece easier.
I have PS5 also, so I can always switch to that when I want that "exaggeration" Look! There's a place for both types.
-
8th March 2013, 12:43 AM #14
- Join Date
- Nov 2009
- Location
- California
- Posts
- 1,503
- Real Name
- Kathy
Re: Experimenting with 32-bit HDR - must try
Yup. That's why Photomatix can do both HDR and exposure fusing.
-
8th March 2013, 01:50 AM #15Moderator
- Join Date
- Mar 2012
- Location
- Ottawa, Canada
- Posts
- 22,425
- Real Name
- Manfred Mueller
Re: Experimenting with 32-bit HDR - must try
Orlando, you'll likely be waiting for a long time. While I do have Lightroom, I very rarely use it. I tend to use a combination of Bridge and Photoshop CS6 for all my edits.
-
8th March 2013, 03:41 PM #16
- Join Date
- Jul 2012
- Location
- NY
- Posts
- 277
- Real Name
- Orlando
Re: Experimenting with 32-bit HDR - must try
No problem. I got enough info to use enfuse. Thanks. Originally Posted by GrumpyDiver
-
11th March 2013, 01:00 AM #17

- Join Date
- Sep 2010
- Location
- New York
- Posts
- 205
- Real Name
- Pierre
Re: Experimenting with 32-bit HDR - must try
Very interesting thread - well done folks - now all I have to do is digest all of this info.
-
2nd December 2013, 06:39 AM #18New Member
- Join Date
- Nov 2010
- Location
- Melbourne
- Posts
- 4
- Real Name
- Sue Block
Re: Experimenting with 32-bit HDR - must try
I have a Mac and LR/Enfuse/ Lightroom 5
have a Mac and Lightroom 5
I have had LR/ Enfuse for some time now.
The few times I have used it I found that LR/Enfuse is very temperamental . That is some times it re-imports the enfuse photo and sometimes it does not.
Is there a reason for this ? The box is always checked to re-import..
Please advise what can be done about this and if does not re-import ways around this to get the enfused photo back into Lightroom?
Thank you.
sue
-
2nd December 2013, 08:54 AM #19
- Join Date
- Dec 2008
- Location
- New Zealand
- Posts
- 17,660
- Real Name
- Have a guess :)
Re: Experimenting with 32-bit HDR - must try
Originally Posted by MilT0s
You guys are probably going to think I'm nit picking, but I think this is important; HDR isn't any kind of "look" - it's a technique (or set of techniques) to capture an image that can't be captured in a normal single exposure. That's it. Originally Posted by AltayHan
Unfortunately, many people have come to mistakenly associate that over-processed / over-saturated / surreal look with HDR, but the two aren't particularly related:
You can get "that look" from a normal single exposure, eg:

and you can get HDR composites that look like any other image, eg:

Usually the biggest challenge isn't so much in the capture of the scene -- it's in the compression of the dynamic range into something our monitors can display (around 6 stops) or we can print (around 4 stops) IN A WAY THAT STILL LOOKS BELIEVEABLE. It's that last bit that's hard.
In many of the examples above - to my eye - the images either look somewhat washed out (just remember after you've created the HDR composite you still need to follow conventional rules about the setting of black and white points), or they just lack credibility (like when I see foreground tones at the same level as sky tones, and my brain is telling me "this doesn't look right -- the sky tones should be MUCH brighter".
Often one of the best finishing touches to HDR composites is to run a final gradient levels adjustment from top to bottom (so the bottom is darker). It doesn't have to be much (often just a stop) -- just enough to subconsciously tell the brain that "this is OK because the sky is brighter, as it is in real life".
Hope this helps.
-
2nd December 2013, 10:19 AM #20

- Join Date
- Aug 2012
- Location
- S, B'ham UK
- Posts
- 3,337
- Real Name
- John
Re: Experimenting with 32-bit HDR - must try
The enfuse manual on this page may be of use to people - for guidance on exposures. and technique.
http://enblend.sourceforge.net/
This is a simple example of a back lit duck that illustrates why the output has to be visualised.
Camera JPG
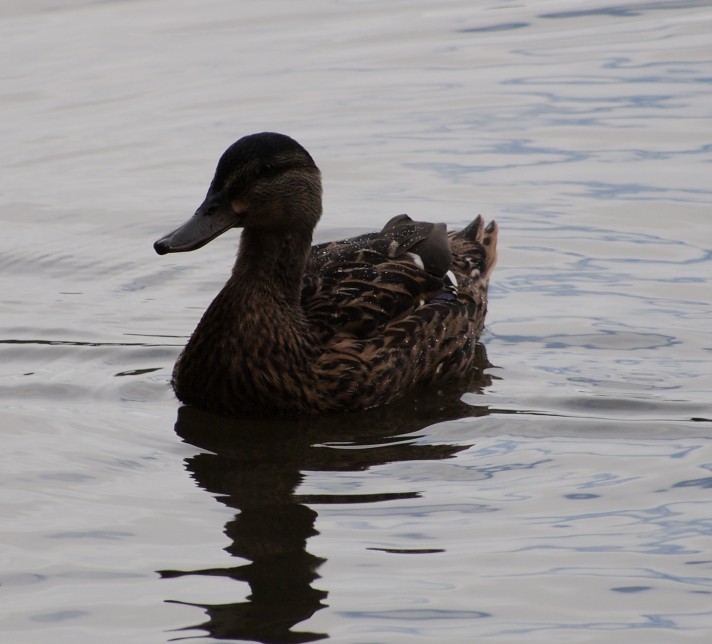
Exposure from the raw for the water

And this one from raw for the duck itself, about 3 stops difference from the same raw file
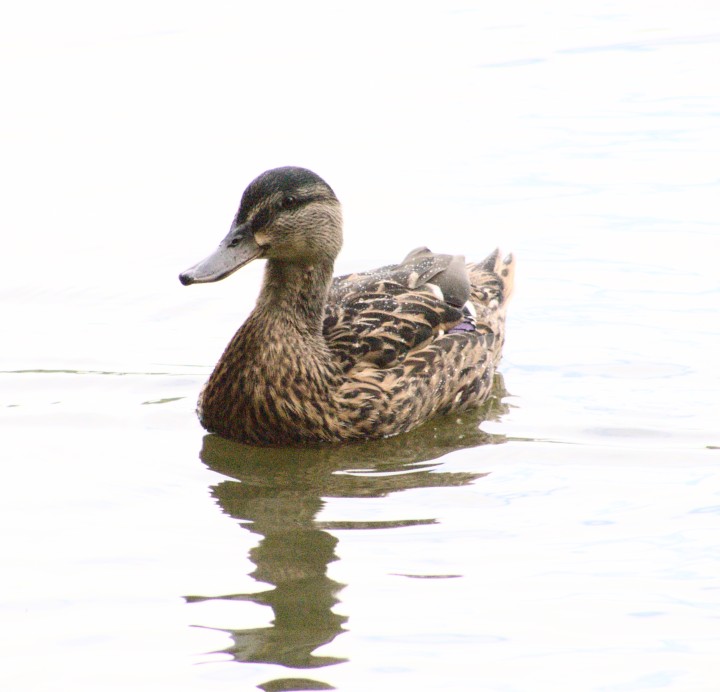
And finally the merged file

Still a back lit duck because each of the 2 images have had an effect on the other. The water exposure would have to be darker to change that aspect but this would also make the duck in it darker which in turn would make the duck in the final image darker.
I'm not sure how enfuse is presented in LR. If I use it then it looks like this which also has some screen shots of the exposures people have used.
https://sourceforge.net/projects/macrofusion/
The package I used for the above has a curve adjustment to set the contribution of each image to the final image at any tone level. The person who wrote it's comment on that is ok I have done it but in many ways it's easier to adjust the final image. Using that facility I could make the water match the water shot without changing the duck at all or made the duck darker or brighter by adjusting the contribution from each image at those tone levels.
The main point really is that as in this case it's often possible to get 3 stops extra tonal range from the same raw file so depending on the package people might find bracketing +/- 2stops only really yields one shot worth working on or maybe 2 and the 3rd is a waste of time.
John
-


 Reply With Quote