
 Helpful Posts:
 ok, if you've read my post in the People and Pets forum "My Second Picture Post (Model Shoot)" that is what brought you here, if not... well here's a brief run down, was invited to participate in a model shoot by my buddies... everything that could go wrong did, and just when I thought I had learned what I can from that experience I was thrown this particular loop.
the agreement was it seems that the people who participated would provide copies of their shots to the models that were there during the shoot and there would be no exceptions. so having no experience what so ever in post processing and having reviewed the pictures I took... well you can imagine my state of panic
I have used Photoshop before, but that was years ago when I met the beast back at university, and I barely passed that subject. so being told that I had to submit four shots for each model (there were three) threw me into a loop, I reviewed the shots I took couldn't find two let alone four good ones that I could give to the models, first time in my life that I felt I was truly letting someone down due to my lack of skill.
so I went to my buds to try and convince them that giving them copies of my shots would be bad, you know, because like they said during the shoot, I was working with a different camera my Canon 60D (they were all using Nikons) the color and texture would be so different that it would be noticeable, I had seen the shots they took and for the most part, the colors were uniform and adding those that I took would throw off that uniformity.
but they insisted that there was no exceptions as I was accounted for during that shoot, so I asked if I can just give them what I thot were ok shots and they could just post process it so it would look the same with the ones they took. they said I should at least try to post process my pics first and see where it goes.
so, went back and chose the four pics for each model that I liked or at least I could work on, and this is what I chose...
for model one:
http://flickr.com/gp/92540488@N02/sV97Yr ; http://flickr.com/gp/92540488@N02/7WMYPw ; http://flickr.com/gp/92540488@N02/17VT21 ; http://flickr.com/gp/92540488@N02/18A88D ;
for model two:
http://flickr.com/gp/92540488@N02/vCG1v7 ; http://flickr.com/gp/92540488@N02/yx0Xom ; http://flickr.com/gp/92540488@N02/4tJi1E ; http://flickr.com/gp/92540488@N02/w39635
and for model three:
http://flickr.com/gp/92540488@N02/12w6Wg ; http://flickr.com/gp/92540488@N02/4vTcQ3 ; http://flickr.com/gp/92540488@N02/s5AFYJ ; http://flickr.com/gp/92540488@N02/Ycp3X0
i know what I've chosen requires a lot of work in post processing, skin tones were off, colors are not as vibrant (green not being green enough) purpose of the shoot was to highlight the make up used by the models, but I just couldn't find a way to do it right in photoshop, and when I was shown the pics done by my buds, well I just wanted to give them my pictures and walk away, because I know I wont be able to replicate what they did with the ones I took. I mean, it was like looking at magazine pictures, no eyebags, no dark lines around the eyes, smooth skin like silk, vibrant colors... I knew I was waaaay out of my league.....until someone made the comment that if I didnt like Photoshop maybe I could use lightroom instead, I've read enuf threads in the forums to know that word so I decided to give it a try. borrowed a computer and tried to improve on the shots I took. I will post the results of my work on the "People and Pets" Forum for C&C...
BTW C&C on the shots I posted here are more than welcome, framing, what I could do to make the images better, using lightroom or PS (if I must - and I know, I probably will need to re-acquaint myself with the beast again) and how it can be done using either software, I have access to both so comments on how to get it done on either software is more than welcome.
to see the results of my bumbling around in lightroom, see "My Model Shoot - Aftermath"
Results 1 to 11 of 11
-
26th January 2013, 03:28 AM #1


- Join Date
- Mar 2011
- Location
- Somewhere in South East Asia
- Posts
- 41
- Real Name
- Reginald
Novice's Post Processing Nightmare (Model Shoot)
Last edited by Deucalion; 26th January 2013 at 03:35 AM.
-
26th January 2013, 05:53 AM #2Moderator

- Join Date
- Mar 2012
- Location
- Ottawa, Canada
- Posts
- 22,451
- Real Name
- Manfred Mueller
Re: Novice's Post Processing Nightmare (Model Shoot)
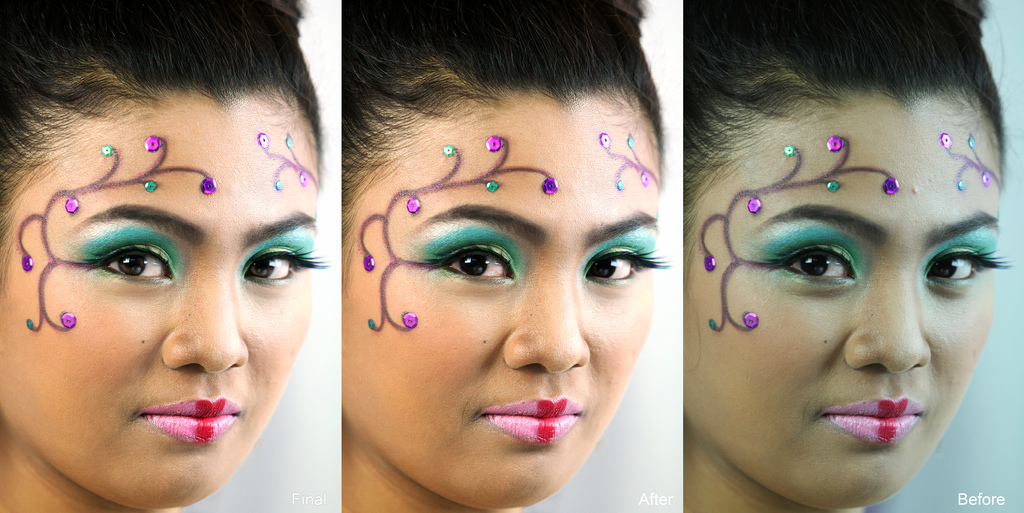
Reginald - this is a common misunderstanding that all of the work is done in PP to get a picture looking great. If you photograph well, you should be doing very minimal PP work.
The biggest issues I see with these images is that the lighting is extremely flat, no interesting shadows that make the faces stand out and look interesting or the hair sparkle. I see you were using at least a couple of lights, so you had enough equipment to do at least a key light and a fill light. I suggest you have a look at some material on studio lighting and understand the basics like broad light and short light, lighting ratios, etc.
Shooting Nikon versus shooting Canon is not going to make any difference; it's not the camera, it's the photographer. Using Photoshop versus Lightroom; same thing; these are tools and you have to know how to use them.
I grabbed one of the images and played around with it for around 10 minutes or so; I should have cleaned up the redness of her eyes, but did not. Minor sharpening, colour cast correction, increased contrast and vibrance and minor cleanup of hair and shadows under her eyes.

Last edited by Manfred M; 26th January 2013 at 06:06 AM. Reason: Added before & after images
-
26th January 2013, 07:03 AM #3
- Join Date
- Nov 2009
- Location
- Provence, France
- Posts
- 993
- Real Name
- Remco
Re: Novice's Post Processing Nightmare (Model Shoot)
Hmm, Flickr now wants me to sign in/up with Yahoo??
-
26th January 2013, 12:47 PM #4
- Join Date
- Mar 2011
- Location
- Somewhere in South East Asia
- Posts
- 41
- Real Name
- Reginald
Re: Novice's Post Processing Nightmare (Model Shoot)
on second thought perhaps I'll continue with my post here, thanks for your input Manfred, I kind of feel sad as I read your sig below ur post, I haven't reached 10,000 photos yet... which means everything that I put out will be terrible... not a very happy thought... and I'm being asked to join another model shoot next week... maybe I should give that one a pass too

at any rate, I think I managed to convince the fellows to give me a pass on this one (I hope)... no longer have to submit any of my shots, which is frankly a relief. as all of them fall under the "before" category that u used as an example Manfred. what I want to know is how u did that clean up of her eyes... I've always had trouble with that, I always use the clone tool and it never comes out right no matter how many times I do it, case in point, I like this particular shot (below) how do I clean up her eyes? and everything else that's wrong with this picture and for the pictures below it for that matter.
btw the following pics were the ones I was going to give my buddies if they still needed me to give them copies of my shots... so any help to really clean them up will be appreciated, just in case they change their minds on giving me a pass..

Sheryl_3 by ElectroSpud, on Flickr
or how about this one...

Kei_13.1 by ElectroSpud, on Flickr
how do I get that clean smooth skin effect for this one?

Kei_12.1 by ElectroSpud, on Flickr
took this shot and it was very dark because she was standing away from the lights, how do I clean it up?

Kei_5.1 by ElectroSpud, on Flickr
how about this one too.. this is probably my favorite, because I dont see anything wrong with it, except for the colors and her skin tone, how do I achieve that magazine like look for her skin?

Kei_1 by ElectroSpud, on Flickr
how about this one too...

Zan_4 by ElectroSpud, on Flickr

Zan_2 by ElectroSpud, on Flickr
this one need sharpening I think...

Sheryl_1 by ElectroSpud, on Flickr
here's another one....

Sheryl_2 by ElectroSpud, on Flickr
soliciting comments, how it can be improved upon, whether in lightroom or in photoshop, like I said, complete novice here when it comes to post processing. help will be greatly appreciated.Last edited by Deucalion; 26th January 2013 at 01:13 PM.
-
26th January 2013, 06:30 PM #5Moderator
- Join Date
- Mar 2012
- Location
- Ottawa, Canada
- Posts
- 22,451
- Real Name
- Manfred Mueller
Re: Novice's Post Processing Nightmare (Model Shoot)
Reginald - I'm not quite sure how you are going to get better if other people do the PP work for you. You have to figure out what needs fixing and then know how to execute that fix.
I suggest you get out there and practice your technical skills (things like lighting, focal length (I personally find that the f/2.8 70-200mm lens you are using is a bit long for studio shots on a crop frame sensor), white balance, exposure, depth of field, etc), your compositional elements (you've obviously cropped the images that you've posted; try to get it right in the camera (yes, you can still crop in PP), look, format (landscape versus portrait), use of negative space, rule of thirds, posing, etc.) and your PP skills (for those little things that you can't do in camera). I did all of the work in PS CS6; using layers and layer masks; I don't know Lightroom well enough to say that it can't be done with it, but I suspect that to be the case.
So analyze your work, clean it up the best you can and get out there and shoot again; it's the only way your work will improve.
I did a tiny bit more work on her eyes this morning to get reduce the red and yellow without making things look over-retouched and did a tiny bit more dodging, cloning and healing.
You should also remember Cartier-Bresson's statement was made in the days of film; I've heard his quote updated in the digital age to be "Your first 100,000 photographs are your worst."Last edited by Manfred M; 26th January 2013 at 06:44 PM.
-
28th January 2013, 07:52 AM #6

- Join Date
- Jun 2010
- Location
- Missouri, USA
- Posts
- 2,454
- Real Name
- Terry
Re: Novice's Post Processing Nightmare (Model Shoot)
Hi Reginald!
I popped over to your other thread to see how your shoot went!
Sounds like a successful shoot to me and great narrative! Good lessons in the School of Reality (aka: Hard Knocks and I am a Permanent Student!) and hey? You waltzed out of that studio with some pretty good stuff to work with!
Manfred had some great advice and we will all do well to heed it. If I may further suggest? Going forward, if you do these shoots and the deal is that you provide photos for the models/MUA, then honor the arrangement. Don’t pass on the next shoot. Do it, have fun, learn as much as you can each time. Put yourself under the gun and bring it home Reginald! Now you know way more than you did. You will know more than that every time. Charge those batteries, bring extras, get there early and shoot a proper gray card for white balance reference. Don’t worry about what your Buds are doing and what their jpeg LCD’s are showing on the backs of those Nikons. Your gear is every bit as capable so don’t let them jack with you and smack talk you in the studio when you are already a tad nervous! Do it and happily offer your results whatever they may be. And above all hold your head up high when you submit your photos! Jump right into the Big Middle of it and do it any chance you get!
Don’t let anyone tell you that no one uses a gray card anymore and I’d change my place of doing business if the sales rep didn’t even know what one was. You may not always need or want to shoot a Gray but it is important to understand how this works in order to do without it. It really makes life in the editing bay much easier!
If you are going to get into studio portraits, I would suggest you acquire something like “Professional Portrait Retouching Techniques for Photographers Using Photoshop”. Written by Scott Kelby. Sit down with it and go to work!
So I’d like to suggest a technique I use for clearing the whites of the eyes in Photoshop CSx to get you started. It’s not the only way to do it but it’s a pretty good one. I don’t know anything about Lightroom so I’m of no use there.
Add a Hue/Saturation adjustment layer. Choose the Reds and move the Saturation slider to the left (desaturate) almost all the way. Of course this will affect the entire image so just look at the effect it is having on the whites of the eyes. Then this is where you have to mask it to just get the eye whites happening.
Add a black mask to this adjustment layer to conceal the entire adjustment, choose a small, soft, brush tool, make sure your foreground color is white to reveal the adjustment you are going to paint in over the black mask, and then brush in the whites of the eyes. You’ll see it happening as you brush it in. You can then use the lightness slider to lighten them, but don’t get carried away with it! And you can always come back and readjust this layer depending on what layers you add on top of it. You can also use a “Levels” adjustment layer to do this. If you use this option you can also sometimes brush in any dark circles or the eye sockets at the same time. Adjust opacity to suit.
For veins in the eyes, and I like to do this after I have brightened and/or alleiviated the redness in the eye whites, try using a brush tool. Get your eyedropper and sample in a clean spot in the whites. Set your brush to around 20% or so and gradually paint away the veins. Go to “Filter” and add around 1% noise to this layer making sure under the “Distribution” panel you have “Uniform” ticked. This helps to mitigate any pastiness the edit may have caused.
In this case Reginald, if it were me, I would pay special attention to the makeup on the models since that is what you said was the objective of this shoot. So I would do my best to make it shine. I would push the saturation of the makeup, and make sure everything was straight and looking as good as I could.
Reginald, I took a liberty with one of the shots that I thought was pretty cool. I am just a hack, but I have incorporated a few of the thoughts (along with some other theories) I have mentioned with this. If I hacked it too much just say and I’ll trash it!
I would absolutely die to have an opportunity like you have had. And if you “pass” on the next shoot like this you get to go for because your dang batteries died or you missed a a little white balance, then I am going lose all hope and sell all of my gear and take up needlepoint! It is "Improvise, Adapt, And Overcome Brother!

Last edited by Loose Canon; 28th January 2013 at 08:14 AM.
-
28th January 2013, 02:50 PM #7

- Join Date
- Jun 2012
- Location
- Detroit, Michigan
- Posts
- 1,009
- Real Name
- Lex
Re: Novice's Post Processing Nightmare (Model Shoot)
Quoted for truth. If you're drowning, it's a great time to learn how to swim. Originally Posted by Loose Cannon
When I started doing derby photography, I was quite literally just a dude who showed up with a DSLR (original Canon Rebel) and a kit lens (18-55mm EF-S), and said yes when they asked if I was a photographer. I sucked when I started. You only get good by working through being pretty crap, which is where Manfred's quote comes in. There is no substitute for experience (10^4 or 10^5 photos is certainly a good start). I'm at about 24,000, and will still be learning when I'm at 2,400,000.
Originally Posted by Loose Cannon
When I started doing derby photography, I was quite literally just a dude who showed up with a DSLR (original Canon Rebel) and a kit lens (18-55mm EF-S), and said yes when they asked if I was a photographer. I sucked when I started. You only get good by working through being pretty crap, which is where Manfred's quote comes in. There is no substitute for experience (10^4 or 10^5 photos is certainly a good start). I'm at about 24,000, and will still be learning when I'm at 2,400,000.
Returning to your shots, I'd say there is very little wrong with them. The gents have covered some excellent PP techniques, but I'd be careful about shooting for that full-on magazine look. It is my opinion that a photographer has a certain obligation to reality, and the average Cosmo cover defies that. My own PP on models stops at modifying permanent features. I'll remove evidence of a hangover, injury, or bad hair day, but any magazine-style heavy skin smoothing or adjusting someone's shape (neither of which has been suggested here, but which the other photogs may be doing) is going too far.
Depending on the colors you want to punch up (cool or warm), you can try the following steps.
-Increase saturation significantly (I use 3-12 points with portraits). This will make the model's skin look unrealistically colored, but step 2 addresses that.
-Change the white balance (you may need to use both the yellow/blue and pink/green sliders) to bring the model's skin back to a realistic shade. I believe Canon used a version of this technique.
It's worth mentioning that both these gents are well ahead of me in PP techniques. Their suggestions are more advanced, but also more targeted. For what it's worth, I think Canon's edit is excellent.
-
29th January 2013, 04:33 PM #8


- Join Date
- Dec 2011
- Location
- New England
- Posts
- 9,247
- Real Name
- Dan
Re: Novice's Post Processing Nightmare (Model Shoot)
Manfred's comments are spot on. All I would add is that you will save yourself a lot of stress if you practice all of the things Manfred mentioned with images that no one else particularly cares about. Until you know how to control the camera and lighting and how to get what you need from PP, it is going to be really hard to practice if you are worried about what someone is expecting.
-
1st February 2013, 04:28 PM #9
- Join Date
- Jan 2012
- Location
- Rotherham
- Posts
- 247
- Real Name
- Keith
Re: Novice's Post Processing Nightmare (Model Shoot)
Model #2 is a very striking young lady. As another novice at PP I took the liberty of having a go Reginald. Using CS2 and Scot Kelby's excellent book I messed about with the colour balance to get rid of the green cast then using a curves layer I was able to white her eyes. The Spot Healing tool took care of the spots and blemishes and the close tool sorted out some others and the patch tool helped with the wrinkles and the dark circles under her eye. A little more Spot Healing dealt with the spots on her upper lip. She really is rather good looking.
This is what I was left with:-

Then I decide to 'Do a Donald' and see what she looks like in B&W

Isn't she lovely.
Thanks for the opportunity. If you don't like what I have done then I will take them down.
- Keith
-
2nd February 2013, 02:04 PM #10
- Join Date
- Mar 2011
- Location
- Somewhere in South East Asia
- Posts
- 41
- Real Name
- Reginald
Re: Novice's Post Processing Nightmare (Model Shoot)
thank you for your comments Terry, Lex, much appreciated, I find that I agree with Manfred on his comments and assessment, that's why I asked my buds if I could pass on next week shoot until I am able to really know my equipment. Truth of the matter, I was just taking pictures and didn't actively control some of the lighting being used, which I could have done, but did not, I guess I let my buds do what they wanted and took whatever pics I could get with what they set up. (hence, the disorganized running around you picked up Terry when you read my other post
)
I'm also looking at other photography stores and looking to find a proper grey card I could bring along which will aid my meager post processing skills. I'm trying to get reacquainted again with Photoshop but at the same time, I'm also looking into Lightroom and Elements.
and I did what you said Terry, I did give the ladies a couple of my shots, although its miles leagues even away from what by buddies gave them, I am happy to note that at least a few were liked and were appreciated. (it was a nice feeling to get, even if I believed I could have done and given better shots to let them know I appreciated their work - I KNOW I CAN do better.)
also, I asked my brother if I could borrow his camera (Nikon D7000) when next I have the opportunity to do another photoshoot with the gang, at least I could properly check and compare my results with my buds as we will be all using the same brand of camera, unfortunately its going to be a new experience for me as my bro's camera is only equipped with a 35mm lens, quite a step down from my long 70-200 or my shorter 17-55 on my Canon camera.
btw, thank you for your examples on post processing Manfred, Terry... its exactly what I wanted to know, the step by step process that you use when you process an image, I know I could read about it in a book but I find that what works for people who actually "do" it is a more interesting way to help me practice my own post processing skills... I get to replicate what you've done and then get to add my own flow should I ever want to do it differently. (but I should really get that book by Scott Kelby that was mentioned... will be trolling around the bookstores tomorrow to see if I can get a copy of it)
and to Keith, bud if you consider yourself a novice in post processing, after seeing what you did with my photo.... (I couldn't even get her skin tone right) I believe that I don't even have the right to call myself a novice, probably something much lower than that.
here's a few images I played around with using lightroom, elements and CS.. comments and suggestions are more than welcome
Kay8 EleCS by ElectroSpud, on Flickr

Kay2 EleCS by ElectroSpud, on Flickr

Kay EleCS by ElectroSpud, on Flickr
-----------------------------------------------------
The first 100,000 photographs will be your worst - Cartier-Bresson : what a horrifying thought! I haven't even reached a thousand yet! - Reginald
-
4th February 2013, 02:02 PM #11Moderator
- Join Date
- Mar 2012
- Location
- Ottawa, Canada
- Posts
- 22,451
- Real Name
- Manfred Mueller
Re: Novice's Post Processing Nightmare (Model Shoot)
A few thoughts for you:
First of all, you might want to consider seeing if you can sit in during the sessions with your friends, without having a camera along to understand how they are shooting the scenes. Offering to help set up the lights is going to give you a lot of valuable experience, even if you haven’t picked up a camera.
While a grey card (or even better a colour target like one of the x-rite Munsell Color Checker targets) would work, you don’t necessarily need one. When I did the colour adjustments in the sample of your shot, I did a read of the neutral background and white balanced to that. Any neutral color; white, grey or black in the image will work. Neutral greys are easiest to work with because you know that none of the colour channels have been blown out.
I think going over to a Nikon when you are used to shooting a Canon is actually going to make life more difficult for you as you are going to have to learn a whole new camera. Stick to the gear you know. The 70-200mm lens is probably the most common portrait lens used by pros, although that is generally on a full-frame body. Depending on where you are shooting, you might find it a bit long.
Finally, for both shooting and PP work, nothing works better than a lot of hard work. Reading books and watching training videos will get you started, but doing things and making your own mistakes is the only way that really works in improving your skills.Last edited by Manfred M; 4th February 2013 at 06:31 PM.

 Reply With Quote