
 Helpful Posts:
 I've been playing with some focus stacking this evening. I realize this photo has no real artistic value, but it was the only subject I could find on short notice that had enough texture to make the project worthwhile.
I have tried stacking in the past, and it's something that I really enjoy shooting. This one in particular took more shots than anything I've tried in the past - so it was especially fun ()!!
I've learned quite a bit from tutorials, and reading books, as well as from some members here, but I'm wondering if anyone can offer some advice that may be 'out of the ordinary', tips of the trade, something that took you 20 years to learn, that you'd like to share with me in just one post!
Also, any C & C is always welcome please! Thanks in advance!
Results 1 to 20 of 45
Thread: Stacked!
-
18th November 2012, 03:31 AM #1


- Join Date
- Jul 2011
- Location
- Ontario, Canada
- Posts
- 1,300
- Real Name
- Andrew
Stacked!
-
18th November 2012, 03:40 AM #2

- Join Date
- May 2011
- Location
- Fort Mill, South Carolina, USA
- Posts
- 6,294
- Real Name
- Frank Miller
Re: Stacked!
Hi Andrew, it looks like you have learned very well! Everything is sharp and clear, as it should be so I'm not seeing anything that needs changing. Did you use any focus stacking software or did you merge the images manually (very time consuming!)?
In any case, well done!
-
18th November 2012, 04:56 AM #3
- Join Date
- Jul 2011
- Location
- Ontario, Canada
- Posts
- 1,300
- Real Name
- Andrew
Re: Stacked!
Thanks Frank, I appreciate the feedback! I do not stack my photos manually, I use Photoshop. Although I would like to give it a try someday, I have a feeling that I'm not missing too much fun!
-
18th November 2012, 05:31 AM #4

- Join Date
- Jun 2012
- Location
- Suva, Fiji
- Posts
- 7,076
- Real Name
- Grahame
Re: Stacked!
Hi Andrew, to help offer any advice (out of the ordinary) it would be useful to know your process for taking the stack and if you came across any specific 'difficult' areas in the process.
How many shots, size of subject (length in focus), aperture used, did you use a focus rail or manually rotate lens focus ?
-
18th November 2012, 10:38 AM #5

- Join Date
- Aug 2012
- Location
- S, B'ham UK
- Posts
- 3,337
- Real Name
- John
Re: Stacked!
There are several applications about that are for stacking to increase depth of field and nothing else. This forum specialises in macrophotography even using microscope objectives that have F numbers that photographers can only dream of so stacking is often essential.
http://www.photomacrography.net/
A lot of the people on there and others use this one http://zerenesystems.com/cms/stacker There are tutorials on the site. It is very reasonably priced for private use and is generally reckoned to be the best of the lot.. I gather that one of the most important aspects of using these sorts of packages is to help the software do it's job by choosing the focal points with some care. On the other hand I have seen shots taken via 200 plus stacks of items only a couple of micron deep at the most and find that a little hard to believe.
This is an excellent example of what can be achieved with bellows and a 50mm lens. Charles's photo's appear all over the place so am sure he wont mind.

-Last edited by ajohnw; 18th November 2012 at 10:59 AM.
-
18th November 2012, 01:13 PM #6
- Join Date
- Jul 2011
- Location
- Ontario, Canada
- Posts
- 1,300
- Real Name
- Andrew
Re: Stacked!
Grahame, thanks for the input. This particular pinecone is 13 cm long, I set it on a white back drop, a positioned my camera accordingly - about 30 cm away. Using a 100 mm macro lens, I took 7 shots manually focused. I used 2 580EXIIs positioned opposing the subject at 10 and 4 o'clock, which allowed me to shoot at f32. I used the live view screen to help. I aligned them automatically in Photoshop, then stacked them.
I guess I didn't really encounter any major problems, aside from not knowing if I had covered enough DOF with the images I had taken. Is this always just an educated guess? I tried about 4 times previously with the same subject,and the final product revealed missing focus. But those were only with 3-5 shots.
A rail would be nice, but I'm not sure if I'm up for the investment just yet!
Thanks for your help!
-
18th November 2012, 01:15 PM #7
- Join Date
- Jul 2011
- Location
- Ontario, Canada
- Posts
- 1,300
- Real Name
- Andrew
Re: Stacked!
Hey John, thank you for the helpful links! I'm going to read up today!
-
18th November 2012, 02:15 PM #8
- Join Date
- May 2011
- Location
- Fort Mill, South Carolina, USA
- Posts
- 6,294
- Real Name
- Frank Miller
Re: Stacked!
Hi Andrew, I have the Velbon Super Mag Slider rail and it works very well. It was about $120US. I find that is most useful on smaller objects in the close-up to macro range. For something like your pine cone you might not have enough slide rail movement to leave the focus set at one spot and move the rail so changing the focus point is sometimes the only way to get the complete set of images. Originally Posted by Andrew76

If you are shooting with a Nikon you might want to check out Control My Nikon for using a PC to control the stacked image capture.
-
18th November 2012, 02:32 PM #9

- Join Date
- Dec 2011
- Location
- New England
- Posts
- 9,314
- Real Name
- Dan
Re: Stacked!
Hi Andrew,
I using stacking on easily a third of my images. Like many others, I use Zerene. I like it for several reasons. First, it has two different stacking algorithms that behave quite differently and can produce quite different images. (For shots like yours, and for flowers, I generally find that the DMap process is better, in that it does a better job of preserving color saturation and texture.) Second, it has excellent retouching capabilities. Stacking often produces halos. This happens most often when two surfaces that are adjacent in the plane parallel to the sensor are quite far apart in the perpendicular distance. With Zerene, you go through the stack to find the image that is in focus at that point and simply paint from there to the stacked image. There are some images for which this does not work, but usually, it works very well. It is also faster than PS.
In my experience, you don't need a rail unless you are doing very high levels of magnification. I don't even own one. Instead, I just focus on the closest point to start, and then move the focus back slightly from one image to the next. Works fine with my images, which are usually in the range of 2:1 to 1:2. If you have live view, that makes it easier to focus clearly on the nearest spot. I generally try to shoot somewhere in the range of f/8-f/11, which leaves a little wiggle room for error.
What I do find extremely helpful is a geared tripod head, which allows you to make very fine adjustments in any direction. I use the Manfrotto 410, which is expensive and heavy, but it works well. Adding an adapter for my standard Arca Swiss plate was nice but not essential.
If you look at the "flowers" and "wilted flowers" galleries on my site, http://dkoretz.smugmug.com/, you'll see lots that I did this way. Most but not all are stacked. (Usually, if they are stacked, much of the exif information will be missing, which helps see which are stacked.) I'll post one example here.
Dan

-
18th November 2012, 06:20 PM #10

- Join Date
- Dec 2010
- Location
- Southland - New Zealand
- Posts
- 473
- Real Name
- Robin
Re: Stacked!
WOW, this stacking creates some amazing images that really to 'POP'.
Stacking, this is the second thing I have learnt today.
-
18th November 2012, 06:41 PM #11

- Join Date
- Sep 2010
- Location
- Victoria BC
- Posts
- 1,510
Re: Stacked!
Andrew:
First off, I think you did a pretty good job of a very difficult subject - a pine cone would probably be on the focus stacking examination.
There is another photographer from the Victoria area (Tim Zurowski) that started a thread on Naturescapes about a week ago. Tim is a very accomplished bird photographer that is interested in branching out:
http://www.timzphotography.com/
PS will stack images, but the dedicated software like Zerene (which I use) and Helicon will do it much faster.
I ran a couple of test stacks to give him an idea of the time it took for stacking:
http://www.naturescapes.net/phpBB3/v...p?f=2&t=224726
Glenn
-
18th November 2012, 06:49 PM #12
- Join Date
- Sep 2010
- Location
- Victoria BC
- Posts
- 1,510
Re: Stacked!
Dan: Originally Posted by DanK
Very nice work on an excellent site. What have you been using to get the black BG?
I agree with your take on the DMap process - better contrast and colours.
It's interesting that you use f/8 to f/11. I've been using f/3.5 to f/5.6 to eliminate busy backgrounds, and this compounds the problems (requiring more shots, more closely spaced).
I read somewhere that AF lenses have shorter travel for a given change in focus distance. The reason given being that longer travel requires more energy input (from the battery) and longer time to attain focus. An MF lens with longer travel/rotation would make life easier.
Glenn
-
18th November 2012, 10:17 PM #13
- Join Date
- Jun 2012
- Location
- Suva, Fiji
- Posts
- 7,076
- Real Name
- Grahame
Re: Stacked!
Hi Andrew,
The reason I asked for your stack process info was that I suspected your subject was fairly large and this is an area that I have previously seen where people have problems determining equal slices for the stack.
About a year ago I tried to assist someone that was taking stacks of model train engines where the finished stack showed some clearly out of focus areas randomly along the length of the engine whilst 80% was perfect. This was due to not being able to accurately rotate the lens focus ring to give equal linear focus distance steps.
Whilst there are options such as focus rails, camera remote control or placing a ruler or graduated marker in the same subject plane I came up with an idea specific for when focusing the lens manually whilst stacking.
The Tip ..
Angular rotation of the focus ring or increment distance will change between near and far ie; the farther away your required focus points become the smaller the focus ring angular rotations become between points. Something we do not have to worry about when taking bug pictures for stacking. For larger subjects there is the rather crude distance scales on some lenses but determining intermediate points is nearly impossible.
To enable exact determination of the increments rotational movement (which will vary) for accurate stacking shots a 'non linear' scale made up on paper and taped to the focus ring can be used.
Based upon my 105VR which has a large rotation of 198 degrees between min and max focus distance I produced a paper scale derived from the curve of a graph produced where the X & Y axis are the 'focus distance' plotted against the 'rotation angle'.
The curve of the graph is then used to determine the position along the rotation axis for any required increments e.g. 2mm, 4mm, 10mm etc. I actually did the example by measuring the focus ring angular rotation (counting the focus ring grip serrations) between focus distance markings on the distance scale but an easier way is to simply use a strip of paper wrapped around the focus ring and plot the readings against a fixed point on the barrel. This method also immediately gives you your required scale overall length for your paper model (which is 162mm for the 105VR).
In theory you could simply use a piece of graph paper to produce the curve and then scales. This could then be scanned and 'reduced' to your actual length requirement. For accuracy and scaling ability I used a CAD system and from that I can print true size, produce true size to a PDF doc for emailing and even open the PDF in Elements for conversion to JPG.
Heres an example of what I produced for the 105VR.

Whilst the non linear scales are marked up as 2,5, 10mm etc this is only accurate relevant to the nearest focus distance but it is the non-linear scales points that are more useful as they give you exact correlation between angular rotation and focus distance.
The paper scale is simply cut out, wrapped around the barrel and a datum point marked. I have shown the actual lens distance scale on this example.
-
18th November 2012, 10:24 PM #14
- Join Date
- Dec 2010
- Location
- Southland - New Zealand
- Posts
- 473
- Real Name
- Robin
Re: Stacked!
Is Helecon a useful programme for doing this?
-
18th November 2012, 10:35 PM #15
- Join Date
- Dec 2011
- Location
- New England
- Posts
- 9,314
- Real Name
- Dan
Re: Stacked!
Glenn,
Many thanks.
I use a black fleece for a background. I've been meaning to get some muslin, because the knobby texture of fleece is not ideal. As long as the background is far enough back, and the lighting is not shining directly on it, this works fine. When it is not fully black, I move it from LR to PS, create a new layer, select the background by color, and zero out levels. I don't have to do that often. I use halogen lights that I can aim, and that lessens the problem.What have you been using to get the black BG?
Re AF lenses--yes, I have read that also, and it seems to be true of some of mine, compared to my old manual lenses. However, I find that with apertures in the range I use, I can manage the change in focus. I try to err in the direction of a small change in focus, at the cost of too many shots.
Re wider apertures: at close to MWD, the DOF is so shallow that I don't find I need wider apertures. It is helpful to keep the background reasonably far away, but I don't often find it a problem, except sometimes with bug shots.
Dan
-
18th November 2012, 11:38 PM #16
- Join Date
- Jul 2011
- Location
- Ontario, Canada
- Posts
- 1,300
- Real Name
- Andrew
Re: Stacked!
WOW, thanks guys! Glenn, I appreciate your nice compliment! I mentioned that I just chose the pine cone, because it was all that was available at the time, it didn't occur to me whether or not it would be a difficult subject or not - but if it is on the exam, I hope I passed!! Thanks again!!
Dan, thanks for the tips, and for directing me to your site - very impressive! Thanks, AND, it's good to know that I'm not the only one who uses a piece of black cloth as a backdrop - I've never shared that with anyone, for fear of persecution from the backdrop Gods!!
Grahame - Thank you VERY much! That was the kind of tip I was looking for! I'm going to stick with Photoshop for a little while longer, until maybe I decide that macro photography is a direction I seriously want to persue, solely for cost reasons. Now off to find someone who owns CAD!
One more question for you, I used f32, and didn't really face any major troubles since I supplied ample light, and plain white background. Are there any issues with this? Do you just use lower f numbers to add depth to the background if it's not 'staged', like mine?
Thanks again very much!! I'll try and post another tonight, I made it to the florist today, and have some mums that are just waiting to be photographed!
-
19th November 2012, 12:49 AM #17
- Join Date
- Aug 2012
- Location
- S, B'ham UK
- Posts
- 3,337
- Real Name
- John
Re: Stacked!
There is a tendency on subjects like Krebb's fly to use as fast an aperture as possible to maximise detail. It may have been taken at F2.8 or stopped down sufficiently to get the best performance out of the lens. The reason for this is diffraction. Resolution goes down as the aperture gets slower. Some relate the maximum diffraction spot size to the pixel size of the camera but this is a rather woolly subject. The raw shot for instance is demosaiced even to produce a jpg and that is an interpolation process so has it's effects. The limit makes a lot more sense when considering that the contrast is very low when resolution is looked at in terms of diffraction spot size. There are formulae on the web for calculating diffraction spot size - probably in the macro tutorial on here. You'll find F32 is way too slow for the level of resolution shown in the shot,
-
-
19th November 2012, 01:03 AM #18
- Join Date
- Dec 2011
- Location
- New England
- Posts
- 9,314
- Real Name
- Dan
Re: Stacked!
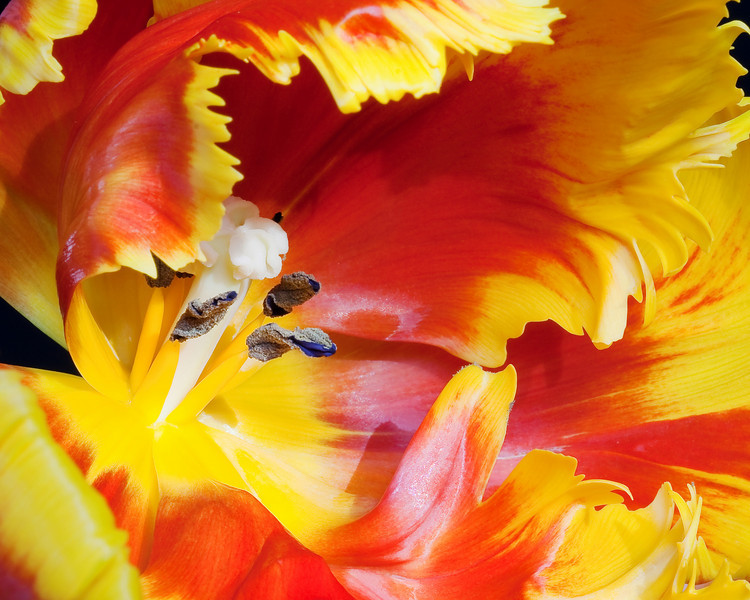
I would not shoot at f/32. In my experience, the softening from diffraction is often exaggerated, but it is nonetheless a real phenomenon, and I would therefore avoid extremely small apertures. Extremely open apertures should also be avoided because most lenses show more distortion wide open, and that effect is often larger than that of diffraction. Diffraction depends in part on pixel pitch, and I don't know what you are shooting, but when I first started macro, I was using an inexpensive Rebel and found that I could print 8 x 10 shots of photos taken at f/20 without noticeable degradation. The few times I went to f/32, however, I was disappointed. A nice compromise is the range between, say, f/8 (small enough that the distortions from wide apertures should be gone) to f/13 or so.
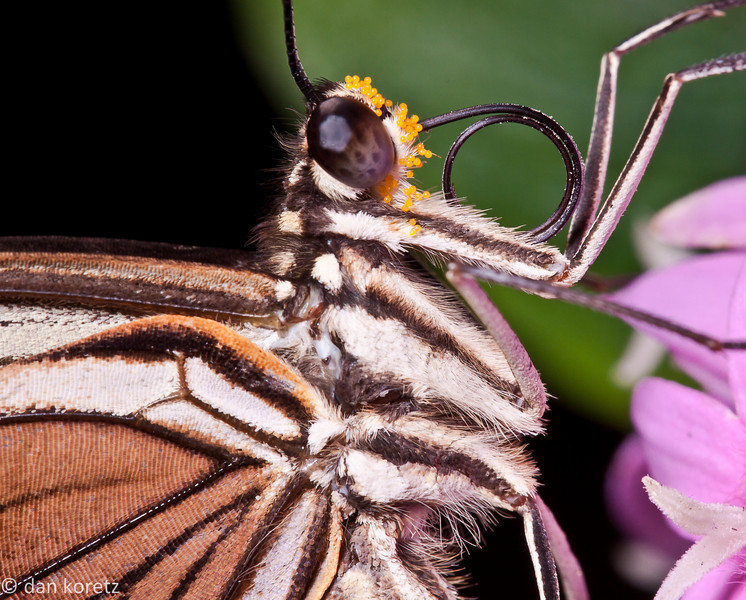
I'll post two examples, both shot without stacking. The first is a flower shot I took with a Rebel XTi and an EF-S 60mm macro at f/20. The second is a butterfly I took at f/13 with a 50D (smaller pixel pitch), a 100mm macro, and a 36mm extension tube for extra closeness/magnification. I think both have acceptable sharpness.
-
19th November 2012, 02:48 AM #19
- Join Date
- Sep 2010
- Location
- Victoria BC
- Posts
- 1,510
Re: Stacked!
It sounds as though we're using similar techniques. I have a black cloth that hangs from a horizontal bamboo stick from two vertical bamboo sticks that I shove into the ground (all my closeup work is outdoors). The horizontal stick fastens to the vertical ones with rubber bands, making is easy to align all three sticks and roll up the cloth over the sticks. Originally Posted by DanK
The problem is that (as you found), the black cloth background doesn't always show up as black.
Very recently I've been experimenting with Lightroom and the Adjustment Brush (K) with Auto Mask checked. I set Exposure and Shadows to minus 100.
This may be the solution I've been looking for - with the black cloth, I could use a small enough aperture to get enough DOF. Without the cloth I had to use larger apertures to avoid including too much background junk into focus, but then had to resort to focus stacking.
The following are before and after using the tools in Lightroom - this is not a very good demo because it was shot at f/5.6, resulting in not enough DOF to define all the edges well enough. As a consequence, there are visible areas where the edges are poorly defined or have a white halo - the petals to the left and right, and the stem are example of this.
But the edges that are reasonably sharp seem to be OK.
The flower adjustments in both images are identical.
The before Lightroom Adjustment Brush shot:

The after Lightroom Adjustment Brush shot:

-
19th November 2012, 03:11 AM #20
- Join Date
- Jul 2011
- Location
- Ontario, Canada
- Posts
- 1,300
- Real Name
- Andrew
Re: Stacked!
Hi Glenn, I find with the black backdrop, I still use a flash, even if shot outside. Then I can pump up the shutter speed, and the background always shows up as black. I'm not sure if you care or not, but that's what I do!
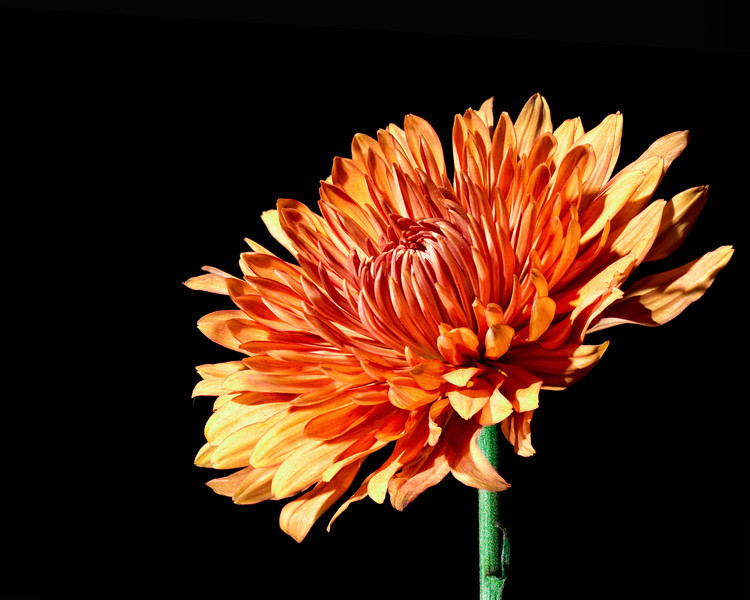
Here's my latest attempt. Again, it took a LOT more images to set up than I'd like, but I'm sure it will get easier, and easier.
This is a 5 image stack shot at f7.1, 1/200 @ 100mm. 2 x 580EXIIs - both at 10 o'clock, one above the flower, and one below. I have previously admitted on this forum that shooting flowers really doesn't interest me..... Tomorrow I'm going back to the florist to see what else they have. I stand corrected.
Please C & C!!
EDIT - PS - Thank you John, and Dan for your explanations on my f number question. You would think I would have known that, but sometimes, when I'm learning new things, the things that should be given, are not. Thanks!Last edited by Andrew76; 19th November 2012 at 03:12 AM. Reason: Added a PS


 Reply With Quote